Genie PowerLift Excelerator Support and Manuals
Get Help and Manuals for this Genie item

View All Support Options Below
Free Genie PowerLift Excelerator manuals!
Problems with Genie PowerLift Excelerator?
Ask a Question
Free Genie PowerLift Excelerator manuals!
Problems with Genie PowerLift Excelerator?
Ask a Question
Most Recent Genie PowerLift Excelerator Questions

Can I Buy Just The Head Unit
(Posted by hoop3t 10 years ago)
Popular Genie PowerLift Excelerator Manual Pages
Owner's Manual - Page 1
... Kit is available for 8' Doors
Included Wall Console MUST be Properly set to Operation of Contents
Safety Information 2 Important Installation Instructions 2 Safety Features 2 Pre-installation Checklist 3 Garage Door Opener Assembly 9 Record Data (for Service 11 Garage Door Opener Installation 12 Accessories 22 Maintenance 23 Troubleshooting Guide 24 Wiring Diagram 27 Warranty...
Owner's Manual - Page 3
... x 2") Lag Screws are under extreme tension and can cause serious injury or death.
This Opener is out of balance. See Troubleshooting Guide on a properly braced sectional door or solidly braced one-piece door. If door appears out of alignment, binds, or does not move smoothly, contact a
3' - 4'
Genie Factory Authorized Dealer or dealer of your garage door
for any...
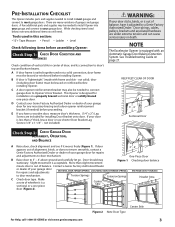
Owner's Manual - Page 4
... Header Bracket).
• Raise door, watching top edge of door and stop door when its edge reaches its highest point.
• Measure distance ("H") from top edge of the garage door opening. A Find vertical center line of door and header: • Close door Measure door width at top. • Mark a point at least two Lag Screws and Flat Washers (not provided...
Owner's Manual - Page 6
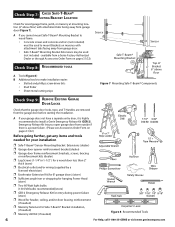
... installation
p Safe-T-Beam® Sensor Mounting Bracket Extensions (dealer)
p Garage door opener reinforcement bracket (dealer)
p Garage door frame reinforcement brackets, screws, bracing
or reinforcement kits (dealer)
p Lag Screws (1-1/4"or 1-1/2" ) for a wood door less than 2"
thick (store)
p Electrical outlet and/or wiring (supplied by a
licensed electrician)
p Excelerator Extension...
Owner's Manual - Page 7
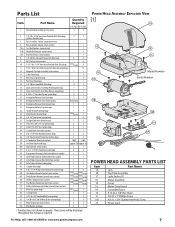
Model Number Serial Number
POWER HEAD ASSEMBLY PARTS LIST
Item
1A 1B 1C 1D 1E 1G 1H 1K 1L 1M 1P
Part Name
Lens Top Plate Assembly Light Socket (2) Motor Assembly Cover Motor Drive Board Controller Board # 10-24 x 3/8" Hex Head # 8-32 x 1" Phillips Screw # 8-32 x 3/8" Slotted Hex Head Screw Power Cord
For Help, call 1-800-35-GENIE or visit www...
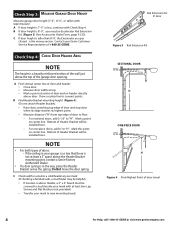
Owner's Manual - Page 9
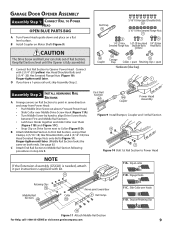
... until the Opener is needed, attach it per instructions supplied with 2 (1/4"-20) (yellow) Hex Head Shoulder Bolts and 2 (1/4" -20) Hex Serrated Flange Nuts (Figure 10). Snap on Motor Shaft (Figure 9). First Rail Section
Coupler
Power Head Assembly
Figure 9 Install Bumper, Coupler and 1st Rail Section
Figure 10 Bolt 1st Rail Section to align Drive Screw Hooks...
Owner's Manual - Page 11
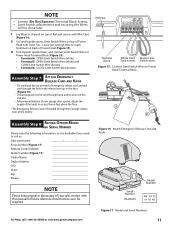
... to reach Terminals on top of your sales receipt with Twist Ties.
For Help, call us:
Date purchased:
Serial number (Figure 17):
Remote Control Model:
Model number (Figure 17):
Dealer Name:
Dealer Address:
City:
State:
Zip:
Phone:
NOTE
Please keep original or photocopy of your garage door opener, adjust the height of the knob...
Owner's Manual - Page 12
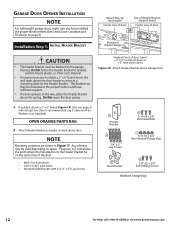
NOTE
Mounting variations are shown in the way, place the Header Bracket above the spring.
Garage Door Opener Installation NOTE
For lightweight garage doors, make sure you have sufficient support. • If a door spring is recommended) Lag Screws and Flat Washers (not supplied). Do Not fasten the Header Bracket to drywall,
particle board, plaster, or other such material. • It...
Owner's Manual - Page 17
...Allow slack for adjustment
Terminal attachments at Power Head. - Insert each Wire under flat plate and tighten Screw.
Loosen Terminal Screws. - Brackets are connected to Terminals #2 and #3 on top of Rail and underneath Wire Clips.
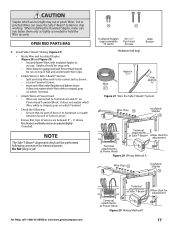
• Attach Wires to Safe-T-Beam® Sensors. - OPEN RED PARTS BAG
C Install Safe-T-Beam® Wiring (Figure 27):
•...
Owner's Manual - Page 18
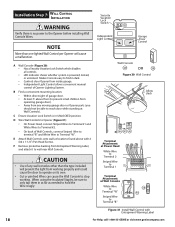
... Wall Control
Allow slack
Terminal Attachment at Power Head White Wire
to Terminal 2 Striped Wire
to Terminal 1
Terminal Attachment at locations found above floor (to prevent small children from working .
Away from inside garage. • Independent Light Control allows convenient manual
control of any moving garage door or Opener parts (you should not be sure to only...
Owner's Manual - Page 19
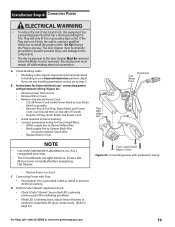
...sensitive.
Replace Motor Cover.
D Perform Safe-T-Beam® alignment check:
• Check if Safe-T-Beam® Source Red LED is glowing continuously (OK) or blinking (problem).
&#...Relief, and Power Cord. Ground to the door Opener Must Be removed when the Motor Cover is installed before energizing the Opener. Ensure the Motor Cover is removed. Four screws hold Motor...
Owner's Manual - Page 20
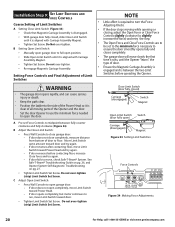
.... • With garage door fully closed )
Carriage (disengaged)
Switch Magnet
Open Limit Switch Switch (door fully open completely, move Limit Switch toward Power Head. - See Safe-T-Beam® Troubleshooting Guide on pg. 26, and Opener System Self-diagnostic Troubleshooting on pg. 27.
• Tighten Limit Switch Set Screw. Close Limit Switch (door fully closed...
Owner's Manual - Page 24

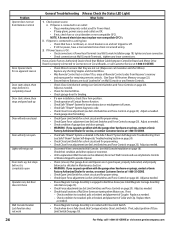
... ALL INSTRUCTIONS. 2 Never let children operate or play with Opener. See Owner's Manual. Troubleshooting Guide
Safe-T-Beam® System Self-Diagnostic Troubleshooting
Source (Red LED) Sensor (Green LED)
Possible Problem
Solution
ON
ON
Normal operation
None required
OFF OFF
• Power Head not powered • Wiring from people and objects until the door is closed...
Owner's Manual - Page 25
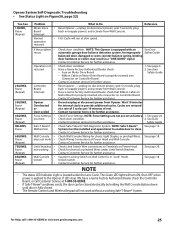
... Self-Diagnostic Troubleshooting • See Status Light on Figure38, page 22)
You See
1 BLINK, Pause (Repeat)
Problem
What to Do
Reference
Motor Drive • Reset Opener-unplug (or disconnect power), wait 5 seconds, plug Board back in (reapply power), and activate from Opener. Ribbon Cable on Controller Board. Contact Customer Service for further assistance.
8 BLINKS...
Owner's Manual - Page 26
... condition and either replace or reconnect. WARNING: If you suspect a problem with the garage door hardware or springs, contact a Genie Factory Authorized Dealer for service, or contact Customer Service at 1-800-35-GENIE.
If so, erase all sections of Lenses. • Check Safe-T-Beam® System diagnostic code Check Close Force adjustment (see Set Limit Switches...
Genie PowerLift Excelerator Reviews
We have not received any reviews for Genie yet.