
Genie PowerLift Excelerator Support Question
Genie PowerLift Excelerator Support Question
Find answers below for this question about Genie PowerLift Excelerator.Need a Genie PowerLift Excelerator manual? We have 1 online manual for this item!
Question posted by hoop3t on October 14th, 2013
Can I Buy Just The Head Unit
The person who posted this question about this Genie product did not include a detailed explanation. Please use the "Request More Information" button to the right if more details would help you to answer this question.
Current Answers
Related Genie PowerLift Excelerator Manual Pages
Owner's Manual - Page 1
...
Safety Information 2 Important Installation Instructions 2 Safety Features 2 Pre-installation Checklist 3 Garage Door Opener Assembly 9 Record Data (for 8' Doors
Included Wall Console MUST be installed prior to close door. Need Help?
3531836147
Table of this Garage Door Opener.
Will not operate "twice as fast" on one-piece doors. Please call us: 1-800-35-GENIE (354-3643)
www...
Owner's Manual - Page 2
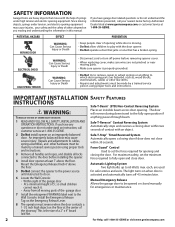
... tools and instructions.
3 Remove all handles and ropes, and disable all moving parts of the garage door. POTENTIAL HAZARD
EFFECT
PREVENTION
MOVING DOOR
WARNING: Can Cause Serious
Injury or Death
• Keep people clear of opening equipment. For maximum safety, set the force required for safer entries and exits. ELECTRICAL SHOCK HIGH...
Owner's Manual - Page 3
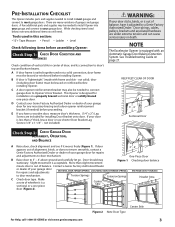
...or solidly braced one-piece door. Door should stay stationary. C A door opener reinforcement bracket may be needed to connect garage door to your garage door
for installation on page 27. NOTE
The Excelerator Opener is "lightweight" (made with an Automatic Garage Door Balance Detection System. One-Piece Door
B Raise door to most garages and connect to 3' - 4' above ground...
Owner's Manual - Page 4
... the Header Bracket mounting point, contact a Genie Factory Authorized Dealer. • If a door spring is a heavily reinforced section of the wall just above the top of the garage door opening. For sectional doors, add 2-1/2" to "H". Mark a point on center line. For one-piece doors, add 6" to "H". If the ceiling in the way, place the Header
Bracket avove...
Owner's Manual - Page 5
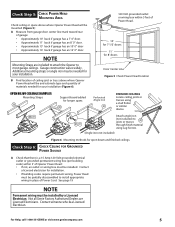
... Area
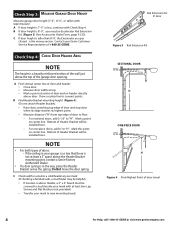
Check ceiling or space above where Opener Power Head will be mounted (Figure 5): A Measure from garage door center line mark toward rear
of Power Head.
10' for 7-1/2' doors
11' for 8' doors
Door Center Line Figure 5 Check Power Head location
Mounting Straps
Support board added for longer spans
Perforated Angle Iron
FINISHED CEILINGS Locate ceiling joists or trusses using...
Owner's Manual - Page 6
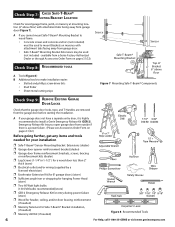
...opener reinforcement bracket (dealer)
p Garage door frame reinforcement brackets, screws, bracing
or reinforcement kits (dealer)
p Lag Screws (1-1/4"or 1-1/2" ) for a wood door less than 2"
thick (store)
p Electrical outlet and/or wiring (supplied by a
licensed electrician)
p Excelerator Extension Kit (for 8' garage doors) (store)
p Sufficient angle iron or strapping for hanging Power Head...
Owner's Manual - Page 9
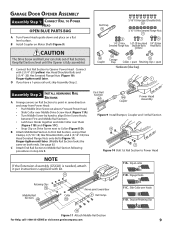
Garage Door Opener Assembly
A ssembly Step C1h: Connect Rail to Power
Head
OPEN BLUE PARTS BAG
A Turn Power Head upside down and place on collar 11B. Keep Rail Sections level until later. C Connect first Rail Section to First Rail Section, using 2 Rail Clamps, 4 (5/16"-18) Hex Shoulder Bolts, and 4 (5/16"-18) Hex Head Serrated Flange Nuts onto Bolts...
Owner's Manual - Page 11
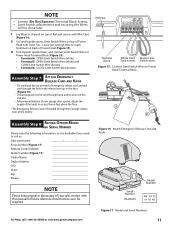
...and bundle excess Limit Switch Wires on back of Power Head (Figure 14). Leave just enough Wire to reach Terminals on top of the knob...:
City:
State:
Zip:
Phone:
NOTE
Please keep original or photocopy of your garage door opener, adjust the height of Power Head with Twist Ties. Antenna
Terminal Block
White Limit Brown Limit Switch wires Switch wires
Figure...
Owner's Manual - Page 12
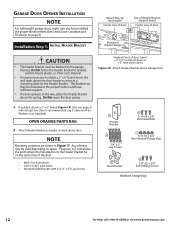
Garage Door Opener Installation NOTE
For lightweight garage doors, make sure you have sufficient support. • If a door spring is critical that the point where the Rail attaches to serve as a mounting plate for the Header Bracket. Any of the door...
5/16-18 x 3/4" Hex Head Bolts
1/4" x 2" Lag Screws
5/16-18 x 3/4" Hex Serrated Flange Nuts
Door Bracket
1/4"-20 x 3/4" Self-Drilling...
Owner's Manual - Page 13
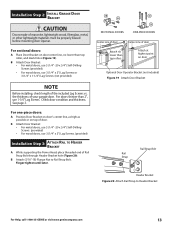
... roller, and mark holes (Figure 19). In sta lla tio n SteCph2:
Install Garage Door Bracket
CAUTION
Doors made of door. For sectional doors:
A Place Door Bracket on top of masonite, lightweight wood, fiberglass, metal, or other lightweight materials must be properly braced before mounting door Opener.
B Attach (5/16"-18) Flange Nut to Header Bracket
For Help, call 1-800...
Owner's Manual - Page 14
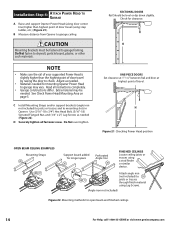
... Screws as needed.
• Materials needed .
Attach angle iron (not included) to mounting slots in Opener. CAUTION
Mounting Brackets must be needed for mounting Opener Power Head to garage may be fastened to check. Do Not over-tighten. SECTIONAL DOORS Rail Should be level or dip down slightly. Read all fasteners now. C Install Mounting Straps...
Owner's Manual - Page 15
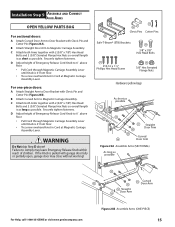
... x 7/8"
Hex Head Bolts
#10-16 x 11/4" Phillips Hex Head Screw
3/8" Hex Serrated Flange Nuts
Hardware (yellow bag)
As short as possible
Straight Door Arm
Curved Door Arm Figure 23A ...n
SteCph5: Assemble and Door Arms
Connect
OPEN YELLOW PARTS BAG
For sectional doors:
A Attach Curved Door Arm to Door Bracket with garage door fully or partially open, garage door may leave Emergency Release ...
Owner's Manual - Page 16

...WARNING
Ensure there is critical. - NOTE
The Opener will spend more time in opposite directions. Check if Bracket extends out from the door opening, where it now.
B Attach Safe-T-Beam®... x 1-1/4") Phillips Hex Head Screws per Bracket.
A Install Safe-T-Beam® Source and Sensor (Figure 24): • Mark both sides of wood, etc. Blocks of garage door frame or wall 6"...
Owner's Manual - Page 18
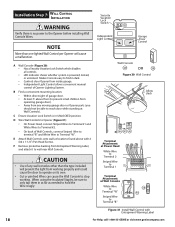
... installing Wall Console Wires. Makes Console easy to find in dark. • Controls door Opener from Entrapment Warning Label, and attach it to Terminal #2.
• On back of garage door. D Wire Wall Controls to Opener (Figure 31):
• On Power Head, connect Striped Wires to Terminal #1 and White Wires to wall near Wall Console.
F Remove protective...
Owner's Manual - Page 20
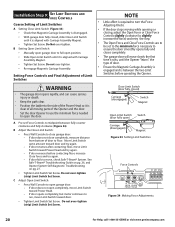
... Set Screw. Setting Force Controls and Final Adjustment of Limit Switches
WARNING
• The garage door opens rapidly, and can cause serious injury or death.
• Keep the path clear. • Position the ladder to the side of the Power Head so it is between fully counter clockwise and fully clockwise (Figure 34). A Pre...
Owner's Manual - Page 21
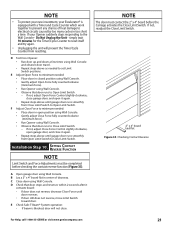
... too short a time. If your Excelerator® is blocked, door will prevent the Timer/Cycle Counter from Close Limit Switch to electrical circuits caused by too many cycles in center of heat damage to Open Limit Switch. If not, adjust Close Force Control slightly clockwise, open garage door, and close garage door, and open position using Wall Console.
•...
Owner's Manual - Page 22
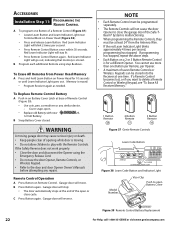
...; Use coin, pen, screwdriver or any repairs. Garage door will reverse. B Snap Battery Cover closed. You cannot use the door Opener, Remote Controls, or
Wireless Keypad. • Refer to play with new
A23,
12 Volt Battery. Garage door will stop:
• The door automatically stops at base of opening while door is stored.
To Erase All Remotes from the...
Owner's Manual - Page 24

...Opener.
Failure to adjust the Opener properly may cause severe injury or death. 6 When possible use the Emergency Release only when the door is completely closed . An improperly balanced door increases the risk of severe injury or death. 7 KEEP GARAGE DOORS...OFF
• Power Head not powered • Wiring from people and objects until the door is closed . The door MUST reverse on the...
Owner's Manual - Page 25
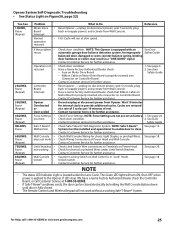
... for further assistance.
Cycles are not pre-set at factory. 1. Pause
Incorrect
• Check door condition.
2.
See page 18.
NOTE
• The status LED Indicator Light is equipped with an
See Door
recurs automatic garage door balance detection system.
See door
- Ribbon Cable on Motor Drive Board is properly inserted into
Connector on Controller Board...
Owner's Manual - Page 26
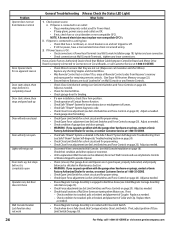
... operation of Coupler. Adjust as needed . If not: - Replace them
as needed . Check power source. Door Opener starts • for binding. WARNING: If you suspect a problem with the garage door hardware or springs, contact a Genie Factory Authorized Dealer for Power Head.
• If lamp glows, power source and outlet are turning when Motor runs. Check...
Similar Questions

What Remote Do I Use For Powerlift Garage Door Opener Model Wr77 Serial No.08258
(Posted by tmski87 3 years ago)

My Promax 1500 Garage Door Opener Not Working.3 Lights Flashing On Unit.
(Posted by cwestsupra 9 years ago)

Garage Door Opener Not Working
Green light and red light are on the safety"eye" When pushing wall, remote or key pad the screw driv...
Green light and red light are on the safety"eye" When pushing wall, remote or key pad the screw driv...
(Posted by scanty5 9 years ago)

Where Is The Learn Code Button Situated On The 3060l-07 Genie Garage Door Opener
Where is the learn code button situated on the 3060L-07 Genie garage door opener. Trying to intregat...
Where is the learn code button situated on the 3060L-07 Genie garage door opener. Trying to intregat...
(Posted by katiaella 10 years ago)

Why Is The Garage Door Opener Has Red Blinking Lights And Does Not Operate?
(Posted by aysegogini 10 years ago)