

Owner's Manual
Page 1
...-35-GENIE (354-3643) www.geniecompany.com Please have Model information ready when calling. Safe-T-Beam® Safety Reverse System MUST be Installed and the Force Controls MUST be installed prior to Operation of Contents Safety Information 2 Important Installation Instructions 2 Safety Features 2 Pre-installation Checklist ...Table of this Garage Door Opener. Need Help? Extension Kit is available for Service 11 Garage Door Opener Installation 12 Accessories 22 Maintenance 23 Troubleshooting Guide 24 Wiring Diagram 27 Warranty information 28 Complete with INTELLICODE® ...
...-35-GENIE (354-3643) www.geniecompany.com Please have Model information ready when calling. Safe-T-Beam® Safety Reverse System MUST be Installed and the Force Controls MUST be installed prior to Operation of Contents Safety Information 2 Important Installation Instructions 2 Safety Features 2 Pre-installation Checklist ...Table of this Garage Door Opener. Need Help? Extension Kit is available for Service 11 Garage Door Opener Installation 12 Accessories 22 Maintenance 23 Troubleshooting Guide 24 Wiring Diagram 27 Warranty information 28 Complete with INTELLICODE® ...
Owner's Manual
Page 2
...closed manually for opening . SAFETY INFORMATION Garage Doors are heavy objects that has a broken spring. IMPORTANT INSTALLATION Safety Features INSTRUCTIONS WARNING: Safe-T-Beam® (STB) Non-Contact Reversing System Places an invisible beam across door opening and closing door ...Do Not connect the opener to 60 Watts max. activated and automatically turns off power before installing the opener. 4 Install door opener at 1-800-35-GENIE. This is until instructed to the door before removing opener cover. • When replacing cover, make sure wires are...
...closed manually for opening . SAFETY INFORMATION Garage Doors are heavy objects that has a broken spring. IMPORTANT INSTALLATION Safety Features INSTRUCTIONS WARNING: Safe-T-Beam® (STB) Non-Contact Reversing System Places an invisible beam across door opening and closing door ...Do Not connect the opener to 60 Watts max. activated and automatically turns off power before installing the opener. 4 Install door opener at 1-800-35-GENIE. This is until instructed to the door before removing opener cover. • When replacing cover, make sure wires are...
Owner's Manual
Page 9
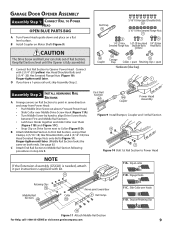
B Install Coupler on Retaining Clip Figure 11 Attach Middle Rail Section For Help, call 1-800-35-GENIE or visit www.geniecompany.com 9 C Connect first Rail Section to First Rail Section, using 2 Rail Clamps, 4 (5/16"-18) Hex Shoulder Bolts, and 4 (5/16"-18) Hex ... Rail Section looks the same on collar 11B. Snap on Motor Shaft (Figure 9). Keep Rail Sections level until the Opener is needed, attach it per instructions supplied with 2 (1/4"-20) (yellow) Hex Head Shoulder Bolts and 2 (1/4" -20) Hex Serrated Flange Nuts (Figure 10). D If you have a 1-piece rail unit, skip Assembly ...
B Install Coupler on Retaining Clip Figure 11 Attach Middle Rail Section For Help, call 1-800-35-GENIE or visit www.geniecompany.com 9 C Connect first Rail Section to First Rail Section, using 2 Rail Clamps, 4 (5/16"-18) Hex Shoulder Bolts, and 4 (5/16"-18) Hex ... Rail Section looks the same on collar 11B. Snap on Motor Shaft (Figure 9). Keep Rail Sections level until the Opener is needed, attach it per instructions supplied with 2 (1/4"-20) (yellow) Hex Head Shoulder Bolts and 2 (1/4" -20) Hex Serrated Flange Nuts (Figure 10). D If you have a 1-piece rail unit, skip Assembly ...
Owner's Manual
Page 14
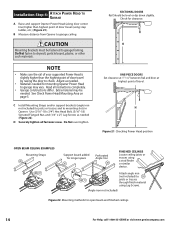
...slightly higher than highest point of door travel (using a stud finder or similar device. C Install Mounting Straps and/or support brackets (angle iron not included) to joists or trusses and to ...such materials. Check for open beam and finished ceilings 14 For Help, call 1-800-35-GENIE or visit www.geniecompany.com ONE-PIECE DOORS Set clearance at 1"-11/2" between Rail and...not included) to garage may be needed (Figure 22). D Securely tighten all instructions completely. • Garage constructions differ. CAUTION Mounting Brackets must be level or dip down slightly. ...
...slightly higher than highest point of door travel (using a stud finder or similar device. C Install Mounting Straps and/or support brackets (angle iron not included) to joists or trusses and to ...such materials. Check for open beam and finished ceilings 14 For Help, call 1-800-35-GENIE or visit www.geniecompany.com ONE-PIECE DOORS Set clearance at 1"-11/2" between Rail and...not included) to garage may be needed (Figure 22). D Securely tighten all instructions completely. • Garage constructions differ. CAUTION Mounting Brackets must be level or dip down slightly. ...
Owner's Manual
Page 19
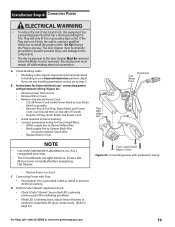
...If you are light sensitive. connecting power with permanent wiring - tabs slide out • Install required entrance bushing. • Connect permanent wiring to Opener Green Wire. - Restore Power... into the outlet, contact a qualified electrician to building, have a licensed electrician perform step B. B Instructions for licensed electrician - Dispose of electrical shock, this equipment has a grounding type Plug that has a...8226; The electrical power to page 26.) For Help, call 1-800-35-GENIE or visit www.geniecompany.com 19 Replace Motor Cover. In sta lla tion ...
...If you are light sensitive. connecting power with permanent wiring - tabs slide out • Install required entrance bushing. • Connect permanent wiring to Opener Green Wire. - Restore Power... into the outlet, contact a qualified electrician to building, have a licensed electrician perform step B. B Instructions for licensed electrician - Dispose of electrical shock, this equipment has a grounding type Plug that has a...8226; The electrical power to page 26.) For Help, call 1-800-35-GENIE or visit www.geniecompany.com 19 Replace Motor Cover. In sta lla tion ...


