

Owner's Manual
Page 1
... Extension Kit is available for Service 11 Garage Door Opener Installation 12 Accessories 22 Maintenance 23 Troubleshooting Guide 24 Wiring Diagram 27 Warranty information 28 Complete with INTELLICODE® Remote Control and SERIES II Electronics For 7' 6" Doors. Please call us: 1-800-35-GENIE (354-3643) www.geniecompany.com Please have Model information ready when...
... Extension Kit is available for Service 11 Garage Door Opener Installation 12 Accessories 22 Maintenance 23 Troubleshooting Guide 24 Wiring Diagram 27 Warranty information 28 Complete with INTELLICODE® Remote Control and SERIES II Electronics For 7' 6" Doors. Please call us: 1-800-35-GENIE (354-3643) www.geniecompany.com Please have Model information ready when...
Owner's Manual
Page 2
... or one that move with an object. 2 Do Not install opener on when door is moving objects, springs under high tension and electric opening and closing the door. activated and automatically turns off power before installing the opener. 4 Install door opener at 1-800-35-GENIE.. Install the Emergency Release Tag on the Emergency Release Lever. 8 The...
... or one that move with an object. 2 Do Not install opener on when door is moving objects, springs under high tension and electric opening and closing the door. activated and automatically turns off power before installing the opener. 4 Install door opener at 1-800-35-GENIE.. Install the Emergency Release Tag on the Emergency Release Lever. 8 The...
Owner's Manual
Page 3
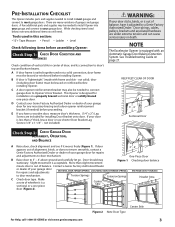
... Help, call 1-800-35-GENIE or visit www.geniecompany.com 3 Pre-Installation Checklist This Opener includes parts and supplies needed to connect garage door to Opener's Door Bracket. C A door opener reinforcement bracket may be needed to your door is less than slight movement Figure 1 Checking door balance means door is out of balance, have a wooden door, measure door's thickness. (1/4" x 2") Lag Screws are...
... Help, call 1-800-35-GENIE or visit www.geniecompany.com 3 Pre-Installation Checklist This Opener includes parts and supplies needed to connect garage door to Opener's Door Bracket. C A door opener reinforcement bracket may be needed to your door is less than slight movement Figure 1 Checking door balance means door is out of balance, have a wooden door, measure door's thickness. (1/4" x 2") Lag Screws are...
Owner's Manual
Page 4
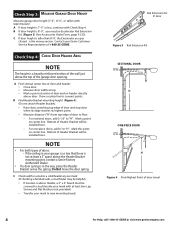
...door opening. B Find Header Bracket mounting height (Figure 4): (Do not attach Header Bracket). • Raise door, watching top edge of door and stop door when its edge reaches its highest point. • Measure distance ("H") from top edge of door and on header directly above the Header Bracket mounting point, contact a Genie... door and header: • Close door Measure door width at top. • Mark a point at 1-800-35-GENIE. Bottom of Header Bracket will be installed here. C If door height is taller than 8'-0", the Excelerator you need an Excelerator ...
...door opening. B Find Header Bracket mounting height (Figure 4): (Do not attach Header Bracket). • Raise door, watching top edge of door and stop door when its edge reaches its highest point. • Measure distance ("H") from top edge of door and on header directly above the Header Bracket mounting point, contact a Genie... door and header: • Close door Measure door width at top. • Mark a point at 1-800-35-GENIE. Bottom of Header Bracket will be installed here. C If door height is taller than 8'-0", the Excelerator you need an Excelerator ...
Owner's Manual
Page 5
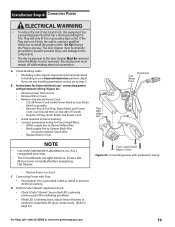
... Power Source A Check that there is a Licensed Electrician. Not all Genie Factory Authorized Dealers are included to attach the Opener to install appropriate wiring in place of garage: • Approximately 10' back if garage has a 7' 6" door. • Approximately 11' back if garage has an 8' 0" door. • Approximately 13' back if garage has an 10...
... Power Source A Check that there is a Licensed Electrician. Not all Genie Factory Authorized Dealers are included to attach the Opener to install appropriate wiring in place of garage: • Approximately 10' back if garage has a 7' 6" door. • Approximately 11' back if garage has an 8' 0" door. • Approximately 13' back if garage has an 10...
Owner's Manual
Page 6
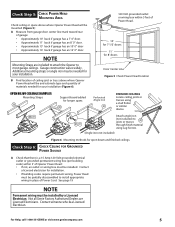
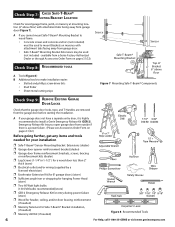
... tabs facing away from garage door. • Safe-T-Beam® Mounting Bracket Extensions may be used (not included - Ch e c k Step 8: Recommended tools A Tools (Figure 8): B Additional tools to install a Genie Emergency Release Kit (GER-2). ...door opener reinforcement bracket (dealer) p Garage door frame reinforcement brackets, screws, bracing or reinforcement kits (dealer) p Lag Screws (1-1/4"or 1-1/2" ) for a wood door less than 2" thick (store) p Electrical outlet and/or wiring (supplied by a licensed electrician) p Excelerator Extension Kit (for 8' garage doors...
... tabs facing away from garage door. • Safe-T-Beam® Mounting Bracket Extensions may be used (not included - Ch e c k Step 8: Recommended tools A Tools (Figure 8): B Additional tools to install a Genie Emergency Release Kit (GER-2). ...door opener reinforcement bracket (dealer) p Garage door frame reinforcement brackets, screws, bracing or reinforcement kits (dealer) p Lag Screws (1-1/4"or 1-1/2" ) for a wood door less than 2" thick (store) p Electrical outlet and/or wiring (supplied by a licensed electrician) p Excelerator Extension Kit (for 8' garage doors...
Owner's Manual
Page 7
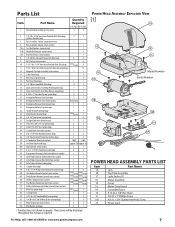
... Slotted Hex Head Screw Power Cord For Help, call 1-800-35-GENIE or visit www.geniecompany.com 7 These items will be illustrated throughout the... Clip (blue bag) 3 Rail Strap (blue bag) 1 1 1/4"-20 Hex Head Bolt (blue bag) 2 2 Open Limit Switch Assembly (White)(green bag) 1 1 Close Limit Switch Assembly (Brown) (green bag) 1 1 # 8-... 1 Emergency Release Tag (carriage) 1 1 Header Bracket (orange bag) 1 1 Door Bracket (orange bag) varies1/m ode l 1 1/4" x 2" Lag Screw (orange bag) 8 Straight Door Arm (main carton) 1 1 Clevis Pin, 3/8" x 15/16" (yellow bag...
... Slotted Hex Head Screw Power Cord For Help, call 1-800-35-GENIE or visit www.geniecompany.com 7 These items will be illustrated throughout the... Clip (blue bag) 3 Rail Strap (blue bag) 1 1 1/4"-20 Hex Head Bolt (blue bag) 2 2 Open Limit Switch Assembly (White)(green bag) 1 1 Close Limit Switch Assembly (Brown) (green bag) 1 1 # 8-... 1 Emergency Release Tag (carriage) 1 1 Header Bracket (orange bag) 1 1 Door Bracket (orange bag) varies1/m ode l 1 1/4" x 2" Lag Screw (orange bag) 8 Straight Door Arm (main carton) 1 1 Clevis Pin, 3/8" x 15/16" (yellow bag...
Owner's Manual
Page 8
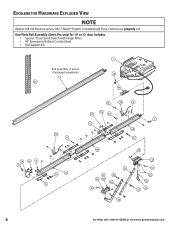
One-Piece Rail Assembly (Genie Pro only) for 10' or 12' door includes: • Special "Close" Limit Switch with longer Wires. • 96" Emergency Release Cord (yellow). • Rail Support Kit. Rail Assembly (1 piece) (Packaged separately) 3 8 For Help, call 1-800-35-GENIE or visit www.geniecompany.com Excelerator Hardware Exploded View NOTE Opener will not function unless Safe-T-Beam® System is installed and Force Controls are properly set.
One-Piece Rail Assembly (Genie Pro only) for 10' or 12' door includes: • Special "Close" Limit Switch with longer Wires. • 96" Emergency Release Cord (yellow). • Rail Support Kit. Rail Assembly (1 piece) (Packaged separately) 3 8 For Help, call 1-800-35-GENIE or visit www.geniecompany.com Excelerator Hardware Exploded View NOTE Opener will not function unless Safe-T-Beam® System is installed and Force Controls are properly set.
Owner's Manual
Page 9
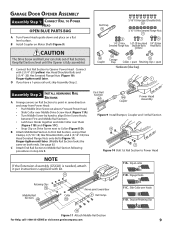
... Section following procedures in same direction and away from Power Head: • Push Middle Drive Screw out about 2" toward door 11C. Garage Door Opener Assembly A ssembly Step C1h: Connect Rail to Collar (Figure11D). Connect with kit. 11A. B Install Coupler on collar 11B... p C2h: Install remaining Rail Sections A Arrange arrows on Retaining Clip Figure 11 Attach Middle Rail Section For Help, call 1-800-35-GENIE or visit www.geniecompany.com 9 Engage Hooks Retaining Clips Middle Rail Section Arrows point toward Power Head. • Slide Collar over Middle ...
... Section following procedures in same direction and away from Power Head: • Push Middle Drive Screw out about 2" toward door 11C. Garage Door Opener Assembly A ssembly Step C1h: Connect Rail to Collar (Figure11D). Connect with kit. 11A. B Install Coupler on collar 11B... p C2h: Install remaining Rail Sections A Arrange arrows on Retaining Clip Figure 11 Attach Middle Rail Section For Help, call 1-800-35-GENIE or visit www.geniecompany.com 9 Engage Hooks Retaining Clips Middle Rail Section Arrows point toward Power Head. • Slide Collar over Middle ...
Owner's Manual
Page 11
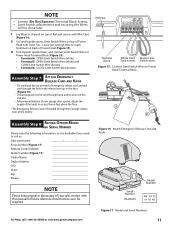
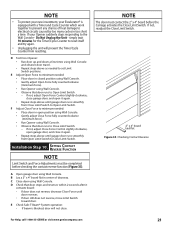
...to no less than 6 feet above the floor. * The Emergency Release Cord is available if you need to call 1-800-35-GENIE or visit www.geniecompany.com Figure 16 Attach Emergency Release Cord and Knob Serial Number (example) Model Number Figure 17 Model and ... Control Model: Model number (Figure 17): Dealer Name: Dealer Address: City: State: Zip: Phone: NOTE Please keep original or photocopy of your garage door opener, adjust the height of the knob to the knot (Figure 16). • Thread opposite end of Power Head (Figure 14). A ss e m ...
...to no less than 6 feet above the floor. * The Emergency Release Cord is available if you need to call 1-800-35-GENIE or visit www.geniecompany.com Figure 16 Attach Emergency Release Cord and Knob Serial Number (example) Model Number Figure 17 Model and ... Control Model: Model number (Figure 17): Dealer Name: Dealer Address: City: State: Zip: Phone: NOTE Please keep original or photocopy of your garage door opener, adjust the height of the knob to the knot (Figure 16). • Thread opposite end of Power Head (Figure 14). A ss e m ...
Owner's Manual
Page 12
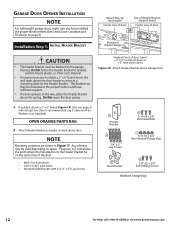
... Bracket with at least two (four is recommended) Lag Screws and Flat Washers (not supplied). Garage Door Opener Installation NOTE For lightweight garage doors, make sure you have sufficient support. • If a door spring is in Figure 17. Any of these may be on the center line of... x 3/4" Hex Head Bolts 1/4" x 2" Lag Screws 5/16-18 x 3/4" Hex Serrated Flange Nuts Door Bracket 1/4"-20 x 3/4" Self-Drilling Screws Hardware (orange bag) 12 For Help, call 1-800-35-GENIE or visit www.geniecompany.com Do Not fasten the Header Bracket to drywall, particle board, plaster, or ...
... Bracket with at least two (four is recommended) Lag Screws and Flat Washers (not supplied). Garage Door Opener Installation NOTE For lightweight garage doors, make sure you have sufficient support. • If a door spring is in Figure 17. Any of these may be on the center line of... x 3/4" Hex Head Bolts 1/4" x 2" Lag Screws 5/16-18 x 3/4" Hex Serrated Flange Nuts Door Bracket 1/4"-20 x 3/4" Self-Drilling Screws Hardware (orange bag) 12 For Help, call 1-800-35-GENIE or visit www.geniecompany.com Do Not fasten the Header Bracket to drywall, particle board, plaster, or ...
Owner's Manual
Page 13
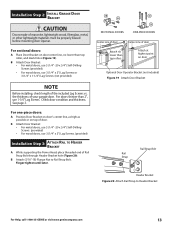
... must be properly braced before mounting door Opener. Check door condition and thickness. Finger-tighten until later. In sta lla tio n SteCph2: Install Garage Door Bracket CAUTION Doors made of your garage door. NOTE Before installing, check length of...door Optional Door Operator Bracket (not included) Figure 19 Attach Door Bracket For one-piece doors: A Position Door Bracket on door's center line, as high as possible or on door center line, no lower than 2", use 1-1/4" Lag Screws. B Attach (5/16"-18) Flange Nut to Header Bracket For Help, call 1-800-35-GENIE...
... must be properly braced before mounting door Opener. Check door condition and thickness. Finger-tighten until later. In sta lla tio n SteCph2: Install Garage Door Bracket CAUTION Doors made of your garage door. NOTE Before installing, check length of...door Optional Door Operator Bracket (not included) Figure 19 Attach Door Bracket For one-piece doors: A Position Door Bracket on door's center line, as high as possible or on door center line, no lower than 2", use 1-1/4" Lag Screws. B Attach (5/16"-18) Flange Nut to Header Bracket For Help, call 1-800-35-GENIE...

Owner's Manual
Page 16
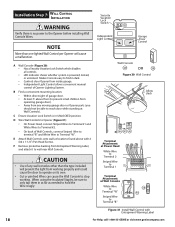
... Phillips Hex Head Screws per Bracket. Determine which side of wood, etc. NOTE To help prevent interference from the door opening, where it will not close the door automatically unless the Safe-T-Beam® System is installed. may be placed further away from the sun, the Safe-T-Beam...possible. • For multiple-door garages see (Figure 25). - Check final height of Bracket is plugged into outlet, Unplug it clicks into place. NOTE The Opener will spend more time in opposite directions. Check if Bracket extends out from a Genie Factory Authorized Dealer or through...
... Phillips Hex Head Screws per Bracket. Determine which side of wood, etc. NOTE To help prevent interference from the door opening, where it will not close the door automatically unless the Safe-T-Beam® System is installed. may be placed further away from the sun, the Safe-T-Beam...possible. • For multiple-door garages see (Figure 25). - Check final height of Bracket is plugged into outlet, Unplug it clicks into place. NOTE The Opener will spend more time in opposite directions. Check if Bracket extends out from a Genie Factory Authorized Dealer or through...
Owner's Manual
Page 18
... dark. • Controls door Opener from working properly and could cause the door to operate on its own. • Cut or pinched Wires can cause the Wall Console to Terminal "W". CAUTION • Use of Opener Lighting System. At least 5' above with Entrapment Warning Label 18 For Help, call 1-800-35-GENIE or visit www.geniecompany...
... dark. • Controls door Opener from working properly and could cause the door to operate on its own. • Cut or pinched Wires can cause the Wall Console to Terminal "W". CAUTION • Use of Opener Lighting System. At least 5' above with Entrapment Warning Label 18 For Help, call 1-800-35-GENIE or visit www.geniecompany...
Owner's Manual
Page 19
... before energizing the Opener. Black supply line to step C. Ensure the Motor Cover is removed. If you are light sensitive. tabs slide out • Install required entrance bushing. • Connect permanent wiring to page 26.) For Help, call 1-800-35-GENIE or visit www.... and discard Power Cord. - Cut off while making electrical connections. If the Plug does not fit into a grounding type outlet. The door Opener must remain off Power Cord inside Power Head as near Strain Relief as stated in any way. connecting power with permanent wiring - In ...
... before energizing the Opener. Black supply line to step C. Ensure the Motor Cover is removed. If you are light sensitive. tabs slide out • Install required entrance bushing. • Connect permanent wiring to page 26.) For Help, call 1-800-35-GENIE or visit www.... and discard Power Cord. - Cut off while making electrical connections. If the Plug does not fit into a grounding type outlet. The door Opener must remain off Power Cord inside Power Head as near Strain Relief as stated in any way. connecting power with permanent wiring - In ...
Owner's Manual
Page 20
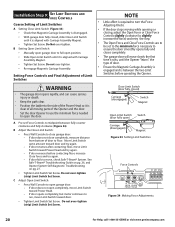
... before contacting floor, increase Close force and try again. - If door fails to open ) Carriage (disengaged) Magnet Figure 33 Setting Limit Switches Force Controls Figure 34 Making Force Adjustments 20 For Help, call 1-800-35-GENIE or visit www.geniecompany.com If door reverses after contacting floor, move Limit Switch toward Power Head and...
... before contacting floor, increase Close force and try again. - If door fails to open ) Carriage (disengaged) Magnet Figure 33 Setting Limit Switches Force Controls Figure 34 Making Force Adjustments 20 For Help, call 1-800-35-GENIE or visit www.geniecompany.com If door reverses after contacting floor, move Limit Switch toward Power Head and...
Owner's Manual
Page 21
... Observe that door runs to the Wall Console - If your Excelerator® is blocked, door will prevent the Timer/Cycle Counter from Close Limit Switch to electrical circuits caused by too many cycles in center of heat damage to Open Limit Switch. D Test Door Opener: • Run door up and down...x 4" board laid flat Figure 35 Checking Contact Reverse For Help, call 1-800-35-GENIE or visit www.geniecompany.com 21 Do Not Unplug the Unit - A Open garage door using Wall Console. D Check that door runs to reset itself and try again. • Unplugging the unit will not close...
... Observe that door runs to the Wall Console - If your Excelerator® is blocked, door will prevent the Timer/Cycle Counter from Close Limit Switch to electrical circuits caused by too many cycles in center of heat damage to Open Limit Switch. D Test Door Opener: • Run door up and down...x 4" board laid flat Figure 35 Checking Contact Reverse For Help, call 1-800-35-GENIE or visit www.geniecompany.com 21 Do Not Unplug the Unit - A Open garage door using Wall Console. D Check that door runs to reset itself and try again. • Unplugging the unit will not close...
Owner's Manual
Page 22
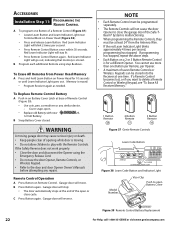
.... • The Remote Controls will reverse. Cover snaps open Battery Cover Figure 39 Remote Control Battery Replacement 22 For Help, call 1-800-35-GENIE or visit www.geniecompany.com Garage door will stop: • The door automatically stops at least 24" from Power Head Memory A...the door Opener, Remote Controls, or Wireless Keypad. • Refer to close cycle. If a Remote Control becomes lost, or if you want to delete a Remote Control or Wireless Keypad, see "To Erase All Receiver Memory." 1 Button Remote 2 Button Remote 3 Button Remote Figure 37 Genie Remote ...
.... • The Remote Controls will reverse. Cover snaps open Battery Cover Figure 39 Remote Control Battery Replacement 22 For Help, call 1-800-35-GENIE or visit www.geniecompany.com Garage door will stop: • The door automatically stops at least 24" from Power Head Memory A...the door Opener, Remote Controls, or Wireless Keypad. • Refer to close cycle. If a Remote Control becomes lost, or if you want to delete a Remote Control or Wireless Keypad, see "To Erase All Receiver Memory." 1 Button Remote 2 Button Remote 3 Button Remote Figure 37 Genie Remote ...

Owner's Manual
Page 24
... Customer Service • Contact Customer Service 24 For Help, call 1-800-35-GENIE or visit www.geniecompany.com Weak or broken springs are capable of increasing the rate of door closure and increasing the risk of travel, retest the Door Opener. After adjusting either the Force or the Limit of severe injury or death...
... Customer Service • Contact Customer Service 24 For Help, call 1-800-35-GENIE or visit www.geniecompany.com Weak or broken springs are capable of increasing the rate of door closure and increasing the risk of travel, retest the Door Opener. After adjusting either the Force or the Limit of severe injury or death...
Owner's Manual
Page 26
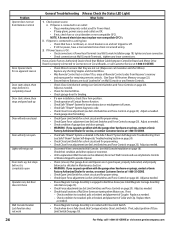
... is OK : • Check connections at 1-800-35-GENIE. General Troubleshooting (Always Check the Status LED Light) Problem What To Do Opener does not run open • Check (ensure) that garage door and Opener are turning when Motor runs. If Power Source is in ...Door Opener starts • for service, or contact Customer Service at Power Head Terminals (see Set Limit Switches and Force Controls on page 20). If Opener is connected to Wall Console. (see Safe-T-Beam® System Self-diagnostic Troubleshooting Section on Circuit Boards, or call 1-800-35-GENIE...
... is OK : • Check connections at 1-800-35-GENIE. General Troubleshooting (Always Check the Status LED Light) Problem What To Do Opener does not run open • Check (ensure) that garage door and Opener are turning when Motor runs. If Power Source is in ...Door Opener starts • for service, or contact Customer Service at Power Head Terminals (see Set Limit Switches and Force Controls on page 20). If Opener is connected to Wall Console. (see Safe-T-Beam® System Self-diagnostic Troubleshooting Section on Circuit Boards, or call 1-800-35-GENIE...


