
Owner's Manual
Page 4
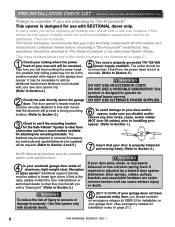
...of your door jams, binds, is improperly balanced or has a broken spring, have a separate entry door, you should be directed to The Genie Company or an authorized Genie® Dealer. (The issue numbers below refer to the circled numbers in the position needed with a "bracing kit." (Refer to Section .... It may be mounted. The brackets may not be addressed. This product is mounted. (Refer to Section 5.) WARNING DO NOT USE AN EXTENSION CORD! WARNING To reduce the risk of aluminum, light-weight steel, fiberglass or glass panels? This opener is possible that ceiling joists may be...
...of your door jams, binds, is improperly balanced or has a broken spring, have a separate entry door, you should be directed to The Genie Company or an authorized Genie® Dealer. (The issue numbers below refer to the circled numbers in the position needed with a "bracing kit." (Refer to Section .... It may be mounted. The brackets may not be addressed. This product is mounted. (Refer to Section 5.) WARNING DO NOT USE AN EXTENSION CORD! WARNING To reduce the risk of aluminum, light-weight steel, fiberglass or glass panels? This opener is possible that ceiling joists may be...

Owner's Manual
Page 5
...-1.800.354.3643 OR WWW.GENIECOMPANY.COM 2 Pg. 12-13 ADDED HEADER BRACKET MOUNTING BOARD BRACES POWER CORD (APPROX. 45 IN.) TO 120V GROUNDED OUTLET EXTENSION SPRING OR TORSION SPRING NOTE: This opener is designed for use with sectional doors.
...-1.800.354.3643 OR WWW.GENIECOMPANY.COM 2 Pg. 12-13 ADDED HEADER BRACKET MOUNTING BOARD BRACES POWER CORD (APPROX. 45 IN.) TO 120V GROUNDED OUTLET EXTENSION SPRING OR TORSION SPRING NOTE: This opener is designed for use with sectional doors.

Owner's Manual
Page 17
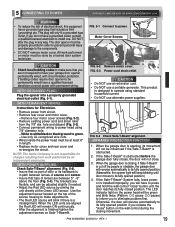
... sensor wiring methods. FIG. 4-1 Mark door frame. b) Blocks of garage receives most direct sunlight (Fig. 4-4). - Staples should be substituted for extensions. • Center bracket on sunny side whenever possible (Fig. 4-4). • For multiple doors. - Preventing crossed signals is beyond door, tracks ...wall far enough, so tongue of bracket until it clicks into place (Fig. 4-3). If not: a) Mounting bracket extensions are available through an authorized Genie® Dealer. NOTE: Mounting brackets can be attached to the opener while installing Safe-T-Beam® wires. 4 ...
... sensor wiring methods. FIG. 4-1 Mark door frame. b) Blocks of garage receives most direct sunlight (Fig. 4-4). - Staples should be substituted for extensions. • Center bracket on sunny side whenever possible (Fig. 4-4). • For multiple doors. - Preventing crossed signals is beyond door, tracks ...wall far enough, so tongue of bracket until it clicks into place (Fig. 4-3). If not: a) Mounting bracket extensions are available through an authorized Genie® Dealer. NOTE: Mounting brackets can be attached to the opener while installing Safe-T-Beam® wires. 4 ...
Owner's Manual
Page 19
...hole and discard (Fig. 5-3). • Connect permanent wiring to the components. • DO NOT remove motor cover. CAUTION • Do NOT use an extension cord. • Do NOT use alternate power supplies. 6" 5" max min from from work performed on the top of the source housing to operate using 7/8"...closing movement. PN# 3642036534, 02/26/2010 REV. 1 19 White to white/black to black/ground to its fully closed position. NOTE: The Genie Company is cut off by aiming the unit directly at least 6" in any way. The LED indicator light on Safe-T-Beam®. FIG. 5-3...
...hole and discard (Fig. 5-3). • Connect permanent wiring to the components. • DO NOT remove motor cover. CAUTION • Do NOT use an extension cord. • Do NOT use alternate power supplies. 6" 5" max min from from work performed on the top of the source housing to operate using 7/8"...closing movement. PN# 3642036534, 02/26/2010 REV. 1 19 White to white/black to black/ground to its fully closed position. NOTE: The Genie Company is cut off by aiming the unit directly at least 6" in any way. The LED indicator light on Safe-T-Beam®. FIG. 5-3...

