
Product Brochure
Page 1
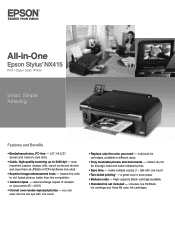
... remove red eye with one touch • Replace only the color you need - individual ink cartridges, available in -One Epson Stylus® NX415 Print | Copy | Scan | Photo Smart. Simple. High-capacity Black cartridge available • Standard ink set included - reduce/enlarge copies of receipts or documents 25 - 400...Quick, high-quality scanning up to save them as JPEGs or PDFs (software included) • Superior image enhancement tools - restore the color to old, faded photos; make multiple copies (1 - 99) with one touch • Two-sided printing1 - includes one 69 Black ...
... remove red eye with one touch • Replace only the color you need - individual ink cartridges, available in -One Epson Stylus® NX415 Print | Copy | Scan | Photo Smart. Simple. High-capacity Black cartridge available • Standard ink set included - reduce/enlarge copies of receipts or documents 25 - 400...Quick, high-quality scanning up to save them as JPEGs or PDFs (software included) • Superior image enhancement tools - restore the color to old, faded photos; make multiple copies (1 - 99) with one touch • Two-sided printing1 - includes one 69 Black ...
Product Brochure
Page 2
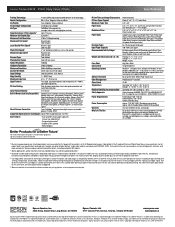
...first cartridges is used for both printing and print head maintenance. Color photo in Draft mode on system configuration, software, and page complexity. Epson Stylus NX415 Print | Copy | Scan | Photo Specifications Printing Technology 4-color (CMYK) drop-on-demand MicroPiezo® ink jet technology ... will vary considerably for a Better Future is a registered logomark and Better Products for reasons including images printed, print settings, temperature and humidity. Microsoft, Windows, Windows Vista and the Windows logos are determined in default, single-side mode ...
...first cartridges is used for both printing and print head maintenance. Color photo in Draft mode on system configuration, software, and page complexity. Epson Stylus NX415 Print | Copy | Scan | Photo Specifications Printing Technology 4-color (CMYK) drop-on-demand MicroPiezo® ink jet technology ... will vary considerably for a Better Future is a registered logomark and Better Products for reasons including images printed, print settings, temperature and humidity. Microsoft, Windows, Windows Vista and the Windows logos are determined in default, single-side mode ...
Quick Guide
Page 2
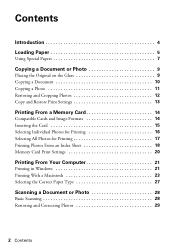
... 9 Placing the Original on the Glass 9 Copying a Document 10 Copying a Photo 11 Restoring and Cropping Photos 12 Copy and Restore Print Settings 13 Printing From a Memory Card 14 Compatible Cards and Image Formats 14 Inserting the Card 15 Selecting Individual Photos for Printing 16 Selecting All ...Photos for Printing 17 Printing Photos From an Index Sheet 18 Memory Card Print Settings 20 Printing From Your Computer 21 Printing in Windows 21 Printing With a Macintosh 23 Selecting the Correct Paper Type 27 Scanning a...
... 9 Placing the Original on the Glass 9 Copying a Document 10 Copying a Photo 11 Restoring and Cropping Photos 12 Copy and Restore Print Settings 13 Printing From a Memory Card 14 Compatible Cards and Image Formats 14 Inserting the Card 15 Selecting Individual Photos for Printing 16 Selecting All ...Photos for Printing 17 Printing Photos From an Index Sheet 18 Memory Card Print Settings 20 Printing From Your Computer 21 Printing in Windows 21 Printing With a Macintosh 23 Selecting the Correct Paper Type 27 Scanning a...
Quick Guide
Page 4
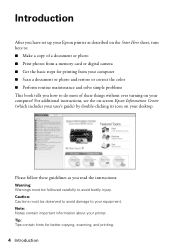
...printing. 4 Introduction Tip: Tips contain hints for printing from your computer ■ Scan a document or photo and restore or correct the color ■ Perform routine maintenance and solve simple problems This book tells you read the instructions: Warning: Warnings must be followed carefully to avoid... about your desktop. For additional instructions, see the on-screen Epson Information Center (which includes your user's guide) by double-clicking its icon on your printer. Introduction After you have set up your Epson printer as you how to do most of these things without ever...
...printing. 4 Introduction Tip: Tips contain hints for printing from your computer ■ Scan a document or photo and restore or correct the color ■ Perform routine maintenance and solve simple problems This book tells you read the instructions: Warning: Warnings must be followed carefully to avoid... about your desktop. For additional instructions, see the on-screen Epson Information Center (which includes your user's guide) by double-clicking its icon on your printer. Introduction After you have set up your Epson printer as you how to do most of these things without ever...
Quick Guide
Page 10
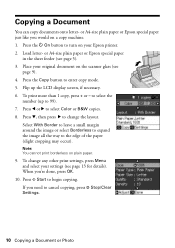
... machine. 1. When you would on the scanner glass (see page 9). 4. Press x Start to cancel copying, press y Stop/Clear Settings. 10 Copying a Document or Photo or A4-size plain paper or Epson special paper just like you 're done, press OK. 10. to 99). 7. Note: You cannot print borderless on your...plain paper or Epson special paper in the sheet feeder (see page 13 for details). To print more than 1 copy, press + or - Press l or r to enter copy mode. 5. Flip up to select the number (up the LCD display screen, if necessary. 6. Press the Copy button to select Color or B&W copies....
... machine. 1. When you would on the scanner glass (see page 9). 4. Press x Start to cancel copying, press y Stop/Clear Settings. 10 Copying a Document or Photo or A4-size plain paper or Epson special paper just like you 're done, press OK. 10. to 99). 7. Note: You cannot print borderless on your...plain paper or Epson special paper in the sheet feeder (see page 13 for details). To print more than 1 copy, press + or - Press l or r to enter copy mode. 5. Flip up to select the number (up the LCD display screen, if necessary. 6. Press the Copy button to select Color or B&W copies....
Quick Guide
Page 11
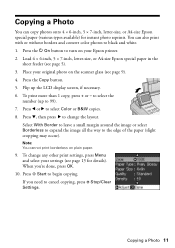
... borders and convert color photos to black and white. 1. Flip up to 99). 7. If you 're done, press OK. 10. You can copy photos onto 4 × 6-inch, 5 × 7-inch, letter-size, or A4-size Epson special paper (various types available) for details). Place your settings (see page 5).... 3. When you need to change any other print settings, press Menu and select your original photo on plain paper. 9. Press the P On button ...
... borders and convert color photos to black and white. 1. Flip up to 99). 7. If you 're done, press OK. 10. You can copy photos onto 4 × 6-inch, 5 × 7-inch, letter-size, or A4-size Epson special paper (various types available) for details). Place your settings (see page 5).... 3. When you need to change any other print settings, press Menu and select your original photo on plain paper. 9. Press the P On button ...

Quick Guide
Page 12
...to cancel copying, press y Stop/ Clear Settings. 12 Copying a Document or Photo You see page 13). Press the P On button to zoom in on the subject. Load 4 × 6-inch, 5 × 7-inch, letter-size, or A4-size Epson special paper. 3. To turn on Color Restoration, press r, select On, and press... OK. (If your photo is not faded, do not turn on your Epson printer. 2. After you 're done, press OK. 10. To change print settings, press Menu and select your settings (see these settings over a ...
...to cancel copying, press y Stop/ Clear Settings. 12 Copying a Document or Photo You see page 13). Press the P On button to zoom in on the subject. Load 4 × 6-inch, 5 × 7-inch, letter-size, or A4-size Epson special paper. 3. To turn on Color Restoration, press r, select On, and press... OK. (If your photo is not faded, do not turn on your Epson printer. 2. After you 're done, press OK. 10. To change print settings, press Menu and select your settings (see these settings over a ...
Quick Guide
Page 13
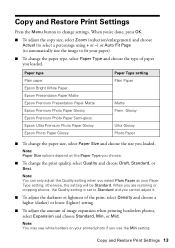
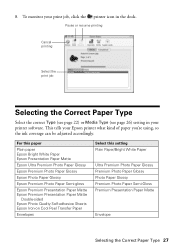
Paper type Plain paper Epson Bright White Paper Epson Presentation Paper Matte Epson Premium Presentation Paper Matte Epson Premium Photo Paper Glossy Epson Premium Photo Paper Semi-gloss Epson Ultra Premium Photo Paper Glossy Epson Photo Paper Glossy Paper Type setting Plain Paper Matte Prem. Note: You may see white borders on the Paper Type you choose. ■ To...
Paper type Plain paper Epson Bright White Paper Epson Presentation Paper Matte Epson Premium Presentation Paper Matte Epson Premium Photo Paper Glossy Epson Premium Photo Paper Semi-gloss Epson Ultra Premium Photo Paper Glossy Epson Photo Paper Glossy Paper Type setting Plain Paper Matte Prem. Note: You may see white borders on the Paper Type you choose. ■ To...
Quick Guide
Page 16
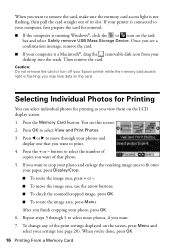
...number of that you want to select View and Print Photos. 3. Repeat steps 3 through your Epson printer while the memory card access light is not flashing, then pull the card straight out of the print settings displayed on the card. To change any of its slot. If your printer is a Macintosh&#...copies you want . 7. Press the Memory Card button. Press the + or - After you may lose data on the screen, press Menu and select your settings (see a confirmation message, remove the card. ■ If your computer is connected to your desktop into the trash. When you want to crop your photo...
...number of that you want to select View and Print Photos. 3. Repeat steps 3 through your Epson printer while the memory card access light is not flashing, then pull the card straight out of the print settings displayed on the card. To change any of its slot. If your printer is a Macintosh&#...copies you want . 7. Press the Memory Card button. Press the + or - After you may lose data on the screen, press Menu and select your settings (see a confirmation message, remove the card. ■ If your computer is connected to your desktop into the trash. When you want to crop your photo...
Quick Guide
Page 17
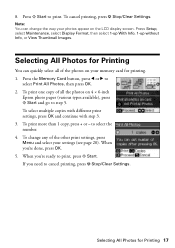
... photos appear on 4 × 6-inch Epson photo paper (various types available), press x Start and go to print, press x Start. To print more than 1 copy, press + or - When you 're done, press OK. 5. To cancel printing, press y Stop/Clear Settings. Press Setup, select Maintenance, select Display Format...need to select Print All Photos, then press OK. 2. Press x Start to select the number. 4. To select multiple copies with different print settings, press OK and continue with step 3. 3. to print. Selecting All Photos for printing. 1. Note: You can quickly select all the photos on...
... photos appear on 4 × 6-inch Epson photo paper (various types available), press x Start and go to print, press x Start. To print more than 1 copy, press + or - When you 're done, press OK. 5. To cancel printing, press y Stop/Clear Settings. Press Setup, select Maintenance, select Display Format...need to select Print All Photos, then press OK. 2. Press x Start to select the number. 4. To select multiple copies with different print settings, press OK and continue with step 3. 3. to print. Selecting All Photos for printing. 1. Note: You can quickly select all the photos on...
Quick Guide
Page 18
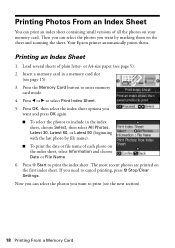
...size paper (see page 15). 3. Press the Memory Card button to select Print Index Sheet. 5. If you want to cancel printing, press y Stop/Clear Settings. Press l or r to enter memory card mode. 4. Printing Photos From an Index Sheet You can print an index sheet containing small versions of plain letter...select the photos you want by file name). ■ To print the date or file name of each photo on the first index sheet. Your Epson printer automatically prints them on your memory card. Insert a memory card in the index sheet, choose Select, then select All Photos, Latest 30, ...
...size paper (see page 15). 3. Press the Memory Card button to select Print Index Sheet. 5. If you want to cancel printing, press y Stop/Clear Settings. Press l or r to enter memory card mode. 4. Printing Photos From an Index Sheet You can print an index sheet containing small versions of plain letter...select the photos you want by file name). ■ To print the date or file name of each photo on the first index sheet. Your Epson printer automatically prints them on your memory card. Insert a memory card in the index sheet, choose Select, then select All Photos, Latest 30, ...
Quick Guide
Page 20
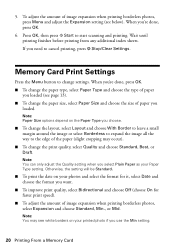
... Off (choose On for faster print speed). ■ To adjust the amount of image expansion when printing borderless photos, press Menu and adjust the Expansion setting (see below). When you're done, press OK. ■ To change the paper type, select Paper Type and choose the type of paper you ... and select the format for it, select Date and choose the format you 're done, press OK. 6. Otherwise, the setting will be Standard. ■ To print the date on your Paper Type setting. If you choose. ■ To change the print quality, select Quality and choose Standard, Best, or Draft. Note: ...
... Off (choose On for faster print speed). ■ To adjust the amount of image expansion when printing borderless photos, press Menu and adjust the Expansion setting (see below). When you're done, press OK. ■ To change the paper type, select Paper Type and choose the type of paper you ... and select the format for it, select Date and choose the format you 're done, press OK. 6. Otherwise, the setting will be Standard. ■ To print the date on your Paper Type setting. If you choose. ■ To change the print quality, select Quality and choose Standard, Best, or Draft. Note: ...
Quick Guide
Page 22
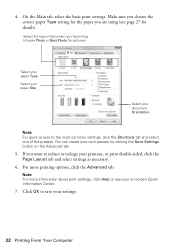
On the Main tab, select the basic print settings. You can create your own presets by clicking the Save Settings button on -screen Epson Information Center. 7. Note: For more printing options, click the Advanced tab. Select the type of the presets. Click OK to save your document Orientation ...Advanced tab. 5. Make sure you 're printing (choose Photo or Best Photo for pictures) Select your paper Type Select your paper Size Select your settings. 22 Printing From Your Computer 4. If you are using (see your printout, or print double-sided, click the Page Layout tab and select...
On the Main tab, select the basic print settings. You can create your own presets by clicking the Save Settings button on -screen Epson Information Center. 7. Note: For more printing options, click the Advanced tab. Select the type of the presets. Click OK to save your document Orientation ...Advanced tab. 5. Make sure you 're printing (choose Photo or Best Photo for pictures) Select your paper Type Select your paper Size Select your settings. 22 Printing From Your Computer 4. If you are using (see your printout, or print double-sided, click the Page Layout tab and select...
Quick Guide
Page 23
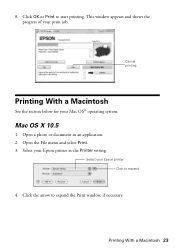
Open the File menu and select Print. 3. Cancel printing Printing With a Macintosh See the section below for your print job. This window appears and shows the progress of your Mac OS® operating system. Mac OS X 10.5 1. Open a photo or document in an application. 2. Click the arrow to start printing. 8. Printing With a Macintosh 23 Select your Epson printer as the Printer setting. Select your Epson printer Click to expand 4. Click OK or Print to expand the Print window, if necessary.
Open the File menu and select Print. 3. Cancel printing Printing With a Macintosh See the section below for your print job. This window appears and shows the progress of your Mac OS® operating system. Mac OS X 10.5 1. Open a photo or document in an application. 2. Click the arrow to start printing. 8. Printing With a Macintosh 23 Select your Epson printer as the Printer setting. Select your Epson printer Click to expand 4. Click OK or Print to expand the Print window, if necessary.

Quick Guide
Page 24
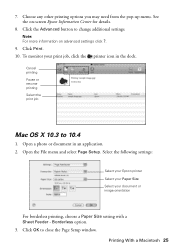
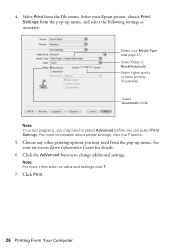
...printing, choose a Paper Size setting with a Sheet Feeder - Copy and page settings Application settings 6. Note: If the setting you want isn't shown (for example, Scale), check for it in the settings for it in your Media Type (see page 27) Select Color or Black/Grayscale Select higher ...quality or faster printing (if available) Choose Print Settings from the pop-up menu, and select the following print settings: 24 Printing From Your Computer Choose Print Settings Select your application before printing. Borderless...
...printing, choose a Paper Size setting with a Sheet Feeder - Copy and page settings Application settings 6. Note: If the setting you want isn't shown (for example, Scale), check for it in the settings for it in your Media Type (see page 27) Select Color or Black/Grayscale Select higher ...quality or faster printing (if available) Choose Print Settings from the pop-up menu, and select the following print settings: 24 Printing From Your Computer Choose Print Settings Select your application before printing. Borderless...
Quick Guide
Page 25
... pop-up menu. To monitor your document or image orientation For borderless printing, choose a Paper Size setting with a Sheet Feeder - Select the following settings: Select your Epson printer Select your Paper Size Select your print job, click the printer icon in an application. 2.... Printing With a Macintosh 25 Click Print. 10. Borderless option. 3. See the on advanced settings click ?. 9. Open a photo or...
... pop-up menu. To monitor your document or image orientation For borderless printing, choose a Paper Size setting with a Sheet Feeder - Select the following settings: Select your Epson printer Select your Paper Size Select your print job, click the printer icon in an application. 2.... Printing With a Macintosh 25 Click Print. 10. Borderless option. 3. See the on advanced settings click ?. 9. Open a photo or...
Quick Guide
Page 26
... the Advanced button to select Advanced before you may need from the File menu. Select your Epson printer, choose Print Settings from the pop-up menu. See your Media Type (see page 27) Select Color or Black/Grayscale Select higher quality or faster printing (if available) Select Automatic mode Note: In certain programs...
... the Advanced button to select Advanced before you may need from the File menu. Select your Epson printer, choose Print Settings from the pop-up menu. See your Media Type (see page 27) Select Color or Black/Grayscale Select higher quality or faster printing (if available) Select Automatic mode Note: In certain programs...
Quick Guide
Page 27
... Plain paper Epson Bright White Paper Epson Presentation Paper Matte Epson Ultra Premium Photo Paper Glossy Epson Premium Photo Paper Glossy Epson Photo Paper Glossy Epson Premium Photo Paper Semi-gloss Epson Premium Presentation Paper Matte Epson Premium Presentation Paper Matte Double-sided Epson Photo Quality Self-adhesive Sheets Epson Iron-on Cool Peel Transfer Paper Envelopes Select this setting Plain...
... Plain paper Epson Bright White Paper Epson Presentation Paper Matte Epson Ultra Premium Photo Paper Glossy Epson Premium Photo Paper Glossy Epson Photo Paper Glossy Epson Premium Photo Paper Semi-gloss Epson Premium Presentation Paper Matte Epson Premium Presentation Paper Matte Double-sided Epson Photo Quality Self-adhesive Sheets Epson Iron-on Cool Peel Transfer Paper Envelopes Select this setting Plain...
Quick Guide
Page 28
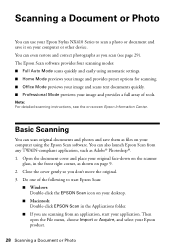
...computer or other device. Scanning a Document or Photo You can use your Epson Stylus NX410 Series to start Epson Scan: ■ Windows: Double-click the EPSON Scan icon on your desktop. ■ Macintosh: Double-click EPSON Scan in the Applications folder. ■ If you are scanning from any...Auto Mode scans quickly and easily using the Epson Scan software. You can even restore and correct photographs as shown on -screen Epson Information Center. Open the document cover and place your original face-down on your computer using automatic settings. ■ Home Mode previews your image ...
...computer or other device. Scanning a Document or Photo You can use your Epson Stylus NX410 Series to start Epson Scan: ■ Windows: Double-click the EPSON Scan icon on your desktop. ■ Macintosh: Double-click EPSON Scan in the Applications folder. ■ If you are scanning from any...Auto Mode scans quickly and easily using the Epson Scan software. You can even restore and correct photographs as shown on -screen Epson Information Center. Open the document cover and place your original face-down on your computer using automatic settings. ■ Home Mode previews your image ...

Quick Guide
Page 29
... screen for information about all the available settings. Restoring and Correcting Photos 29 Then follow the instructions in Epson Scan's Full Auto Mode. Full Auto Mode Click the Customize button, click Dust Removal and/or Color Restoration, click OK, and click Scan. Restoring and ...Help on -screen Epson Information Center. You see a different Epson Scan window.) 5. Click the Scan button. Automatically orients your photo is scanned and you see the Epson Scan window: 4. Select Full Auto Mode as you want to -life color and sharpness as the Mode setting in the upper...
... screen for information about all the available settings. Restoring and Correcting Photos 29 Then follow the instructions in Epson Scan's Full Auto Mode. Full Auto Mode Click the Customize button, click Dust Removal and/or Color Restoration, click OK, and click Scan. Restoring and ...Help on -screen Epson Information Center. You see a different Epson Scan window.) 5. Click the Scan button. Automatically orients your photo is scanned and you see the Epson Scan window: 4. Select Full Auto Mode as you want to -life color and sharpness as the Mode setting in the upper...


