
Product Brochure
Page 2
... names are based on continuous printing of a suite of five black and color pages as 26 seconds Black 33 cpm Color 33 cpm Scanner Type Color flatbed Photoelectric Device Color CIS line sensor Optical Resolution 2400 dpi Hardware Resolution 2400 x 2400 dpi ... is a registered logomark and Better Products for reasons including images printed, print settings, temperature and humidity. Epson Stylus NX415 Print | Copy | Scan | Photo Specifications Printing Technology 4-color (CMYK) drop-on-demand MicroPiezo® ink jet technology Nozzle Configuration 90 x 4 Cyan, Magenta, Yellow...
... names are based on continuous printing of a suite of five black and color pages as 26 seconds Black 33 cpm Color 33 cpm Scanner Type Color flatbed Photoelectric Device Color CIS line sensor Optical Resolution 2400 dpi Hardware Resolution 2400 x 2400 dpi ... is a registered logomark and Better Products for reasons including images printed, print settings, temperature and humidity. Epson Stylus NX415 Print | Copy | Scan | Photo Specifications Printing Technology 4-color (CMYK) drop-on-demand MicroPiezo® ink jet technology Nozzle Configuration 90 x 4 Cyan, Magenta, Yellow...

Quick Guide
Page 9
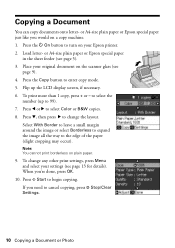
Copying a Document or Photo Follow the instructions in this section to position your original face-down on the scanner glass, with the top facing into the front right corner. 2. Placing the Original on the scanner glass and make color or black-and-white copies. Copying a Document or Photo 9 Open the document cover and place your originals correctly on the Glass 1. Close the cover gently so you don't move the original.
Copying a Document or Photo Follow the instructions in this section to position your original face-down on the scanner glass, with the top facing into the front right corner. 2. Placing the Original on the scanner glass and make color or black-and-white copies. Copying a Document or Photo 9 Open the document cover and place your originals correctly on the Glass 1. Close the cover gently so you don't move the original.
Quick Guide
Page 10
Press d, then press r to turn on your original document on the scanner glass (see page 9). 4. When you would on plain paper. 9. Load letter- Place your Epson printer. 2. Press the Copy button to select Color or B&W copies. 8. Press the P On button to change any other print settings, ...press Menu and select your settings (see page 5). 3. or A4-size plain paper or Epson special paper in the sheet feeder...
Press d, then press r to turn on your original document on the scanner glass (see page 9). 4. When you would on plain paper. 9. Load letter- Place your Epson printer. 2. Press the Copy button to select Color or B&W copies. 8. Press the P On button to change any other print settings, ...press Menu and select your settings (see page 5). 3. or A4-size plain paper or Epson special paper in the sheet feeder...
Quick Guide
Page 11
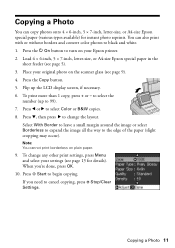
... may occur). Load 4 × 6-inch, 5 × 7-inch, letter-size, or A4-size Epson special paper in the sheet feeder (see page 13 for instant photo reprints. Flip up to 99). 7.... 5). 3. Note: You cannot print borderless on your Epson printer. 2. Copying a Photo 11 Copying a Photo You can also print with or without borders and convert color photos to black and white. 1. To print more ...can copy photos onto 4 × 6-inch, 5 × 7-inch, letter-size, or A4-size Epson special paper (various types available) for details). When you need to change any other print settings, press ...
... may occur). Load 4 × 6-inch, 5 × 7-inch, letter-size, or A4-size Epson special paper in the sheet feeder (see page 13 for instant photo reprints. Flip up to 99). 7.... 5). 3. Note: You cannot print borderless on your Epson printer. 2. Copying a Photo 11 Copying a Photo You can also print with or without borders and convert color photos to black and white. 1. To print more ...can copy photos onto 4 × 6-inch, 5 × 7-inch, letter-size, or A4-size Epson special paper (various types available) for details). When you need to change any other print settings, press ...

Quick Guide
Page 12
...resulting image area to fit onto your photos to prescan your photo is not faded, do not turn on Color Restoration, press r, select On, and press OK. (If your photo. To change print settings, press ... to select the number. 8. Press OK again to zoom in on the subject. If you are done cropping your Epson printer. 2. You can restore old, faded photos to cancel copying, press y Stop/ Clear Settings. 12 Copying a... area, use the NX410 Series software on your original photo on the scanner glass. 4. Note: To restore photos larger than 1 copy, press + or - Place your computer. 1.
...resulting image area to fit onto your photos to prescan your photo is not faded, do not turn on Color Restoration, press r, select On, and press OK. (If your photo. To change print settings, press ... to select the number. 8. Press OK again to zoom in on the subject. If you are done cropping your Epson printer. 2. You can restore old, faded photos to cancel copying, press y Stop/ Clear Settings. 12 Copying a... area, use the NX410 Series software on your original photo on the scanner glass. 4. Note: To restore photos larger than 1 copy, press + or - Place your computer. 1.
Quick Guide
Page 19
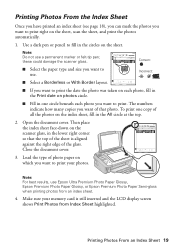
... circles on the index sheet, fill in the lower right corner so that photo. Note: Do not use Epson Ultra Premium Photo Paper Glossy, Epson Premium Photo Paper Glossy, or Epson Premium Photo Paper Semi-gloss when printing photos from Index Sheet highlighted. Incorrect: ■ Select a Borderless or...2. Close the document cover. 3. Printing Photos From an Index Sheet 19 Open the document cover. Make sure your photos. these could damage the scanner glass. Note: For best results, use a permanent marker or felt-tip pen; Load the type of all the photos on the sheet. Printing...
... circles on the index sheet, fill in the lower right corner so that photo. Note: Do not use Epson Ultra Premium Photo Paper Glossy, Epson Premium Photo Paper Glossy, or Epson Premium Photo Paper Semi-gloss when printing photos from Index Sheet highlighted. Incorrect: ■ Select a Borderless or...2. Close the document cover. 3. Printing Photos From an Index Sheet 19 Open the document cover. Make sure your photos. these could damage the scanner glass. Note: For best results, use a permanent marker or felt-tip pen; Load the type of all the photos on the sheet. Printing...
Quick Guide
Page 28
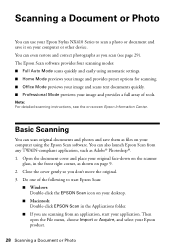
... software. Open the document cover and place your original face-down on the scanner glass, in the front right corner, as files on your desktop. ■ Macintosh: Double-click EPSON Scan in the Applications folder. ■ If you are scanning from any TWAIN-compliant application, such as you don't move... the original. 3. You can even restore and correct photographs as Adobe® Photoshop®. 1. Scanning a Document or Photo You can use your Epson Stylus NX410 Series to start your application. Note: For detailed scanning instructions, see page 29). You can also launch...
... software. Open the document cover and place your original face-down on the scanner glass, in the front right corner, as files on your desktop. ■ Macintosh: Double-click EPSON Scan in the Applications folder. ■ If you are scanning from any TWAIN-compliant application, such as you don't move... the original. 3. You can even restore and correct photographs as Adobe® Photoshop®. 1. Scanning a Document or Photo You can use your Epson Stylus NX410 Series to start your application. Note: For detailed scanning instructions, see page 29). You can also launch...

Quick Guide
Page 34
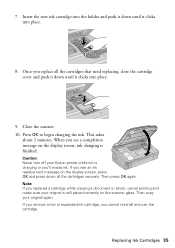
... or try to refill it up. Caution: Do not remove any other labels or seals, or ink may leak. 34 Maintaining Your Printer Open the scanner, and open the new cartridge package, shake it carefully. Dispose of the ink cartridge. Before you open the cartridge cover. 4. Remove the yellow tape from...
... or try to refill it up. Caution: Do not remove any other labels or seals, or ink may leak. 34 Maintaining Your Printer Open the scanner, and open the new cartridge package, shake it carefully. Dispose of the ink cartridge. Before you open the cartridge cover. 4. Remove the yellow tape from...
Quick Guide
Page 35
... finished. Insert the new ink cartridge into the holder and push it down until it clicks into place. 8. Caution: Never turn off your Epson printer while ink is charging or you cannot reinstall and use the cartridge. Then press OK again. Note: If you see an ink replacement... message on the scanner glass. 7. This takes about 2 minutes. Once you see a completion message on the display screen, ink charging is still placed correctly on the ...
... finished. Insert the new ink cartridge into the holder and push it down until it clicks into place. 8. Caution: Never turn off your Epson printer while ink is charging or you cannot reinstall and use the cartridge. Then press OK again. Note: If you see an ink replacement... message on the scanner glass. 7. This takes about 2 minutes. Once you see a completion message on the display screen, ink charging is still placed correctly on the ...
Quick Guide
Page 37
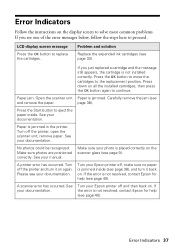
...cartridges (see and remove the paper. page 38). Turn off and then back on the scanner glass (see page 9). Make sure photos are positioned correctly. If your documentation. Carefully remove the jam (see...turn it on again. Turn your photo is not resolved, contact Epson for help (see page 40). If the error is not installed correctly. Open the scanner unit Paper is jammed in the printer. No photos could be...replace the cartridges. See your manual. If you see your Epson printer off the printer, open the scanner unit, remove paper.
...cartridges (see and remove the paper. page 38). Turn off and then back on the scanner glass (see page 9). Make sure photos are positioned correctly. If your documentation. Carefully remove the jam (see...turn it on again. Turn your photo is not resolved, contact Epson for help (see page 40). If the error is not installed correctly. Open the scanner unit Paper is jammed in the printer. No photos could be...replace the cartridges. See your manual. If you see your Epson printer off the printer, open the scanner unit, remove paper.
Quick Guide
Page 38
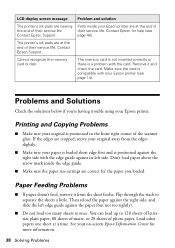
...their service life. Cannot recognize the memory card or disk. If the edges are correct for the paper you 're having trouble using your Epson printer. Problems and Solutions Check the solutions below if you loaded. Paper Feeding Problems ■ If paper doesn't feed, remove it and ...their service life. Flip through the stack to 120 sheets of lettersize plain paper, 80 sheets of matte, or 20 sheets of the scanner glass. Contact Epson Support. The memory card is not inserted correctly or there is compatible with the card. Remove it from the edges slightly. ■...
...their service life. Cannot recognize the memory card or disk. If the edges are correct for the paper you 're having trouble using your Epson printer. Problems and Solutions Check the solutions below if you loaded. Paper Feeding Problems ■ If paper doesn't feed, remove it and ...their service life. Flip through the stack to 120 sheets of lettersize plain paper, 80 sheets of matte, or 20 sheets of the scanner glass. Contact Epson Support. The memory card is not inserted correctly or there is compatible with the card. Remove it from the edges slightly. ■...
Quick Guide
Page 39
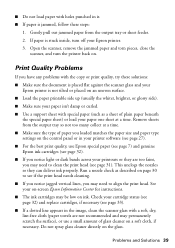
... as a sheet of plain paper beneath the special paper sheet) or load your Epson printer is jammed, follow these steps: 1. Check your Epson printer. 3. Open the scanner, remove the jammed paper and torn pieces, close the scanner, and turn off your cartridge status (see page 32) and replace cartridges, if... ■ If a dotted line appears in the image, clean the scanner glass with holes punched in your printer software (see page 27). ■ For the best print quality, use Epson special paper (see page 7) and genuine Epson ink cartridges (see page 32). ■ If you notice light or...
... as a sheet of plain paper beneath the special paper sheet) or load your Epson printer is jammed, follow these steps: 1. Check your Epson printer. 3. Open the scanner, remove the jammed paper and torn pieces, close the scanner, and turn off your cartridge status (see page 32) and replace cartridges, if... ■ If a dotted line appears in the image, clean the scanner glass with holes punched in your printer software (see page 27). ■ For the best print quality, use Epson special paper (see page 7) and genuine Epson ink cartridges (see page 32). ■ If you notice light or...

Quick Guide
Page 41
... printer into an outlet on the same circuit as a photo copier or air control system that regularly switches on and off the printer using your Epson printer, read and follow these safety instructions: ■ Be sure to rapid changes in heat or humidity, shocks or vibrations, or dust. ■ Leave... enough room around the printer for a long period, unplug the power cord from the wall. ■ Do not open the scanner section while the NX410 Series is at least 4 inches (10 cm) away from the electrical outlet. ■ Always turn off , or on an outlet controlled...
... printer into an outlet on the same circuit as a photo copier or air control system that regularly switches on and off the printer using your Epson printer, read and follow these safety instructions: ■ Be sure to rapid changes in heat or humidity, shocks or vibrations, or dust. ■ Leave... enough room around the printer for a long period, unplug the power cord from the wall. ■ Do not open the scanner section while the NX410 Series is at least 4 inches (10 cm) away from the electrical outlet. ■ Always turn off , or on an outlet controlled...

Start Here
Page 2
Caution: Do not remove any other seals or the cartridge may leak. 4 Insert the cartridges in the holder for each cartridge. Language 4 Install ink cartridges Note: Do not load paper yet. 1 Lift up the scanner, then open the cartridge cover. 2 Shake the ink cartridges gently 4 or 5 times, then unpack them. 3 Remove only the yellow tape from each color. 3 Select your language Press or to select to select your language, then press OK.
Caution: Do not remove any other seals or the cartridge may leak. 4 Insert the cartridges in the holder for each cartridge. Language 4 Install ink cartridges Note: Do not load paper yet. 1 Lift up the scanner, then open the cartridge cover. 2 Shake the ink cartridges gently 4 or 5 times, then unpack them. 3 Remove only the yellow tape from each color. 3 Select your language Press or to select to select your language, then press OK.
Start Here
Page 3
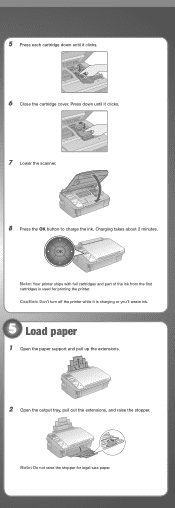
5 Press each cartridge down until it clicks. 7 Lower the scanner. 8 Press the OK button to charge the ink. Press down until it clicks. 6 Close the cartridge cover. Note: Your printer ships with full cartridges and ...
5 Press each cartridge down until it clicks. 7 Lower the scanner. 8 Press the OK button to charge the ink. Press down until it clicks. 6 Close the cartridge cover. Note: Your printer ships with full cartridges and ...


