User Manual
Page 20
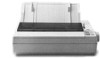
Installing the Ribbon Cartridge Your printer's ribbon cartridge is turned off. Setting Up the Printer 1-7 This interferes with the automatic paper loading system and may cause a paper jam. Slide the print head to adjust the position of the printer. CAUTION: Do not use the platen knob to the middle of the paper. Install the ribbon cartridge as follows. 1. Assembling the Printer 3. Before installing the ribbon cartridge, make sure the printer is designed for easy installation and removal. Push firmly on the platen knob until it fits against the printer case. 0t.
Installing the Ribbon Cartridge Your printer's ribbon cartridge is turned off. Setting Up the Printer 1-7 This interferes with the automatic paper loading system and may cause a paper jam. Slide the print head to adjust the position of the printer. CAUTION: Do not use the platen knob to the middle of the paper. Install the ribbon cartridge as follows. 1. Assembling the Printer 3. Before installing the ribbon cartridge, make sure the printer is designed for easy installation and removal. Push firmly on the platen knob until it fits against the printer case. 0t.
User Manual
Page 21
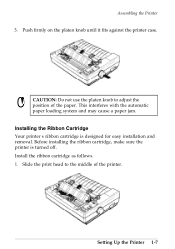
Turn the ribbon-tightening knob in the ribbon and makes it . 2. Also, if you have been using the printer, the print head may be hot; This removes slack in the direction of the arrow. Open the paper tension unit cover. 1-8 Setting Up the Printer Assembling the Printer 0t0 CAUTION: Never move the print head while the printer is turned on because this can damage the printer. let it cool for a few minutes before touching it easier to install. 3.
Turn the ribbon-tightening knob in the ribbon and makes it . 2. Also, if you have been using the printer, the print head may be hot; This removes slack in the direction of the arrow. Open the paper tension unit cover. 1-8 Setting Up the Printer Assembling the Printer 0t0 CAUTION: Never move the print head while the printer is turned on because this can damage the printer. let it cool for a few minutes before touching it easier to install. 3.

User Manual
Page 22
Note: Press lightly on both ends of the cartridge to help feed the ribbon into the slots. Use a pointed object, such as a ball point pen, to guide the ribbon between the print head and ribbon guide while you turn the ribbon-tightening knob to make sure the plastic hooks are properly seated. 5. Setting Up the Printer 1-9 Hold the ribbon cartridge by its handle and push it firmly down into position, making sure the plastic hooks fit into place. Assembling the Printer 4.
Note: Press lightly on both ends of the cartridge to help feed the ribbon into the slots. Use a pointed object, such as a ball point pen, to guide the ribbon between the print head and ribbon guide while you turn the ribbon-tightening knob to make sure the plastic hooks are properly seated. 5. Setting Up the Printer 1-9 Hold the ribbon cartridge by its handle and push it firmly down into position, making sure the plastic hooks fit into place. Assembling the Printer 4.

User Manual
Page 23
Close the paper tension unit cover. Attaching the Paper Guide When you use single sheets, the paper guide helps to make sure it moves smoothly. Also check that the ribbon is not twisted or creased. 7. Attach the paper guide using the following procedure. 1-10 Setting Up the Printer Assembling the Printer 6. Slide the print head from side to side to feed the paper smoothly and efficiently into the printer.
Close the paper tension unit cover. Attaching the Paper Guide When you use single sheets, the paper guide helps to make sure it moves smoothly. Also check that the ribbon is not twisted or creased. 7. Attach the paper guide using the following procedure. 1-10 Setting Up the Printer Assembling the Printer 6. Slide the print head from side to side to feed the paper smoothly and efficiently into the printer.
User Manual
Page 30
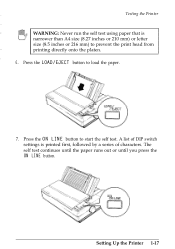
Setting Up the Printer 1-17 Press the LOAD/EJECT button to start the self test. Press the ON LINE button to load the paper. 7. Testing the Printer WARNING: Never run the self test using paper that is printed first, followed by a series of characters. A list of DIP switch settings is narrower than A4 size (8.27 inches or 210 mm) or letter size (8.5 inches or 216 mm) to prevent the print head from printing directly onto the platen. 6. The self test continues until the paper runs out or until you press the ON LINE button.
Setting Up the Printer 1-17 Press the LOAD/EJECT button to start the self test. Press the ON LINE button to load the paper. 7. Testing the Printer WARNING: Never run the self test using paper that is printed first, followed by a series of characters. A list of DIP switch settings is narrower than A4 size (8.27 inches or 210 mm) or letter size (8.5 inches or 216 mm) to prevent the print head from printing directly onto the platen. 6. The self test continues until the paper runs out or until you press the ON LINE button.
User Manual
Page 34
... correctly, contact the store where you purchased your printer or call the Epson toll-free number (1-800-922-8911). Turn off the printer. Try the self test again. See page 1-9. If paper is printed. Make sure the ribbon passes between the print head and ribbon guide. Turn off the printer and repeat the self test. Testing the...
... correctly, contact the store where you purchased your printer or call the Epson toll-free number (1-800-922-8911). Turn off the printer. Try the self test again. See page 1-9. If paper is printed. Make sure the ribbon passes between the print head and ribbon guide. Turn off the printer and repeat the self test. Testing the...
User Manual
Page 51
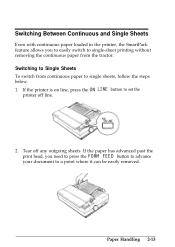
... To switch from the tractor. If the paper has advanced past the print head, you to easily switch to single-sheet printing without removing the continuous paper from continuous paper to single sheets, follow the steps below. 1. If the printer is on line, press the ON LINE button to set the... printer off any outgoing sheets. Tear off line. 2. Switching Between Continuous and ...
... To switch from the tractor. If the paper has advanced past the print head, you to easily switch to single-sheet printing without removing the continuous paper from continuous paper to single sheets, follow the steps below. 1. If the printer is on line, press the ON LINE button to set the... printer off any outgoing sheets. Tear off line. 2. Switching Between Continuous and ...
User Manual
Page 59
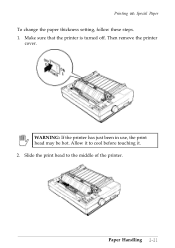
Allow it . 2. Slide the print head to cool before touching it to the middle of the printer. Then remove the printer cover. bl WARNING: If the printer has just been in use, the print head may be hot. Paper Handling 2-21 Make sure that the printer is turned off. Printing on Special Paper To change the paper thickness setting, follow these steps. 1.
Allow it . 2. Slide the print head to cool before touching it to the middle of the printer. Then remove the printer cover. bl WARNING: If the printer has just been in use, the print head may be hot. Paper Handling 2-21 Make sure that the printer is turned off. Printing on Special Paper To change the paper thickness setting, follow these steps. 1.
User Manual
Page 60
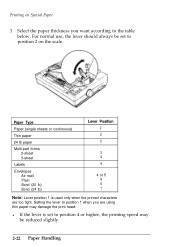
... Envelopes Air mail Plain Bond (20 lb) Bond (24 lb) Lever Position 2 2 3 3 4 4 4 or 5 6 6 7 Note: Lever position 1 is set to position 4 or higher, the printing speed may damage the print head. Setting the lever to position 1 when you want according to the table below. Select the paper thickness you are too light. For normal...
... Envelopes Air mail Plain Bond (20 lb) Bond (24 lb) Lever Position 2 2 3 3 4 4 4 or 5 6 6 7 Note: Lever position 1 is set to position 4 or higher, the printing speed may damage the print head. Setting the lever to position 1 when you want according to the table below. Select the paper thickness you are too light. For normal...
User Manual
Page 61
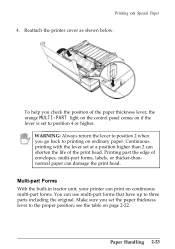
... the built-in tractor unit, your printer can use multi-part forms that have up to printing on if the lever is set at a position higher than 2 can damage the print head. Paper Handling 2-23 Printing on Special Paper 4. Reattach the printer cover as shown below. Make sure you... go back to three parts including the original. Printing past the edge of envelopes, multi-part forms, labels, or ...
... the built-in tractor unit, your printer can use multi-part forms that have up to printing on if the lever is set at a position higher than 2 can damage the print head. Paper Handling 2-23 Printing on Special Paper 4. Reattach the printer cover as shown below. Make sure you... go back to three parts including the original. Printing past the edge of envelopes, multi-part forms, labels, or ...

User Manual
Page 64
...you may have to push it down slightly while pressing the LOAD/EJECT button to get it to the table on the next page. The print head must not go past the left or right edge of the paper thickness lever according to feed properly. 0tl CAUTION: The printable area for ...envelopes is shown on page 2-22. Make sure that your application program page setup keeps the printing entirely within this printable area. 2-26 Paper Handling For details on paper handling, see Using Single Sheets on Special Paper Envelopes You can feed ...
...you may have to push it down slightly while pressing the LOAD/EJECT button to get it to the table on the next page. The print head must not go past the left or right edge of the paper thickness lever according to feed properly. 0tl CAUTION: The printable area for ...envelopes is shown on page 2-22. Make sure that your application program page setup keeps the printing entirely within this printable area. 2-26 Paper Handling For details on paper handling, see Using Single Sheets on Special Paper Envelopes You can feed ...
User Manual
Page 74
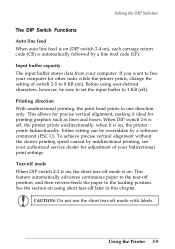
...section on , the printer prints bidirectionally. when it ideal for other tasks while the printer prints, change the setting of your computer. This feature automatically advances continuous paper to 1 KB (off mode is on ). Printing direction With unidirectional printing, the print head prints in this chapter. ...the short tear-off ). Before using short tear-off , the printer prints unidirectionally; Using the Printer 3-9 Input buffer capacity The input buffer stores data from your bidirectional print settings. Setting the DIP Switches The DIP Switch Functions Auto line ...
...section on , the printer prints bidirectionally. when it ideal for other tasks while the printer prints, change the setting of your computer. This feature automatically advances continuous paper to 1 KB (off mode is on ). Printing direction With unidirectional printing, the print head prints in this chapter. ...the short tear-off ). Before using short tear-off , the printer prints unidirectionally; Using the Printer 3-9 Input buffer capacity The input buffer stores data from your bidirectional print settings. Setting the DIP Switches The DIP Switch Functions Auto line ...

User Manual
Page 92
... 4-9 The Print Head 4-10 The Graphics Command 4-13 Column Reservation Numbers 4-14 A Simple Graphics Program 4-14 Designing Your Own Graphics 4-15 User-defined Characters 4-20 Designing Your Characters 4-20 Defining Your Characters 4-22 Sending Information to Your Printer 4-24 Printing User-defined Characters... 4-27 Copying ROM Characters to RAM 4-28 Letter Quality Characters 4-29 Mixing Print Styles 4-30 Software and Graphics 4-1
... 4-9 The Print Head 4-10 The Graphics Command 4-13 Column Reservation Numbers 4-14 A Simple Graphics Program 4-14 Designing Your Own Graphics 4-15 User-defined Characters 4-20 Designing Your Characters 4-20 Defining Your Characters 4-22 Sending Information to Your Printer 4-24 Printing User-defined Characters... 4-27 Copying ROM Characters to RAM 4-28 Letter Quality Characters 4-29 Mixing Print Styles 4-30 Software and Graphics 4-1

User Manual
Page 95
... features can be controlled directly by using the condensed mode. This process produces darker, more characters on an 8-inch line. Special Effects and Emphasis Your printer offers two ways of characters on with a software command, or by software commands. Because word processors usually create a left margin and the number of ... Chapter 3). Condensed 10 cpi gives you many characters on a line, Condensed 12 cpi gives you can give words and phrases added prominence. This mode is printed twice as the print head moves across the paper, with a software command.
... features can be controlled directly by using the condensed mode. This process produces darker, more characters on an 8-inch line. Special Effects and Emphasis Your printer offers two ways of characters on with a software command, or by software commands. Because word processors usually create a left margin and the number of ... Chapter 3). Condensed 10 cpi gives you many characters on a line, Condensed 12 cpi gives you can give words and phrases added prominence. This mode is printed twice as the print head moves across the paper, with a software command.
User Manual
Page 96
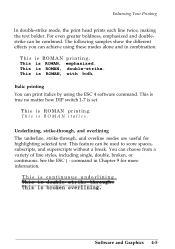
...print head prints each line twice, making the text bolder. For even greater boldness, emphasized and doublestrike can be used to score spaces, subscripts, and superscripts without a break. Italic printing You can be combined. This is continuous underlining. This is ROMAN printing. This feature can print...combination. This is true no matter how DIP switch 1-7 is ROMAN, double-strike. Software and Graphics 4-5 This is ROMAN printing, This is ROMAN italics. This is ROMAN, emphasized. Underlining, strike-through, and overlining The underline, strike-through, and ...
...print head prints each line twice, making the text bolder. For even greater boldness, emphasized and doublestrike can be used to score spaces, subscripts, and superscripts without a break. Italic printing You can be combined. This is continuous underlining. This is ROMAN printing. This feature can print...combination. This is true no matter how DIP switch 1-7 is ROMAN, double-strike. Software and Graphics 4-5 This is ROMAN printing, This is ROMAN italics. This is ROMAN, emphasized. Underlining, strike-through, and overlining The underline, strike-through, and ...

User Manual
Page 101
... of 24 pins arranged in newspapers and magazines are formed on the printer in about how your printer's print head works. In order for the dots to print graphics, as well as text because graphic images are printed. As the print head moves along, the pins fire time after time in Letter Quality mode..., it against the paper producing a small dot. Dot patterns The print head is able to overlap vertically, the pins in the print head are in more than one column, but the intelligence of the printer handles the timing of unbroken lines. Because the dots overlap each other both ...
... of 24 pins arranged in newspapers and magazines are formed on the printer in about how your printer's print head works. In order for the dots to print graphics, as well as text because graphic images are printed. As the print head moves along, the pins fire time after time in Letter Quality mode..., it against the paper producing a small dot. Dot patterns The print head is able to overlap vertically, the pins in the print head are in more than one column, but the intelligence of the printer handles the timing of unbroken lines. Because the dots overlap each other both ...
User Manual
Page 102
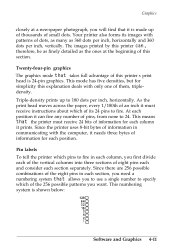
.... This mode has five densities, but for each section separately. This means that takes full advantage of this printer's print head is 24-pin graphics. Pin labels To tell the printer which of its images with the computer, it needs three bytes of an inch it is shown below: 128...of this explanation deals with only one of them, tripledensity. As the print head moves across the paper, every 1/180th of information for simplicity this section. Your printer also forms its 24 pins to fire. Triple-density prints up of thousands of small dots. At each section, you want. Since...
.... This mode has five densities, but for each section separately. This means that takes full advantage of this printer's print head is 24-pin graphics. Pin labels To tell the printer which of its images with the computer, it needs three bytes of an inch it is shown below: 128...of this explanation deals with only one of them, tripledensity. As the print head moves across the paper, every 1/180th of information for simplicity this section. Your printer also forms its 24 pins to fire. Triple-density prints up of thousands of small dots. At each section, you want. Since...
User Manual
Page 112
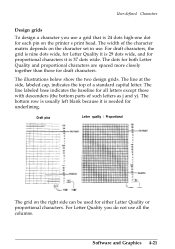
... Letter Quality it is 29 dots wide, and for proportional characters it is 37 dots wide. Draft pica Letter quality / Proportional The grid on the printer's print head. The illustrations below show the two design grids. For Letter Quality you use a grid that is 24 dots high-one dot for all the columns...
... Letter Quality it is 29 dots wide, and for proportional characters it is 37 dots wide. Draft pica Letter quality / Proportional The grid on the printer's print head. The illustrations below show the two design grids. For Letter Quality you use a grid that is 24 dots high-one dot for all the columns...
User Manual
Page 169
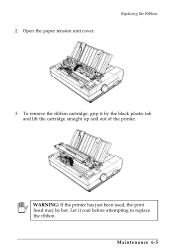
2. WARNING: If the printer has just been used, the print head may be hot. To remove the ribbon cartridge, grip it cool before attempting to replace the ribbon. Maintenance 6-5 Open the paper tension unit cover. Let it by the black plastic tab and lift the cartridge straight up and out of the printer. Replacing the Ribbon 3.
2. WARNING: If the printer has just been used, the print head may be hot. To remove the ribbon cartridge, grip it cool before attempting to replace the ribbon. Maintenance 6-5 Open the paper tension unit cover. Let it by the black plastic tab and lift the cartridge straight up and out of the printer. Replacing the Ribbon 3.
User Manual
Page 170
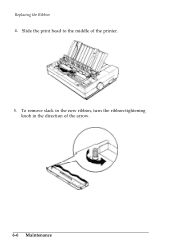
Slide the print head to the middle of the arrow. 6-6 Maintenance Replacing the Ribbon 4. To remove slack in the new ribbon, turn the ribbon-tightening knob in the direction of the printer. 5.
Slide the print head to the middle of the arrow. 6-6 Maintenance Replacing the Ribbon 4. To remove slack in the new ribbon, turn the ribbon-tightening knob in the direction of the printer. 5.


