
Product Support Bulletin(s)
Page 1
...light is flashing: Printhead is accepted 3 beeps: Paper End detected 5 beeps: Abnormal carriage movement Where the beeps or the pauses are of the beeps issued by product name. The following error codes are listed by the printers are longer, it has been noted in locating and...LQ-850, LQ-950, LQ-1050, L1000, AP-4000, AP-4500 1 beep: BEL code (.5 set beep) 1 beep: A Control Panel setting is over heated. NOTE: Most of .1 second duration with a .1 second pause between beeps. EPSON Product Support Bulletin Subject: 24 Pin Printer Error and Beep Codes Date: 4/3/91 Page(s): 1...
...light is flashing: Printhead is accepted 3 beeps: Paper End detected 5 beeps: Abnormal carriage movement Where the beeps or the pauses are of the beeps issued by product name. The following error codes are listed by the printers are longer, it has been noted in locating and...LQ-850, LQ-950, LQ-1050, L1000, AP-4000, AP-4500 1 beep: BEL code (.5 set beep) 1 beep: A Control Panel setting is over heated. NOTE: Most of .1 second duration with a .1 second pause between beeps. EPSON Product Support Bulletin Subject: 24 Pin Printer Error and Beep Codes Date: 4/3/91 Page(s): 1...
Product Support Bulletin(s)
Page 2
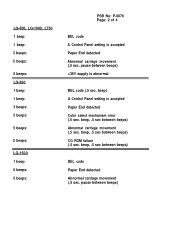
...: 5 beeps: LQ-1500 1 beep: 5 beeps: 5 beeps: PSB No: P-0076 Page: 2 of 4 BEL code A Control Panel setting is accepted Paper End detected Color select mechanism error (.5 sec. beep, .5 sec between beeps) BEL code Paper End detected Abnormal carriage movement (.5 sec. beep, .5 sec between beeps) CG ROM failure (.5 sec. beep) A Control Panel setting is...
...: 5 beeps: LQ-1500 1 beep: 5 beeps: 5 beeps: PSB No: P-0076 Page: 2 of 4 BEL code A Control Panel setting is accepted Paper End detected Color select mechanism error (.5 sec. beep, .5 sec between beeps) BEL code Paper End detected Abnormal carriage movement (.5 sec. beep, .5 sec between beeps) CG ROM failure (.5 sec. beep) A Control Panel setting is...

Product Support Bulletin(s)
Page 3
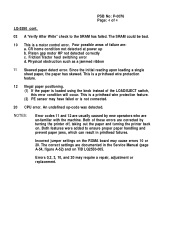
... incorrectly. 1 beep: BEL code 5 beeps: Abnormal voltage- 5 beeps: Abnormal carriage movement (.5 sec. PSB No: P-0076 Page: 3 of 4 LQ-2500 NOTE: Printers with LCD displays use error messages along with the Power-on LED lit can be caused by a bent pin on one of problems. The following... messages will help you to CGROM 03 EEROM read/write error 10 Abnormal carriage movement LQ-2550 1 beep: BEL code 3 beeps: Paper End detected 5 beeps: Abnormal carriage movement (.5 sec. Missing or damaged 7A ROM 02 Internal ROM check does not match. pause between beeps) ...
... incorrectly. 1 beep: BEL code 5 beeps: Abnormal voltage- 5 beeps: Abnormal carriage movement (.5 sec. PSB No: P-0076 Page: 3 of 4 LQ-2500 NOTE: Printers with LCD displays use error messages along with the Power-on LED lit can be caused by a bent pin on one of problems. The following... messages will help you to CGROM 03 EEROM read/write error 10 Abnormal carriage movement LQ-2550 1 beep: BEL code 3 beeps: Paper End detected 5 beeps: Abnormal carriage movement (.5 sec. Missing or damaged 7A ROM 02 Internal ROM check does not match. pause between beeps) ...
Product Support Bulletin(s)
Page 4
...knob instead of failure are documented in printhead failures. CR home condition not detected at power up b. Since the initial reading upon loading a single sheet paper, the paper has skewed. Incorrect jumper settings on . The correct settings are : a. PSB No: P-0076 Page: 4 of 4 LQ-2550 cont. 03 A...-code was detected. Both of these errors are corrected by new operators who are usually caused by turning the printer off, taking out the paper and turning the printer back on the ROMA board may require a repair, adjustment or replacement. NOTES: Error codes 11 and 12 are...
...knob instead of failure are documented in printhead failures. CR home condition not detected at power up b. Since the initial reading upon loading a single sheet paper, the paper has skewed. Incorrect jumper settings on . The correct settings are : a. PSB No: P-0076 Page: 4 of 4 LQ-2550 cont. 03 A...-code was detected. Both of these errors are corrected by new operators who are usually caused by turning the printer off, taking out the paper and turning the printer back on the ROMA board may require a repair, adjustment or replacement. NOTES: Error codes 11 and 12 are...

User Manual
Page 6
... 4 Application Notes 5 Where to Get Help 6 Chapter 1 Setting Up the Printer 1-1 Unpacking the Printer 1-2 Choosing a Place for the Printer 1-4 Assembling the Printer 1-6 Testing the Printer 1-13 Connecting the Printer to Your Computer 1-22 Setting Up Your Application Software 1-25 Chapter 2 Paper Handling 2-1 Using Single Sheets 2-2 Using Continuous Paper 2-6 Switching Between Continuous and Single Sheets 2-13 Printing on Special...
... 4 Application Notes 5 Where to Get Help 6 Chapter 1 Setting Up the Printer 1-1 Unpacking the Printer 1-2 Choosing a Place for the Printer 1-4 Assembling the Printer 1-6 Testing the Printer 1-13 Connecting the Printer to Your Computer 1-22 Setting Up Your Application Software 1-25 Chapter 2 Paper Handling 2-1 Using Single Sheets 2-2 Using Continuous Paper 2-6 Switching Between Continuous and Single Sheets 2-13 Printing on Special...

User Manual
Page 7
... Tractor 5-17 The Multi-Font Module 5-28 The Interface Boards 5-34 Chapter 6 Maintenance 6-1 Cleaning the Printer 6-2 Replacing the Ribbon 6-4 Transporting the Printer 6-10 Chapter 7 Troubleshooting 7-1 Problems and Solutions 7-2 Power Supply 7-4 Printing 7-5 Paper Handling 7-14 Options 7-24 Chapter 8 Technical Specifications Printer Specifications Interface Specifications Option Specifications Initialization 8-1 . . . . . 8-2 . . . . . 8-9 . . . . . 8-13 . . . . . 8-15 Chapter 9 Command Summary 9-1 Using the Command...
... Tractor 5-17 The Multi-Font Module 5-28 The Interface Boards 5-34 Chapter 6 Maintenance 6-1 Cleaning the Printer 6-2 Replacing the Ribbon 6-4 Transporting the Printer 6-10 Chapter 7 Troubleshooting 7-1 Problems and Solutions 7-2 Power Supply 7-4 Printing 7-5 Paper Handling 7-14 Options 7-24 Chapter 8 Technical Specifications Printer Specifications Interface Specifications Option Specifications Initialization 8-1 . . . . . 8-2 . . . . . 8-9 . . . . . 8-13 . . . . . 8-15 Chapter 9 Command Summary 9-1 Using the Command...

User Manual
Page 8
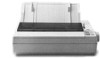
... allows you use single sheets of up to finely adjust the loading and short tearoff positions. Features In addition to expect from Epson printers, the ActionPrinter 4000 offers the following features: Easy paper handling, featuring automatic single-sheet loading. Compatibility with a wide range of operation you have come to the high-quality printing and ease...
... allows you use single sheets of up to finely adjust the loading and short tearoff positions. Features In addition to expect from Epson printers, the ActionPrinter 4000 offers the following features: Easy paper handling, featuring automatic single-sheet loading. Compatibility with a wide range of operation you have come to the high-quality printing and ease...

User Manual
Page 9
... to handle a wide range of standard bond paper can be automatically fed into the printer without reloading. 2 Introduction For detailed information on installing and using these options, see Chapter 5. Up to 150 sheets of paper types, including envelopes and labels. l The ability... to handle single-sheet paper more easily and more efficiently. Options A variety of printer options is available for use with your printer. Introduction l Fourteen international character sets, a legal...
... to handle a wide range of standard bond paper can be automatically fed into the printer without reloading. 2 Introduction For detailed information on installing and using these options, see Chapter 5. Up to 150 sheets of paper types, including envelopes and labels. l The ability... to handle single-sheet paper more easily and more efficiently. Options A variety of printer options is available for use with your printer. Introduction l Fourteen international character sets, a legal...

User Manual
Page 10
Introduction 3 Film Ribbon Cartridge (#7768) The optional film ribbon cartridge provides you with continuous multi-part forms. Multi-Font Module (#7407) The optional Multi-Font module adds to the number of continuous paper handling. Introduction Pull Tractor Unit (C800061) This option improves the performance of fonts available in the Letter Quality mode. It is especially useful with even higher quality printing than the standard fabric ribbon.
Introduction 3 Film Ribbon Cartridge (#7768) The optional film ribbon cartridge provides you with continuous multi-part forms. Multi-Font Module (#7407) The optional Multi-Font module adds to the number of continuous paper handling. Introduction Pull Tractor Unit (C800061) This option improves the performance of fonts available in the Letter Quality mode. It is especially useful with even higher quality printing than the standard fabric ribbon.

User Manual
Page 11
...the back flap of this manual are illustrations of the printer in parallel interface. l Chapters 2 and 3 cover paper handling and general printer operation. Guidelines for the dayto-day operation of your Epson printer. Finding your way around l Chapter 1 contains information on... unpacking, setting up and operating your printer. 4 Introduction This important information is necessary...
...the back flap of this manual are illustrations of the printer in parallel interface. l Chapters 2 and 3 cover paper handling and general printer operation. Guidelines for the dayto-day operation of your Epson printer. Finding your way around l Chapter 1 contains information on... unpacking, setting up and operating your printer. 4 Introduction This important information is necessary...
User Manual
Page 14
Chapter 1 Setting Up the Printer Unpacking the Printer 1-2 Checking the Parts 1-2 Choosing a Place for the Printer 1-4 Assembling the Printer 1-6 Installing the Platen Knob 1-6 Installing the Ribbon Cartridge 1-7 Attaching the Paper Guide 1-10 Testing the Printer 1-13 Plugging in the Printer 1-13 Running the Self Test 1-14 Checking the Operation 1-21 Connecting the Printer to Your Computer 1-22 The Parallel Interface 1-22 Setting Up Your Application Software 1-25 Choosing From a Menu 1-25 Setting Up the Printer 1-1
Chapter 1 Setting Up the Printer Unpacking the Printer 1-2 Checking the Parts 1-2 Choosing a Place for the Printer 1-4 Assembling the Printer 1-6 Installing the Platen Knob 1-6 Installing the Ribbon Cartridge 1-7 Attaching the Paper Guide 1-10 Testing the Printer 1-13 Plugging in the Printer 1-13 Running the Self Test 1-14 Checking the Operation 1-21 Connecting the Printer to Your Computer 1-22 The Parallel Interface 1-22 Setting Up Your Application Software 1-25 Choosing From a Menu 1-25 Setting Up the Printer 1-1

User Manual
Page 18
... the stand supports is enough clearance to keep the paper from horizontal. l Position your printer must be able to the printer stand. Setting Up the Printer 1-5 l Never use a stand that they do not interfere with paper feeding. l With a cut sheet feeder, your printer's cables so that supports the printer at least twice the weight of the stand...
... the stand supports is enough clearance to keep the paper from horizontal. l Position your printer must be able to the printer stand. Setting Up the Printer 1-5 l Never use a stand that they do not interfere with paper feeding. l With a cut sheet feeder, your printer's cables so that supports the printer at least twice the weight of the stand...

User Manual
Page 19
The platen knob is to feed the paper manually in the printer's white foam packing material. 1. Installing the Platen Knob The platen knob is used to install the platen knob. Remove the printer cover. 2. Insert the knob into the hole on the best place to set up your printer, the next step is packed in an indentation in the event of a paper jam or other paper feeding problem. Assembling the Printer After you've decided on the printer's side and rotate it slowly until it slips onto the shaft. 1-6 Setting Up the Printer
The platen knob is to feed the paper manually in the printer's white foam packing material. 1. Installing the Platen Knob The platen knob is used to install the platen knob. Remove the printer cover. 2. Insert the knob into the hole on the best place to set up your printer, the next step is packed in an indentation in the event of a paper jam or other paper feeding problem. Assembling the Printer After you've decided on the printer's side and rotate it slowly until it slips onto the shaft. 1-6 Setting Up the Printer
User Manual
Page 20
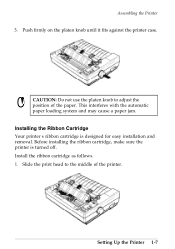
Installing the Ribbon Cartridge Your printer's ribbon cartridge is turned off. Install the ribbon cartridge as follows. 1. This interferes with the automatic paper loading system and may cause a paper jam. Setting Up the Printer 1-7 CAUTION: Do not use the platen knob to the middle of the paper. Before installing the ribbon cartridge, make sure the printer is designed for easy installation and removal. Slide the print head to adjust the position of the printer. Assembling the Printer 3. Push firmly on the platen knob until it fits against the printer case. 0t.
Installing the Ribbon Cartridge Your printer's ribbon cartridge is turned off. Install the ribbon cartridge as follows. 1. This interferes with the automatic paper loading system and may cause a paper jam. Setting Up the Printer 1-7 CAUTION: Do not use the platen knob to the middle of the paper. Before installing the ribbon cartridge, make sure the printer is designed for easy installation and removal. Slide the print head to adjust the position of the printer. Assembling the Printer 3. Push firmly on the platen knob until it fits against the printer case. 0t.
User Manual
Page 21
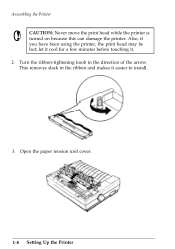
Turn the ribbon-tightening knob in the ribbon and makes it . 2. Open the paper tension unit cover. 1-8 Setting Up the Printer This removes slack in the direction of the arrow. Assembling the Printer 0t0 CAUTION: Never move the print head while the printer is turned on because this can damage the printer. Also, if you have been using the printer, the print head may be hot; let it cool for a few minutes before touching it easier to install. 3.
Turn the ribbon-tightening knob in the ribbon and makes it . 2. Open the paper tension unit cover. 1-8 Setting Up the Printer This removes slack in the direction of the arrow. Assembling the Printer 0t0 CAUTION: Never move the print head while the printer is turned on because this can damage the printer. Also, if you have been using the printer, the print head may be hot; let it cool for a few minutes before touching it easier to install. 3.

User Manual
Page 23
Slide the print head from side to side to feed the paper smoothly and efficiently into the printer. Close the paper tension unit cover. Also check that the ribbon is not twisted or creased. 7. Attach the paper guide using the following procedure. 1-10 Setting Up the Printer Assembling the Printer 6. Attaching the Paper Guide When you use single sheets, the paper guide helps to make sure it moves smoothly.
Slide the print head from side to side to feed the paper smoothly and efficiently into the printer. Close the paper tension unit cover. Also check that the ribbon is not twisted or creased. 7. Attach the paper guide using the following procedure. 1-10 Setting Up the Printer Assembling the Printer 6. Attaching the Paper Guide When you use single sheets, the paper guide helps to make sure it moves smoothly.

User Manual
Page 24
Assembling the Printer 1. then gently lower it locks into place. Setting Up the Printer 1-11 Place the paper guide on the printer as shown below. 2. Raise the paper guide until it down onto the printer. Note: To lower the paper guide, lift up slightly to release it from its locked position;
Assembling the Printer 1. then gently lower it locks into place. Setting Up the Printer 1-11 Place the paper guide on the printer as shown below. 2. Raise the paper guide until it down onto the printer. Note: To lower the paper guide, lift up slightly to release it from its locked position;

User Manual
Page 26
Make sure that the printer is correctly installed. Setting Up the Printer 1-13 Before running the self test, you connect it to a computer. Testing the Printer Now that your printer was not damaged during shipping and that the ribbon is turned off. Plugging in self test function to see that the printer is working correctly before you need to connect the printer to make sure that your printer is fully assembled, you can use its built-in the Printer 1. You should perform this test to an electrical outlet and load a sheet of paper.
Make sure that the printer is correctly installed. Setting Up the Printer 1-13 Before running the self test, you connect it to a computer. Testing the Printer Now that your printer was not damaged during shipping and that the ribbon is turned off. Plugging in self test function to see that the printer is working correctly before you need to connect the printer to make sure that your printer is fully assembled, you can use its built-in the Printer 1. You should perform this test to an electrical outlet and load a sheet of paper.

User Manual
Page 27
Push the paper release lever back to the single-sheet position. 1-14 Setting Up the Printer Plug the power cable into a properly grounded electrical outlet. Make sure the printer is easier. 1. Testing the Printer 2. Running the Self Test The self test can be run with continuous paper, use single-sheet paper now because single-sheet loading is turned off. 2. Although the self test can be run in the draft or Letter Quality mode, depending on which button you hold down as you turn on the printer.
Push the paper release lever back to the single-sheet position. 1-14 Setting Up the Printer Plug the power cable into a properly grounded electrical outlet. Make sure the printer is easier. 1. Testing the Printer 2. Running the Self Test The self test can be run with continuous paper, use single-sheet paper now because single-sheet loading is turned off. 2. Although the self test can be run in the draft or Letter Quality mode, depending on which button you hold down as you turn on the printer.
User Manual
Page 28
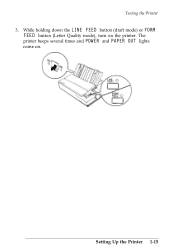
Setting Up the Printer 1-15 Testing the Printer 3. While holding down the LINE FEED button (draft mode) or FORM FEED button (Letter Quality mode), turn on . The printer beeps several times and POWER and PAPER OUT lights come on the printer.
Setting Up the Printer 1-15 Testing the Printer 3. While holding down the LINE FEED button (draft mode) or FORM FEED button (Letter Quality mode), turn on . The printer beeps several times and POWER and PAPER OUT lights come on the printer.
