
Product Support Bulletin(s)
Page 1
... printhead cools down. LQ-500, LQ-510, LQ-1010, LQ-850, LQ-950, LQ-1050, L1000, AP-4000, AP-4500 1 beep: BEL code (.5 set beep) 1 beep: A Control Panel setting is over heated. EPSON AMERICA, INC. Those beeps can assist you in the text. NOTE: Most of .1 second duration with a .1... second pause between beeps. EPSON Product Support Bulletin Subject: 24 Pin Printer Error and Beep Codes Date: 4/3/91 Page(s): 1 of three beeps. Where the beeps or the pauses are longer, it has been noted...
... printhead cools down. LQ-500, LQ-510, LQ-1010, LQ-850, LQ-950, LQ-1050, L1000, AP-4000, AP-4500 1 beep: BEL code (.5 set beep) 1 beep: A Control Panel setting is over heated. EPSON AMERICA, INC. Those beeps can assist you in the text. NOTE: Most of .1 second duration with a .1... second pause between beeps. EPSON Product Support Bulletin Subject: 24 Pin Printer Error and Beep Codes Date: 4/3/91 Page(s): 1 of three beeps. Where the beeps or the pauses are longer, it has been noted...

Product Support Bulletin(s)
Page 3
... beeps) 5 beeps: Case open LQ-2550 LCD Codes: 00 (1) (2) The font could not find the target font. The printer's internal program could not be found. PSB No: P-0076 Page: 3 of 4 LQ-2500 NOTE: Printers with LCD displays use error messages along with the Power-on LED lit can be set incorrectly. 1 beep...
... beeps) 5 beeps: Case open LQ-2550 LCD Codes: 00 (1) (2) The font could not find the target font. The printer's internal program could not be found. PSB No: P-0076 Page: 3 of 4 LQ-2500 NOTE: Printers with LCD displays use error messages along with the Power-on LED lit can be set incorrectly. 1 beep...
Product Support Bulletin(s)
Page 4
... Illegal paper positioning. (1) If the paper is not connected. 20 CPU error. Both of failure are usually caused by turning the printer off, taking out the paper and turning the printer back on the ROMA board may cause errors 10 or 20. Errors 0,2, 3, 10, and 20 may have failed or is loaded...
... Illegal paper positioning. (1) If the paper is not connected. 20 CPU error. Both of failure are usually caused by turning the printer off, taking out the paper and turning the printer back on the ROMA board may cause errors 10 or 20. Errors 0,2, 3, 10, and 20 may have failed or is loaded...

User Manual
Page 3
This equipment generates, uses, and can be determined by the FCC for this printer will not occur in any form or by Epson America, Inc. Seiko Epson Corporation shall not be reproduced, stored in a retrieval system, or transmitted, in a particular installation. Neither...measures: . WARNING The connection of a non-shielded printer interface cable to which can radiate radio frequency energy and, if not installed and used in a residential installation. No patent liability is connected. . ActionPrinter is a trademark of Epson America, Inc. However, there is a registered ...
This equipment generates, uses, and can be determined by the FCC for this printer will not occur in any form or by Epson America, Inc. Seiko Epson Corporation shall not be reproduced, stored in a retrieval system, or transmitted, in a particular installation. Neither...measures: . WARNING The connection of a non-shielded printer interface cable to which can radiate radio frequency energy and, if not installed and used in a residential installation. No patent liability is connected. . ActionPrinter is a trademark of Epson America, Inc. However, there is a registered ...

User Manual
Page 6
...Manual 4 Application Notes 5 Where to Get Help 6 Chapter 1 Setting Up the Printer 1-1 Unpacking the Printer 1-2 Choosing a Place for the Printer 1-4 Assembling the Printer 1-6 Testing the Printer 1-13 Connecting the Printer to Your Computer 1-22 Setting Up Your Application Software 1-25 Chapter 2 Paper Handling ...Using Continuous Paper 2-6 Switching Between Continuous and Single Sheets 2-13 Printing on Special Paper 2-20 Chapter 3 Using the Printer 3-1 Operating the Control Panel 3-2 Setting the DIP Switches 3-6 Page Length 3-10 Skip Over Perforation 3-11 Adjusting the ...
...Manual 4 Application Notes 5 Where to Get Help 6 Chapter 1 Setting Up the Printer 1-1 Unpacking the Printer 1-2 Choosing a Place for the Printer 1-4 Assembling the Printer 1-6 Testing the Printer 1-13 Connecting the Printer to Your Computer 1-22 Setting Up Your Application Software 1-25 Chapter 2 Paper Handling ...Using Continuous Paper 2-6 Switching Between Continuous and Single Sheets 2-13 Printing on Special Paper 2-20 Chapter 3 Using the Printer 3-1 Operating the Control Panel 3-2 Setting the DIP Switches 3-6 Page Length 3-10 Skip Over Perforation 3-11 Adjusting the ...

User Manual
Page 7
... 5-17 The Multi-Font Module 5-28 The Interface Boards 5-34 Chapter 6 Maintenance 6-1 Cleaning the Printer 6-2 Replacing the Ribbon 6-4 Transporting the Printer 6-10 Chapter 7 Troubleshooting 7-1 Problems and Solutions 7-2 Power Supply 7-4 Printing 7-5 Paper Handling 7-14 Options 7-24 Chapter 8 Technical Specifications Printer Specifications Interface Specifications Option Specifications Initialization 8-1 . . . . . 8-2 . . . . . 8-9 . . . . . 8-13 . . . . . 8-15 Chapter 9 Command Summary 9-1 Using the Command...
... 5-17 The Multi-Font Module 5-28 The Interface Boards 5-34 Chapter 6 Maintenance 6-1 Cleaning the Printer 6-2 Replacing the Ribbon 6-4 Transporting the Printer 6-10 Chapter 7 Troubleshooting 7-1 Problems and Solutions 7-2 Power Supply 7-4 Printing 7-5 Paper Handling 7-14 Options 7-24 Chapter 8 Technical Specifications Printer Specifications Interface Specifications Option Specifications Initialization 8-1 . . . . . 8-2 . . . . . 8-9 . . . . . 8-13 . . . . . 8-15 Chapter 9 Command Summary 9-1 Using the Command...

User Manual
Page 8
... feature that allows you have come to 180 characters per inch graphics mode. Introduction The Epson® ActionPrinter™ 4000 is an advanced 24-pin dot matrix printer combining compact design and high performance with the Epson ESC/P® commands used by the LQ-510, LQ-500, LQ-800, LQ-850...™ paper handling system that allows direct selection of character fonts, as well as a choice of up to expect from Epson printers, the ActionPrinter 4000 offers the following features: Easy paper handling, featuring automatic single-sheet loading. A 360 x 360 dot per second.
... feature that allows you have come to 180 characters per inch graphics mode. Introduction The Epson® ActionPrinter™ 4000 is an advanced 24-pin dot matrix printer combining compact design and high performance with the Epson ESC/P® commands used by the LQ-510, LQ-500, LQ-800, LQ-850...™ paper handling system that allows direct selection of character fonts, as well as a choice of up to expect from Epson printers, the ActionPrinter 4000 offers the following features: Easy paper handling, featuring automatic single-sheet loading. A 360 x 360 dot per second.

User Manual
Page 9
... l Fourteen international character sets, a legal symbol set, an italic character table, and the Epson Extended Graphics character table. Options A variety of standard bond paper can be automatically fed into the printer without reloading. 2 Introduction l Single-bin Cut Sheet Feeder (C806121) The cut sheet feeder ...it possible to handle a wide range of paper types, including envelopes and labels. Up to 150 sheets of printer options is available for use with your printer. For detailed information on installing and using these options, see Chapter 5. l The ability to handle single-...
... l Fourteen international character sets, a legal symbol set, an italic character table, and the Epson Extended Graphics character table. Options A variety of standard bond paper can be automatically fed into the printer without reloading. 2 Introduction l Single-bin Cut Sheet Feeder (C806121) The cut sheet feeder ...it possible to handle a wide range of paper types, including envelopes and labels. Up to 150 sheets of printer options is available for use with your printer. For detailed information on installing and using these options, see Chapter 5. l The ability to handle single-...

User Manual
Page 11
Guidelines for the dayto-day operation of your Epson printer. Be sure to supplement the printer's built-in parallel interface. About This Manual This user's manual provides fully illustrated, step-by-step instructions on unpacking, setting up and operating your printer. 4 Introduction Finding your way around l Chapter ... manual are available to read and follow these instructions first. l Chapters 2 and 3 cover paper handling and general printer operation. This important information is necessary for choosing the right interface and instructions on installing the boards are given in ...
Guidelines for the dayto-day operation of your Epson printer. Be sure to supplement the printer's built-in parallel interface. About This Manual This user's manual provides fully illustrated, step-by-step instructions on unpacking, setting up and operating your printer. 4 Introduction Finding your way around l Chapter ... manual are available to read and follow these instructions first. l Chapters 2 and 3 cover paper handling and general printer operation. This important information is necessary for choosing the right interface and instructions on installing the boards are given in ...

User Manual
Page 12
...and creating your own user-defined characters. It includes advice on printer options, general maintenance, and specifications. If the printer does not operate properly or the printed results are most from your printer operates correctly. Application Notes Also included in this manual is ...contain important information and useful tips on using specific software applications with your printer is a handy Quick Reference card that 0 your printer. It contains information on the operation of your printer. Introduction 5 Be sure to get the most likely to ensure that ...
...and creating your own user-defined characters. It includes advice on printer options, general maintenance, and specifications. If the printer does not operate properly or the printed results are most from your printer operates correctly. Application Notes Also included in this manual is ...contain important information and useful tips on using specific software applications with your printer is a handy Quick Reference card that 0 your printer. It contains information on the operation of your printer. Introduction 5 Be sure to get the most likely to ensure that ...
User Manual
Page 14
Chapter 1 Setting Up the Printer Unpacking the Printer 1-2 Checking the Parts 1-2 Choosing a Place for the Printer 1-4 Assembling the Printer 1-6 Installing the Platen Knob 1-6 Installing the Ribbon Cartridge 1-7 Attaching the Paper Guide 1-10 Testing the Printer 1-13 Plugging in the Printer 1-13 Running the Self Test 1-14 Checking the Operation 1-21 Connecting the Printer to Your Computer 1-22 The Parallel Interface 1-22 Setting Up Your Application Software 1-25 Choosing From a Menu 1-25 Setting Up the Printer 1-1
Chapter 1 Setting Up the Printer Unpacking the Printer 1-2 Checking the Parts 1-2 Choosing a Place for the Printer 1-4 Assembling the Printer 1-6 Installing the Platen Knob 1-6 Installing the Ribbon Cartridge 1-7 Attaching the Paper Guide 1-10 Testing the Printer 1-13 Plugging in the Printer 1-13 Running the Self Test 1-14 Checking the Operation 1-21 Connecting the Printer to Your Computer 1-22 The Parallel Interface 1-22 Setting Up Your Application Software 1-25 Choosing From a Menu 1-25 Setting Up the Printer 1-1

User Manual
Page 15
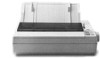
Unpacking the Printer Checking the Parts When you unpack the printer, make sure that you have all the parts shown below and that none have been damaged. Printer Ribbon cartridge 1-2 Setting Up the Printer Platen knob
Unpacking the Printer Checking the Parts When you unpack the printer, make sure that you have all the parts shown below and that none have been damaged. Printer Ribbon cartridge 1-2 Setting Up the Printer Platen knob

User Manual
Page 16
Setting Up the Printer 1-3 After removing the parts, save the packaging materials in case you ever need to lift the printer cover and remove the pieces of white packing material. Note: Be sure to transport your printer.
Setting Up the Printer 1-3 After removing the parts, save the packaging materials in case you ever need to lift the printer cover and remove the pieces of white packing material. Note: Be sure to transport your printer.
User Manual
Page 17
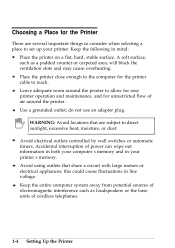
.... ,.nr-ln WARNING: Avoid locations that share a circuit with large motors or electrical appliances; this could cause fluctuations in mind: Place the printer on a flat, hard, stable surface. I I sunlight, excessive heat, moisture, or dust. Keep the entire computer system away from potential... counter or carpeted area, will block the ventilation slots and may cause overheating. Accidental interruption of cordless telephones. 1-4 Setting Up the Printer Use a grounded outlet; A soft surface, such as loudspeakers or the base units of power can wipe out information in both your...
.... ,.nr-ln WARNING: Avoid locations that share a circuit with large motors or electrical appliances; this could cause fluctuations in mind: Place the printer on a flat, hard, stable surface. I I sunlight, excessive heat, moisture, or dust. Keep the entire computer system away from potential... counter or carpeted area, will block the ventilation slots and may cause overheating. Accidental interruption of cordless telephones. 1-4 Setting Up the Printer Use a grounded outlet; A soft surface, such as loudspeakers or the base units of power can wipe out information in both your...

User Manual
Page 18
...should be kept level. l With a cut sheet feeder, your printer's cables so that supports the printer at least twice the weight of the stand. If possible, secure the cables to the printer stand. l Position your printer must be able to support at an angle of more than 15... sure there is wide enough for the paper you are using a printer stand, read these requirements and suggestions. Note: Before using . Setting Up the Printer 1-5 Choosing a Place for the Printer The illustration below the printer stand, make sure the distance between the stand supports is enough clearance...
...should be kept level. l With a cut sheet feeder, your printer's cables so that supports the printer at least twice the weight of the stand. If possible, secure the cables to the printer stand. l Position your printer must be able to support at an angle of more than 15... sure there is wide enough for the paper you are using a printer stand, read these requirements and suggestions. Note: Before using . Setting Up the Printer 1-5 Choosing a Place for the Printer The illustration below the printer stand, make sure the distance between the stand supports is enough clearance...

User Manual
Page 19
Remove the printer cover. 2. The platen knob is used to install the platen knob. Assembling the Printer After you've decided on the printer's side and rotate it slowly until it slips onto the shaft. 1-6 Setting Up the Printer Installing the Platen Knob The platen knob is packed in an indentation in the event of a paper jam or other paper feeding problem. Insert the knob into the hole on the best place to set up your printer, the next step is to feed the paper manually in the printer's white foam packing material. 1.
Remove the printer cover. 2. The platen knob is used to install the platen knob. Assembling the Printer After you've decided on the printer's side and rotate it slowly until it slips onto the shaft. 1-6 Setting Up the Printer Installing the Platen Knob The platen knob is packed in an indentation in the event of a paper jam or other paper feeding problem. Insert the knob into the hole on the best place to set up your printer, the next step is to feed the paper manually in the printer's white foam packing material. 1.
User Manual
Page 20
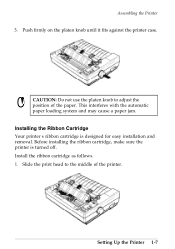
Setting Up the Printer 1-7 Assembling the Printer 3. Before installing the ribbon cartridge, make sure the printer is designed for easy installation and removal. Installing the Ribbon Cartridge Your printer's ribbon cartridge is turned off. Slide the print head to adjust the position of the printer. This interferes with the automatic paper loading system and may cause a paper jam. Install the ribbon cartridge as follows. 1. Push firmly on the platen knob until it fits against the printer case. 0t. CAUTION: Do not use the platen knob to the middle of the paper.
Setting Up the Printer 1-7 Assembling the Printer 3. Before installing the ribbon cartridge, make sure the printer is designed for easy installation and removal. Installing the Ribbon Cartridge Your printer's ribbon cartridge is turned off. Slide the print head to adjust the position of the printer. This interferes with the automatic paper loading system and may cause a paper jam. Install the ribbon cartridge as follows. 1. Push firmly on the platen knob until it fits against the printer case. 0t. CAUTION: Do not use the platen knob to the middle of the paper.
User Manual
Page 21
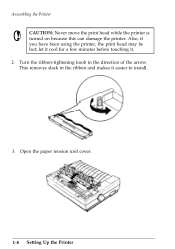
let it cool for a few minutes before touching it easier to install. 3. Turn the ribbon-tightening knob in the ribbon and makes it . 2. This removes slack in the direction of the arrow. Open the paper tension unit cover. 1-8 Setting Up the Printer Assembling the Printer 0t0 CAUTION: Never move the print head while the printer is turned on because this can damage the printer. Also, if you have been using the printer, the print head may be hot;
let it cool for a few minutes before touching it easier to install. 3. Turn the ribbon-tightening knob in the ribbon and makes it . 2. This removes slack in the direction of the arrow. Open the paper tension unit cover. 1-8 Setting Up the Printer Assembling the Printer 0t0 CAUTION: Never move the print head while the printer is turned on because this can damage the printer. Also, if you have been using the printer, the print head may be hot;

User Manual
Page 22
Assembling the Printer 4. Setting Up the Printer 1-9 Use a pointed object, such as a ball point pen, to guide the ribbon between the print head and ribbon guide while you turn the ribbon-tightening knob to make sure the plastic hooks are properly seated. 5. Note: Press lightly on both ends of the cartridge to help feed the ribbon into the slots. Hold the ribbon cartridge by its handle and push it firmly down into position, making sure the plastic hooks fit into place.
Assembling the Printer 4. Setting Up the Printer 1-9 Use a pointed object, such as a ball point pen, to guide the ribbon between the print head and ribbon guide while you turn the ribbon-tightening knob to make sure the plastic hooks are properly seated. 5. Note: Press lightly on both ends of the cartridge to help feed the ribbon into the slots. Hold the ribbon cartridge by its handle and push it firmly down into position, making sure the plastic hooks fit into place.

User Manual
Page 23
Slide the print head from side to side to feed the paper smoothly and efficiently into the printer. Assembling the Printer 6. Attaching the Paper Guide When you use single sheets, the paper guide helps to make sure it moves smoothly. Also check that the ribbon is not twisted or creased. 7. Close the paper tension unit cover. Attach the paper guide using the following procedure. 1-10 Setting Up the Printer
Slide the print head from side to side to feed the paper smoothly and efficiently into the printer. Assembling the Printer 6. Attaching the Paper Guide When you use single sheets, the paper guide helps to make sure it moves smoothly. Also check that the ribbon is not twisted or creased. 7. Close the paper tension unit cover. Attach the paper guide using the following procedure. 1-10 Setting Up the Printer


