
Product Support Bulletin(s)
Page 3
...be found. PSB No: P-0076 Page: 3 of 4 LQ-2500 NOTE: Printers with LCD displays use error messages along with beeps to inform the user of the PROMS or jumper J1 may have been mixed. The versions may be set incorrectly. 1 beep: BEL code 5 beeps: Abnormal voltage- 5 ...check does not match. pause between beeps) LQ-2500 LCD Codes: 00 Invalid ID request to troubleshoot problems. A blank LCD screen with the Power-on one of problems. The following messages will help you to CGROM 03 EEROM read/write error 10 Abnormal carriage movement LQ-2550 1 beep: BEL code 3 beeps: Paper...
...be found. PSB No: P-0076 Page: 3 of 4 LQ-2500 NOTE: Printers with LCD displays use error messages along with beeps to inform the user of the PROMS or jumper J1 may have been mixed. The versions may be set incorrectly. 1 beep: BEL code 5 beeps: Abnormal voltage- 5 ...check does not match. pause between beeps) LQ-2500 LCD Codes: 00 Invalid ID request to troubleshoot problems. A blank LCD screen with the Power-on one of problems. The following messages will help you to CGROM 03 EEROM read/write error 10 Abnormal carriage movement LQ-2550 1 beep: BEL code 3 beeps: Paper...
Product Support Bulletin(s)
Page 4
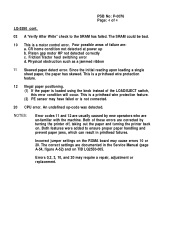
... the Service Manual (page A-54, figure A-52) and on TIB LQ2550-005. Friction/Tractor feed switching error d. Physical obstruction such as a jammed ribbon 11 Skewed paper detect error. CR home condition not detected at power up b. This is a printhead wire protection feature. 12 Illegal paper positioning. (1) If the paper is not connected. 20 CPU error. Incorrect jumper settings on . The correct settings are usually caused by turning the printer...
... the Service Manual (page A-54, figure A-52) and on TIB LQ2550-005. Friction/Tractor feed switching error d. Physical obstruction such as a jammed ribbon 11 Skewed paper detect error. CR home condition not detected at power up b. This is a printhead wire protection feature. 12 Illegal paper positioning. (1) If the paper is not connected. 20 CPU error. Incorrect jumper settings on . The correct settings are usually caused by turning the printer...

User Manual
Page 8
... of operation you use single sheets of normal or condensed printing. Features In addition to expect from Epson printers, the ActionPrinter 4000 offers the following features: Easy paper handling, featuring automatic single-sheet loading. A micro-adjustment feature that allows direct selection of character fonts, as well as a choice of paper without removing the continuous paper, eliminates paper waste with short tear-off, and allows easy and accurate paper alignment.
... of operation you use single sheets of normal or condensed printing. Features In addition to expect from Epson printers, the ActionPrinter 4000 offers the following features: Easy paper handling, featuring automatic single-sheet loading. A micro-adjustment feature that allows direct selection of character fonts, as well as a choice of paper without removing the continuous paper, eliminates paper waste with short tear-off, and allows easy and accurate paper alignment.
User Manual
Page 34
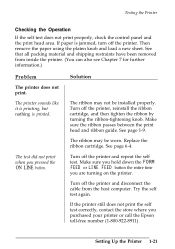
... the Epson toll-free number (1-800-922-8911). If the printer still does not print the self test correctly, contact the store where you pressed the ON LINE button. Turn off the printer and repeat the self test. Then remove the paper using the platen knob and load a new sheet. Make sure you hold down the FORM FEED or LINE FEED button the entire time you are turning on the printer. Setting Up the Printer 1-21 See page 6-4. Turn...
... the Epson toll-free number (1-800-922-8911). If the printer still does not print the self test correctly, contact the store where you pressed the ON LINE button. Turn off the printer and repeat the self test. Then remove the paper using the platen knob and load a new sheet. Make sure you hold down the FORM FEED or LINE FEED button the entire time you are turning on the printer. Setting Up the Printer 1-21 See page 6-4. Turn...

User Manual
Page 58
... page 2-26. WARNING: When printing on multi-part forms, labels, or envelopes, make sure that can also print on special types of paper, you should not print any closer than one-half inch from either side of paper types, including multi-part forms, labels, and envelopes. Before printing on a wide variety of the paper. Printing on Special Paper In addition to printing on single sheets and continuous paper, your application program settings keep...
... page 2-26. WARNING: When printing on multi-part forms, labels, or envelopes, make sure that can also print on special types of paper, you should not print any closer than one-half inch from either side of paper types, including multi-part forms, labels, and envelopes. Before printing on a wide variety of the paper. Printing on Special Paper In addition to printing on single sheets and continuous paper, your application program settings keep...

User Manual
Page 64
... for envelopes is shown on Special Paper Envelopes You can feed envelopes individually using the single-sheet loading feature. Before loading envelopes, adjust the position of the envelope or other thick paper. When manually feeding an envelope, you may have to push it down slightly while pressing the LOAD/EJECT button to get it to the table on page 2-2. Printing on the next page. Make sure that your application program page setup keeps the printing entirely...
... for envelopes is shown on Special Paper Envelopes You can feed envelopes individually using the single-sheet loading feature. Before loading envelopes, adjust the position of the envelope or other thick paper. When manually feeding an envelope, you may have to push it down slightly while pressing the LOAD/EJECT button to get it to the table on page 2-2. Printing on the next page. Make sure that your application program page setup keeps the printing entirely...

User Manual
Page 92
... Spacing 4-2 Character Size 4-3 Special Effects and Emphasis 4-4 Selecting Typestyles With Master Select 4-6 Graphics 4-9 The Print Head 4-10 The Graphics Command 4-13 Column Reservation Numbers 4-14 A Simple Graphics Program 4-14 Designing Your Own Graphics 4-15 User-defined Characters 4-20 Designing Your Characters 4-20 Defining Your Characters 4-22 Sending Information to Your Printer 4-24 Printing User-defined Characters 4-27 Copying ROM Characters...
... Spacing 4-2 Character Size 4-3 Special Effects and Emphasis 4-4 Selecting Typestyles With Master Select 4-6 Graphics 4-9 The Print Head 4-10 The Graphics Command 4-13 Column Reservation Numbers 4-14 A Simple Graphics Program 4-14 Designing Your Own Graphics 4-15 User-defined Characters 4-20 Designing Your Characters 4-20 Defining Your Characters 4-22 Sending Information to Your Printer 4-24 Printing User-defined Characters 4-27 Copying ROM Characters...

User Manual
Page 121
...: Draft pica Letter Quality and Proportional Mixing Print Styles Each of your printer's various print styles. Only one type of character definition may be stored in combination with user-defined characters. For instance, emphasized mode works with most of the three user-defined character modes (draft, Letter Quality, and proportional) can be used in RAM at any time. 4-30 Software and Graphics
...: Draft pica Letter Quality and Proportional Mixing Print Styles Each of your printer's various print styles. Only one type of character definition may be stored in combination with user-defined characters. For instance, emphasized mode works with most of the three user-defined character modes (draft, Letter Quality, and proportional) can be used in RAM at any time. 4-30 Software and Graphics

User Manual
Page 138
Be sure to turn off (to store the removed cut sheet feeder in its original box and packing materials. 5-16 Using the Printer Options Removal of the printer cover with the clear plastic part that was on it originally. Set DIP switch 1-8 to off the cut sheet feeder is now completed. Replace the clear plastic part of the cut sheet feeder mode). 4. The Cut Sheet Feeder 3.
Be sure to turn off (to store the removed cut sheet feeder in its original box and packing materials. 5-16 Using the Printer Options Removal of the printer cover with the clear plastic part that was on it originally. Set DIP switch 1-8 to off the cut sheet feeder is now completed. Replace the clear plastic part of the cut sheet feeder mode). 4. The Cut Sheet Feeder 3.

User Manual
Page 176
Power supply l Power is faint or uneven. l Switching between single sheets and continuous paper cannot be performed properly. Problems and Solutions This chapter discusses problems you are having difficulty achieving the desired printing result, first locate the problem in the printed characters or graphics. See 7-4 Printing l The printer does not print. l Printed characters are missing in the table below and then see the appropriate page for the...
Power supply l Power is faint or uneven. l Switching between single sheets and continuous paper cannot be performed properly. Problems and Solutions This chapter discusses problems you are having difficulty achieving the desired printing result, first locate the problem in the printed characters or graphics. See 7-4 Printing l The printer does not print. l Printed characters are missing in the table below and then see the appropriate page for the...

User Manual
Page 179
... be using the wire retaining clips. Press the ON LINE button. The paper may not be set too far to the left. The printer may not be loose. See Chapter 2. Printing Problem The printer does not print. The ON LINE light is printed. Check the printer settings and make the necessary changes. Load more paper into the printer. Troubleshooting 7-5 Solution The software may be off line and cannot receive data. Check both ends of paper. Make sure your printer...
... be using the wire retaining clips. Press the ON LINE button. The paper may not be set too far to the left. The printer may not be loose. See Chapter 2. Printing Problem The printer does not print. The ON LINE light is printed. Check the printer settings and make the necessary changes. Load more paper into the printer. Troubleshooting 7-5 Solution The software may be off line and cannot receive data. Check both ends of paper. Make sure your printer...

User Manual
Page 180
... overheated. Turn off the printer, check for paper jams or other problems, then turn the printer back on. Make sure the cartridge hooks are inserted securely into the printer. the printer resumes printing automatically when the print head cools. The printer sounds like it . The ribbon may not be installed properly. The print head is printed. The printer makes a strange noise, the buzzer sounds several times, and the printer stops abruptly. Printed characters have parts missing at...
... overheated. Turn off the printer, check for paper jams or other problems, then turn the printer back on. Make sure the cartridge hooks are inserted securely into the printer. the printer resumes printing automatically when the print head cools. The printer sounds like it . The ribbon may not be installed properly. The print head is printed. The printer makes a strange noise, the buzzer sounds several times, and the printer stops abruptly. Printed characters have parts missing at...
User Manual
Page 185
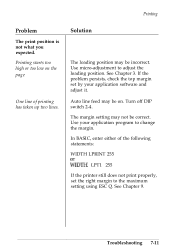
...-adjustment to change the margin. Turn off DIP switch 2-4. See Chapter 9. Solution The loading position may be correct. If the problem persists, check the top margin set the right margin to the maximum setting using ESC Q. In BASIC, enter either of printing has taken up two lines. Troubleshooting 7-11 See Chapter 3. Printing starts too high or too low on . The margin setting may be on the page...
...-adjustment to change the margin. Turn off DIP switch 2-4. See Chapter 9. Solution The loading position may be correct. If the problem persists, check the top margin set the right margin to the maximum setting using ESC Q. In BASIC, enter either of printing has taken up two lines. Troubleshooting 7-11 See Chapter 3. Printing starts too high or too low on . The margin setting may be on the page...

User Manual
Page 189
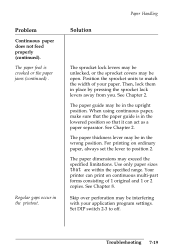
... LOAD/EJECT button. See Chapter 3. When feeding thicker than normal paper, press down freely. See Chapter 8. Paper Handling Problem Single sheets do not feed properly (continued). Push paper release lever back to the width of the paper. When the cut sheet feeder mode may exceed the specified limitations. Adjust the edge guides to the single-sheet position. Use only paper sizes that the paper can move up and down lightly on ). Troubleshooting...
... LOAD/EJECT button. See Chapter 3. When feeding thicker than normal paper, press down freely. See Chapter 8. Paper Handling Problem Single sheets do not feed properly (continued). Push paper release lever back to the width of the paper. When the cut sheet feeder mode may exceed the specified limitations. Adjust the edge guides to the single-sheet position. Use only paper sizes that the paper can move up and down lightly on ). Troubleshooting...
User Manual
Page 193
.... Your printer can act as a paper separator. Problem Continuous paper does not feed properly (continued). Position the sprocket units to off. For printing on continuous multi-part forms consisting of your application program settings. The paper guide may be interfering with your paper. When using continuous paper, make sure that the paper guide is crooked or the paper jams (continued) . See Chapter 2. Skip over perforation may be open. Set DIP switch 2-3 to...
.... Your printer can act as a paper separator. Problem Continuous paper does not feed properly (continued). Position the sprocket units to off. For printing on continuous multi-part forms consisting of your application program settings. The paper guide may be interfering with your paper. When using continuous paper, make sure that the paper guide is crooked or the paper jams (continued) . See Chapter 2. Skip over perforation may be open. Set DIP switch 2-3 to...

User Manual
Page 206
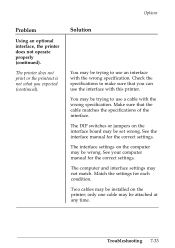
...slot. The printer does not print or the printout is correctly inserted into the connector on the main board. 7-32 Troubleshooting Align the (>) marks on the control panel. Check that the interface board is not what you to use control codes, use ESC k command to select the font. Options Problem Using the font ...expected. The font in the module do not print. Using an optional interface, the printer does not operate properly. Solution The font module may be loose or not properly connected. Select the slot by pressing the FONT button on the module and the slot and insert...
...slot. The printer does not print or the printout is correctly inserted into the connector on the main board. 7-32 Troubleshooting Align the (>) marks on the control panel. Check that the interface board is not what you to use control codes, use ESC k command to select the font. Options Problem Using the font ...expected. The font in the module do not print. Using an optional interface, the printer does not operate properly. Solution The font module may be loose or not properly connected. Select the slot by pressing the FONT button on the module and the slot and insert...
User Manual
Page 207
..., the printer does not operate properly (continued). Troubleshooting 7-33 Solution You may be installed on the printer; See your computer manual for each condition. Match the settings for the correct settings. You may be trying to use a cable with the wrong specification. The interface settings on the interface board may not match. only one cable may be attached at any time. The DIP switches or...
..., the printer does not operate properly (continued). Troubleshooting 7-33 Solution You may be installed on the printer; See your computer manual for each condition. Match the settings for the correct settings. You may be trying to use a cable with the wrong specification. The interface settings on the interface board may not match. only one cable may be attached at any time. The DIP switches or...

User Manual
Page 280
..., 3-22, -23 Cleaning printer, 6-2, -3 Column reservation numbers, 4-14 Command summary, 9-1, -40 Condensed button, 3-4 Condensed mode, 3-19, 4-6, -8 Configuring application software, 1-25 Connecting printer, 1-22, -24 Continuous paper, maximum width, 2-6 loading, 2-6, -12 Control key table, 9-4 Control panel, 3-2, -5 buttons, 3-3, -5 lights, 3-2 Cut sheet feeder, 5-2, -16 capacity, 8-13 installing, 5-24 loading paper, 5-5, -7 mode, 5-5 removing, 5-15, -16 software control, 5-14 specifications, 8-13, -14 testing, 5-9, -10 using, 5-11, -14 D Data dump mode, 3-24, -26 Default settings, 8-15, -16...
..., 3-22, -23 Cleaning printer, 6-2, -3 Column reservation numbers, 4-14 Command summary, 9-1, -40 Condensed button, 3-4 Condensed mode, 3-19, 4-6, -8 Configuring application software, 1-25 Connecting printer, 1-22, -24 Continuous paper, maximum width, 2-6 loading, 2-6, -12 Control key table, 9-4 Control panel, 3-2, -5 buttons, 3-3, -5 lights, 3-2 Cut sheet feeder, 5-2, -16 capacity, 8-13 installing, 5-24 loading paper, 5-5, -7 mode, 5-5 removing, 5-15, -16 software control, 5-14 specifications, 8-13, -14 testing, 5-9, -10 using, 5-11, -14 D Data dump mode, 3-24, -26 Default settings, 8-15, -16...
User Manual
Page 282
..., 3-22, -23 Micro-adjustment, 3-13 Moving printer, 6-10 print head, 1-8 Multi-Font Module, 5-28, -33 font descriptions, 5-28, -30 installation, 5-30, -32 selecting fonts, 5-33 Multi-part forms, 2-23 Multi-part light, 3-2 O On line button, 3-3 On line light, 3-2 Options see Cut-sheet feeder see Interface boards see Multi-Font Module see Pull tractor Outline mode, 4-6, 9-32 Overline mode, 4-5, 9-31 P Page length, 3-10 Paper copy capacity, 8-6 length, 8-4, 8-14 loading, 2-1, -27 printable...
..., 3-22, -23 Micro-adjustment, 3-13 Moving printer, 6-10 print head, 1-8 Multi-Font Module, 5-28, -33 font descriptions, 5-28, -30 installation, 5-30, -32 selecting fonts, 5-33 Multi-part forms, 2-23 Multi-part light, 3-2 O On line button, 3-3 On line light, 3-2 Options see Cut-sheet feeder see Interface boards see Multi-Font Module see Pull tractor Outline mode, 4-6, 9-32 Overline mode, 4-5, 9-31 P Page length, 3-10 Paper copy capacity, 8-6 length, 8-4, 8-14 loading, 2-1, -27 printable...
User Manual
Page 283
Printer cover, 1-12 Printer stand, 1-5 Print head, 1-8, 4-10 -12 Printing direction, 3-9 Problems, see Troubleshooting Proportional spacing, 4-2, -3, 4-6, -8, 9-25, A-2 -5 Pull tractor, 5-17, -27 installing, 5-17, -18 loading paper, 5-19, -23 removing, 5-24, -27 Push tractor, 2-6, -18 R Ready light, 3-2 Ribbon cartridge installing, 1-7 -9 replacing, 6-4 -9 specifications, 8-7 Roman font, 3-18 S Sans serif font, 3-18 SelecType options, 3-17, -19, 5-33 Self test, printer, 1-14, -21, 5-9, -10 Serial interface, see Interface boards Setting up printer, 1-1, -25 Shadow mode, 4-6, 9-32 Short tear-off...
Printer cover, 1-12 Printer stand, 1-5 Print head, 1-8, 4-10 -12 Printing direction, 3-9 Problems, see Troubleshooting Proportional spacing, 4-2, -3, 4-6, -8, 9-25, A-2 -5 Pull tractor, 5-17, -27 installing, 5-17, -18 loading paper, 5-19, -23 removing, 5-24, -27 Push tractor, 2-6, -18 R Ready light, 3-2 Ribbon cartridge installing, 1-7 -9 replacing, 6-4 -9 specifications, 8-7 Roman font, 3-18 S Sans serif font, 3-18 SelecType options, 3-17, -19, 5-33 Self test, printer, 1-14, -21, 5-9, -10 Serial interface, see Interface boards Setting up printer, 1-1, -25 Shadow mode, 4-6, 9-32 Short tear-off...


