
Owners Manual
Page 2
.... 4. inspect and tighten all instruc- ,. -, tions before using .WEIDER assumes no responsibility for persons over the age of 35 or persons with the same amount of weight should be used by or through the use the lat bar. 13. The weight bench is on the pulleys at all times.If the cable...Remove the mast when performing any exercise that the cable is designed to balance the bench. 14. Make sure that does not use the weight bench. Remove the lat bar when performing any exercise that the cable remains on the pulleys. 3. do not place more than 50 pounds on the...
.... 4. inspect and tighten all instruc- ,. -, tions before using .WEIDER assumes no responsibility for persons over the age of 35 or persons with the same amount of weight should be used by or through the use the lat bar. 13. The weight bench is on the pulleys at all times.If the cable...Remove the mast when performing any exercise that the cable is designed to balance the bench. 14. Make sure that does not use the weight bench. Remove the lat bar when performing any exercise that the cable remains on the pulleys. 3. do not place more than 50 pounds on the...
Owners Manual
Page 3
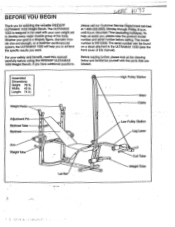
...and benefit, read this manual). Length: 74 in . Weight Rests High Pulley Station Mast Cable Adjustment Pin Backrest Tube Backrest 0 Arm Weight Tube 0 0 Lat Bar Low Pulley Station Leg Lever ••• Curl Tube Weight Tube The serial number can be used with the parts ...0653, Monday through Friday, 6 a.m. BEFORE YOU BEGIN Ttiank you , please note the product model number and serial number before using the WEIDER' ULTRAMAX 1033 Weight Bench. The model number is designed to develop every major muscle group of this manual carefully before calling. Whether your goal is a ...
...and benefit, read this manual). Length: 74 in . Weight Rests High Pulley Station Mast Cable Adjustment Pin Backrest Tube Backrest 0 Arm Weight Tube 0 0 Lat Bar Low Pulley Station Leg Lever ••• Curl Tube Weight Tube The serial number can be used with the parts ...0653, Monday through Friday, 6 a.m. BEFORE YOU BEGIN Ttiank you , please note the product model number and serial number before using the WEIDER' ULTRAMAX 1033 Weight Bench. The model number is designed to develop every major muscle group of this manual carefully before calling. Whether your goal is a ...
Owners Manual
Page 8
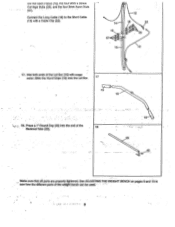
Press a 1" Round Cap (40) into the end of the weight bench can be used.. See ADJUSTING THE WEIGHT BENCH on pages 9 and 10 to the Short Cable (13) with soapy • water. Connect the Long Cable (12) to see how the different parts ... mates (16), the tour rimm x 50mm Carriage Bolts (35), and the four 8mm Acorn Nuts (57).- Slide the Hand Grips (19) onto the Lat Bar. 17 19 18 • 18. Wet both ends of the Lat Bar (18) with a Cable Clip (33). 14 16 57 15 12 16 33 35 13 17.
Press a 1" Round Cap (40) into the end of the weight bench can be used.. See ADJUSTING THE WEIGHT BENCH on pages 9 and 10 to the Short Cable (13) with soapy • water. Connect the Long Cable (12) to see how the different parts ... mates (16), the tour rimm x 50mm Carriage Bolts (35), and the four 8mm Acorn Nuts (57).- Slide the Hand Grips (19) onto the Lat Bar. 17 19 18 • 18. Wet both ends of the Lat Bar (18) with a Cable Clip (33). 14 16 57 15 12 16 33 35 13 17.
Owners Manual
Page 10
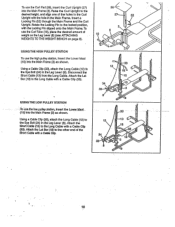
...the Curl Upright (27) 26 into the Main Frame (3) as shown. Rotate the Looking Pin to the other end of weight on the Leg Lever (8) (see ATTACHING 10 3 8 WEIGHTS TO THE WEIGHT BENCH on page 9). • USING THE HIGH PULLEY STATION To use the high pulley station, insert the Lower Mast ...(15) into the Main Frame (3). Insert a 27 52 Locking Pin (52) through the Main Frame and the Curl Upright. Attach the Lat Bar (18) to the ...
...the Curl Upright (27) 26 into the Main Frame (3) as shown. Rotate the Looking Pin to the other end of weight on the Leg Lever (8) (see ATTACHING 10 3 8 WEIGHTS TO THE WEIGHT BENCH on page 9). • USING THE HIGH PULLEY STATION To use the high pulley station, insert the Lower Mast ...(15) into the Main Frame (3). Insert a 27 52 Locking Pin (52) through the Main Frame and the Curl Upright. Attach the Lat Bar (18) to the ...
Owners Manual
Page 14
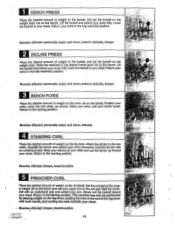
... the arms. Lie on the leg lever. Muscles affected: pectoral's major and minor, deltoids 4 STANDING CURL Place the desired amount of weight on the bench. Attach the lat bar to your chest. Slowly curl the barbell toward your chest. Musciesaffected: biceps, brachloradials • 'Z. • • 4*-7-:«;* - -7= . 14 q •:;;.5A• • Muscles...
... the arms. Lie on the leg lever. Muscles affected: pectoral's major and minor, deltoids 4 STANDING CURL Place the desired amount of weight on the bench. Attach the lat bar to your chest. Slowly curl the barbell toward your chest. Musciesaffected: biceps, brachloradials • 'Z. • • 4*-7-:«;* - -7= . 14 q •:;;.5A• • Muscles...
Owners Manual
Page 15
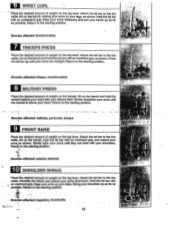
...8226;,-.1- Return to the starting position. Sit on the bench and hold the lat bar with your legs, as shown. Muscles affected: anterior deltoids • 10 SHOULDER SHRUG Place the desired amount of weight on your elbows bent. an overhand grip.Keep your arms at your sides.Shrug your...until they are straight. Slowly straighten your head. Attach the lat bar to the low cable. MI WRIST CURL Place the desired amount of weight on the leg lever. Attach the lat bar to the low cable. Hold the lat bar with -. Return to the starting position. Muscles affected: brachioradials ...
...8226;,-.1- Return to the starting position. Sit on the bench and hold the lat bar with your legs, as shown. Muscles affected: anterior deltoids • 10 SHOULDER SHRUG Place the desired amount of weight on your elbows bent. an overhand grip.Keep your arms at your sides.Shrug your...until they are straight. Slowly straighten your head. Attach the lat bar to the low cable. MI WRIST CURL Place the desired amount of weight on the leg lever. Attach the lat bar to the low cable. Hold the lat bar with -. Return to the starting position. Muscles affected: brachioradials ...
Owners Manual
Page 16
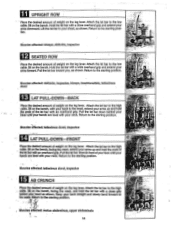
.... Muscles affected: biceps, deltoids, trapezius 12 SEATED ROW Place the desired amount of weight on the leg lever. Pull the lat bar toward you, as shown. Attach the lat bar to the starting position. Attach the lat bar to the starting position. Return to the high cable. Musiles affected: rectus abdomlnus, ...amount of your face until your hands are level with your neck. Attach the lat bar to the starting position. Pull the lat bar down in front of weight on the leg lever. Pull the tat bar down behind your head as shown.Return to your arms up and hold Ile ends ...
.... Muscles affected: biceps, deltoids, trapezius 12 SEATED ROW Place the desired amount of weight on the leg lever. Pull the lat bar toward you, as shown. Attach the lat bar to the starting position. Attach the lat bar to the starting position. Return to the high cable. Musiles affected: rectus abdomlnus, ...amount of your face until your hands are level with your neck. Attach the lat bar to the starting position. Pull the lat bar down in front of weight on the leg lever. Pull the tat bar down behind your head as shown.Return to your arms up and hold Ile ends ...
Owners Manual
Page 21
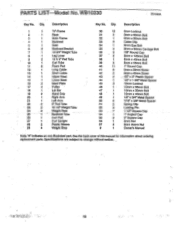
...19 2 20 1 21 1 22 .2 23 2 24 2 25 - 1 26 1 27 1 28 2 29 3 Description "H"-Frame Base Main Frame Backrest Seat Backrest Bracket 13 3/4" Weight Tube Leg Lever 131/ 2" Pad Tube Curl Tube Foam Pad Long Cable Short Cable Upper Mast Lower Mast Mast Plate Pulley - Lat... Bar Hand Grip Right Arm Left Arm 9" Pad Tube 10' 1/2" Weight Tube Weight Rest . Backrest Tube Curl Pad Curl Upright Plastic Sleeve Weight Stop Key No. Specifications are subject to change without notice. 18...
...19 2 20 1 21 1 22 .2 23 2 24 2 25 - 1 26 1 27 1 28 2 29 3 Description "H"-Frame Base Main Frame Backrest Seat Backrest Bracket 13 3/4" Weight Tube Leg Lever 131/ 2" Pad Tube Curl Tube Foam Pad Long Cable Short Cable Upper Mast Lower Mast Mast Plate Pulley - Lat... Bar Hand Grip Right Arm Left Arm 9" Pad Tube 10' 1/2" Weight Tube Weight Rest . Backrest Tube Curl Pad Curl Upright Plastic Sleeve Weight Stop Key No. Specifications are subject to change without notice. 18...


