
Owners Manual
Page 1
... AVOID UNNECESSARY DELAYS, PLEASE CALL • DIRECT TO OUR TOLL-FREE CUSTOMER HOT LINE. 0 Our trained technicians will provide Immediate assistance, free of charge to providing complete customer satisfaction. manual . ment. vytierideri Model No. WB10330 Serial o. 0 O Senal Number Decal QUESTIONS? I 7 7 47 7 • 0 • 0 OWNER'S MANUAL Read all safety precautions and instructions in this owner's manual before using this owner's for future reference. CUSTOMER HOT LINE...
... AVOID UNNECESSARY DELAYS, PLEASE CALL • DIRECT TO OUR TOLL-FREE CUSTOMER HOT LINE. 0 Our trained technicians will provide Immediate assistance, free of charge to providing complete customer satisfaction. manual . ment. vytierideri Model No. WB10330 Serial o. 0 O Senal Number Decal QUESTIONS? I 7 7 47 7 • 0 • 0 OWNER'S MANUAL Read all safety precautions and instructions in this owner's manual before using this owner's for future reference. CUSTOMER HOT LINE...
Owners Manual
Page 2
... BEGIN ASSEMBLY ADJUSTING THE WEIGHT BENCH USING THE WEIGHT BENCH PART LIST EXPLODED DRAWING ORDERING REPLACEMENT PARTS UMITED WARRANTY Note: A PART IDENTIFICATION CHART is attached in the accompanying literature before using the weight bench.-- Replace any time while exercising, stop immediately and make sure that does not use the mast. 12. Make sure that the cable remains on a revel surface. Keep hands and feet away from the weight bench at all instruc- ,. -, tions before using.WEIDER assumes...
... BEGIN ASSEMBLY ADJUSTING THE WEIGHT BENCH USING THE WEIGHT BENCH PART LIST EXPLODED DRAWING ORDERING REPLACEMENT PARTS UMITED WARRANTY Note: A PART IDENTIFICATION CHART is attached in the accompanying literature before using the weight bench.-- Replace any time while exercising, stop immediately and make sure that does not use the mast. 12. Make sure that the cable remains on a revel surface. Keep hands and feet away from the weight bench at all instruc- ,. -, tions before using.WEIDER assumes...
Owners Manual
Page 3
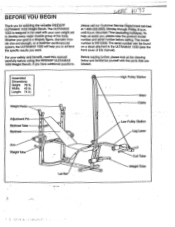
... muscle group of this manual carefully before calling. To help you , please note the product model number and serial number before using the WEIDER' ULTRAMAX 1033 Weight Bench. Weight Rests High Pulley Station Mast Cable Adjustment Pin Backrest Tube Backrest 0 Arm Weight Tube 0 0 Lat Bar Low Pulley Station Leg Lever ••• Curl Tube Weight Tube Whether your own weight set to achieve the specific results you forseleOting the versatile WEIDER° ULTRAMAX 1033 Weight Bench. The ULTRAMAX 1033 is WB10330. BEFORE...
... muscle group of this manual carefully before calling. To help you , please note the product model number and serial number before using the WEIDER' ULTRAMAX 1033 Weight Bench. Weight Rests High Pulley Station Mast Cable Adjustment Pin Backrest Tube Backrest 0 Arm Weight Tube 0 0 Lat Bar Low Pulley Station Leg Lever ••• Curl Tube Weight Tube Whether your own weight set to achieve the specific results you forseleOting the versatile WEIDER° ULTRAMAX 1033 Weight Bench. The ULTRAMAX 1033 is WB10330. BEFORE...
Owners Manual
Page 4
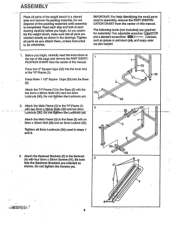
... not tighten the Screws yet. 1N•39 41 4 6 4 Tighten all parts are oriented exactly as you attach them, unless instructed to the "H"-Frame (1) with an 8mm x 55mm Bolt (39) and an 8mm Locknut (30). IMPORTANT: For help identifying the small parts used in a cleared area and remove the packing materials. Attach the Main Frame (3) to do otherwise. As you assemble the weight bench...
... not tighten the Screws yet. 1N•39 41 4 6 4 Tighten all parts are oriented exactly as you attach them, unless instructed to the "H"-Frame (1) with an 8mm x 55mm Bolt (39) and an 8mm Locknut (30). IMPORTANT: For help identifying the small parts used in a cleared area and remove the packing materials. Attach the Main Frame (3) to do otherwise. As you assemble the weight bench...

Owners Manual
Page 5
...the 13 1/2" Pad Tubes (9) through the lower hole in the Leg Lever (8). . . • Slide Foam Pads (11) onto the ends of the Leg Lever (8). Press a 1 1/2" Square Cap (53) into the other end of the 13 3/4" Weight Tube (7). Press a 1" Round Cap (40) into the ...6 Tighten the four 6mm x 20mm Screws (41) used In step 3. 50-4? 30 1 : 0 3 32 5. Press the 1" Angled Cap (54) onto the indicated end of the Weight Tube. 7. Wide End i ' 1 0 i 3 6. Attach the Backrest (4) to the bracket on the Main 5 .- Attach the Seat (5) to the Main Frame (3) with 4 the 8mm x 80mm Bolt (...
...the 13 1/2" Pad Tubes (9) through the lower hole in the Leg Lever (8). . . • Slide Foam Pads (11) onto the ends of the Leg Lever (8). Press a 1 1/2" Square Cap (53) into the other end of the 13 3/4" Weight Tube (7). Press a 1" Round Cap (40) into the ...6 Tighten the four 6mm x 20mm Screws (41) used In step 3. 50-4? 30 1 : 0 3 32 5. Press the 1" Angled Cap (54) onto the indicated end of the Weight Tube. 7. Wide End i ' 1 0 i 3 6. Attach the Backrest (4) to the bracket on the Main 5 .- Attach the Seat (5) to the Main Frame (3) with 4 the 8mm x 80mm Bolt (...

Owners Manual
Page 6
... lubricant to the 10mm x 55mm Bolt (46). • Attach the Leg Lever (8) to the Main Frame (3) with the Locking Pin clipped to the "H"-Frame. Rotate the Locking Pin to the desired 9 height, and align one of the Weight Rests (24) into the "H"Frame (1). Press a V Round Cap (40) into the indicated hole in the Weight Rest with an 8mm x 45mm Screw...
... lubricant to the 10mm x 55mm Bolt (46). • Attach the Leg Lever (8) to the Main Frame (3) with the Locking Pin clipped to the "H"-Frame. Rotate the Locking Pin to the desired 9 height, and align one of the Weight Rests (24) into the "H"Frame (1). Press a V Round Cap (40) into the indicated hole in the Weight Rest with an 8mm x 45mm Screw...
Owners Manual
Page 7
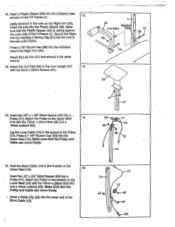
... the 10mm x 3.,qrnm Bolt (47) and a 10mm Locknut (45). Hold the Short Cable (13) in the Pulley (17). Attach the Pulley to the Curl Upright (27) 13 with two 6mm x 20mm Screws (41). _ a 1 20 0 Welded `I' Lubricate Tube 51 - 0 28 3 . ,i ,...43 2 4 • 14. Insert a Plastic Sleeve (28) into the end of the Short Cable (13). : 15 45-* 13 1.7 . Press a 1 1/2" Square Cap...
... the 10mm x 3.,qrnm Bolt (47) and a 10mm Locknut (45). Hold the Short Cable (13) in the Pulley (17). Attach the Pulley to the Curl Upright (27) 13 with two 6mm x 20mm Screws (41). _ a 1 20 0 Welded `I' Lubricate Tube 51 - 0 28 3 . ,i ,...43 2 4 • 14. Insert a Plastic Sleeve (28) into the end of the Short Cable (13). : 15 45-* 13 1.7 . Press a 1 1/2" Square Cap...
Owners Manual
Page 8
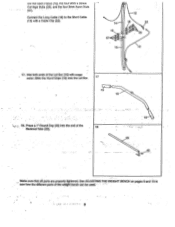
... be used.. Slide the Hand Grips (19) onto the Lat Bar. 17 19 18 • 18. See ADJUSTING THE WEIGHT BENCH on pages 9 and 10 to the Short Cable (13) with soapy • water. Press a 1" Round Cap (40) into the end of the Backrest Tube (25). - 18 7 19 25 40 • • Make sure that all parts are properly tightened.
... be used.. Slide the Hand Grips (19) onto the Lat Bar. 17 19 18 • 18. See ADJUSTING THE WEIGHT BENCH on pages 9 and 10 to the Short Cable (13) with soapy • water. Press a 1" Round Cap (40) into the end of the Backrest Tube (25). - 18 7 19 25 40 • • Make sure that all parts are properly tightened.
Owners Manual
Page 9
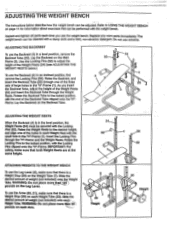
ADJUSTING THE WEIGHT BENCH The instructions below .) To use the weight bench. Refer to USING THE WEIGHT BENCH on page 11 for information about exercises that can be secured with the end of weight (not included) onto a Weight Tube. Use the Locking Pins (52) to the desired height, and align one of the three sets of the Weight Rests (24) and insert the Backrest Tube through the Weight Rests. Weight Rests...
ADJUSTING THE WEIGHT BENCH The instructions below .) To use the weight bench. Refer to USING THE WEIGHT BENCH on page 11 for information about exercises that can be secured with the end of weight (not included) onto a Weight Tube. Use the Locking Pins (52) to the desired height, and align one of the three sets of the Weight Rests (24) and insert the Backrest Tube through the Weight Rests. Weight Rests...
Owners Manual
Page 10
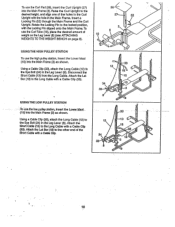
... Cable. Attach the Short Cable (13) to the Eye Bolt (34) in the Leg Lever (8). Raise the Curl Upright to the locked position, with the Locking Pin clipped onto the Main Frame. Rotate the Looking Pin to the desired height, and align one of weight on the Leg Lever (8) (see ATTACHING 10 3 8 WEIGHTS TO THE WEIGHT BENCH on page 9). • USING THE HIGH PULLEY STATION To use...
... Cable. Attach the Short Cable (13) to the Eye Bolt (34) in the Leg Lever (8). Raise the Curl Upright to the locked position, with the Locking Pin clipped onto the Main Frame. Rotate the Looking Pin to the desired height, and align one of weight on the Leg Lever (8) (see ATTACHING 10 3 8 WEIGHTS TO THE WEIGHT BENCH on page 9). • USING THE HIGH PULLEY STATION To use...
Owners Manual
Page 11
... more detailed information about exercise. Once you find the schedule that your muscles to a high percentage of day when your body for 3 minutes after each set . U lINIL.3 I 11C VVI IUM I titNUll The WEIDER° ULTRAMAX 1033 Weight Bench is a tool, and learning to use it properly is essential for you, stick with it. 11 WARNING: Before beginning this OWNER'S MANUAL carefully before...
... more detailed information about exercise. Once you find the schedule that your muscles to a high percentage of day when your body for 3 minutes after each set . U lINIL.3 I 11C VVI IUM I titNUll The WEIDER° ULTRAMAX 1033 Weight Bench is a tool, and learning to use it properly is essential for you, stick with it. 11 WARNING: Before beginning this OWNER'S MANUAL carefully before...
Owners Manual
Page 12
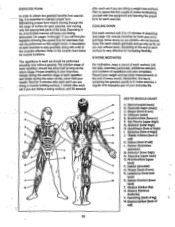
... form means moving only the appropriate parts of repetitions and sets completed. Exercising in each workout. never hold your arms and legs. Move slowly as you are doing a toning workout, and 30 seconds after each set if you are doing a muscle building workout, 1 minute after each set if you can be performed smoothly and without strain. List the date, exercises performed, resistance selected, and numbers of the body...
... form means moving only the appropriate parts of repetitions and sets completed. Exercising in each workout. never hold your arms and legs. Move slowly as you are doing a toning workout, and 30 seconds after each set if you are doing a muscle building workout, 1 minute after each set if you can be performed smoothly and without strain. List the date, exercises performed, resistance selected, and numbers of the body...
Owners Manual
Page 13
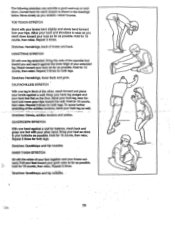
...toes as far as possible. Stretches: Hamstrings, back of the achilles tendons, bend your back leg as possible. Reach toward your buttocks as well. Stretches: Hamstrings, lower back and groin. QUADRICEPS STRETCH With one leg in the drawings below. Repeat 3 times for 15 counts, then relax. Repeat 3 times. ... provide a good warm-up or cooldown. Correct form for both legs. Bring the sole of the opposite foot toward the wall. Repeat 3 times for balance, reach back and grasp one leg extended. Bend your front leg, lean forward and move your toes as far as you reach down toward...
...toes as far as possible. Stretches: Hamstrings, back of the achilles tendons, bend your back leg as possible. Reach toward your buttocks as well. Stretches: Hamstrings, lower back and groin. QUADRICEPS STRETCH With one leg in the drawings below. Repeat 3 times for 15 counts, then relax. Repeat 3 times. ... provide a good warm-up or cooldown. Correct form for both legs. Bring the sole of the opposite foot toward the wall. Repeat 3 times for balance, reach back and grasp one leg extended. Bend your front leg, lean forward and move your toes as far as you reach down toward...
Owners Manual
Page 14
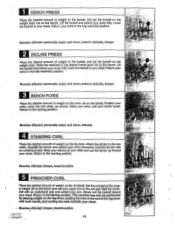
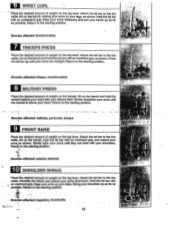
... weight rests. Return to your chest. Musciesaffected: biceps, brachloradials • 'Z. • • 4*-7-:«;* - -7= . 14 q •:;;.5A• • Muscles affected: pectoralis major and minor, anterior deltoids, triceps El INCLINE PRESS Place the desired amount of weight on the weight rests. Lower the barbell to the starting position. Attach the lat bar to the fully extended position. Return your arms to the low cable...
... weight rests. Return to your chest. Musciesaffected: biceps, brachloradials • 'Z. • • 4*-7-:«;* - -7= . 14 q •:;;.5A• • Muscles affected: pectoralis major and minor, anterior deltoids, triceps El INCLINE PRESS Place the desired amount of weight on the weight rests. Lower the barbell to the starting position. Attach the lat bar to the fully extended position. Return your arms to the low cable...
Owners Manual
Page 15
... affected: triceps, brachioradials 8 MILITARY PRESS Place the desired amount of weight on the bench and hold the lat bar with your legs, as shown. Hold the lat bar with an underhand grip. Sit on the bench, resting your arms on your shoulders. Attach the lat bar to the low cable. Return to the starting position. Hold the lat bar with -. Return to the starting position. • *4-• Muscles...
... affected: triceps, brachioradials 8 MILITARY PRESS Place the desired amount of weight on the bench and hold the lat bar with your legs, as shown. Hold the lat bar with an underhand grip. Sit on the bench, resting your arms on your shoulders. Attach the lat bar to the low cable. Return to the starting position. Hold the lat bar with -. Return to the starting position. • *4-• Muscles...
Owners Manual
Page 16
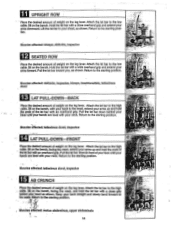
... amount of weight on the leg lever. Return to the mast, extend your arms up and hold Ile ends of weight on the bench. Muscles affected: biceps, deltoids, trapezius 12 SEATED ROW Place the desired amount of weight on the leg lever. Attach the lat bar to the high Wi• cable. Sit on the leg lever. Attach the lat bar to the low cable. Muscles affected...
... amount of weight on the leg lever. Return to the mast, extend your arms up and hold Ile ends of weight on the bench. Muscles affected: biceps, deltoids, trapezius 12 SEATED ROW Place the desired amount of weight on the leg lever. Attach the lat bar to the high Wi• cable. Sit on the leg lever. Attach the lat bar to the low cable. Muscles affected...
Owners Manual
Page 18
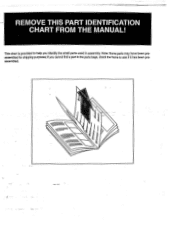
REMOVE THIS PART IDENTIFICATION CHART FROM THE MANUAL! if you identify the small parts used in the parts bags, check the frame to help you cannot find a part in assembly. Note: Some parts may have been preassembled for shipping purposes; This chart is provided to see if it has been preassembled. :V:te • • • • 1V •;4..M.04,Y 44.i.tli ott.U..j1.44:,:ii.4.:.:Ai i.ouLICaetl,Lipiiihinl•biTili444'..WiM W'""'"..".
REMOVE THIS PART IDENTIFICATION CHART FROM THE MANUAL! if you identify the small parts used in the parts bags, check the frame to help you cannot find a part in assembly. Note: Some parts may have been preassembled for shipping purposes; This chart is provided to see if it has been preassembled. :V:te • • • • 1V •;4..M.04,Y 44.i.tli ott.U..j1.44:,:ii.4.:.:Ai i.ouLICaetl,Lipiiihinl•biTili444'..WiM W'""'"..".
Owners Manual
Page 19
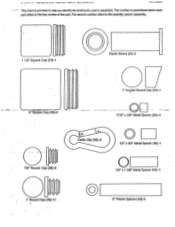
The second number refers to help you identify the small parts used in parenthesis below each part refers to the key number of the part. This chart is II I It VI it - 111 IL I rail a ■ aro is provided to the quantity used in assembly. I ---- The number in assembly. 1 1/2" Square Cap (53)-1 0 Plastic Sleeve (28)-2 2" Square Cap (55)-2 1" Angled Round Cap (54)-1 , O Cable Clip (33)-3 7/161 x 3/8" Metal Spacer (50)-2 0 1/2" x 3/4" Metal Spacer (49)-1 7/8" Round Cap (36)-2 1" Round Cap (40)-11 0 1/2" x 1 3/8' Metal Spacer (44)-1 3" Plastic Spacer (43)-2
The second number refers to help you identify the small parts used in parenthesis below each part refers to the key number of the part. This chart is II I It VI it - 111 IL I rail a ■ aro is provided to the quantity used in assembly. I ---- The number in assembly. 1 1/2" Square Cap (53)-1 0 Plastic Sleeve (28)-2 2" Square Cap (55)-2 1" Angled Round Cap (54)-1 , O Cable Clip (33)-3 7/161 x 3/8" Metal Spacer (50)-2 0 1/2" x 3/4" Metal Spacer (49)-1 7/8" Round Cap (36)-2 1" Round Cap (40)-11 0 1/2" x 1 3/8' Metal Spacer (44)-1 3" Plastic Spacer (43)-2
Owners Manual
Page 21
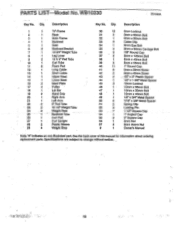
... 51 2 Spring Clip 52 3 Locking Pin 53 7 1 ur Square Cap 54 1 1" Angled Cap- 55 2 2" Square Cap 56 1 8mm Nut 57 4 8mm Acorn Nut # 1 Owner's Manual Note: "#" Indicates an non-illustrated part. Specifications are subject to change without notice. 18 Backrest Tube Curl Pad Curl Upright Plastic Sleeve Weight Stop Key No. PARTS LIST Model No. See the back cover of this manual for information about ordering replacement parts.
... 51 2 Spring Clip 52 3 Locking Pin 53 7 1 ur Square Cap 54 1 1" Angled Cap- 55 2 2" Square Cap 56 1 8mm Nut 57 4 8mm Acorn Nut # 1 Owner's Manual Note: "#" Indicates an non-illustrated part. Specifications are subject to change without notice. 18 Backrest Tube Curl Pad Curl Upright Plastic Sleeve Weight Stop Key No. PARTS LIST Model No. See the back cover of this manual for information about ordering replacement parts.
Owners Manual
Page 23
... OR PROFITS, LOSS OF ENJOYMENT OR USE, COSTS OF REMOVAL, INSTALLATION OR OTHER CONSEQUENTIAL DAMAGES OF WHATSOEVER NATURE. This warranty extends only to give the following information: 1. until 6 p.m. The MODEL NUMBER of the product (WEIDER° ULTRAMAX 1033 Weight Bench). 3. ORDERING REPLACEMENT PARTS To order replacement parts, simply call our Customer Service Department toll-free at one of its authorized service centers. This warranty gives you , please be received by...
... OR PROFITS, LOSS OF ENJOYMENT OR USE, COSTS OF REMOVAL, INSTALLATION OR OTHER CONSEQUENTIAL DAMAGES OF WHATSOEVER NATURE. This warranty extends only to give the following information: 1. until 6 p.m. The MODEL NUMBER of the product (WEIDER° ULTRAMAX 1033 Weight Bench). 3. ORDERING REPLACEMENT PARTS To order replacement parts, simply call our Customer Service Department toll-free at one of its authorized service centers. This warranty gives you , please be received by...


