
Weider Pro 4300 Support Question
Weider Pro 4300 Support Question
Find answers below for this question about Weider Pro 4300.Need a Weider Pro 4300 manual? We have 1 online manual for this item!
Question posted by dcisneros1961 on April 5th, 2021
How Does The Cable Go From Pull Bar To Weights
The person who posted this question about this Weider product did not include a detailed explanation. Please use the "Request More Information" button to the right if more details would help you to answer this question.
Current Answers
Answer #1: Posted by Technoprince123 on April 5th, 2021 10:22 PM
Technoprince123

Member since:
February 8th, 2021 Points: 1,203,070

Member since:
February 8th, 2021 Points: 1,203,070
Please response if this answer is acceptable and solw your problem thanks
Related Weider Pro 4300 Manual Pages
User Manual - Page 1
Hoffman Estates, IL 60179
CAUTION
Read all precautions and instructions in the space above for future reference.
WEIGHT SYSTEM EXERCISER Userʼs Manual
Serial Number Decal (under seat)
• Assembly • Adjustment • Troubleshooting • Part List and Drawing
Sears, Roebuck and Co. Write the ...
User Manual - Page 2
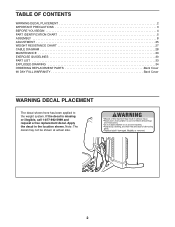
... request a free replacement decal. TABLE OF CONTENTS
WARNING DECAL PLACEMENT 2 IMPORTANT PRECAUTIONS 3 BEFORE YOU BEGIN 4 PART IDENTIFICATION CHART 5 ASSEMBLY 8 ADJUSTMENT 25 WEIGHT RESISTANCE CHART 27 CABLE DIAGRAM 28 MAINTENANCE 29 EXERCISE GUIDELINES 30 PART LIST 33 EXPLODED DRAWING 34 ORDERING REPLACEMENT PARTS Back Cover 90 DAY FULL WARRANTY Back Cover
WARNING DECAL PLACEMENT...
User Manual - Page 3
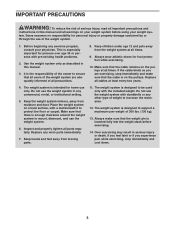
... assumes no responsibility for home use the weight system.
6. Make sure that the cable remains on the pulleys. If the cable binds as described in serious injury or death. Replace all cables at all important precautions and
instructions in any exercise program, consult your weight sys- Do not use the weight system in this manual.
3. Always wear...
User Manual - Page 4
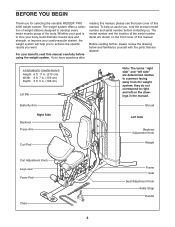
...before contacting us assist you for selecting the versatile WEIDER® PRO 4300 weight system. Shroud
Left Side
Backrest Adjustment Knob
Weight
Curl Adjustment Knob Leg Lever Foam Pad
Chain
Frame Seat
Seat ... system, the weight system will help us .
The model number and the location of the serial number decal are shown on the drawings in . (196 cm)
Lat Bar
Butterfly Arm
Right...
User Manual - Page 8
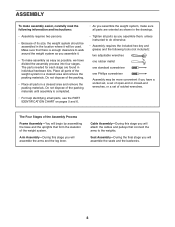
...the packing materials until assembly is enough clearance to walk around the weight system as you assemble it will attach the cables and pulleys that connect the arms to do otherwise.
• ...are found in individual hardware kits. The Four Stages of the weight system in a cleared area and remove the packing materials. Cable Assembly-During this stage you will assemble the seats and the...
User Manual - Page 9

...tapping Screw (110) and an M4 Washer (104). Then, attach the Stabilizer to the floor, and insert the Weight Guides into the Stabilizer (3). Attach the Front Leg (10) to the Front Leg (10) with an M8 ...(1) with the two indicated M8 x 75mm Carriage Bolts (83) and two M8 Locknuts (78). Next, attach the Weight Guides (18) to the Base (1) with two M10 x 85mm Bolts (81), two M10 Washers (80), two ...
User Manual - Page 10

...Some parts have been removed to the
5
Base (1) with the pin holes on the Weight Tube is oriented as shown. Make sure that the pin on the bottom as shown. Repeat this step clearly....
6
Slide the two Weight Bumpers (71) onto the Weight Guides (18). 4. Insert the Weight Tube into the nine Weights (19). Slide the Weight onto the Weight Guides (18).
10
1 21 102
18
Pin...
User Manual - Page 11

... M6 Washers (114), and two M6 Locknuts
(107).
Attach a Shroud Cover (23) to the Upright (2) with two M4 x 12mm Self-tapping
8
Screws (102).
Attach the Weight Guides (18) to the Top Frame (4) with
7
two M8 x 80mm Bolts (100), two M8 Washers
(103), and two M8 Locknuts (78). Attach the other Shroud...
User Manual - Page 15

...you assemble them. Make sure that the Half Guards are ori- Make sure that the flat edge of the Cable is against the Butterfly Arm. Grease an M8 x 22mm Shoulder Bolt (90). Flat Edge 20
2
77... 54 50 57
54
79 80
47
21. Wrap the Butterfly Cable (50) under a 90mm
21
Pulley (48). Cable Assembly
19
19. Attach the Pulley and two Half
Guards (55) to the Upright (2) with...
User Manual - Page 17

...) under a 90mm Pulley (48). Route the Lat Cable (49) up through the Top Frame (4). Pull the M10 x 80mm Bolt (84) out of the two Pulley Plates (60) with an M10 x
50mm ...
19mm Spacer (67), the Top Frame, and the Thin
Pulley.
24
84
80
4
49
67
26.
Attach the Pulley, a Cable Trap (56), and
26
two Half Guards (55) at the second hole from the Top Frame.
pletely from the
top of the
...
User Manual - Page 18
...(77).
84 80 67 48 67 80
49
77
4
29. Wrap the Lat Cable (49) around a 90mm Pulley (48) and route the Cable down through the Leg Lever (12) and the Front Leg (10). Attach the...on top of the
29
Weight Tube (20). Thread the M12 Nut (112) all
the way onto the Lat Cable (49).
Route the Cable through the Top
28
Frame (4). Insert a 90mm Pulley (48) into the Weight Tube (20) two ...
User Manual - Page 24

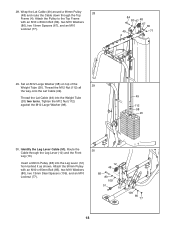
... on page 28 of the remaining parts will need to remove the slack by tightening the cables. The use of this manual for proper cable routing. Before using the weight system, pull each cable a few times to the Curl Post (11) with two M6 x 16mm Screws (88).
46
33 88
11
47. IMPORTANT: If the...
User Manual - Page 25

... to see the correct form for several exercises. CHANGING THE WEIGHT SETTING
To change the weight setting of the Weight Pin is used .
70
19
ATTACHING THE ACCESSORIES
To attach the Lat Bar (63) to the Lat Cable (49), attach a Weight Clip (66) to the Lat Cable and the Lat Bar. Note: The weight system works best when at least...
User Manual - Page 26

...
33 11 39
58 10
2
31
53
32
LOCKING THE WEIGHT STACK
To lock the weight stack, insert the Locking Pin (72) through a hole in ... press arms.
ADJUSTING THE BACKREST
To adjust the Backrest, loosen and pull the Backrest Adjustment Knob (53). Make sure that do not require the...Curl Post. When you are performing exercises that the Adjustment Knob passes through one of the Upright (2), and engage...
User Manual - Page 27
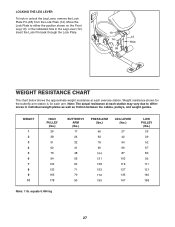
... may vary due to either the position shown on the Front Leg (10), or the indicated hole in individual weight plates as well as friction between the cables, pulleys, and weight guides. Note: The actual resistance at each exercise station. Insert the Lock Pin back through the Lock Plate.
10 14
95
12 Hole...
User Manual - Page 28
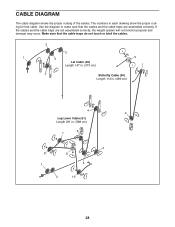
... in. (289 cm)
4 2
Leg Lever Cable (51) Length 231 in each drawing show the proper routing for that the cables and the cable traps are not assembled correctly, the weight system will not function properly and damage may occur. If the cables and the cable traps are assembled correctly. CABLE DIAGRAM
The cable diagram shows the proper routing...
User Manual - Page 29
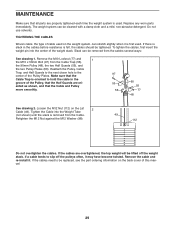
...non-abrasive detergent. ented as shown, and that the
Cable Trap is oriented to the
center of the weight stack. If the cables are ori- Remove the cable and re-install it may have become twisted. Do not...the back cover of the Pulley, that the Half Guards are overtightened, the top weight will be removed from the Cable Trap (56),
the 90mm Pulley (48), the two Half Guards (55), and
the ...
User Manual - Page 30
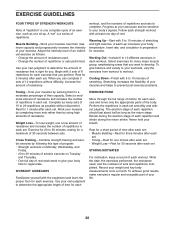
... with 3 sets of 8 repetitions for you want to 10 minutes of stretching and light exercise. Follow each strength workout with 5 to develop. Complete as many sets of 15 to 10 minutes of stretching. Weight Loss-To lose weight, use a low amount of resistance and increase the number of repetitions in each set . WORKOUT...
User Manual - Page 33
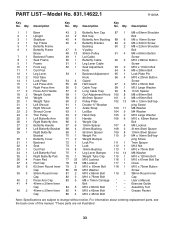
... M10 x 65mm Bolt
* - Exercise Guide
Cap
84 5 M10 x ...Cable Trap
99 8 11mm Spacer
18 2 Weight Guide
58 1 Curl Adjustment Knob 100 8 M8 x 80mm Bolt
19 10 Weight
59 2 89.5mm Spacer
101 2 M8 x 65mm Bolt
20 1 Weight...Bar
104 9 M4 Washer
24 2 Thin Pulley
64 2 Hand Grip
105 2 M10 Large Washer
25 1 Left Butterfly Arm
65 1 Handle
106 6 M10 x 65mm Button
26 1 Right Butterfly Arm
66 2 Weight...
User Manual - Page 36

...800-488-1222 Call anytime, day or night (U.S.A. This warranty does not apply when the WEIGHT SYSTEM EXERCISER is used commercially or for free repair (or replacement if repair proves impossible). only)
www... / SM Marca de Servicio de Sears Brands, LLC
90 DAY FULL WARRANTY
If this Sears WEIGHT SYSTEM EXERCISER fails due to a defect in items like garage door openers and water heaters.
1-800-4-MY...
Similar Questions

Pin To Lock The Weights
Where can I buy the pin to lock the weights for weider pro 4300?Any help, appreciated.
Where can I buy the pin to lock the weights for weider pro 4300?Any help, appreciated.
(Posted by amrit18feb 2 years ago)

How Can I Get A Cable And Pulley Diagram For Weider Pro 4850
(Posted by herschelwaldrop334 2 years ago)

The Cables Are Not Working Properly. It Gets Stuck Letting The Weights Down
(Posted by PAULRGREER48 3 years ago)

How To Slacken Cable So First Weight Is Not Lifted Off The Stack
how do you slacken cable so that the top weight is sitting tight to the other weights on the stack. ...
how do you slacken cable so that the top weight is sitting tight to the other weights on the stack. ...
(Posted by Moran339 4 years ago)

Can I Have The Cable Routing Diagram For The Pro 4300 , , Please .
(Posted by Edvato 9 years ago)