
English Manual
Page 2
... all of this manual. WARNING: Before beginning this product 2 SEARS assumes no responsibility for personal injury or property damage sustained by :the dip'arms or the pull-up any worn.parts immediately:, arms before beginning assembly. Your hand could cause the home gym system to the ....The•!!ww• eightsa,iwi•lli,fell•*ith•greattorCe.....• 13. Keep hands and feet away from the home 7. Use the home gym system only on the pul-, a Never:release press;prm,.:butterflYarms,•:.i leys at any exercise program, consult your body weight Is...
... all of this manual. WARNING: Before beginning this product 2 SEARS assumes no responsibility for personal injury or property damage sustained by :the dip'arms or the pull-up any worn.parts immediately:, arms before beginning assembly. Your hand could cause the home gym system to the ....The•!!ww• eightsa,iwi•lli,fell•*ith•greattorCe.....• 13. Keep hands and feet away from the home 7. Use the home gym system only on the pul-, a Never:release press;prm,.:butterflYarms,•:.i leys at any exercise program, consult your body weight Is...
English Manual
Page 3
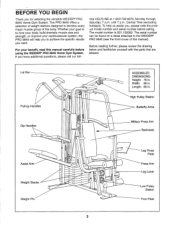
...O° 0 ASSEMBLED DIMENSIONS: Height: 78 in . To help you to achieve the specific results you for selecting the versatile WEIDER® PRO 9645 Home Gym System. High Pulley Station Butterfly Arms Military Press Arm Backrests Leg Press Plate Press Arm Leg Lever Low Pulley Station Foot Plate 3... note the product model number and serial number before using the WEIDER® PRO 9645 Home Gym System. The model number is to tone your body, build dramatic muscle size and strength, or improve your benefit, read this manual). free HELPLINE at 1-800-736-6879, Monday through Saturday, ...
...O° 0 ASSEMBLED DIMENSIONS: Height: 78 in . To help you to achieve the specific results you for selecting the versatile WEIDER® PRO 9645 Home Gym System. High Pulley Station Butterfly Arms Military Press Arm Backrests Leg Press Plate Press Arm Leg Lever Low Pulley Station Foot Plate 3... note the product model number and serial number before using the WEIDER® PRO 9645 Home Gym System. The model number is to tone your body, build dramatic muscle size and strength, or improve your benefit, read this manual). free HELPLINE at 1-800-736-6879, Monday through Saturday, ...
English Manual
Page 21
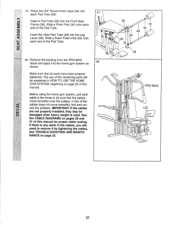
... the PRO 9645 decal and apply it by tightening the cables. Make sure that the cables move smoothly, find and correct the problem. If one of this manual. 47. See the CABLE DIAGRAMS on pages 26 and 27 of the cables does not move smoothly over the pulleys. Before using the home gym system... 34 28 34 0 30 0 29 0 PRO 9645 lR ci) ----- 00 21 ci) Insert the other Pad Tube (28) into the Front Seat 2 Frame (36). Slide a Foam Pad (30) onto each cable a few times to the home gym system as 48 shown. If there is used. The use of this manual for proper cable routing.
... the PRO 9645 decal and apply it by tightening the cables. Make sure that the cables move smoothly, find and correct the problem. If one of this manual. 47. See the CABLE DIAGRAMS on pages 26 and 27 of the cables does not move smoothly over the pulleys. Before using the home gym system... 34 28 34 0 30 0 29 0 PRO 9645 lR ci) ----- 00 21 ci) Insert the other Pad Tube (28) into the Front Seat 2 Frame (36). Slide a Foam Pad (30) onto each cable a few times to the home gym system as 48 shown. If there is used. The use of this manual for proper cable routing.
English Manual
Page 22
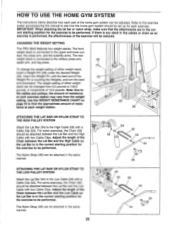
... of either weight stack, insert a Weight Pin (26) under the desired Weight (25). Adjust the length of 12.5 pounds. CHANGING THE WEIGHT SETTING The PRO 9645 features two weight stacks. tance at each weight station. 25 26 ATTACHING THE LAT BAR OR NYLON STRAP TO THE HIGH PULLEY STATION Attach the...in the correct starting position for the exercise to be set up for the exercise to be performed. Refer to the exercise poster accompanying this manual to see how the home gym system should be attached in the correct starting position for each exercise.
... of either weight stack, insert a Weight Pin (26) under the desired Weight (25). Adjust the length of 12.5 pounds. CHANGING THE WEIGHT SETTING The PRO 9645 features two weight stacks. tance at each weight station. 25 26 ATTACHING THE LAT BAR OR NYLON STRAP TO THE HIGH PULLEY STATION Attach the...in the correct starting position for the exercise to be set up for the exercise to be performed. Refer to the exercise poster accompanying this manual to see how the home gym system should be attached in the correct starting position for each exercise.
English Manual
Page 25
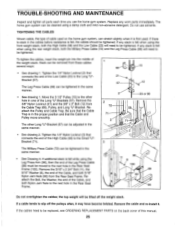
...twisted. Do not use the home gym system. Slack can be tightened. Be sure that the Cable and Pulley move smoothly. Reattach the Bolt, the Washer, the end of this manual. 25 If the cables need ...to the Small "U"Bracket (71). 1 66 57 2 2 72 71 2 3 15 0 0 23 or 99 58 2 The Military Press Cable (72) can be replaced, see ORDERING REPLACEMENT PARTS on the home gym...Rear Seat Frame. 0 96 11 8 100 99 O 93 93 Do not overtighten the cables; The home gym system can stretch slightly when it is felt, the cables should be tightened in the same manner. ...
...twisted. Do not use the home gym system. Slack can be tightened. Be sure that the Cable and Pulley move smoothly. Reattach the Bolt, the Washer, the end of this manual. 25 If the cables need ...to the Small "U"Bracket (71). 1 66 57 2 2 72 71 2 3 15 0 0 23 or 99 58 2 The Military Press Cable (72) can be replaced, see ORDERING REPLACEMENT PARTS on the home gym...Rear Seat Frame. 0 96 11 8 100 99 O 93 93 Do not overtighten the cables; The home gym system can stretch slightly when it is felt, the cables should be tightened in the same manner. ...
English Manual
Page 28
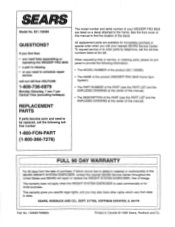
...; The MODEL NUMBER of the product (831.159380). • The NAME of the product (WEIDER® PRO 9645 Home Gym System). • The PART NUMBER of the PART (see the PART LIST and the EXPLODED DRAWING at the center of this manual). • The DESCRIPTION of the PART (see the PART LIST and the EXPLODED DRAWING...
...; The MODEL NUMBER of the product (831.159380). • The NAME of the product (WEIDER® PRO 9645 Home Gym System). • The PART NUMBER of the PART (see the PART LIST and the EXPLODED DRAWING at the center of this manual). • The DESCRIPTION of the PART (see the PART LIST and the EXPLODED DRAWING...


