
English Manual
Page 2
... home 7. SEARS assumes no responsibility for personal injury or property damage sustained by :the dip'arms or the pull-up any worn.parts immediately:, arms before using the home gym system. :•It•Islhelespo.nsibility•lOfthe:Oinmer .tio 'ensure • 9. ... of the pulleys. WARNING: Before beginning this or any time while exercising, stop immediately and make ...iletbar.. Remove the PART IDENTIFICATION CHART and the PART LIST/EXPLODED DRAWING before using . leg press plate, are exercising, stop immediately and begin cooling down. that the cables...
... home 7. SEARS assumes no responsibility for personal injury or property damage sustained by :the dip'arms or the pull-up any worn.parts immediately:, arms before using the home gym system. :•It•Islhelespo.nsibility•lOfthe:Oinmer .tio 'ensure • 9. ... of the pulleys. WARNING: Before beginning this or any time while exercising, stop immediately and make ...iletbar.. Remove the PART IDENTIFICATION CHART and the PART LIST/EXPLODED DRAWING before using . leg press plate, are exercising, stop immediately and begin cooling down. that the cables...
English Manual
Page 3
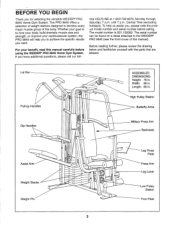
... number is to achieve the specific results you , please note the product model number and serial number before using the WEIDER® PRO 9645 Home Gym System. The serial number can be found on a decal attached to develop every major muscle group of this...WEIDER® PRO 9645 Home Gym System. free HELPLINE at 1-800-736-6879, Monday through Saturday, 7 a.m. Length: 66 in . BEFORE YOU BEGIN Thank you have additional questions, please call our toll- Central Time (excluding holidays). Before reading further, please review the drawing below and familiarize yourself with the parts...
... number is to achieve the specific results you , please note the product model number and serial number before using the WEIDER® PRO 9645 Home Gym System. The serial number can be found on a decal attached to develop every major muscle group of this...WEIDER® PRO 9645 Home Gym System. free HELPLINE at 1-800-736-6879, Monday through Saturday, 7 a.m. Length: 66 in . BEFORE YOU BEGIN Thank you have additional questions, please call our toll- Central Time (excluding holidays). Before reading further, please review the drawing below and familiarize yourself with the parts...
English Manual
Page 4
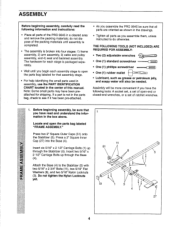
... labeled "FRAME ASSEMBLY." Assembly will also be more convenient if you have the following information and instructions: • Place all parts of the PRO 9645 in the center of this manual. Insert two 5/16" x 2 1/2" Carriage Bolts up 51 through the Base (4). THE FOLLOWING TOOLS (NOT INCLUDED... assembly. Do not tighten the Nylon Locknuts yet. 51 11 8 1 3 4 5 1 27 4 If a part is not in the parts bag, check to see if it has been pre-attached. • As you assemble the PRO 9645 be sure that you have been preattached for each assembly stage to open the...
... labeled "FRAME ASSEMBLY." Assembly will also be more convenient if you have the following information and instructions: • Place all parts of the PRO 9645 in the center of this manual. Insert two 5/16" x 2 1/2" Carriage Bolts up 51 through the Base (4). THE FOLLOWING TOOLS (NOT INCLUDED... assembly. Do not tighten the Nylon Locknuts yet. 51 11 8 1 3 4 5 1 27 4 If a part is not in the parts bag, check to see if it has been pre-attached. • As you assemble the PRO 9645 be sure that you have been preattached for each assembly stage to open the...
English Manual
Page 8
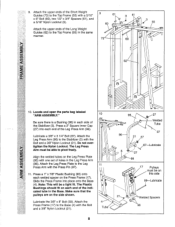
Locate and open the parts bag labeled "ARM ASSEMBLY." 10 Be sure there is a Bushing (98) in the same manner. 9 61 3 61 60 1O. Align the welded tubes on the ...
Locate and open the parts bag labeled "ARM ASSEMBLY." 10 Be sure there is a Bushing (98) in the same manner. 9 61 3 61 60 1O. Align the welded tubes on the ...
English Manual
Page 11
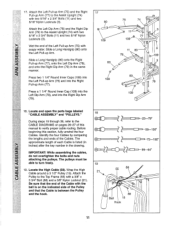
...-up Arm (75) and into the Right Dip Arm (79). 17 80 109 80 I -4-58-150" 72-192" - 99-64" 11 Locate and open the parts bags labeled "CABLE ASSEMBLY" and "PULLEYS." Be sure that the Cable is listed (in inches) after the key number in the same manner. Wet the...
...-up Arm (75) and into the Right Dip Arm (79). 17 80 109 80 I -4-58-150" 72-192" - 99-64" 11 Locate and open the parts bags labeled "CABLE ASSEMBLY" and "PULLEYS." Be sure that the Cable is listed (in inches) after the key number in the same manner. Wet the...
English Manual
Page 13
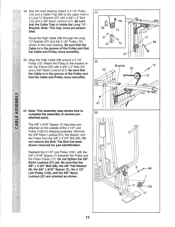
...a Cable Trap (66) to the upper hole in the inset drawing. Attach the Pulley to complete the assembly of the 3 1/2" Low Pulley (102) for part identification. a 57 12 25 55 57 Bracket 58 15 58 12 15 21 26. The 5/8" x 9/16" Spacer (7) has been preattached on the Top ...a 3/8" x 2" Bolt (12) and a 3/8" Nylon Locknut (21). Note: This assembly step shows how to the bracket on the outside of several pre- 26 attached parts. The Bolt has been shown removed for shipping purposes. Do not tighten the 3/8" Nylon Locknut (21) yet. Route the High Cable (58) through the Long...
...a Cable Trap (66) to the upper hole in the inset drawing. Attach the Pulley to complete the assembly of the 3 1/2" Low Pulley (102) for part identification. a 57 12 25 55 57 Bracket 58 15 58 12 15 21 26. The 5/8" x 9/16" Spacer (7) has been preattached on the Top ...a 3/8" x 2" Bolt (12) and a 3/8" Nylon Locknut (21). Note: This assembly step shows how to the bracket on the outside of several pre- 26 attached parts. The Bolt has been shown removed for shipping purposes. Do not tighten the 3/8" Nylon Locknut (21) yet. Route the High Cable (58) through the Long...

English Manual
Page 19
... other end of the Seat to the Assist Arm (105) with a 1/4" Flat Washer (10) and a 1/4" x 2 1/2" Screw (43). 13 0 100 18 42. Locate and open the parts bag labeled "SEAT ASSEMBLY." 40 Insert a 1/4" x 2 1/2" Carriage Bolt (92) through the indicated hole in a Seat Plate (37). Attach the Assist Seat (104) and the Angle...
... other end of the Seat to the Assist Arm (105) with a 1/4" Flat Washer (10) and a 1/4" x 2 1/2" Screw (43). 13 0 100 18 42. Locate and open the parts bag labeled "SEAT ASSEMBLY." 40 Insert a 1/4" x 2 1/2" Carriage Bolt (92) through the indicated hole in a Seat Plate (37). Attach the Assist Seat (104) and the Angle...
English Manual
Page 21
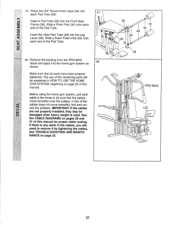
Remove the backing from the PRO 9645 decal and apply it by tightening the cables. If one of the remaining parts will need to remove it to be explained in HOW TO USE THE HOME GYM SYSTEM, beginning on page 22 of this manual. The use ... 34 0 30 0 29 0 PRO 9645 lR ci) ----- 00 21 ci) Insert the other Pad Tube (28) into the Front Seat 2 Frame (36). IMPORTANT: If the cables are not properly installed, they may be damaged when heavy weight is any slack in the cables, you will be sure that all parts have been properly...
Remove the backing from the PRO 9645 decal and apply it by tightening the cables. If one of the remaining parts will need to remove it to be explained in HOW TO USE THE HOME GYM SYSTEM, beginning on page 22 of this manual. The use ... 34 0 30 0 29 0 PRO 9645 lR ci) ----- 00 21 ci) Insert the other Pad Tube (28) into the Front Seat 2 Frame (36). IMPORTANT: If the cables are not properly installed, they may be damaged when heavy weight is any slack in the cables, you will be sure that all parts have been properly...
English Manual
Page 22
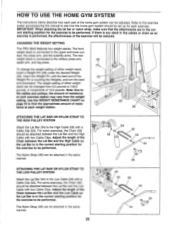
... the exercise poster accompanying this manual to 106.5 pounds, in the same manner. 22 23 53 52 53 39 54 CHANGING THE WEIGHT SETTING The PRO 9645 features two weight stacks. leys, the press arm, and the butterfly arms. The rear weight stack is touching the Weights, and turn the bent end... downward. Note: Due to the cables and pulleys, the amount of resistance at each part of the 25 Weight Pin is connected to be attached in increments of either weight stack can be performed. For some exercises, the Chain (52...
... the exercise poster accompanying this manual to 106.5 pounds, in the same manner. 22 23 53 52 53 39 54 CHANGING THE WEIGHT SETTING The PRO 9645 features two weight stacks. leys, the press arm, and the butterfly arms. The rear weight stack is touching the Weights, and turn the bent end... downward. Note: Due to the cables and pulleys, the amount of resistance at each part of the 25 Weight Pin is connected to be attached in increments of either weight stack can be performed. For some exercises, the Chain (52...
English Manual
Page 25
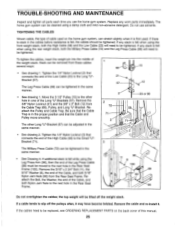
...using the front weight stack, both 5/16" Nylon Jam Nuts (93) from the Cable Trap (66), Pulley, and Long "U"-Bracket. If any worn parts immediately. Tighten the 1/4" Nylon Locknut (2) that connects the end of cable used on the back cover of the Leg Press Cable (99) must be ... Remove the 5/16" x 2 3/4" Bolt (11), the 5/16" Washer (8), the end of the Long "U"-Brackets (57). TROUBLE-SHOOTING AND MAINTENANCE Inspect and tighten all parts each time you use solvents. the top weight will need to the other Long "U"-Bracket (57) can be tightened. TIGHTENING THE CABLES Woven cable, the...
...using the front weight stack, both 5/16" Nylon Jam Nuts (93) from the Cable Trap (66), Pulley, and Long "U"-Bracket. If any worn parts immediately. Tighten the 1/4" Nylon Locknut (2) that connects the end of cable used on the back cover of the Leg Press Cable (99) must be ... Remove the 5/16" x 2 3/4" Bolt (11), the 5/16" Washer (8), the end of the Long "U"-Brackets (57). TROUBLE-SHOOTING AND MAINTENANCE Inspect and tighten all parts each time you use solvents. the top weight will need to the other Long "U"-Bracket (57) can be tightened. TIGHTENING THE CABLES Woven cable, the...
English Manual
Page 28
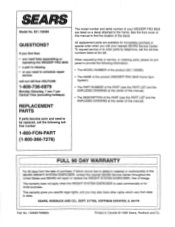
... number of charge. SEARS, ROEBUCK AND CO., DEPT. 817WA, HOFFMAN ESTATES, IL 60179 Part No. 133393 R0896A Printed in this manual). When requesting help assembling or operating the WEIDER® PRO 9645 • a part is used commercially orfor rental purposes. See the front cover of this manual). •... following information: • The MODEL NUMBER of the product (831.159380). • The NAME of the product (WEIDER® PRO 9645 Home Gym System). • The PART NUMBER of the decal. This warranty does not apply when the WEIGHT SYSTEM EXERCISER is missing • or you need...
... number of charge. SEARS, ROEBUCK AND CO., DEPT. 817WA, HOFFMAN ESTATES, IL 60179 Part No. 133393 R0896A Printed in this manual). When requesting help assembling or operating the WEIDER® PRO 9645 • a part is used commercially orfor rental purposes. See the front cover of this manual). •... following information: • The MODEL NUMBER of the product (831.159380). • The NAME of the product (WEIDER® PRO 9645 Home Gym System). • The PART NUMBER of the decal. This warranty does not apply when the WEIGHT SYSTEM EXERCISER is missing • or you need...


