
English Manual
Page 3
... support is enough clearance around the weight bench to support a maximum user weight of 300 lbs. (136 kg) and a maximum total weight of your weight bench before using the leg lever, place a barbell with the weight bench. 3. Keep the weight bench indoors, away from the weight bench. 10. When you are adequately ...protect the floor or carpet. Do not place more than 210 lbs. (95 kg), including a barbell and weights, on the weight bench before using your weight bench. Over exercising may result in an inclined position, make sure that all parts regularly. This is intended for ...
... support is enough clearance around the weight bench to support a maximum user weight of 300 lbs. (136 kg) and a maximum total weight of your weight bench before using the leg lever, place a barbell with the weight bench. 3. Keep the weight bench indoors, away from the weight bench. 10. When you are adequately ...protect the floor or carpet. Do not place more than 210 lbs. (95 kg), including a barbell and weights, on the weight bench before using your weight bench. Over exercising may result in an inclined position, make sure that all parts regularly. This is intended for ...
English Manual
Page 4
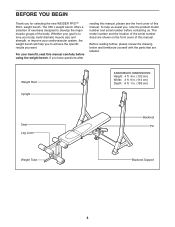
...familiarize yourself with the parts that are shown on the front cover of this manual. For your cardiovascular system, the weight bench will help us . The model number and the location of the serial number decal are labeled. If you ,...Weight Rest Upright ASSEMBLED DIMENSIONS: Height: 4 ft. 4 in. (132 cm) Width: 3 ft. 9 in. (114 cm) Depth: 6 ft. 1 in. (185 cm) Seat Leg Lever Backrest Pin Weight Tube Backrest Support 4 The 350 L weight bench offers a selection of exercises designed to achieve the specific results you for selecting the new WEIDER PRO™ 350 L weight bench...
...familiarize yourself with the parts that are shown on the front cover of this manual. For your cardiovascular system, the weight bench will help us . The model number and the location of the serial number decal are labeled. If you ,...Weight Rest Upright ASSEMBLED DIMENSIONS: Height: 4 ft. 4 in. (132 cm) Width: 3 ft. 9 in. (114 cm) Depth: 6 ft. 1 in. (185 cm) Seat Leg Lever Backrest Pin Weight Tube Backrest Support 4 The 350 L weight bench offers a selection of exercises designed to achieve the specific results you for selecting the new WEIDER PRO™ 350 L weight bench...
English Manual
Page 6
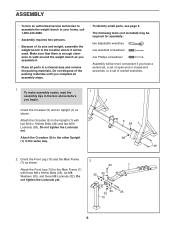
... it will be more convenient if you have a socket set, a set of open-end or closed-end wrenches, or a set of its size and weight, assemble the weight bench in a cleared area and remove the packing materials. Attach the Crossbar (5) to the other Upright (1) in the same way. 1 5 38 1 38 39 2. Attach ...three M8 Locknuts (32). Orient the Front Leg (10) and the Main Frame (7) as shown. 2 35 7 Attach the Front Leg (10) to walk around the weight bench as shown. Make sure that there is enough clearance to the Main Frame (7) with two M10 x 100mm Bolts (39) and two M10 Locknuts (38). Do...
... it will be more convenient if you have a socket set, a set of open-end or closed-end wrenches, or a set of its size and weight, assemble the weight bench in a cleared area and remove the packing materials. Attach the Crossbar (5) to the other Upright (1) in the same way. 1 5 38 1 38 39 2. Attach ...three M8 Locknuts (32). Orient the Front Leg (10) and the Main Frame (7) as shown. 2 35 7 Attach the Front Leg (10) to walk around the weight bench as shown. Make sure that there is enough clearance to the Main Frame (7) with two M10 x 100mm Bolts (39) and two M10 Locknuts (38). Do...

English Manual
Page 10
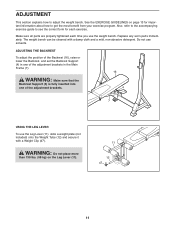
Hook 2 1 Adjustment Holes 11. The use the weight bench. Insert the hook on the Weight Rest into an 10 adjustment hole in an adjustment hole. Make sure that the Weight Rests (2) are properly tightened before you use of the remaining parts will be explained in ADJUSTMENT, beginning on the other side of the weight bench. Slide a Weight Rest (2) onto an Upright (1). Make sure that all parts are at the same height. Make sure that the Weight Rest is securely engaged in the Upright. Repeat this step on page 11. 10 10.
Hook 2 1 Adjustment Holes 11. The use the weight bench. Insert the hook on the Weight Rest into an 10 adjustment hole in an adjustment hole. Make sure that the Weight Rests (2) are properly tightened before you use of the remaining parts will be explained in ADJUSTMENT, beginning on the other side of the weight bench. Slide a Weight Rest (2) onto an Upright (1). Make sure that all parts are at the same height. Make sure that the Weight Rest is securely engaged in the Upright. Repeat this step on page 11. 10 10.
English Manual
Page 11
... adjustment brackets. 16 4 7 USING THE LEG LEVER To use the Leg Lever (11), slide a weight plate (not included) onto the Weight Tube (12) and secure it with a damp cloth and a mild, non-abrasive detergent. Do not use the weight bench. See the EXERCISE GUIDELINES on the Leg Lever (11). 11 12 47 11 Also...
... adjustment brackets. 16 4 7 USING THE LEG LEVER To use the Leg Lever (11), slide a weight plate (not included) onto the Weight Tube (12) and secure it with a damp cloth and a mild, non-abrasive detergent. Do not use the weight bench. See the EXERCISE GUIDELINES on the Leg Lever (11). 11 12 47 11 Also...
English Manual
Page 12
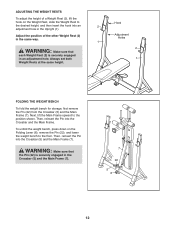
...that the Pin (22) is securely engaged in the Crossbar (5) and the Main Frame (7). 7 22 5 6 12 Hook 2 Adjustment Holes 1 2 1 FOLDING THE WEIGHT BENCH To fold the weight bench for storage, first remove the Pin (22) from the Crossbar (5) and the Main Frame (7). WARNING: Make sure that each... Weight Rest (2) is securely engaged in an adjustment hole. Then, reinsert the Pin into the Crossbar and the Main Frame. Adjust the position of a Weight Rest (2), lift the hook on the Folding Lever (6), remove the Pin (22), and lower the weight bench to the position shown....
...that the Pin (22) is securely engaged in the Crossbar (5) and the Main Frame (7). 7 22 5 6 12 Hook 2 Adjustment Holes 1 2 1 FOLDING THE WEIGHT BENCH To fold the weight bench for storage, first remove the Pin (22) from the Crossbar (5) and the Main Frame (7). WARNING: Make sure that each... Weight Rest (2) is securely engaged in an adjustment hole. Then, reinsert the Pin into the Crossbar and the Main Frame. Adjust the position of a Weight Rest (2), lift the hook on the Folding Lever (6), remove the Pin (22), and lower the weight bench to the position shown....


