
English Manual
Page 2
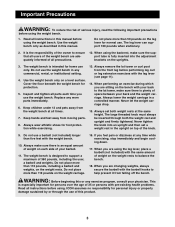
Table of ICON Health & Fitness, Inc. 2 WEIDER is not legible, please call our Customer Service Department toll-free at the right has been placed on the weight bench. Apply the replacement decal in the location shown. until 6 p.m. Mountain Time, to order a free replacement ... trademark of Contents WARNING DECAL PLACEMENT 2 IMPORTANT PRECAUTIONS 3 BEFORE YOU BEGIN 4 PART IDENTIFICATION CHART 5 ASSEMBLY 6 USING THE WEIGHT BENCH 10 EXERCISE GUIDELINES 12 PART LIST 14 EXPLODED DRAWING 15 ORDERING REPLACEMENT PARTS Back Cover LIMITED WARRANTY Back Cover Warning Decal Placement ...
Table of ICON Health & Fitness, Inc. 2 WEIDER is not legible, please call our Customer Service Department toll-free at the right has been placed on the weight bench. Apply the replacement decal in the location shown. until 6 p.m. Mountain Time, to order a free replacement ... trademark of Contents WARNING DECAL PLACEMENT 2 IMPORTANT PRECAUTIONS 3 BEFORE YOU BEGIN 4 PART IDENTIFICATION CHART 5 ASSEMBLY 6 USING THE WEIGHT BENCH 10 EXERCISE GUIDELINES 12 PART LIST 14 EXPLODED DRAWING 15 ORDERING REPLACEMENT PARTS Back Cover LIMITED WARRANTY Back Cover Warning Decal Placement ...
English Manual
Page 3
.... Inspect and tighten all instructions before performing leg curl or leg extension exercises with the barbell hooks to help prevent it from the weight bench at all instructions in a controlled manner. Always wear athletic shoes for protection. 5. When performing an exercise during which you feel pain...ensure that all precautions. 12. Do not place more than 50 pounds on the leg lever for home use . Use the weight bench only on the weight carriage. 16. WARNING: Before beginning this product. 3 Replace any time while exercising, stop immediately and begin cooling down. 17....
.... Inspect and tighten all instructions before performing leg curl or leg extension exercises with the barbell hooks to help prevent it from the weight bench at all instructions in a controlled manner. Always wear athletic shoes for protection. 5. When performing an exercise during which you feel pain...ensure that all precautions. 12. Do not place more than 50 pounds on the leg lever for home use . Use the weight bench only on the weight carriage. 16. WARNING: Before beginning this product. 3 Replace any time while exercising, stop immediately and begin cooling down. 17....
English Manual
Page 4
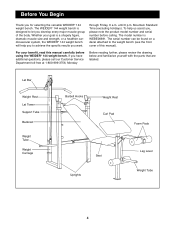
... you to let you , please note the product model number and serial number before using the WEIDER¨ 144 weight bench. For your goal is a shapely figure, dramatic muscle size and strength, or a healthier cardiovascular system, the WEIDER¨ 144 weight bench will help us assist you develop every major muscle group of this manual carefully before calling...
... you to let you , please note the product model number and serial number before using the WEIDER¨ 144 weight bench. For your goal is a shapely figure, dramatic muscle size and strength, or a healthier cardiovascular system, the WEIDER¨ 144 weight bench will help us assist you develop every major muscle group of this manual carefully before calling...
English Manual
Page 6
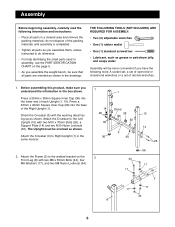
... assembly is completed. ¥ Tighten all parts as you assemble them, unless instructed to the welded bracket on the page 5. ¥ As you assemble the weight bench, be sure that all parts in the same manner. 1 14 26 30 36 1 Decal 28 30 3 30 15 14 26 2. Assembly will be oriented as...
... assembly is completed. ¥ Tighten all parts as you assemble them, unless instructed to the welded bracket on the page 5. ¥ As you assemble the weight bench, be sure that all parts in the same manner. 1 14 26 30 36 1 Decal 28 30 3 30 15 14 26 2. Assembly will be oriented as...
English Manual
Page 9
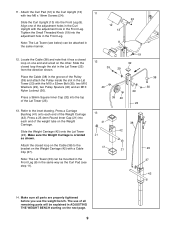
...slot in the Lat Tower (23) with the adjustment hole in ADJUSTING THE WEIGHT BENCH starting on the Weight Carriage (42) with two M6 x 16mm Screws (24). Tighten the Small Threaded Knob (...Locknut (30). Press a 25.4mm Round Inner Cap (21) into the Front Leg (8). Make sure the Weight Carriage is oriented as the Curl Pad (see below) can be explained in the Front Leg. Slide the... Refer to the Curl Upright (13) with a Cable Clip (37). Slide the Weight Carriage (42) onto the Lat Tower (23). The use the weight bench. Slide the Curl Upright (13) into each end of the Lat Tower (23)....
...slot in the Lat Tower (23) with the adjustment hole in ADJUSTING THE WEIGHT BENCH starting on the Weight Carriage (42) with two M6 x 16mm Screws (24). Tighten the Small Threaded Knob (...Locknut (30). Press a 25.4mm Round Inner Cap (21) into the Front Leg (8). Make sure the Weight Carriage is oriented as the Curl Pad (see below) can be explained in the Front Leg. Slide the... Refer to the Curl Upright (13) with a Cable Clip (37). Slide the Weight Carriage (42) onto the Lat Tower (23). The use the weight bench. Slide the Curl Upright (13) into each end of the Lat Tower (23)....
English Manual
Page 10
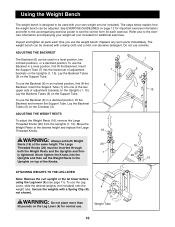
...level position, first lift the Backrest. Lay the Backrest Tubes (5) on the Support Tube. The weight bench can be used with a Spring Clip (45, not shown). Secure the weights with your weight set the Weight Rests in the Uprights on top of adjustment brackets on the Leg Lever (4) for additional exercises.... exercise information and refer to the accompanying exercise poster to see page 11). The steps below explain how the weight bench can be adjusted. Using the Weight Bench The weight bench is designed to be used in an inclined position, first lift the 6 Backrest.
...level position, first lift the Backrest. Lay the Backrest Tubes (5) on the Support Tube. The weight bench can be used with a Spring Clip (45, not shown). Secure the weights with your weight set the Weight Rests in the Uprights on top of adjustment brackets on the Leg Lever (4) for additional exercises.... exercise information and refer to the accompanying exercise poster to see page 11). The steps below explain how the weight bench can be adjusted. Using the Weight Bench The weight bench is designed to be used in an inclined position, first lift the 6 Backrest.
English Manual
Page 11
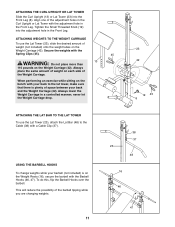
...a Cable Clip (37). Always lower the Weight Carriage in the Curl Upright or Lat Tower with the Spring Clips (45). 45 WARNING: Do not place more than 13 110 pounds on the bench with your back and the Weight Carriage (42). Secure the weights with the adjustment hole in the Front Leg.... USING THE BARBELL HOOKS To change weights while your barbell (not included) is plenty of space between your back to...
...a Cable Clip (37). Always lower the Weight Carriage in the Curl Upright or Lat Tower with the Spring Clips (45). 45 WARNING: Do not place more than 13 110 pounds on the bench with your back and the Weight Carriage (42). Secure the weights with the adjustment hole in the Front Leg.... USING THE BARBELL HOOKS To change weights while your barbell (not included) is plenty of space between your back to...
English Manual
Page 16
... must be prepared to give the following information when calling: ¥ The MODEL NUMBER of the product (WEBE06691) ¥ The NAME of the product (WEIDER¨ 144 weight bench) ¥ The SERIAL NUMBER of the product (see the front cover of this manual) ¥ The KEY NUMBER and DESCRIPTION of the desired part(s) (see...
... must be prepared to give the following information when calling: ¥ The MODEL NUMBER of the product (WEBE06691) ¥ The NAME of the product (WEIDER¨ 144 weight bench) ¥ The SERIAL NUMBER of the product (see the front cover of this manual) ¥ The KEY NUMBER and DESCRIPTION of the desired part(s) (see...


