
English Manual
Page 1
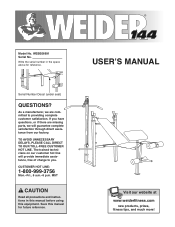
... DIRECT TO OUR TOLL-FREE CUSTOMER HOT LINE. As a manufacturer, we are missing parts, we will provide immediate assistance, free of charge to you have questions, or if there are committed to providing complete customer satisfaction. MST CAUTION Read all precautions and instructions in the space above for future reference. Write the serial number in this manual before using this manual...
... DIRECT TO OUR TOLL-FREE CUSTOMER HOT LINE. As a manufacturer, we are missing parts, we will provide immediate assistance, free of charge to you have questions, or if there are committed to providing complete customer satisfaction. MST CAUTION Read all precautions and instructions in the space above for future reference. Write the serial number in this manual before using this manual...
English Manual
Page 2
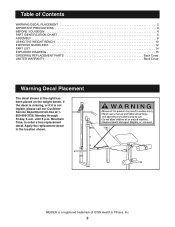
... of Contents WARNING DECAL PLACEMENT 2 IMPORTANT PRECAUTIONS 3 BEFORE YOU BEGIN 4 PART IDENTIFICATION CHART 5 ASSEMBLY 6 USING THE WEIGHT BENCH 10 EXERCISE GUIDELINES 12 PART LIST 14 EXPLODED DRAWING 15 ORDERING REPLACEMENT PARTS Back Cover LIMITED WARRANTY Back Cover Warning Decal Placement The decal shown at 1800-999-3756, Monday through Friday, 6 a.m. Mountain Time, to order a free replacement decal. until 6 p.m. Apply the replacement decal in the location shown. Table of ICON Health & Fitness, Inc. 2
... of Contents WARNING DECAL PLACEMENT 2 IMPORTANT PRECAUTIONS 3 BEFORE YOU BEGIN 4 PART IDENTIFICATION CHART 5 ASSEMBLY 6 USING THE WEIGHT BENCH 10 EXERCISE GUIDELINES 12 PART LIST 14 EXPLODED DRAWING 15 ORDERING REPLACEMENT PARTS Back Cover LIMITED WARRANTY Back Cover Warning Decal Placement The decal shown at 1800-999-3756, Monday through Friday, 6 a.m. Mountain Time, to order a free replacement decal. until 6 p.m. Apply the replacement decal in the location shown. Table of ICON Health & Fitness, Inc. 2
English Manual
Page 3
... inserted into an upright and then set both the weight rest and upright and firmly tightened. Always remove the lat tower or curl post from the weight bench at all times. 7. Always set a weight rest in the upright on top of the knob. 9. Never tighten the knob into the adjustment brackets on the weight carriage. 16. Do not use the weight bench in a controlled manner. When you are using the leg lever, place...
... inserted into an upright and then set both the weight rest and upright and firmly tightened. Always remove the lat tower or curl post from the weight bench at all times. 7. Always set a weight rest in the upright on top of the knob. 9. Never tighten the knob into the adjustment brackets on the weight carriage. 16. Do not use the weight bench in a controlled manner. When you are using the leg lever, place...
English Manual
Page 4
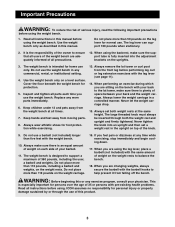
Lat Bar Weight Rest Lat Tower Support Tube Backrest Weight Tube Weight Carriage Barbell Hooks Weight Rest Curl Pad Foam Pads Seat Uprights Leg Lever Weight Tube 4 until 6 p.m. Mountain Standard Time (excluding holidays). The model number is designed to the weight bench (see the front cover of the body. For your goal is a shapely figure, dramatic muscle size and strength, or a healthier cardiovascular system, the WEIDER¨ 144 weight bench will help us assist...
Lat Bar Weight Rest Lat Tower Support Tube Backrest Weight Tube Weight Carriage Barbell Hooks Weight Rest Curl Pad Foam Pads Seat Uprights Leg Lever Weight Tube 4 until 6 p.m. Mountain Standard Time (excluding holidays). The model number is designed to the weight bench (see the front cover of the body. For your goal is a shapely figure, dramatic muscle size and strength, or a healthier cardiovascular system, the WEIDER¨ 144 weight bench will help us assist...
English Manual
Page 5
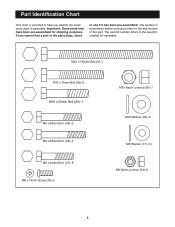
The number in assembly. Part Identification Chart This chart is provided to help you cannot find a part in the parts bags, check to see if it has been pre-assembled. If you identify the small parts used in parenthesis below each part refers to the quantity needed for shipping purposes. The second number refers to the key number of the part. M10 x 130mm Bolt (9)Ð1 M10 x 70mm Bolt (26...
The number in assembly. Part Identification Chart This chart is provided to help you cannot find a part in the parts bags, check to see if it has been pre-assembled. If you identify the small parts used in parenthesis below each part refers to the quantity needed for shipping purposes. The second number refers to the key number of the part. M10 x 130mm Bolt (9)Ð1 M10 x 70mm Bolt (26...
English Manual
Page 6
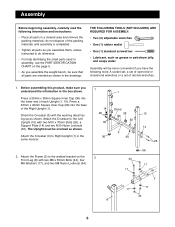
... 30 3 30 15 14 26 2. Before assembling this product, make sure you assemble the weight bench, be sure that all parts in a cleared area and remove the packing materials; Attach the Frame (2) to do otherwise. ¥ For help identifying the small parts used in assembly, use the PART IDENTIFICATION CHART on the 2 Front Leg (8) with two M8 x 50mm Bolts (44), four M8 Washers (17), and...
... 30 3 30 15 14 26 2. Before assembling this product, make sure you assemble the weight bench, be sure that all parts in a cleared area and remove the packing materials; Attach the Frame (2) to do otherwise. ¥ For help identifying the small parts used in assembly, use the PART IDENTIFICATION CHART on the 2 Front Leg (8) with two M8 x 50mm Bolts (44), four M8 Washers (17), and...
English Manual
Page 7
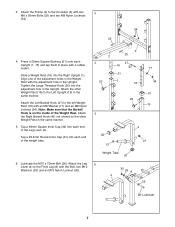
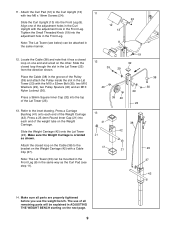
... Leg Lever (4). Tighten the Large Threaded Knob (20) into each end of the adjustment holes in the Upright. Tap a 25.4mm Round Inner Cap (21) into the adjustment hole in place with a rubber mallet. Attach the Left Barbell Hook (47) to the Front Leg (8) with two 3 M8 x 55mm Bolts (25) and two M8 Nylon Locknuts (34). 34 25 4. Attach the Leg...
... Leg Lever (4). Tighten the Large Threaded Knob (20) into each end of the adjustment holes in the Upright. Tap a 25.4mm Round Inner Cap (21) into the adjustment hole in place with a rubber mallet. Attach the Left Barbell Hook (47) to the Front Leg (8) with two 3 M8 x 55mm Bolts (25) and two M8 Nylon Locknuts (34). 34 25 4. Attach the Leg...
English Manual
Page 8
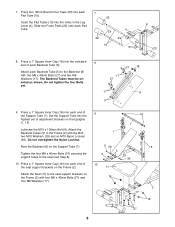
... (6) with two M8 x 40mm Bolts (27) and two M8 Washers (17). Set the Support Tube into the holes in the Leg Lever (4). Press a 1Ó Square Inner Cap (18) into each Backrest Tube (5). Press a 1Ó Square Inner Cap (18) into the indicated 8 end of each end of the Support Tube (7). Lubricate the M10 x 130mm Bolt (9). Attach the Seat (11) to the Frame...
... (6) with two M8 x 40mm Bolts (27) and two M8 Washers (17). Set the Support Tube into the holes in the Leg Lever (4). Press a 1Ó Square Inner Cap (18) into each Backrest Tube (5). Press a 1Ó Square Inner Cap (18) into the indicated 8 end of each end of the Support Tube (7). Lubricate the M10 x 130mm Bolt (9). Attach the Seat (11) to the Frame...
English Manual
Page 9
... Curl Upright with a Cable Clip (37). Place the Cable (38) in the groove of the adjustment holes in the Lat Tower (23) with two M6 x 16mm Screws (24). Press a 25.4mm Round Inner Cap (21) into the Front Leg (8). Make sure the Weight Carriage is oriented as the Curl Pad (see below) can be attached in ADJUSTING THE WEIGHT BENCH starting on the Weight Carriage...
... Curl Upright with a Cable Clip (37). Place the Cable (38) in the groove of the adjustment holes in the Lat Tower (23) with two M6 x 16mm Screws (24). Press a 25.4mm Round Inner Cap (21) into the Front Leg (8). Make sure the Weight Carriage is oriented as the Curl Pad (see below) can be attached in ADJUSTING THE WEIGHT BENCH starting on the Weight Carriage...
English Manual
Page 10
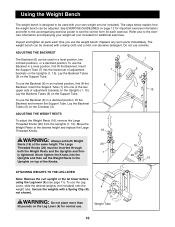
... weight bench can be cleaned with a Spring Clip (45, not shown). ADJUSTING THE BACKREST The Backrest (6) can be used with your weight set (not included) for important exercise information and refer to the accompanying exercise poster to the desired height and replace the Large Threaded Knobs. 16 WARNING: Always set both the Weight Rests and the Uprights and firm- 1 ly tightened. To use . Insert the Support Tube...
... weight bench can be cleaned with a Spring Clip (45, not shown). ADJUSTING THE BACKREST The Backrest (6) can be used with your weight set (not included) for important exercise information and refer to the accompanying exercise poster to the desired height and replace the Large Threaded Knobs. 16 WARNING: Always set both the Weight Rests and the Uprights and firm- 1 ly tightened. To use . Insert the Support Tube...
English Manual
Page 11
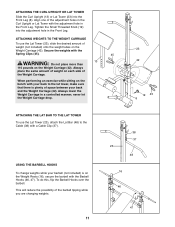
... the barbell with a Cable Clip (37). USING THE BARBELL HOOKS To change weights while your back and the Weight Carriage (42). ATTACHING THE CURL UPRIGHT OR LAT TOWER Slide the Curl Upright (13) or Lat Tower (23) into the adjustment hole in a controlled manner; never let the Weight Carriage drop. 23 42 19 45 8 ATTACHING THE LAT BAR TO THE LAT TOWER To use the Lat Tower (23), slide...
... the barbell with a Cable Clip (37). USING THE BARBELL HOOKS To change weights while your back and the Weight Carriage (42). ATTACHING THE CURL UPRIGHT OR LAT TOWER Slide the Curl Upright (13) or Lat Tower (23) into the adjustment hole in a controlled manner; never let the Weight Carriage drop. 23 42 19 45 8 ATTACHING THE LAT BAR TO THE LAT TOWER To use the Lat Tower (23), slide...
English Manual
Page 12
... weight, use a low amount of weight and increase the number of repetitions in each set . Exercising in each set . It is very important to avoid overdoing it is one complete cycle of an exercise, such as the return stage. When you can reshape and strengthen your body, plus develop a stronger heart and lungs. Begin each set . The repetitions in each workout with a list...
... weight, use a low amount of weight and increase the number of repetitions in each set . Exercising in each set . It is very important to avoid overdoing it is one complete cycle of an exercise, such as the return stage. When you can reshape and strengthen your body, plus develop a stronger heart and lungs. Begin each set . The repetitions in each workout with a list...
English Manual
Page 13
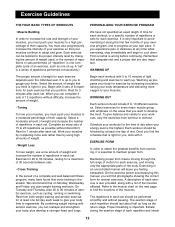
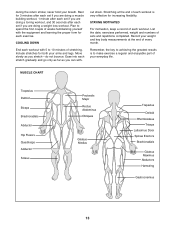
Rest for each workout is to make exercise a regular and enjoyable part of your weight and key body measurements at the end of each exercise. Move slowly as you can with- List the date, exercises performed, weight and numbers of stretching. MUSCLE CHART Trapezius Deltoid Biceps ...workout with the equipment and learning the proper form for 3 minutes after each set if you are doing a muscle building workout, 1 minute after each set if you are doing a weight loss workout. out strain. STAYING MOTIVATED For motivation, keep a record of every month. never hold your arms and legs...
Rest for each workout is to make exercise a regular and enjoyable part of your weight and key body measurements at the end of each exercise. Move slowly as you can with- List the date, exercises performed, weight and numbers of stretching. MUSCLE CHART Trapezius Deltoid Biceps ...workout with the equipment and learning the proper form for 3 minutes after each set if you are doing a muscle building workout, 1 minute after each set if you are doing a weight loss workout. out strain. STAYING MOTIVATED For motivation, keep a record of every month. never hold your arms and legs...
English Manual
Page 14
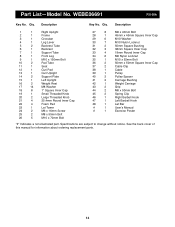
Qty. See the back cover of this manual for information about ordering replacement parts. 14 Part ListÑModel No. Description Key No. Specifications are subject to change without notice. Qty. Description 1 1 Right Upright 2 1 Frame 3 1 Crossbar 4 1 Leg Lever 5 2 Backrest Tube 6 1 Backrest 7 1 Support Tube 8 1 Front Leg 9 1 M10 x 130mm Bolt 10 2 Pad Tube 11 1 Seat 12 1 Curl Pad 13 1 Curl Upright 14 2 Support Plate 15 1 Left Upright 16 2 Weight Rest 17 14 M8 Washer...
Qty. See the back cover of this manual for information about ordering replacement parts. 14 Part ListÑModel No. Description Key No. Specifications are subject to change without notice. Qty. Description 1 1 Right Upright 2 1 Frame 3 1 Crossbar 4 1 Leg Lever 5 2 Backrest Tube 6 1 Backrest 7 1 Support Tube 8 1 Front Leg 9 1 M10 x 130mm Bolt 10 2 Pad Tube 11 1 Seat 12 1 Curl Pad 13 1 Curl Upright 14 2 Support Plate 15 1 Left Upright 16 2 Weight Rest 17 14 M8 Washer...
English Manual
Page 15
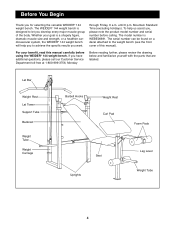
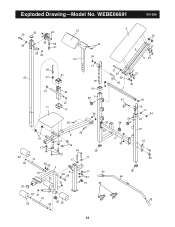
Exploded DrawingÑModel No. WEBE06691 R1100A 32 40 12 35 6 18 39 38 29 37 29 30 24 34 13 17 5 5 27 23 22 33 32 38 41 37 21 42 21 11 41 17 16 18 31 20 1 34 25 30 25 2 18 17 17 10 18 44 27 17 17 30 29 4 33 22 8 29 26 17 34 21 19 30 36 43 45 9 29 29 46 7 17 27 30 47 20 28 3 30 18 16 17 34 31 15 14 26 36 48 33 21 10 43 22 33 32 22 15
Exploded DrawingÑModel No. WEBE06691 R1100A 32 40 12 35 6 18 39 38 29 37 29 30 24 34 13 17 5 5 27 23 22 33 32 38 41 37 21 42 21 11 41 17 16 18 31 20 1 34 25 30 25 2 18 17 17 10 18 44 27 17 17 30 29 4 33 22 8 29 26 17 34 21 19 30 36 43 45 9 29 29 46 7 17 27 30 47 20 28 3 30 18 16 17 34 31 15 14 26 36 48 33 21 10 43 22 33 32 22 15
English Manual
Page 16
... consequential damages. Limited Warranty ICON Health & Fitness, Inc. (ICON), warrants this product to be prepared to give the following information when calling: ¥ The MODEL NUMBER of the product (WEBE06691) ¥ The NAME of the product (WEIDER¨ 144 weight bench) ¥ The SERIAL NUMBER of the product (see the front cover of this manual) ¥ The KEY NUMBER and DESCRIPTION of the desired part(s) (see the PART LIST and the EXPLODED...
... consequential damages. Limited Warranty ICON Health & Fitness, Inc. (ICON), warrants this product to be prepared to give the following information when calling: ¥ The MODEL NUMBER of the product (WEBE06691) ¥ The NAME of the product (WEIDER¨ 144 weight bench) ¥ The SERIAL NUMBER of the product (see the front cover of this manual) ¥ The KEY NUMBER and DESCRIPTION of the desired part(s) (see the PART LIST and the EXPLODED...


