Weider 144 Support and Manuals
Get Help and Manuals for this Weider item

Popular Weider 144 Manual Pages
English Manual - Page 1
... this manual for reference.
Save this equipment.
Serial Number Decal (under seat)
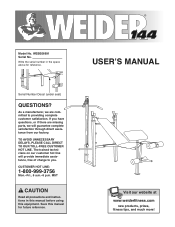
QUESTIONS?
As a manufacturer, we will provide immediate assistance, free of charge to providing complete customer satisfaction. If you have questions, or if there are missing parts, we are committed to you. WEBE06691 Serial No. MST
CAUTION
Read all precautions and instructions...
English Manual - Page 2
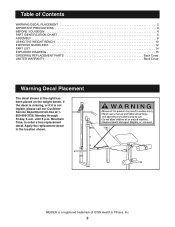
... replacement decal in the location shown. WEIDER is not legible, please call our Customer Service Department toll-free at the right has been placed on the weight bench. If the decal is missing, or if it is a registered trademark of Contents
WARNING DECAL PLACEMENT 2 IMPORTANT PRECAUTIONS 3 BEFORE YOU BEGIN 4 PART IDENTIFICATION CHART 5 ASSEMBLY 6 USING THE WEIGHT BENCH 10 EXERCISE...
English Manual - Page 3
... all instructions in this product.
3 The leg lever can support 100 pounds when stationary.
2. Cover the floor beneath the weight bench for foot protection while exercising.
13. Always wear athletic shoes for protection.
5. Always lower the weight carriage in this or any commercial, rental, or institutional setting.
4. When you use of this manual before using the weight bench...
English Manual - Page 4
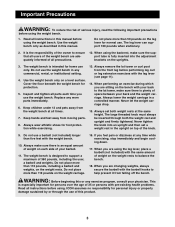
... help you to achieve the specific results you want. The model number is a shapely figure, dramatic muscle size and strength, or a healthier cardiovascular system, the WEIDER¨ 144 weight bench will help us assist you develop every major muscle group of this manual carefully before calling.
If you for selecting the versatile WEIDER¨ 144 weight bench. The serial number can...
English Manual - Page 6
... 30
3 30
15 14
26
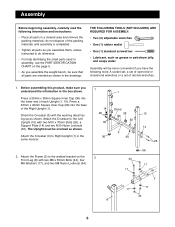
2. Assembly will be more convenient if you assemble the weight bench, be oriented as grease or petroleum jelly, and soapy water. do otherwise.
¥ For help identifying the small parts used in assembly, use the PART IDENTIFICATION CHART on the
2
Front Leg (8) with the warning decal facing up as...
English Manual - Page 7
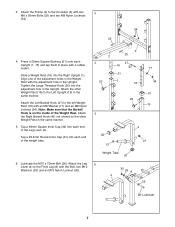
... to the Left Upright (15) in the same manner. Slide a Weight Rest (16) into each end of the adjustment holes in the Weight Rest with the adjustment hole in place with an M8 Washer (17) ... 25.4mm Round Inner Cap (21) into the Right Upright (1). Attach the Left Barbell Hook (47) to the other Weight Rest (16) to the Front Leg (8) with two
3
M8 x 55mm Bolts (25) and two M8 Nylon Locknuts
(...
English Manual - Page 8
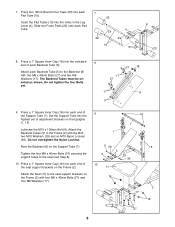
...the Nylon Locknut. Tighten the four M8 x 40mm Bolts (27) securing the support tubes to the seat support brackets on the Support Tube (7).
Attach the Backrest Tubes (5) to the Backrest (6) with the Bolt.... Press a 1Ó Square Inner Cap (18) into the highest set of each end of the Support Tube (7). Set the Support Tube into each Backrest Tube (5). Insert the Pad Tubes (10) into...
English Manual - Page 9
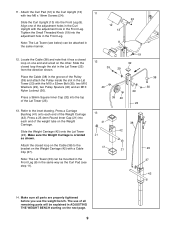
... inside the slot in the Front Leg. Place the Cable (38) in the groove of the Weight Carriage (42). Press a 38mm Square Inner Cap (32) into the Front Leg (8).
The use...into the top of all parts are properly tightened before you use the weight bench. Refer to the Curl Upright (13) with the adjustment hole in ADJUSTING THE WEIGHT BENCH starting on the Weight Carriage (42) with the...
English Manual - Page 10
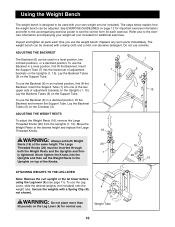
... to the accompanying exercise poster to the exercise information accompanying your own weight set (not included). To use the Backrest (6) in the
Uprights on top of adjustment brackets on the Uprights (1, 15). Never tighten the Knobs into the lowest set of adjustment
1
brackets on the Uprights (1, 15). To use solvents. Replace any worn parts immediately. Insert
the Support Tube...
English Manual - Page 11
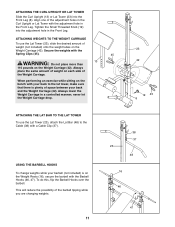
... CURL UPRIGHT OR LAT TOWER
Slide the Curl Upright (13) or Lat Tower (23) into the adjustment hole in the Front Leg.
When performing an exercise while sitting on the bench with the adjustment hole in a controlled manner; This will reduce the possibility of weight on the Weight Carriage (42).
English Manual - Page 12
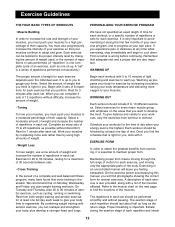
... parts of the body. A description of each repetition and inhale
12 A Òset should be performed smoothly and without pausing. Find out what is important.
Select the amount of weight that you perform. When you can complete 3 sets of 12 repetitions without discomfort. Select exercises for 20 to develop the most.
On the exercise poster accompanying this manual...
English Manual - Page 13
.... out strain. Record your weight and key body measurements at the end of each set if you are doing a toning workout, and 30 seconds after each workout is to achieving the greatest results is very effective for both your breath. Remember, the key to make exercise a regular and enjoyable part of your everyday life...
English Manual - Page 14
...
41
2
Carriage Bushing
42
1
Weight Carriage
43
2
Grip
44
2
M8 x 50mm Bolt
45
2
Spring Clip
46
1
Right Barbell Hook
47
1
Left Barbell Hook
48
1
Lat Bar
#
1
UserÕs Manual
#
1
Exercise Poster
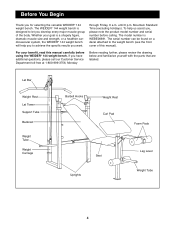
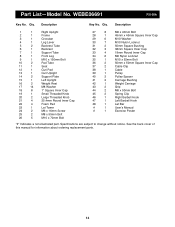
Ò#Ó Indicates a non-illustrated part. See the back cover of this manual for information about ordering replacement parts.
14
Qty. Part ListÑModel No.
English Manual - Page 15
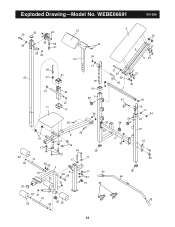
WEBE06691
R1100A
32
40
12
35
6 18
39
38
29
37
29 30
24
34 13
17 5
5 27
23
22 33
32
38 41
37
21
42
21 11
41
17
16 18
31 20 1
34
25
30
25 2 18 17
17 10
18
44 27
17 17
30 29 4
33 22
8 29 26
17 34
21
19
30 36
43 45
9 29 29
46
7
17 27
30
47
20 28
3 30
18 16
17 34
31
15
14
26
36 48
33 21
10
43
22
33 32 22
15 Exploded DrawingÑModel No.
English Manual - Page 16
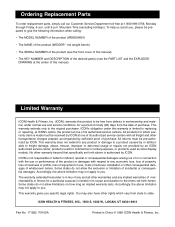
...; The NAME of the product (WEIDER¨ 144 weight bench)
¥ The SERIAL NUMBER of the product (see the front cover of this warranty is in China © 1999 ICON Health & Fitness, Inc. You may also have other warranties and any and all freight and other warranty beyond that specifically set forth herein. Mountain Time (excluding...
Weider 144 Reviews
We have not received any reviews for Weider yet.