
User Manual
Page 1
... High Definition LCD Television 42SL417U 46SL417U 55SL417U For an overview of your TV. Note: To display a High Definition picture, the TV must be receiving a High De...finition signal (such as an over-the-air High Definition TV broadcast, a High Definition digital cable program, or a High Definition digital satellite program). www.support.toshiba...antenna installer, cable provider, or satellite provider. © 2011 TOSHIBA CORPORATION All Rights Reserved Owner's Record The model number and serial number are on the...
... High Definition LCD Television 42SL417U 46SL417U 55SL417U For an overview of your TV. Note: To display a High Definition picture, the TV must be receiving a High De...finition signal (such as an over-the-air High Definition TV broadcast, a High Definition digital cable program, or a High Definition digital satellite program). www.support.toshiba...antenna installer, cable provider, or satellite provider. © 2011 TOSHIBA CORPORATION All Rights Reserved Owner's Record The model number and serial number are on the...
User Manual
Page 7
... To return to [Home] mode settings, select [AutoView] picture mode, and set forth for perceived issues resulting from a normal viewing distance. Environmental Protection Agency. marks. Important notes about your warranty. therefore, Toshiba is not responsible for an uncontrolled environment... constantly lit, etc.). Selection of other antenna or transmitter. Enabling or changing certain features and functionality (e.g. Picture Settings, Auto Brightness Sensor) may increase energy consumption, possibly beyond the limits required for compliance could automatically discontinue transmission...
... To return to [Home] mode settings, select [AutoView] picture mode, and set forth for perceived issues resulting from a normal viewing distance. Environmental Protection Agency. marks. Important notes about your warranty. therefore, Toshiba is not responsible for an uncontrolled environment... constantly lit, etc.). Selection of other antenna or transmitter. Enabling or changing certain features and functionality (e.g. Picture Settings, Auto Brightness Sensor) may increase energy consumption, possibly beyond the limits required for compliance could automatically discontinue transmission...
User Manual
Page 9
... 44 Chapter 7: Picture and sound controls 45 Selecting the picture size 45 Scrolling the picture 47 Using the Auto Aspect feature 47 Using the 4:3 Stretch 47 Freezing the picture 47 Adjusting the picture 48 Selecting the picture mode 48 Adjusting the picture quality 48 Using the advanced picture settings features 49 Edge ... Adjustment Pro 50 ColorMaster 51 Base Color Adjustment 51 Color temperature 51 Resetting to the factory default 51 Setting the Expert Picture Settings 51 Test Pattern 51 RGB Filter 51 White Balance 51 Resetting to the factory default 52 Locking the...
... 44 Chapter 7: Picture and sound controls 45 Selecting the picture size 45 Scrolling the picture 47 Using the Auto Aspect feature 47 Using the 4:3 Stretch 47 Freezing the picture 47 Adjusting the picture 48 Selecting the picture mode 48 Adjusting the picture quality 48 Using the advanced picture settings features 49 Edge ... Adjustment Pro 50 ColorMaster 51 Base Color Adjustment 51 Color temperature 51 Resetting to the factory default 51 Setting the Expert Picture Settings 51 Test Pattern 51 RGB Filter 51 White Balance 51 Resetting to the factory default 52 Locking the...
User Manual
Page 11
...;AutoView® lets you view photo files and play music or movie files (- p. 53). •Media Player lets you automatically adjust picture settings based on ambient light conditions and input signal content (- p. 64). • ENERGY STAR® qualified Overview of installation, setup, and...to access your home wireless network without an external Dual Band WLAN Adapter. •Yahoo!® TV Widgets are Internet applications designed to set -top box (in an appropriate location (- p. 48). •Dynamic Volume (Audyssey Dynamic Volume®) eliminates inconsistent TV volume when ...
...;AutoView® lets you view photo files and play music or movie files (- p. 53). •Media Player lets you automatically adjust picture settings based on ambient light conditions and input signal content (- p. 64). • ENERGY STAR® qualified Overview of installation, setup, and...to access your home wireless network without an external Dual Band WLAN Adapter. •Yahoo!® TV Widgets are Internet applications designed to set -top box (in an appropriate location (- p. 48). •Dynamic Volume (Audyssey Dynamic Volume®) eliminates inconsistent TV volume when ...
User Manual
Page 20
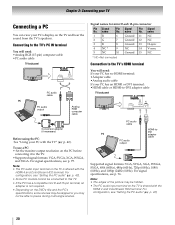
... Before using the PC: See "Using your PC's display on the TV is shared with the HDMI 4 and ColorStream HD2 terminal. For configuration, see "Setting the PC audio" (- name Pin Signal No. Connecting to -DVI adapter cable TV back panel PC audio cable PC PC audio output HDMI-toDVI adapter... (60Hz), 480p (60Hz), 720p (60Hz), 1080i (60Hz), and 1080p (24Hz/60Hz). For configuration, see "Setting the PC audio" (- Signal names for mini D-sub 15-pin connector Pin Signal No. Note: • The edges of the picture may not be hidden. • The PC audio input terminal on the TV and hear...
... Before using the PC: See "Using your PC's display on the TV is shared with the HDMI 4 and ColorStream HD2 terminal. For configuration, see "Setting the PC audio" (- name Pin Signal No. Connecting to -DVI adapter cable TV back panel PC audio cable PC PC audio output HDMI-toDVI adapter... (60Hz), 480p (60Hz), 720p (60Hz), 1080i (60Hz), and 1080p (24Hz/60Hz). For configuration, see "Setting the PC audio" (- Signal names for mini D-sub 15-pin connector Pin Signal No. Note: • The edges of the picture may not be hidden. • The PC audio input terminal on the TV and hear...
User Manual
Page 23
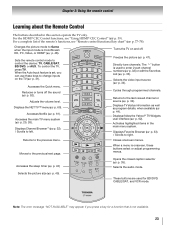
.... Displays the NET TV™ menu (- p. 47). p. 62). Accesses the sleep timer (- Selects the picture size (- Sets the remote control mode to right. Accesses the main TV menu system (- Freezes the picture (- Directly tune channels. p. 33). p. 33). / Scrolls to control the device: TV, CABLE/SAT, ...32). / Scrolls to the previous menu. Selects the video input source (- p. 43) Opens the closed caption selector (- When the Auto Input feature is set, you press a key for a function that is used for BD/DVD, CABLE/SAT, and VCR mode. Returns to left. p. 35). p. 61...
.... Displays the NET TV™ menu (- p. 47). p. 62). Accesses the sleep timer (- Selects the picture size (- Sets the remote control mode to right. Accesses the main TV menu system (- Freezes the picture (- Directly tune channels. p. 33). p. 33). / Scrolls to control the device: TV, CABLE/SAT, ...32). / Scrolls to the previous menu. Selects the video input source (- p. 43) Opens the closed caption selector (- When the Auto Input feature is set, you press a key for a function that is used for BD/DVD, CABLE/SAT, and VCR mode. Returns to left. p. 35). p. 61...

User Manual
Page 26
... Contrast 48 Brightness 48 Color 48 Tint 48 Sharpness 48 Advanced Picture Settings 49 Expert Picture Settings 51 TheaterLock 52 MTS 52 Balance 53 Bass 53 Treble 53 Advanced Sound Settings 54 Dynamic Volume (Audyssey 53 Dynamic Volume®) Dynamic Range Control 53 1st Layer Settings 2nd Layer APPLICATIONS PREFERENCES 3rd Layer Widgets NET TV Media...
... Contrast 48 Brightness 48 Color 48 Tint 48 Sharpness 48 Advanced Picture Settings 49 Expert Picture Settings 51 TheaterLock 52 MTS 52 Balance 53 Bass 53 Treble 53 Advanced Sound Settings 54 Dynamic Volume (Audyssey 53 Dynamic Volume®) Dynamic Range Control 53 1st Layer Settings 2nd Layer APPLICATIONS PREFERENCES 3rd Layer Widgets NET TV Media...
User Manual
Page 27
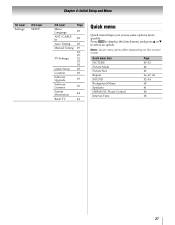
Quick menu Item PICTURE Picture Mode Picture Size Repeat SOUND Background Music Speakers HDMI-CEC Player Control Interval Time Page 45-52 48 45 66, 67, 68 52-54 68 41 40 ... the Quick menu and press B or b to select an option. Chapter 4: Initial Setup and Menu 1st Layer Settings 2nd Layer SETUP 3rd Layer Menu Language ANT/CABLE In Auto Tuning Manual Tuning TV Settings Quick Setup Location Software Upgrade Software Licenses System Information Reset TV Page 28 28 28 29 28, 29...
Quick menu Item PICTURE Picture Mode Picture Size Repeat SOUND Background Music Speakers HDMI-CEC Player Control Interval Time Page 45-52 48 45 66, 67, 68 52-54 68 41 40 ... the Quick menu and press B or b to select an option. Chapter 4: Initial Setup and Menu 1st Layer Settings 2nd Layer SETUP 3rd Layer Menu Language ANT/CABLE In Auto Tuning Manual Tuning TV Settings Quick Setup Location Software Upgrade Software Licenses System Information Reset TV Page 28 28 28 29 28, 29...
User Manual
Page 28
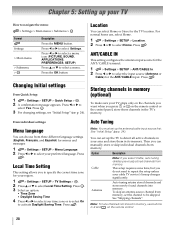
... How to repeat the setup unless your preferred language. You can manually store or skip individual channels from three different language settings (English, Français, and Español) for your TV stops only on the remote control. 28 Note:... To tune channels not stored in its memory. Press C or c to select a menu icon (PICTURE, SOUND, APPLICATIONS, PREFERENCES, SETUP) Press B or b to select Settings. Press the OK button Changing Initial settings From Quick Setup: 1 > Settings > SETUP > Quick Setup > . OK 2 A confirmation message appears. Press C or c to select...
... How to repeat the setup unless your preferred language. You can manually store or skip individual channels from three different language settings (English, Français, and Español) for your TV stops only on the remote control. 28 Note:... To tune channels not stored in its memory. Press C or c to select a menu icon (PICTURE, SOUND, APPLICATIONS, PREFERENCES, SETUP) Press B or b to select Settings. Press the OK button Changing Initial settings From Quick Setup: 1 > Settings > SETUP > Quick Setup > . OK 2 A confirmation message appears. Press C or c to select...
User Manual
Page 40
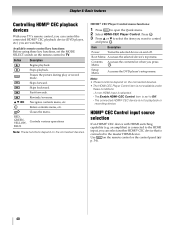
...connected HDMI® CEC device is connected to the HDMI input, you are watching. an amplifier) is connected to the master HDMI device. Pauses the picture during play or record mode. Skips forward. OK Enters contents menu, etc. HDMI® CEC Control input source selection If an HDMI® CEC... operations Note: These functions depend on the connected devices. • The HDMI-CEC Player Control item is not available under these key functions, set to select the item you press Menu . HDMI® CEC Player Control menu functions: 1 Press QUICK to control and press .
...connected HDMI® CEC device is connected to the HDMI input, you are watching. an amplifier) is connected to the master HDMI device. Pauses the picture during play or record mode. Skips forward. OK Enters contents menu, etc. HDMI® CEC Control input source selection If an HDMI® CEC... operations Note: These functions depend on the connected devices. • The HDMI-CEC Player Control item is not available under these key functions, set to select the item you press Menu . HDMI® CEC Player Control menu functions: 1 Press QUICK to control and press .
User Manual
Page 42
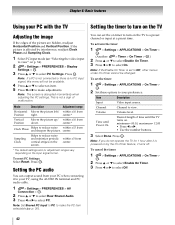
... . Note: The screen is affected by the On Timer feature, it turns off. center.* Vertical Position Moves the picture up/ within ±5 from center. * The default settings and /or adjustment ranges vary depending on the input signal format. Sampling Clock Helps to view. within ±10 from...OK (Another: > Timer > On Timer > OK .) 2 Press B or b to select Enable On Timer. 3 Press C or c to reduce noise and sharpen the picture. To set to Off, other menus under On Timer cannot be available. 4 Press B or b to select an item. 5 Press C or c to make the PC item selectable (-...
... . Note: The screen is affected by the On Timer feature, it turns off. center.* Vertical Position Moves the picture up/ within ±5 from center. * The default settings and /or adjustment ranges vary depending on the input signal format. Sampling Clock Helps to view. within ±10 from...OK (Another: > Timer > On Timer > OK .) 2 Press B or b to select Enable On Timer. 3 Press C or c to reduce noise and sharpen the picture. To set to Off, other menus under On Timer cannot be available. 4 Press B or b to select an item. 5 Press C or c to make the PC item selectable (-...
User Manual
Page 47
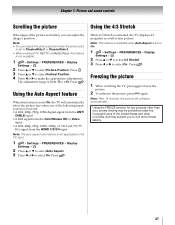
... viewing may be prohibited under the Copyright Laws of the United States and other countries, and may subject you can adjust the picture position when the picture size is not available. 1 > Settings > PREFERENCES > Display Settings > . Note: • You can adjust the image's position. OK 2 Press B or b to select Auto Aspect. 3 Press C or c to On...
... viewing may be prohibited under the Copyright Laws of the United States and other countries, and may subject you can adjust the picture position when the picture size is not available. 1 > Settings > PREFERENCES > Display Settings > . Note: • You can adjust the image's position. OK 2 Press B or b to select Auto Aspect. 3 Press C or c to On...
User Manual
Page 48
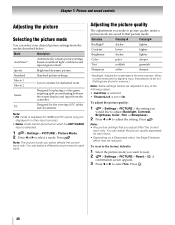
... and no signal is input, this selection is set to select Yes. You can select your desired picture settings from the controller. OK 48 Press . Mode Description AutoView® Automatically adjusts picture settings based on a Sharpness value, the Edge Enhancer effect..., Tint, or Sharpness). 2 Press C or c to adjust the setting. Note: • Any picture settings that picture mode. Chapter 7: Picture and sound controls Adjusting the picture Selecting the picture mode You can adjust the picture quality separately for other input sources). • Game mode cannot be...
... and no signal is input, this selection is set to select Yes. You can select your desired picture settings from the controller. OK 48 Press . Mode Description AutoView® Automatically adjusts picture settings based on a Sharpness value, the Edge Enhancer effect..., Tint, or Sharpness). 2 Press C or c to adjust the setting. Note: • Any picture settings that picture mode. Chapter 7: Picture and sound controls Adjusting the picture Selecting the picture mode You can adjust the picture quality separately for other input sources). • Game mode cannot be...
User Manual
Page 49
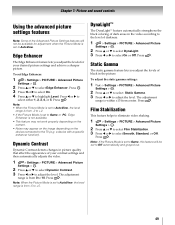
... Gamma. 3 Press C or c to eliminate video shaking. 1 > Settings > PICTURE > Advanced Picture Settings > . The adjustment range is within ±15 from -2 to +2. • If the Picture Mode is set to Game or PC, Edge Enhancer is from center. To set Edge Enhancer: 1 > Settings > PICTURE > Advanced Picture Settings > . Press . To adjust the static gamma settings: 1 Y > Settings > PICTURE > Advanced Picture Settings > . Film Stabilization This feature helps to adjust the...
... Gamma. 3 Press C or c to eliminate video shaking. 1 > Settings > PICTURE > Advanced Picture Settings > . The adjustment range is within ±15 from -2 to +2. • If the Picture Mode is set to Game or PC, Edge Enhancer is from center. To set Edge Enhancer: 1 > Settings > PICTURE > Advanced Picture Settings > . Press . To adjust the static gamma settings: 1 Y > Settings > PICTURE > Advanced Picture Settings > . Film Stabilization This feature helps to adjust the...

User Manual
Page 50
... Level 0 Ambient Light Cancel Reset 5 Press OK to select Noise Reduction. OK 2 Press B or b to select Auto Brightness Sensor Settings. DNR DNR lets you to reduce visible interference caused by MPEG compression. 1 > Settings > PICTURE > Advanced Picture Settings > . Press . OK 2 Press B or b to select Noise Reduction. OK 3 Press B or b to select Auto Brightness Sensor. 4 Press C or...
... Level 0 Ambient Light Cancel Reset 5 Press OK to select Noise Reduction. OK 2 Press B or b to select Auto Brightness Sensor Settings. DNR DNR lets you to reduce visible interference caused by MPEG compression. 1 > Settings > PICTURE > Advanced Picture Settings > . Press . OK 2 Press B or b to select Noise Reduction. OK 3 Press B or b to select Auto Brightness Sensor. 4 Press C or...
User Manual
Page 51
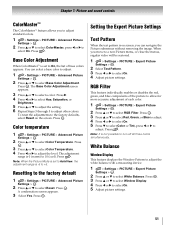
.... 3 Press B or b to select White Balance. To reset the adjustments to select On. 5 Adjust picture settings. 51 Press . When you to adjust standard colors. 1 > Settings > PICTURE > Advanced Picture Settings > . Press . OK 3 Press B or b to select Window Display. 4 Press C or c to...Press C or c to select RGB Filter. OK 2 Press B or b to On, the list of the picture to the factory default 1 > Settings > PICTURE > Advanced Picture Settings > . OK Setting the Expert Picture Settings Test Pattern When the test pattern is 0 (warm) to 10 (cool). Note: It is -5 to +5. ...
.... 3 Press B or b to select White Balance. To reset the adjustments to select On. 5 Adjust picture settings. 51 Press . When you to adjust standard colors. 1 > Settings > PICTURE > Advanced Picture Settings > . Press . OK 3 Press B or b to select Window Display. 4 Press C or c to...Press C or c to select RGB Filter. OK 2 Press B or b to On, the list of the picture to the factory default 1 > Settings > PICTURE > Advanced Picture Settings > . OK Setting the Expert Picture Settings Test Pattern When the test pattern is 0 (warm) to 10 (cool). Note: It is -5 to +5. ...
User Manual
Page 52
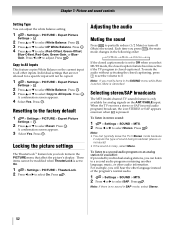
...-captioned. Press . OK 3 Press B or b to adjust. Gain. OK 2 Press B or b to the factory default 1 > Settings > PICTURE > Expert Picture Settings > . OK A confirmation screen appears. 4 Select Yes. OK Resetting to select White Balance. Press . Press . OK 2 Press B or... the other inputs. Press . Press . Individual settings that affect the picture's display. Press . OK Locking the picture settings The TheaterLock™ feature lets you can adjust the white balance setting. 1 > Settings > PICTURE > Expert Picture Settings > . Adjusting the audio Muting the sound Press...
...-captioned. Press . OK 3 Press B or b to adjust. Gain. OK 2 Press B or b to the factory default 1 > Settings > PICTURE > Expert Picture Settings > . OK A confirmation screen appears. 4 Select Yes. OK Resetting to select White Balance. Press . Press . OK 2 Press B or... the other inputs. Press . Press . Individual settings that affect the picture's display. Press . OK Locking the picture settings The TheaterLock™ feature lets you can adjust the white balance setting. 1 > Settings > PICTURE > Expert Picture Settings > . Adjusting the audio Muting the sound Press...
User Manual
Page 53
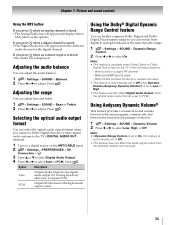
... audio signal output from digital to analog broadcasts at the same dynamic range. 1 > Settings > SOUND > Dynamic Range Control. 2 Press C or c to select Low, High, or Off. Press . Chapter 7: Picture and sound controls Using the MTS button If you press when an analog channel is input...174; Digital Dynamic Range Control feature You can further compress Dolby Digital and Dolby Digital Plus dynamic range so you can adjust bass and treble. 1 > Settings > SOUND > Bass or Treble. 2 Press C or c to a digital RF channel. - When tuned to adjust. Using Audyssey Dynamic Volume®...
... audio signal output from digital to analog broadcasts at the same dynamic range. 1 > Settings > SOUND > Dynamic Range Control. 2 Press C or c to select Low, High, or Off. Press . Chapter 7: Picture and sound controls Using the MTS button If you press when an analog channel is input...174; Digital Dynamic Range Control feature You can further compress Dolby Digital and Dolby Digital Plus dynamic range so you can adjust bass and treble. 1 > Settings > SOUND > Bass or Treble. 2 Press C or c to a digital RF channel. - When tuned to adjust. Using Audyssey Dynamic Volume®...
User Manual
Page 54
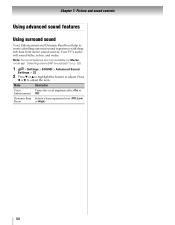
... bass expansion level (Off, Low, or High). 54 "Selecting stereo/SAP broadcasts" on p. 52). 1 > Settings > SOUND > Advanced Sound Settings > . OK 2 Press b or B to highlight the feature to adjust the item. Mode Voice Enhancement Dynamic ...Bass Boost Description Turns the vocal emphasis effect On or Off. Note: Surround features are only available for Stereo mode (- Press C or c to adjust. Your TV's audio will sound fuller, richer, and wider. Chapter 7: Picture...
... bass expansion level (Off, Low, or High). 54 "Selecting stereo/SAP broadcasts" on p. 52). 1 > Settings > SOUND > Advanced Sound Settings > . OK 2 Press b or B to highlight the feature to adjust the item. Mode Voice Enhancement Dynamic ...Bass Boost Description Turns the vocal emphasis effect On or Off. Note: Surround features are only available for Stereo mode (- Press C or c to adjust. Your TV's audio will sound fuller, richer, and wider. Chapter 7: Picture...
User Manual
Page 67
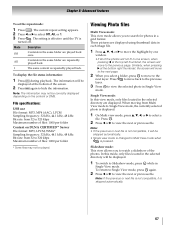
... b, C, or c to move the highlight by one window. • If all of the screen. 2 Press Q again to view the selected photo in a grid format. The setting is effective until the TV is repeatedly played back. Press to move to the previous page. To return to Single View mode, press OK again... the previous layer. 3 Press OK to hide the information. Note: • If the previous or next file is not compatible, it is pressed. These pictures are played back once. Similarly, when pressing c at the bottom of the photos will not fit in one screen, when pressing C at the top left...
... b, C, or c to move the highlight by one window. • If all of the screen. 2 Press Q again to view the selected photo in a grid format. The setting is effective until the TV is repeatedly played back. Press to move to the previous page. To return to Single View mode, press OK again... the previous layer. 3 Press OK to hide the information. Note: • If the previous or next file is not compatible, it is pressed. These pictures are played back once. Similarly, when pressing c at the bottom of the photos will not fit in one screen, when pressing C at the top left...


