User Manual
Page 5
...the TV as described in front of the LCD TV (- These actions will damage the LCD screen. If these sounds become frequent or continuous, unplug the power cord and contact a Toshiba Authorized Service Provider. 44) WARNING: RISK OF SERIOUS PERSONAL INJURY OR EQUIPMENT DAMAGE! Service 46) WARNING: RISK OF...the screws attached to place the spacers provided with a sharp or heavy object. 45) • The LCD screen of this manual to a Toshiba Authorized Service Provider. 47) If you need to determine that can be used when attaching the pedestal stand to avoid damage to the LCD ...
...the TV as described in front of the LCD TV (- These actions will damage the LCD screen. If these sounds become frequent or continuous, unplug the power cord and contact a Toshiba Authorized Service Provider. 44) WARNING: RISK OF SERIOUS PERSONAL INJURY OR EQUIPMENT DAMAGE! Service 46) WARNING: RISK OF...the screws attached to place the spacers provided with a sharp or heavy object. 45) • The LCD screen of this manual to a Toshiba Authorized Service Provider. 47) If you need to determine that can be used when attaching the pedestal stand to avoid damage to the LCD ...
User Manual
Page 8
... A PERSONAL AND NON-COMMERCIAL ACTIVITY AND/OR WAS OBTAINED FROM A VIDEO PROVIDER LICENSED TO PROVIDE AVC VIDEO. Audyssey EQ® provides clear, accurate and natural sound right out of Silicon Image, Inc. and foreign patents pending. in the United States and other countries. • MPEG Layer-3 audio coding technology licensed from...
... A PERSONAL AND NON-COMMERCIAL ACTIVITY AND/OR WAS OBTAINED FROM A VIDEO PROVIDER LICENSED TO PROVIDE AVC VIDEO. Audyssey EQ® provides clear, accurate and natural sound right out of Silicon Image, Inc. and foreign patents pending. in the United States and other countries. • MPEG Layer-3 audio coding technology licensed from...
User Manual
Page 9
... No Signal Power Down 43 Displaying TV status information 44 Viewing support information 44 Resetting to Factory Defaults 44 Power failure 44 Chapter 7: Picture and sound controls 45 Selecting the picture size 45 Scrolling the picture 47 Using the Auto Aspect feature 47 Using the 4:3 Stretch 47 Freezing the picture 47... Pattern 51 RGB Filter 51 White Balance 51 Resetting to the factory default 52 Locking the picture settings 52 Adjusting the audio 52 Muting the sound 52 9
... No Signal Power Down 43 Displaying TV status information 44 Viewing support information 44 Resetting to Factory Defaults 44 Power failure 44 Chapter 7: Picture and sound controls 45 Selecting the picture size 45 Scrolling the picture 47 Using the Auto Aspect feature 47 Using the 4:3 Stretch 47 Freezing the picture 47... Pattern 51 RGB Filter 51 White Balance 51 Resetting to the factory default 52 Locking the picture settings 52 Adjusting the audio 52 Muting the sound 52 9
User Manual
Page 10
... the optical audio output format 53 Using the Dolby® Digital Dynamic Range Control feature 53 Using Audyssey Dynamic Volume 53 Using advanced sound features 54 Using surround sound 54 Chapter 8: Advanced features 55 Using your home network 55 Setting up the Network 56 Wireless Setup 56 Advanced Network Setup 58 Network... default 80 Operating the TV with combination buttons 81 Remote control codes 82 Limited United States Warranty for LCD Televisions 88 Limited Canadian Warranty for Toshiba Brand Flat Panel Televisions 89 Index 92 10
... the optical audio output format 53 Using the Dolby® Digital Dynamic Range Control feature 53 Using Audyssey Dynamic Volume 53 Using advanced sound features 54 Using surround sound 54 Chapter 8: Advanced features 55 Using your home network 55 Setting up the Network 56 Wireless Setup 56 Advanced Network Setup 58 Network... default 80 Operating the TV with combination buttons 81 Remote control codes 82 Limited United States Warranty for LCD Televisions 88 Limited Canadian Warranty for Toshiba Brand Flat Panel Televisions 89 Index 92 10
User Manual
Page 19
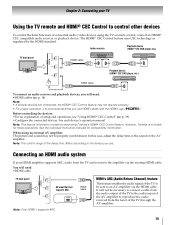
...the HDMI Logo ( ). See the individual instruction manuals for those operations. Note: The control range of the delay time differs according to models incorporating Toshiba's HDMI® CEC Control feature. HDMI's ARC (Audio Return Channel) feature This feature enables the audio signal of the TV to be sent ... recommended that supports ARC HDMI cable Note: Only HDMI 1 supports ARC. Before controlling the devices: •For an explanation of the sound on the AV amplifier. Audio receiver Playback device (HDMI® CEC DVD player,etc.) TV back panel HDMI cable HDMI OUT HDMI ...
...the HDMI Logo ( ). See the individual instruction manuals for those operations. Note: The control range of the delay time differs according to models incorporating Toshiba's HDMI® CEC Control feature. HDMI's ARC (Audio Return Channel) feature This feature enables the audio signal of the TV to be sent ... recommended that supports ARC HDMI cable Note: Only HDMI 1 supports ARC. Before controlling the devices: •For an explanation of the sound on the AV amplifier. Audio receiver Playback device (HDMI® CEC DVD player,etc.) TV back panel HDMI cable HDMI OUT HDMI ...
User Manual
Page 20
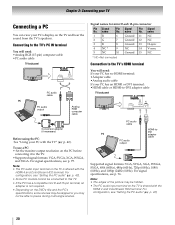
.... •Supported signal formats: VGA, SVGA, XGA, WXGA, and SXGA. To use a PC: • Set the monitor output resolution on the TV and hear the sound from the TV's speakers. Note: • The PC audio input terminal on the TV is not required. • Depending on the TV is shared with...
.... •Supported signal formats: VGA, SVGA, XGA, WXGA, and SXGA. To use a PC: • Set the monitor output resolution on the TV and hear the sound from the TV's speakers. Note: • The PC audio input terminal on the TV is not required. • Depending on the TV is shared with...
User Manual
Page 23
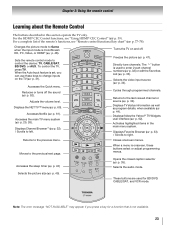
... the TV (- Directly tune channels. p. 33). p. 34). Displays/hides the Yahoo!® TV Widgets user interface (- p. 62). Moves to change inputs on and off the sound (- Accesses the sleep timer (- p. 43) Opens the closed caption selector (- p. 45). Note: The error message "NOT AVAILABLE" may appear if you can use these buttons...
... the TV (- Directly tune channels. p. 33). p. 34). Displays/hides the Yahoo!® TV Widgets user interface (- p. 62). Moves to change inputs on and off the sound (- Accesses the sleep timer (- p. 43) Opens the closed caption selector (- p. 45). Note: The error message "NOT AVAILABLE" may appear if you can use these buttons...

User Manual
Page 26
...Layer Page Network Media Player Wallpaper Timer Settings NET TV Network Setup Wireless Information Photo Movie Music On Timer Sleep Timer Game Timer PICTURE SOUND 60 56 57 (Device select) 67 (Device select) 65 (Device select) 66 69 42 43 39 Picture Mode 48 Reset ...Tint 48 Sharpness 48 Advanced Picture Settings 49 Expert Picture Settings 51 TheaterLock 52 MTS 52 Balance 53 Bass 53 Treble 53 Advanced Sound Settings 54 Dynamic Volume (Audyssey 53 Dynamic Volume®) Dynamic Range Control 53 1st Layer Settings 2nd Layer APPLICATIONS PREFERENCES 3rd ...
...Layer Page Network Media Player Wallpaper Timer Settings NET TV Network Setup Wireless Information Photo Movie Music On Timer Sleep Timer Game Timer PICTURE SOUND 60 56 57 (Device select) 67 (Device select) 65 (Device select) 66 69 42 43 39 Picture Mode 48 Reset ...Tint 48 Sharpness 48 Advanced Picture Settings 49 Expert Picture Settings 51 TheaterLock 52 MTS 52 Balance 53 Bass 53 Treble 53 Advanced Sound Settings 54 Dynamic Volume (Audyssey 53 Dynamic Volume®) Dynamic Range Control 53 1st Layer Settings 2nd Layer APPLICATIONS PREFERENCES 3rd ...
User Manual
Page 27
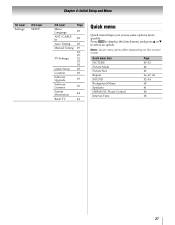
... 28 60 60 44 44 Quick menu Quick menu helps you access some options more quickly. Quick menu Item PICTURE Picture Mode Picture Size Repeat SOUND Background Music Speakers HDMI-CEC Player Control Interval Time Page 45-52 48 45 66, 67, 68 52-54 68 41 40 68 27 Press...
... 28 60 60 44 44 Quick menu Quick menu helps you access some options more quickly. Quick menu Item PICTURE Picture Mode Picture Size Repeat SOUND Background Music Speakers HDMI-CEC Player Control Interval Time Page 45-52 48 45 66, 67, 68 52-54 68 41 40 68 27 Press...
User Manual
Page 28
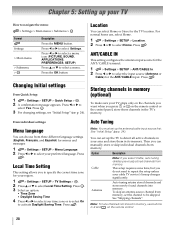
...;ais, and Español) for your cable TV service's lineup changes significantly. Press C or c to select a menu. Press C or c to select a menu icon (PICTURE, SOUND, APPLICATIONS, PREFERENCES, SETUP) Press B or b to select Settings. Press the OK button Changing Initial settings From Quick Setup: 1 > Settings > SETUP > Quick Setup > . Press . Location You...
...;ais, and Español) for your cable TV service's lineup changes significantly. Press C or c to select a menu. Press C or c to select a menu icon (PICTURE, SOUND, APPLICATIONS, PREFERENCES, SETUP) Press B or b to select Settings. Press the OK button Changing Initial settings From Quick Setup: 1 > Settings > SETUP > Quick Setup > . Press . Location You...
User Manual
Page 35
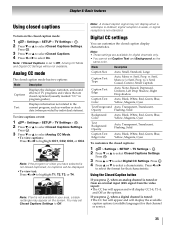
... data (when provided by individual stations). Note: • These settings are closed caption mode has two options: Mode Description Captions Displays the dialogue, narration, and sound effects of TV programs and videos that channel or service. 35 Press . Using the Closed Caption button If you press CC when a digital channel is...
... data (when provided by individual stations). Note: • These settings are closed caption mode has two options: Mode Description Captions Displays the dialogue, narration, and sound effects of TV programs and videos that channel or service. 35 Press . Using the Closed Caption button If you press CC when a digital channel is...
User Manual
Page 41
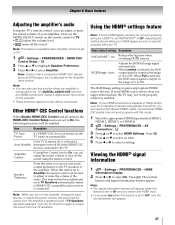
... and set to TV Speakers automatically unless a HDMI® CEC compatible audio receiver is set the MODE SELECT switch on again to output the sound from the amplifier's speakers even if TV Speakers has been selected. Note: • You can also use this mode. 1 Select the appropriate...of 1080p and/or your TV. Chapter 6: Basic features Adjusting the amplifier's audio Using the TV's remote control, you can adjust or mute the sound volume of your HDMI TV, set INSTAPORT™ to Off. Select a digital audio input mode on the amplifier. • These functions depend on ...
... and set to TV Speakers automatically unless a HDMI® CEC compatible audio receiver is set the MODE SELECT switch on again to output the sound from the amplifier's speakers even if TV Speakers has been selected. Note: • You can also use this mode. 1 Select the appropriate...of 1080p and/or your TV. Chapter 6: Basic features Adjusting the amplifier's audio Using the TV's remote control, you can adjust or mute the sound volume of your HDMI TV, set INSTAPORT™ to Off. Select a digital audio input mode on the amplifier. • These functions depend on ...
User Manual
Page 42
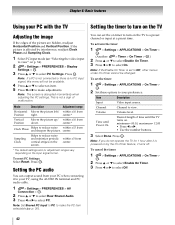
... > . OK 2 Press B or b to select Rear Shared Audio. 3 Press C or c to select PC Settings. Setting the timer to turn on the TV You can output sound from center. * The default settings and /or adjustment ranges vary depending on by interference, readjust Clock Phase and Sampling Clock. 1 Select PC input mode (- To...
... > . OK 2 Press B or b to select Rear Shared Audio. 3 Press C or c to select PC Settings. Setting the timer to turn on the TV You can output sound from center. * The default settings and /or adjustment ranges vary depending on by interference, readjust Clock Phase and Sampling Clock. 1 Select PC input mode (- To...

User Manual
Page 45
Chapter 7: Picture and sound controls Selecting the picture size You can save separate picture size preferences for any of the picture sizes) depends on your private viewing may subject ...
Chapter 7: Picture and sound controls Selecting the picture size You can save separate picture size preferences for any of the picture sizes) depends on your private viewing may subject ...

User Manual
Page 46
..., WXGA, and SXGA sources and Photo files) Some program formats will display with sidebars and/or bars at the top and bottom. Chapter 7: Picture and sound controls Picture Size Native (for 480i (HDMI), 480p (HDMI), 720p, 1080i, and 1080p signal programs) Picture Size TheaterWide 1 (for letter box programs) A B C D E F G The picture's top...
..., WXGA, and SXGA sources and Photo files) Some program formats will display with sidebars and/or bars at the top and bottom. Chapter 7: Picture and sound controls Picture Size Native (for 480i (HDMI), 480p (HDMI), 720p, 1080i, and 1080p signal programs) Picture Size TheaterWide 1 (for letter box programs) A B C D E F G The picture's top...
User Manual
Page 47
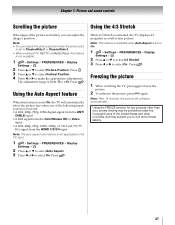
... Auto Aspect feature When this feature is not available. 1 > Settings > PREFERENCES > Display Settings > . When 4:3 Stretch is set to make the appropriate adjustments. Chapter 7: Picture and sound controls Scrolling the picture Using the 4:3 Stretch If the edges of the picture are hidden, you to civil and criminal liability. 47 Freezing the picture...
... Auto Aspect feature When this feature is not available. 1 > Settings > PREFERENCES > Display Settings > . When 4:3 Stretch is set to make the appropriate adjustments. Chapter 7: Picture and sound controls Scrolling the picture Using the 4:3 Stretch If the edges of the picture are hidden, you to civil and criminal liability. 47 Freezing the picture...
User Manual
Page 48
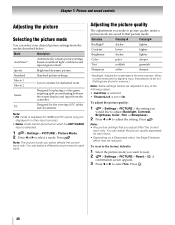
... 2 Lower contrast for each input. • Depending on ambient light conditions and input signal content. A confirmation screen appears. 3 Press C or c to On. Chapter 7: Picture and sound controls Adjusting the picture Selecting the picture mode You can select your desired picture settings from the controller. Note: • Any picture settings that picture...
... 2 Lower contrast for each input. • Depending on ambient light conditions and input signal content. A confirmation screen appears. 3 Press C or c to On. Chapter 7: Picture and sound controls Adjusting the picture Selecting the picture mode You can select your desired picture settings from the controller. Note: • Any picture settings that picture...
User Manual
Page 49
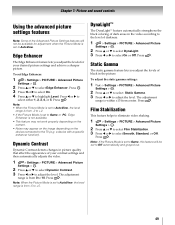
... function). Edge Enhancer The Edge Enhancer feature lets you adjust the levels of your desired picture settings and achieve a sharper picture. Press . Chapter 7: Picture and sound controls Using the advanced picture settings features Note: Some of the Advanced Picture Settings features will be available for your contrast settings and then automatically...
... function). Edge Enhancer The Edge Enhancer feature lets you adjust the levels of your desired picture settings and achieve a sharper picture. Press . Chapter 7: Picture and sound controls Using the advanced picture settings features Note: Some of the Advanced Picture Settings features will be available for your contrast settings and then automatically...

User Manual
Page 50
... reducing image brightness. 1 > Settings > PICTURE > Advanced Picture Settings > . OK 2 Press B or b to match the ambient light conditions. 1 > Settings > PICTURE > Advanced Picture Settings > . Chapter 7: Picture and sound controls ClearFrame™ feature The ClearFrame 120 Hz anti-blur technology doubles the frame rate from 0 to 120 frames per second to 100. Press . The...
... reducing image brightness. 1 > Settings > PICTURE > Advanced Picture Settings > . OK 2 Press B or b to match the ambient light conditions. 1 > Settings > PICTURE > Advanced Picture Settings > . Chapter 7: Picture and sound controls ClearFrame™ feature The ClearFrame 120 Hz anti-blur technology doubles the frame rate from 0 to 120 frames per second to 100. Press . The...
User Manual
Page 51
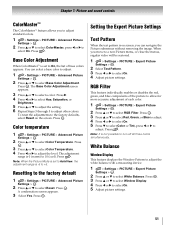
... Brightness. 5 Press B or b to adjust the setting. 6 Repeat Steps 3 through 5 to select RGB Filter. Press . OK 2 Press B or b to adjust other colors. Chapter 7: Picture and sound controls ColorMaster™ The ColorMaster™ feature allows you move to a non-Picture menu, or close the menus, regular video will be restored. 1 > Settings > PICTURE...
... Brightness. 5 Press B or b to adjust the setting. 6 Repeat Steps 3 through 5 to select RGB Filter. Press . OK 2 Press B or b to adjust other colors. Chapter 7: Picture and sound controls ColorMaster™ The ColorMaster™ feature allows you move to a non-Picture menu, or close the menus, regular video will be restored. 1 > Settings > PICTURE...


