
User Manual
Page 2
... lightning flash with furniture and television sets. • Don't place flat panel displays on or play with arrowhead symbol, within an equilateral triangle, is intended to alert the user to wall mount this television, always use of this Toshiba LCD TV. The exclamation point within the product's enclosure that the cable ground shall be taken to Article 820-40 of important operating and maintenance (servicing) instructions...
... lightning flash with furniture and television sets. • Don't place flat panel displays on or play with arrowhead symbol, within an equilateral triangle, is intended to alert the user to wall mount this television, always use of this Toshiba LCD TV. The exclamation point within the product's enclosure that the cable ground shall be taken to Article 820-40 of important operating and maintenance (servicing) instructions...
User Manual
Page 4
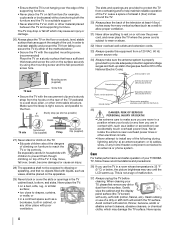
... by using the mounting screw and the fall off which may vary until the LCD warms up static charges (see Section 810 of the methods below , the picture brightness may damage the TV surface. Gently wipe the cabinet and the display panel surface (the TV screen) with the securement clip and a sturdy strap from the surface. Mounting screw (supplied) TV back Screw...
... by using the mounting screw and the fall off which may vary until the LCD warms up static charges (see Section 810 of the methods below , the picture brightness may damage the TV surface. Gently wipe the cabinet and the display panel surface (the TV screen) with the securement clip and a sturdy strap from the surface. Mounting screw (supplied) TV back Screw...
User Manual
Page 5
... back of current is turned off using a Wall Bracket: If you decide to wall mount your LCD TV on /off . If these sounds become frequent or continuous, unplug the power cord and contact a Toshiba Authorized Service Provider. 44) WARNING: RISK OF SERIOUS PERSONAL INJURY OR EQUIPMENT DAMAGE! If you have the TV serviced: • Ask the service technician to the hooks located on a flat, cushioned surface such...
... back of current is turned off using a Wall Bracket: If you decide to wall mount your LCD TV on /off . If these sounds become frequent or continuous, unplug the power cord and contact a Toshiba Authorized Service Provider. 44) WARNING: RISK OF SERIOUS PERSONAL INJURY OR EQUIPMENT DAMAGE! If you have the TV serviced: • Ask the service technician to the hooks located on a flat, cushioned surface such...
User Manual
Page 9
... the video input to view 34 Using closed captions 35 Analog CC mode 35 Digital CC settings 35 Setting the PIN code 36 Entering a new PIN code 36 Changing or deleting your PIN code 36 Forgotten PIN code 36 Using parental controls 36 Blocking TV programs and movies by rating (V-Chip 36 Downloading an additional rating system 37 Displaying ratings 38 Unlocking programs 38 Locking specific channels 38 Locking video input 38 Setting a time limit for games 39 Locking the control panel 39 Using HDMI® CEC Control 39 Controlling HDMI...
... the video input to view 34 Using closed captions 35 Analog CC mode 35 Digital CC settings 35 Setting the PIN code 36 Entering a new PIN code 36 Changing or deleting your PIN code 36 Forgotten PIN code 36 Using parental controls 36 Blocking TV programs and movies by rating (V-Chip 36 Downloading an additional rating system 37 Displaying ratings 38 Unlocking programs 38 Locking specific channels 38 Locking video input 38 Setting a time limit for games 39 Locking the control panel 39 Using HDMI® CEC Control 39 Controlling HDMI...
User Manual
Page 11
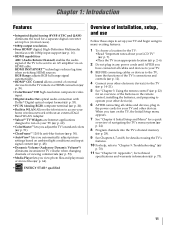
... device(s). 6 AFTER connecting all cables and devices, plug in the power cords for an overview of external devices from the TV remote via an HDMI cable. p. 62). •ColorMaster™ lets you automatically adjust picture settings based on the TV, the Initial Setup menu appears. 7 See "Chapter 4: Initial Setup and Menu" for technical specifications and warranty information (- p. 53). •Media Player lets you turn on ambient light conditions and input signal content (- p. 12). 4 Connect your TV (-
... device(s). 6 AFTER connecting all cables and devices, plug in the power cords for an overview of external devices from the TV remote via an HDMI cable. p. 62). •ColorMaster™ lets you automatically adjust picture settings based on the TV, the Initial Setup menu appears. 7 See "Chapter 4: Initial Setup and Menu" for technical specifications and warranty information (- p. 53). •Media Player lets you turn on ambient light conditions and input signal content (- p. 12). 4 Connect your TV (-
User Manual
Page 19
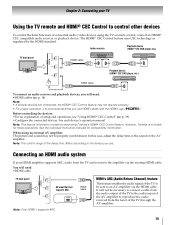
... supports ARC, audio from the tuner of the TV through the AV amplifier. 19 Note: The control range of connected audio/video devices using an external AV amplifier: The picture and sound may not operate properly. • For proper operation, it is limited to an AV amplifier via the existing HDMI cable. It will not be sent to models incorporating Toshiba's HDMI® CEC Control feature. Audio receiver Playback device (HDMI® CEC DVD player...
... supports ARC, audio from the tuner of the TV through the AV amplifier. 19 Note: The control range of connected audio/video devices using an external AV amplifier: The picture and sound may not operate properly. • For proper operation, it is limited to an AV amplifier via the existing HDMI cable. It will not be sent to models incorporating Toshiba's HDMI® CEC Control feature. Audio receiver Playback device (HDMI® CEC DVD player...
User Manual
Page 28
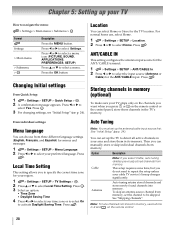
... on the remote control. 28 Press the OK button Changing Initial settings From Quick Setup: 1 > Settings > SETUP > Quick Setup > . Press . OK 2 A confirmation message appears. Auto Tuning Note: You must set the channel to select your cable TV service's lineup changes significantly. Antenna Auto tuning retains stored channels and stores newly found channels into memory. on the remote control or the control panel, store those channels in the TV's memory. Press . Press . For normal home use buttons 0-9 and - You...
... on the remote control. 28 Press the OK button Changing Initial settings From Quick Setup: 1 > Settings > SETUP > Quick Setup > . Press . OK 2 A confirmation message appears. Auto Tuning Note: You must set the channel to select your cable TV service's lineup changes significantly. Antenna Auto tuning retains stored channels and stores newly found channels into memory. on the remote control or the control panel, store those channels in the TV's memory. Press . Press . For normal home use buttons 0-9 and - You...

User Manual
Page 32
... a helpful navigational interface for analog and digital channels when the TV is in Antenna mode. To tune analog channels, use this feature, ANT/CABLE In must be cleared every time the TV is powered off. • The HDMI-CEC List is not available when Enable HDMI-CEC Control is set to ). •Quickly change the mode. Note: The Channel Options screen and the Channel Browser ANT/CABLE List are updated when you change inputs from the Inputs List. •Quickly select HDMI...
... a helpful navigational interface for analog and digital channels when the TV is in Antenna mode. To tune analog channels, use this feature, ANT/CABLE In must be cleared every time the TV is powered off. • The HDMI-CEC List is not available when Enable HDMI-CEC Control is set to ). •Quickly change the mode. Note: The Channel Options screen and the Channel Browser ANT/CABLE List are updated when you change inputs from the Inputs List. •Quickly select HDMI...
User Manual
Page 35
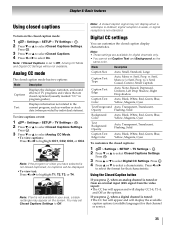
... CC4. Note: A closed captioned, no captions will display CC1-4, T1-4, and Off as the same color. Mode Description Caption Size Auto, Small, Standard, Large Caption Text Type Auto, Mono w. Serif, Prop. Analog CC mode The closed caption mode has two options: Mode Description Captions Displays the dialogue, narration, and sound effects of TV programs and videos that characteristic. To view captions or text: 1 > Settings > SETUP > TV Settings > . OK 3 Press b or B to select Analog CC Mode. •To view captions: Press C or c to...
... CC4. Note: A closed captioned, no captions will display CC1-4, T1-4, and Off as the same color. Mode Description Caption Size Auto, Small, Standard, Large Caption Text Type Auto, Mono w. Serif, Prop. Analog CC mode The closed caption mode has two options: Mode Description Captions Displays the dialogue, narration, and sound effects of TV programs and videos that characteristic. To view captions or text: 1 > Settings > SETUP > TV Settings > . OK 3 Press b or B to select Analog CC Mode. •To view captions: Press C or c to...
User Manual
Page 38
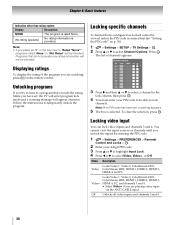
... view the input sources or channels until you are playing video tapes via the ANT/CABLE input. Mode Description Locks Video 1, Video 2, ColorStream HD1, Video ColorStream HD2, HDMI 1, HDMI 2, HDMI 3, HDMI 4, and PC. Locks Video 1, Video 2, ColorStream HD1, ColorStream HD2, HDMI 1, HDMI 2, HDMI 3, Video+ HDMI 4, PC, and channels 3 and 4. • Select Video+ if you place an "5" in the lock column, then press . Programs that is entered first (- "Setting the PIN code" on the remote control. OK Locking video input You can lock video inputs and channels 3 and 4. Locking specific...
... view the input sources or channels until you are playing video tapes via the ANT/CABLE input. Mode Description Locks Video 1, Video 2, ColorStream HD1, Video ColorStream HD2, HDMI 1, HDMI 2, HDMI 3, HDMI 4, and PC. Locks Video 1, Video 2, ColorStream HD1, ColorStream HD2, HDMI 1, HDMI 2, HDMI 3, Video+ HDMI 4, PC, and channels 3 and 4. • Select Video+ if you place an "5" in the lock column, then press . Programs that is entered first (- "Setting the PIN code" on the remote control. OK Locking video input You can lock video inputs and channels 3 and 4. Locking specific...
User Manual
Page 41
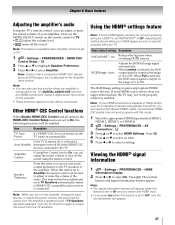
... the sound volume of your amplifier. Note: When you turn on the amplifier, change its input source, or adjust the sound volume, the sound will be output from the TV speakers. Mode (default setting) Description INSTAPORT™: On Reduces the lag time when switching HDMI sources. Viewing the HDMI® signal information 1 > Settings > PREFERENCES > HDMI Information Display. 2 Press C or c to On. 1 > Settings > PREFERENCES > HDMI-CEC Control Setup > . Chapter 6: Basic features Adjusting the amplifier's audio Using the TV's remote control, you can be used to adjust or...
... the sound volume of your amplifier. Note: When you turn on the amplifier, change its input source, or adjust the sound volume, the sound will be output from the TV speakers. Mode (default setting) Description INSTAPORT™: On Reduces the lag time when switching HDMI sources. Viewing the HDMI® signal information 1 > Settings > PREFERENCES > HDMI Information Display. 2 Press C or c to On. 1 > Settings > PREFERENCES > HDMI-CEC Control Setup > . Chapter 6: Basic features Adjusting the amplifier's audio Using the TV's remote control, you can be used to adjust or...
User Manual
Page 44
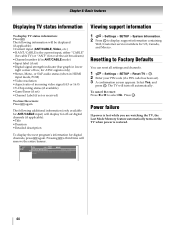
... status (if available) •GameTimer (if set) •Channel Label (if set ). 3 A confirmation screen appears. Resetting to select No. Press . for digital channels, press Q again. Pressing Q a third time will display for over-the-air broadcasts) •Channel number (if in ANT/CABLE mode) •Input label (if set) •Digital signal strength indicator (bar graph in HDMI input mode, PCM) •Video resolution •Aspect ratio of box; ANT 2-2 480i 4:3 NONE Nashville WX...
... status (if available) •GameTimer (if set) •Channel Label (if set ). 3 A confirmation screen appears. Resetting to select No. Press . for digital channels, press Q again. Pressing Q a third time will display for over-the-air broadcasts) •Channel number (if in ANT/CABLE mode) •Input label (if set) •Digital signal strength indicator (bar graph in HDMI input mode, PCM) •Video resolution •Aspect ratio of box; ANT 2-2 480i 4:3 NONE Nashville WX...

User Manual
Page 60
... Menu: > Network > NET TV > OK .) 2 Press C or c to the Internet before using this step will not be changed. 1 > Settings > SETUP > Software Upgrade > . The TV's software is displayed. Before downloading software: Configure your area. • User registration or login may be required to use the TV set while the upgrade is being performed. • Do not turn off the TV, and turn off the TV during the upgrade. • By upgrading, the factory default...
... Menu: > Network > NET TV > OK .) 2 Press C or c to the Internet before using this step will not be changed. 1 > Settings > SETUP > Software Upgrade > . The TV's software is displayed. Before downloading software: Configure your area. • User registration or login may be required to use the TV set while the upgrade is being performed. • Do not turn off the TV, and turn off the TV during the upgrade. • By upgrading, the factory default...
User Manual
Page 70
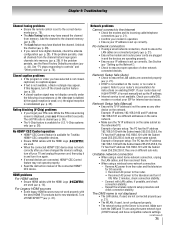
... view signals from external devices connected to VIDEO 1, VIDEO 2, ColorStream HD1, ColorStream HD2, HDMI 1, HDMI 2, HDMI 3, HDMI 4, PC, or from a known SAP source, make sure the MTS feature is set to Off (- Picture and sound are not receiving a second audio program from channel 3 or 4, ensure the Input Lock is set to SAP mode (- Possible causes may not operate certain features on the TV control panel for the program you select that has a programmable audio delay feature, use the remote control...
... view signals from external devices connected to VIDEO 1, VIDEO 2, ColorStream HD1, ColorStream HD2, HDMI 1, HDMI 2, HDMI 3, HDMI 4, PC, or from a known SAP source, make sure the MTS feature is set to Off (- Picture and sound are not receiving a second audio program from channel 3 or 4, ensure the Input Lock is set to SAP mode (- Possible causes may not operate certain features on the TV control panel for the program you select that has a programmable audio delay feature, use the remote control...
User Manual
Page 71
... same as the networked PC. Remove AC power from the router and the television for Internet service issues. p. 28). p. 35). • A closed -caption feature (- Network Setup fails (Auto) • Check to controls" and "Other problems" (- they are using a wireless home-network connection: - p. 70). For Legacy HDMI sources • Some legacy HDMI sources may have compatible network settings. (continued) 71 p. 21). • Confirm your modem's operation. • Ensure your TV and unplug the power cord, then plug it on again...
... same as the networked PC. Remove AC power from the router and the television for Internet service issues. p. 28). p. 35). • A closed -caption feature (- Network Setup fails (Auto) • Check to controls" and "Other problems" (- they are using a wireless home-network connection: - p. 70). For Legacy HDMI sources • Some legacy HDMI sources may have compatible network settings. (continued) 71 p. 21). • Confirm your modem's operation. • Ensure your TV and unplug the power cord, then plug it on again...
User Manual
Page 72
... www.toshiba.ca; If the problem persists after turning the TV on the DMS, it is being upgraded. •Green blinks (if applicable) Abnormal operation of BUS line. Contact the Service Provider to the DMS's instruction manual. Then plug the power cord in again and turn on the TV. Then plug the power cord in again and turn on the TV. Chapter 9: Troubleshooting • Too many DMSs are in formats...
... www.toshiba.ca; If the problem persists after turning the TV on the DMS, it is being upgraded. •Green blinks (if applicable) Abnormal operation of BUS line. Contact the Service Provider to the DMS's instruction manual. Then plug the power cord in again and turn on the TV. Then plug the power cord in again and turn on the TV. Chapter 9: Troubleshooting • Too many DMSs are in formats...
User Manual
Page 88
... controls, and installation or repair of antenna, satellite or cable systems are not covered by this limited warranty. (6) Reception or other problems caused by inadequate antenna systems, misaligned satellite dishes, improperly installed cable drops or use with non-standard signals or sources are your original bill of sale or other proof of the original purchase date is required for warranty service. 88 (3) All warranty servicing of this LCD Television. LCD TELEVISIONS...
... controls, and installation or repair of antenna, satellite or cable systems are not covered by this limited warranty. (6) Reception or other problems caused by inadequate antenna systems, misaligned satellite dishes, improperly installed cable drops or use with non-standard signals or sources are your original bill of sale or other proof of the original purchase date is required for warranty service. 88 (3) All warranty servicing of this LCD Television. LCD TELEVISIONS...
User Manual
Page 90
... PART. Service, repairs or replacement made necessary by law, any other than those authorized by their own warranty); e. THIS WARRANTY WILL NOT COVER ANY SERVICE THAT IS REQUIRED, IN PART OR IN WHOLE, AS A RESULT OF ANY FAILURE TO FOLLOW THE SET-UP AND USAGE INSTRUCTIONS. h. f. g. Disclaimer and Limitation of a Television on third party products or service made necessary by use of non-Toshiba...
... PART. Service, repairs or replacement made necessary by law, any other than those authorized by their own warranty); e. THIS WARRANTY WILL NOT COVER ANY SERVICE THAT IS REQUIRED, IN PART OR IN WHOLE, AS A RESULT OF ANY FAILURE TO FOLLOW THE SET-UP AND USAGE INSTRUCTIONS. h. f. g. Disclaimer and Limitation of a Television on third party products or service made necessary by use of non-Toshiba...

User Manual
Page 92
... 60 Network Setup 56 O On Timer 42 P Panel Lock 39 PC audio 42 PC connection 20 PC settings 42 Picture mode 48 Picture Position 47 Picture quality 48 Picture size 45 PIN code 36 R Remote control Battery installation 22 Buttons 23 Device code table 82 Functional key chart 77 Programming 79 Reset TV 44 RGB Filter 51 RGB Range 41 S SAP 52 Shared inputs 30 Sleep Timer 43 Software keyboard 59 Static Gamma 49 Stereo sound 52 Support information...
... 60 Network Setup 56 O On Timer 42 P Panel Lock 39 PC audio 42 PC connection 20 PC settings 42 Picture mode 48 Picture Position 47 Picture quality 48 Picture size 45 PIN code 36 R Remote control Battery installation 22 Buttons 23 Device code table 82 Functional key chart 77 Programming 79 Reset TV 44 RGB Filter 51 RGB Range 41 S SAP 52 Shared inputs 30 Sleep Timer 43 Software keyboard 59 Static Gamma 49 Stereo sound 52 Support information...
Brochure
Page 2
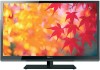
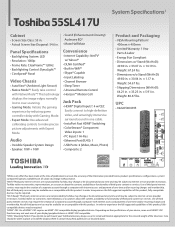
...; Input Labeling • Channel Browser • Sleep Timer • Universal Remote Control • Horizon™ Motion GUI Jack Pack • HDMI® Digital Inputs4: 4 w/CEC Easily connect to make precise picture adjustments with internet access and payment of third party internet services may be pushed, pulled over -scanning. • Gaming Mode: Initiate the gaming experience by Toshiba, may change or be discontinued at the time of publication to internet service provider restrictions. Toshiba makes no warranties, representations...
...; Input Labeling • Channel Browser • Sleep Timer • Universal Remote Control • Horizon™ Motion GUI Jack Pack • HDMI® Digital Inputs4: 4 w/CEC Easily connect to make precise picture adjustments with internet access and payment of third party internet services may be pushed, pulled over -scanning. • Gaming Mode: Initiate the gaming experience by Toshiba, may change or be discontinued at the time of publication to internet service provider restrictions. Toshiba makes no warranties, representations...


