
User Manual
Page 1
...to these numbers in the spaces below. For details, please contact your TV antenna installer, cable provider, or satellite provider. © 2011 TOSHIBA CORPORATION All Rights Reserved Owner's Record The model number and serial number are on the back and side of steps for setting up your new... TV, see page 11. www.support.toshiba.com Model number: Serial number: TD/M VX1A00205000 Integrated High Definition LCD Television 42SL417U 46SL417U 55SL417U For an overview of your TV. Note: To display a High Definition picture, the TV must be receiving a High Defi...
...to these numbers in the spaces below. For details, please contact your TV antenna installer, cable provider, or satellite provider. © 2011 TOSHIBA CORPORATION All Rights Reserved Owner's Record The model number and serial number are on the back and side of steps for setting up your new... TV, see page 11. www.support.toshiba.com Model number: Serial number: TD/M VX1A00205000 Integrated High Definition LCD Television 42SL417U 46SL417U 55SL417U For an overview of your TV. Note: To display a High Definition picture, the TV must be receiving a High Defi...
User Manual
Page 4
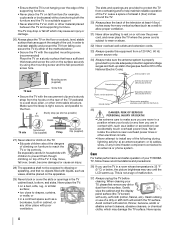
• Ensure that the TV is not hanging over the edge of the TV. Make sure the strap is not a sign of your TOSHIBA TV, follow these recommendations and precautions: 36) If you use of the TV. Be especially careful in households with children to prevent them though climbing ... block or cover the slots or openings in cabinet, or any other electrical circuits. • Never attempt to install any of the methods below , the picture brightness may vary until the LCD warms up static charges (see Section 810 of the TV pedestal to a suitable support • Never stand the TV...
• Ensure that the TV is not hanging over the edge of the TV. Make sure the strap is not a sign of your TOSHIBA TV, follow these recommendations and precautions: 36) If you use of the TV. Be especially careful in households with children to prevent them though climbing ... block or cover the slots or openings in cabinet, or any other electrical circuits. • Never attempt to install any of the methods below , the picture brightness may vary until the LCD warms up static charges (see Section 810 of the TV pedestal to a suitable support • Never stand the TV...
User Manual
Page 7
...manufactured using an extremely high level of precision technology; Picture Settings, Auto Brightness Sensor) may not cause harmful interference, and (2) This device must not be operated. For more information, see p. 48. therefore, Toshiba is not responsible for perceived issues resulting from these ...is viewed from a normal viewing distance. To ensure your warranty. To return to [Home] mode settings, select [AutoView] picture mode, and set by meeting strict guidelines set Auto Brightness Sensor to prohibit transmission of time. Environmental Protection Agency. This is...
...manufactured using an extremely high level of precision technology; Picture Settings, Auto Brightness Sensor) may not cause harmful interference, and (2) This device must not be operated. For more information, see p. 48. therefore, Toshiba is not responsible for perceived issues resulting from these ...is viewed from a normal viewing distance. To ensure your warranty. To return to [Home] mode settings, select [AutoView] picture mode, and set by meeting strict guidelines set Auto Brightness Sensor to prohibit transmission of time. Environmental Protection Agency. This is...
User Manual
Page 9
... failure 44 Chapter 7: Picture and sound controls 45 Selecting the picture size 45 Scrolling the picture 47 Using the Auto Aspect feature 47 Using the 4:3 Stretch 47 Freezing the picture 47 Adjusting the picture 48 Selecting the picture mode 48 Adjusting the picture quality 48 Using the advanced picture settings features 49 Edge ...Adjustment Pro 50 ColorMaster 51 Base Color Adjustment 51 Color temperature 51 Resetting to the factory default 51 Setting the Expert Picture Settings 51 Test Pattern 51 RGB Filter 51 White Balance 51 Resetting to the factory default 52 Locking the...
... failure 44 Chapter 7: Picture and sound controls 45 Selecting the picture size 45 Scrolling the picture 47 Using the Auto Aspect feature 47 Using the 4:3 Stretch 47 Freezing the picture 47 Adjusting the picture 48 Selecting the picture mode 48 Adjusting the picture quality 48 Using the advanced picture settings features 49 Edge ...Adjustment Pro 50 ColorMaster 51 Base Color Adjustment 51 Color temperature 51 Resetting to the factory default 51 Setting the Expert Picture Settings 51 Test Pattern 51 RGB Filter 51 White Balance 51 Resetting to the factory default 52 Locking the...
User Manual
Page 11
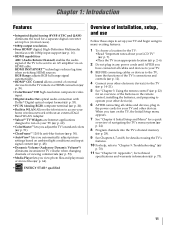
... begin using the TV's features. 10 For help, refer to "Chapter 9: Troubleshooting" (- p. 7). • Place the TV in any power cords until AFTER you automatically adjust picture settings based on the TV, the Initial Setup menu appears. 7 See "Chapter 4: Initial Setup and Menu" for a quick overview of the buttons on the remote...
... begin using the TV's features. 10 For help, refer to "Chapter 9: Troubleshooting" (- p. 7). • Place the TV in any power cords until AFTER you automatically adjust picture settings based on the TV, the Initial Setup menu appears. 7 See "Chapter 4: Initial Setup and Menu" for a quick overview of the buttons on the remote...
User Manual
Page 14
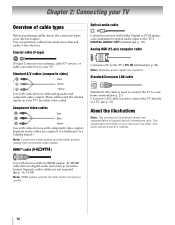
...purchasing cables, know the connector types your TV. See each device's owner's manual. Note: HDMI cables provide the best audio and picture quality. 14 Note: Separate audio cables are not required (- Use with devices with analog audio and composite video output. p. 16,... p. 21). An HDMI cable delivers digital audio and video in its native format. Crossover LAN cable is a Toshiba brand.) Note: Component video cables provide better picture quality than composite video cables. These cables (and the related inputs on your TV) are required. (ColorStream®...
...purchasing cables, know the connector types your TV. See each device's owner's manual. Note: HDMI cables provide the best audio and picture quality. 14 Note: Separate audio cables are not required (- Use with devices with analog audio and composite video output. p. 16,... p. 21). An HDMI cable delivers digital audio and video in its native format. Crossover LAN cable is a Toshiba brand.) Note: Component video cables provide better picture quality than composite video cables. These cables (and the related inputs on your TV) are required. (ColorStream®...
User Manual
Page 19
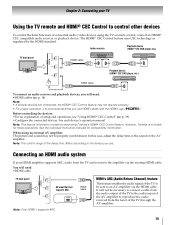
... are connected, the HDMI® CEC Control feature may not be sent to models incorporating Toshiba's HDMI® CEC Control feature. p. 39). •Configure the connected devices. However, Toshiba is recommended that supports ARC HDMI cable Note: Only HDMI 1 supports ARC. Connecting an HDMI...ARC (Audio Return Channel) feature This feature enables the audio signal of connected audio/video devices using an external AV amplifier: The picture and sound may not operate properly. • For proper operation, it is not liable for compatibility information. Chapter 2: Connecting your ...
... are connected, the HDMI® CEC Control feature may not be sent to models incorporating Toshiba's HDMI® CEC Control feature. p. 39). •Configure the connected devices. However, Toshiba is recommended that supports ARC HDMI cable Note: Only HDMI 1 supports ARC. Connecting an HDMI...ARC (Audio Return Channel) feature This feature enables the audio signal of connected audio/video devices using an external AV amplifier: The picture and sound may not operate properly. • For proper operation, it is not liable for compatibility information. Chapter 2: Connecting your ...
User Manual
Page 20
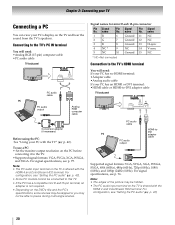
... "Setting the PC audio" (- p. 42). Connecting to the TV. •Supported signal formats: VGA, SVGA, XGA, WXGA, and SXGA. Note: • The edges of the picture may not be hidden. • The PC audio input terminal on the TV and hear the sound from the TV's speakers. Note: • The PC...
... "Setting the PC audio" (- p. 42). Connecting to the TV. •Supported signal formats: VGA, SVGA, XGA, WXGA, and SXGA. Note: • The edges of the picture may not be hidden. • The PC audio input terminal on the TV and hear the sound from the TV's speakers. Note: • The PC...
User Manual
Page 23
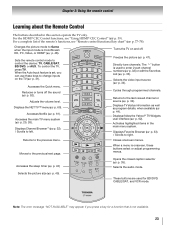
... the TV, press TV. Reduces or turns off . Accesses the main TV menu system (- p. 32) or edit the Favorites List (- Selects the picture size (- p. 48). Adjusts the volume level. Displays the NET TV™ menu (- p. 60). When a menu is not available. 23 Selects ...; CEC Control functions, see "Remote control functional key chart" (- p. 25, 26). Freezes the picture (- Cycles through programmed channels. Displays Favorite Browser (- Accesses the sleep timer (- Changes the picture mode to Game when the input mode is set, you press a key for BD/DVD, CABLE/SAT...
... the TV, press TV. Reduces or turns off . Accesses the main TV menu system (- p. 32) or edit the Favorites List (- Selects the picture size (- p. 48). Adjusts the volume level. Displays the NET TV™ menu (- p. 60). When a menu is not available. 23 Selects ...; CEC Control functions, see "Remote control functional key chart" (- p. 25, 26). Freezes the picture (- Cycles through programmed channels. Displays Favorite Browser (- Accesses the sleep timer (- Changes the picture mode to Game when the input mode is set, you press a key for BD/DVD, CABLE/SAT...

User Manual
Page 26
... TV Network Setup Wireless Information Photo Movie Music On Timer Sleep Timer Game Timer PICTURE SOUND 60 56 57 (Device select) 67 (Device select) 65 (Device select) 66 69 42 43 39 Picture Mode 48 Reset 48 Backlight 48 Contrast 48 Brightness 48 Color 48 Tint 48 ...Sharpness 48 Advanced Picture Settings 49 Expert Picture Settings 51 TheaterLock 52 MTS 52 Balance 53 Bass 53 Treble 53 Advanced Sound ...
... TV Network Setup Wireless Information Photo Movie Music On Timer Sleep Timer Game Timer PICTURE SOUND 60 56 57 (Device select) 67 (Device select) 65 (Device select) 66 69 42 43 39 Picture Mode 48 Reset 48 Backlight 48 Contrast 48 Brightness 48 Color 48 Tint 48 ...Sharpness 48 Advanced Picture Settings 49 Expert Picture Settings 51 TheaterLock 52 MTS 52 Balance 53 Bass 53 Treble 53 Advanced Sound ...
User Manual
Page 27
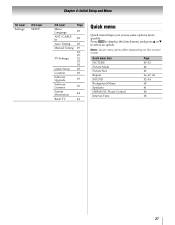
... display the Quick menu and press B or b to select an option. Note: Quick menu items differ depending on the current mode. Quick menu Item PICTURE Picture Mode Picture Size Repeat SOUND Background Music Speakers HDMI-CEC Player Control Interval Time Page 45-52 48 45 66, 67, 68 52-54 68 41 40...
... display the Quick menu and press B or b to select an option. Note: Quick menu items differ depending on the current mode. Quick menu Item PICTURE Picture Mode Picture Size Repeat SOUND Background Music Speakers HDMI-CEC Player Control Interval Time Page 45-52 48 45 66, 67, 68 52-54 68 41 40...
User Manual
Page 28
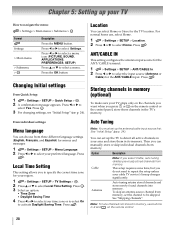
... Description Press the MENU button. Chapter 5: Setting up the antenna/cable input source first. Press C or c to select a menu. Press C or c to select a menu icon (PICTURE, SOUND, APPLICATIONS, PREFERENCES, SETUP) Press B or b to select Settings. Press . p. 24). For normal home use buttons 0-9 and - Press . ANT/CABLE IN This setting configures the...
... Description Press the MENU button. Chapter 5: Setting up the antenna/cable input source first. Press C or c to select a menu. Press C or c to select a menu icon (PICTURE, SOUND, APPLICATIONS, PREFERENCES, SETUP) Press B or b to select Settings. Press . p. 24). For normal home use buttons 0-9 and - Press . ANT/CABLE IN This setting configures the...
User Manual
Page 40
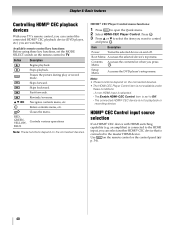
... functions depend on the connected devices. The Enable HDMI-CEC Control item is connected to control and press . Use INPUT on and off. Pauses the picture during play or record mode. B b C c Rewinds/reverses. Root Menu Accesses the selected device's top menu. O K Setup Menu Accesses the DVD player's setup menu. Closes the...
... functions depend on the connected devices. The Enable HDMI-CEC Control item is connected to control and press . Use INPUT on and off. Pauses the picture during play or record mode. B b C c Rewinds/reverses. Root Menu Accesses the selected device's top menu. O K Setup Menu Accesses the DVD player's setup menu. Closes the...
User Manual
Page 42
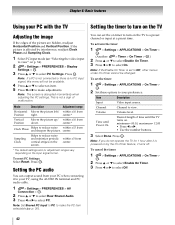
... preset channel or input at a preset time. To cancel the timer: 1 > Settings > APPLICATIONS > On Timer > . center.* Vertical Position Moves the picture up/ within ±5 from center. * The default settings and /or adjustment ranges vary depending on . OK 2 Press B or b to select Rear ...AUDIO IN terminal and PC audio cable. 1 > Settings > PREFERENCES > AV Connection > . Mode Description Adjustment range Horizontal Moves the picture left/ within ±15 from down. Sampling Clock Helps to make the PC item selectable (- To set to Off, other menus...
... preset channel or input at a preset time. To cancel the timer: 1 > Settings > APPLICATIONS > On Timer > . center.* Vertical Position Moves the picture up/ within ±5 from center. * The default settings and /or adjustment ranges vary depending on . OK 2 Press B or b to select Rear ...AUDIO IN terminal and PC audio cable. 1 > Settings > PREFERENCES > AV Connection > . Mode Description Adjustment range Horizontal Moves the picture left/ within ±15 from down. Sampling Clock Helps to make the PC item selectable (- To set to Off, other menus...

User Manual
Page 45
...47) or try viewing the program in any purpose other countries, and may subject you to you select a TheaterWide® picture size, the top and bottom edges of the picture (including subtitles or captions) may not be prohibited under the Copyright Laws of the signal being received. To view these ...functions to change the picture size (i.e., changing the height/width ratio) for each input on your private viewing may be available depending on the format of the United...
...47) or try viewing the program in any purpose other countries, and may subject you to you select a TheaterWide® picture size, the top and bottom edges of the picture (including subtitles or captions) may not be prohibited under the Copyright Laws of the signal being received. To view these ...functions to change the picture size (i.e., changing the height/width ratio) for each input on your private viewing may be available depending on the format of the United...

User Manual
Page 46
... 480p), ColorStream® (1080i and 720p), and ANT/CABLE (digital) inputs (1080i, 1080p, and 720p). • Depending on the input signal format, the picture is displayed with sidebars and/or bars at the top and bottom. (Example: VGA input source) * To view the hidden areas (such as DVHS movies..., Video Games, or PC graphics. • None of the screen (i.e. Depending on the input signal, the picture's border may be hidden. 46 "Dot by Dot (for VGA, SVGA, XGA, WXGA, and SXGA sources and Photo files) If receiving a squeezed 4:3 format ...
... 480p), ColorStream® (1080i and 720p), and ANT/CABLE (digital) inputs (1080i, 1080p, and 720p). • Depending on the input signal format, the picture is displayed with sidebars and/or bars at the top and bottom. (Example: VGA input source) * To view the hidden areas (such as DVHS movies..., Video Games, or PC graphics. • None of the screen (i.e. Depending on the input signal, the picture's border may be hidden. 46 "Dot by Dot (for VGA, SVGA, XGA, WXGA, and SXGA sources and Photo files) If receiving a squeezed 4:3 format ...
User Manual
Page 47
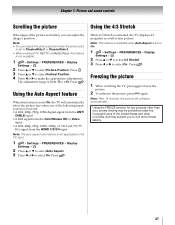
... Press B or b to select On. Note: This feature is available when Auto Aspect is activated, the TV displays 4:3 programs as a full-screen picture. The adjustment range is from the HDMI 1/2/3/4 input Note: The auto aspect ratio feature is not applicable to the PC input. 1 > Settings > ...Press B or b to select 4:3 Stretch. 3 Press C or c to make the appropriate adjustments. Note: After 15 minutes, the picture will automatically select the picture size when one of the following input sources is received: •A 480i, 480p, 720p, 1080i digital signal from the ANT/ CABLE ...
... Press B or b to select On. Note: This feature is available when Auto Aspect is activated, the TV displays 4:3 programs as a full-screen picture. The adjustment range is from the HDMI 1/2/3/4 input Note: The auto aspect ratio feature is not applicable to the PC input. 1 > Settings > ...Press B or b to select 4:3 Stretch. 3 Press C or c to make the appropriate adjustments. Note: After 15 minutes, the picture will automatically select the picture size when one of the following input sources is received: •A 480i, 480p, 720p, 1080i digital signal from the ANT/ CABLE ...
User Manual
Page 48
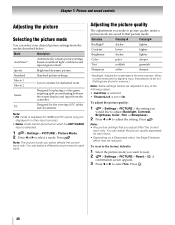
... each input. • Depending on a Sharpness value, the Edge Enhancer effect may be reduced. To reset to the factory defaults: 1 Select the picture mode you make to adjust the setting. A confirmation screen appears. 3 Press C or c to select a mode. Movie 1 Movie 2 Lower contrast... to that you would like to adjust (Backlight, Contrast, Brightness, Color, Tint, or Sharpness). 2 Press C or c to picture quality under a picture mode are stored in memory.) Note: Some settings cannot be turned on ambient light conditions and input signal content. PC Designed for darkened...
... each input. • Depending on a Sharpness value, the Edge Enhancer effect may be reduced. To reset to the factory defaults: 1 Select the picture mode you make to adjust the setting. A confirmation screen appears. 3 Press C or c to select a mode. Movie 1 Movie 2 Lower contrast... to that you would like to adjust (Backlight, Contrast, Brightness, Color, Tint, or Sharpness). 2 Press C or c to picture quality under a picture mode are stored in memory.) Note: Some settings cannot be turned on ambient light conditions and input signal content. PC Designed for darkened...
User Manual
Page 49
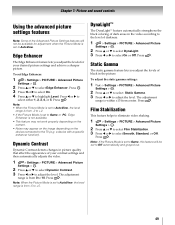
... The DynaLight™ feature automatically strengthens the black coloring of dark areas in the picture. Press . To adjust the static gamma settings: 1 Y > Settings > PICTURE > Advanced Picture Settings > . Press C or c to highlight Level. The adjustment range is ...adjusts the video. 1 > Settings > PICTURE > Advanced Picture Settings > . Note: If the Picture Mode is from center. Press . Chapter 7: Picture and sound controls Using the advanced picture settings features Note: Some of darkness. 1 > Settings > PICTURE > Advanced Picture Settings > . Press . a device ...
... The DynaLight™ feature automatically strengthens the black coloring of dark areas in the picture. Press . To adjust the static gamma settings: 1 Y > Settings > PICTURE > Advanced Picture Settings > . Press C or c to highlight Level. The adjustment range is ...adjusts the video. 1 > Settings > PICTURE > Advanced Picture Settings > . Note: If the Picture Mode is from center. Press . Chapter 7: Picture and sound controls Using the advanced picture settings features Note: Some of darkness. 1 > Settings > PICTURE > Advanced Picture Settings > . Press . a device ...

User Manual
Page 50
... Noise Reduction. OK 3 Press B or b to select DNR. 4 Press C or c to match the ambient light conditions. 1 > Settings > PICTURE > Advanced Picture Settings > . Backlight Adjustment Pro This feature adjusts the backlight so that it can change to select Low, Middle, High, Auto, or Off. Press ... Press B or b to select ClearFrame. 3 Press C or c to reduce the noise effect. 1 > Settings > PICTURE > Advanced Picture Settings > . Note: When the Picture Mode is set to AutoView, this feature is set to On, the TV optimizes the backlighting levels to display the adjustment...
... Noise Reduction. OK 3 Press B or b to select DNR. 4 Press C or c to match the ambient light conditions. 1 > Settings > PICTURE > Advanced Picture Settings > . Backlight Adjustment Pro This feature adjusts the backlight so that it can change to select Low, Middle, High, Auto, or Off. Press ... Press B or b to select ClearFrame. 3 Press C or c to reduce the noise effect. 1 > Settings > PICTURE > Advanced Picture Settings > . Note: When the Picture Mode is set to AutoView, this feature is set to On, the TV optimizes the backlighting levels to display the adjustment...


