User Manual
Page 5
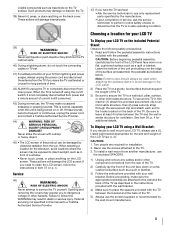
...of your LCD TV, always use the screws supplied or recommended by the wall mount manufacturer. 5 If these sounds become frequent or continuous, unplug the power cord and contact a Toshiba Authorized Service Provider. 44) WARNING: RISK OF SERIOUS PERSONAL INJURY OR EQUIPMENT DAMAGE! Service 46) WARNING: ... precautions: 1) Read and Follow the pedestal assembly instructions included with your wall bracket. To secure the TV in this manual to a Toshiba Authorized Service Provider. 47) If you leave the TV unattended or unused for the size and weight of the TV. volatile compounds such...
...of your LCD TV, always use the screws supplied or recommended by the wall mount manufacturer. 5 If these sounds become frequent or continuous, unplug the power cord and contact a Toshiba Authorized Service Provider. 44) WARNING: RISK OF SERIOUS PERSONAL INJURY OR EQUIPMENT DAMAGE! Service 46) WARNING: ... precautions: 1) Read and Follow the pedestal assembly instructions included with your wall bracket. To secure the TV in this manual to a Toshiba Authorized Service Provider. 47) If you leave the TV unattended or unused for the size and weight of the TV. volatile compounds such...
User Manual
Page 8
... enjoy your audio experience as much as your video. • Manufactured under license from Adobe Systems Incorporated. Audyssey EQ® provides clear, accurate and natural sound right out of Yahoo! Copyright © 1995-2009 Adobe Systems Incorporated. SEE HTTP://WWW.MPEGLA.COM • THIS PRODUCT IS LICENSED UNDER THE VC-1 PATENT...
... enjoy your audio experience as much as your video. • Manufactured under license from Adobe Systems Incorporated. Audyssey EQ® provides clear, accurate and natural sound right out of Yahoo! Copyright © 1995-2009 Adobe Systems Incorporated. SEE HTTP://WWW.MPEGLA.COM • THIS PRODUCT IS LICENSED UNDER THE VC-1 PATENT...
User Manual
Page 9
... No Signal Power Down 43 Displaying TV status information 44 Viewing support information 44 Resetting to Factory Defaults 44 Power failure 44 Chapter 7: Picture and sound controls 45 Selecting the picture size 45 Scrolling the picture 47 Using the Auto Aspect feature 47 Using the 4:3 Stretch 47 Freezing the picture 47... Pattern 51 RGB Filter 51 White Balance 51 Resetting to the factory default 52 Locking the picture settings 52 Adjusting the audio 52 Muting the sound 52 9
... No Signal Power Down 43 Displaying TV status information 44 Viewing support information 44 Resetting to Factory Defaults 44 Power failure 44 Chapter 7: Picture and sound controls 45 Selecting the picture size 45 Scrolling the picture 47 Using the Auto Aspect feature 47 Using the 4:3 Stretch 47 Freezing the picture 47... Pattern 51 RGB Filter 51 White Balance 51 Resetting to the factory default 52 Locking the picture settings 52 Adjusting the audio 52 Muting the sound 52 9
User Manual
Page 10
... the optical audio output format 53 Using the Dolby® Digital Dynamic Range Control feature 53 Using Audyssey Dynamic Volume 53 Using advanced sound features 54 Using surround sound 54 Chapter 8: Advanced features 55 Using your home network 55 Setting up the Network 56 Wireless Setup 56 Advanced Network Setup 58 Network... default 80 Operating the TV with combination buttons 81 Remote control codes 82 Limited United States Warranty for LCD Televisions 88 Limited Canadian Warranty for Toshiba Brand Flat Panel Televisions 89 Index 92 10
... the optical audio output format 53 Using the Dolby® Digital Dynamic Range Control feature 53 Using Audyssey Dynamic Volume 53 Using advanced sound features 54 Using surround sound 54 Chapter 8: Advanced features 55 Using your home network 55 Setting up the Network 56 Wireless Setup 56 Advanced Network Setup 58 Network... default 80 Operating the TV with combination buttons 81 Remote control codes 82 Limited United States Warranty for LCD Televisions 88 Limited Canadian Warranty for Toshiba Brand Flat Panel Televisions 89 Index 92 10
User Manual
Page 19
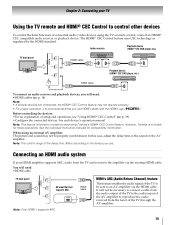
...basic functions of connected audio/video devices using an external AV amplifier: The picture and sound may not operate properly. • For proper operation, it is limited to models incorporating Toshiba's HDMI® CEC Control feature. See the individual instruction manuals for those operations. HDMI..., connect an HDMI® CEC compatible audio receiver or playback device. Before controlling the devices: •For an explanation of the sound on the AV amplifier. Chapter 2: Connecting your HDMI amplifier supports ARC, audio from the TV can be necessary to connect a cable...
...basic functions of connected audio/video devices using an external AV amplifier: The picture and sound may not operate properly. • For proper operation, it is limited to models incorporating Toshiba's HDMI® CEC Control feature. See the individual instruction manuals for those operations. HDMI..., connect an HDMI® CEC compatible audio receiver or playback device. Before controlling the devices: •For an explanation of the sound on the AV amplifier. Chapter 2: Connecting your HDMI amplifier supports ARC, audio from the TV can be necessary to connect a cable...
User Manual
Page 20
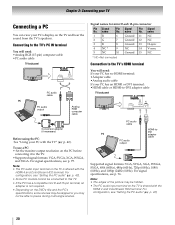
..., and SXGA. For configuration, see p. 75. name Pin Signal No. To use a PC: • Set the monitor output resolution on the TV and hear the sound from the TV's speakers. p. 42). Signal names for mini D-sub 15-pin connector Pin Signal No. For signal specifications, see "Setting the PC audio" (- Note...
..., and SXGA. For configuration, see p. 75. name Pin Signal No. To use a PC: • Set the monitor output resolution on the TV and hear the sound from the TV's speakers. p. 42). Signal names for mini D-sub 15-pin connector Pin Signal No. For signal specifications, see "Setting the PC audio" (- Note...
User Manual
Page 23
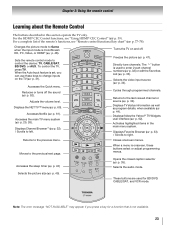
... main TV menu system (- Freezes the picture (- The "-" button is used for a function that is onscreen, these keys to change inputs on and off the sound (- Displays TV status information as well as program details, when available (p. 44). Moves to right. Selects the audio mode. p. 31). p. 61). Selects the video input...
... main TV menu system (- Freezes the picture (- The "-" button is used for a function that is onscreen, these keys to change inputs on and off the sound (- Displays TV status information as well as program details, when available (p. 44). Moves to right. Selects the audio mode. p. 31). p. 61). Selects the video input...

User Manual
Page 26
...Layer Page Network Media Player Wallpaper Timer Settings NET TV Network Setup Wireless Information Photo Movie Music On Timer Sleep Timer Game Timer PICTURE SOUND 60 56 57 (Device select) 67 (Device select) 65 (Device select) 66 69 42 43 39 Picture Mode 48 Reset ...Tint 48 Sharpness 48 Advanced Picture Settings 49 Expert Picture Settings 51 TheaterLock 52 MTS 52 Balance 53 Bass 53 Treble 53 Advanced Sound Settings 54 Dynamic Volume (Audyssey 53 Dynamic Volume®) Dynamic Range Control 53 1st Layer Settings 2nd Layer APPLICATIONS PREFERENCES 3rd ...
...Layer Page Network Media Player Wallpaper Timer Settings NET TV Network Setup Wireless Information Photo Movie Music On Timer Sleep Timer Game Timer PICTURE SOUND 60 56 57 (Device select) 67 (Device select) 65 (Device select) 66 69 42 43 39 Picture Mode 48 Reset ...Tint 48 Sharpness 48 Advanced Picture Settings 49 Expert Picture Settings 51 TheaterLock 52 MTS 52 Balance 53 Bass 53 Treble 53 Advanced Sound Settings 54 Dynamic Volume (Audyssey 53 Dynamic Volume®) Dynamic Range Control 53 1st Layer Settings 2nd Layer APPLICATIONS PREFERENCES 3rd ...
User Manual
Page 27
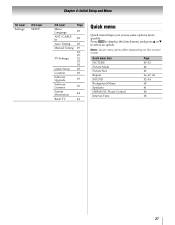
Quick menu Item PICTURE Picture Mode Picture Size Repeat SOUND Background Music Speakers HDMI-CEC Player Control Interval Time Page 45-52 48 45 66, 67, 68 52-54 68 41 40 68 27 Note: ...
Quick menu Item PICTURE Picture Mode Picture Size Repeat SOUND Background Music Speakers HDMI-CEC Player Control Interval Time Page 45-52 48 45 66, 67, 68 52-54 68 41 40 68 27 Note: ...
User Manual
Page 28
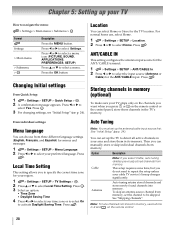
Press C or c to select a menu icon (PICTURE, SOUND, APPLICATIONS, PREFERENCES, SETUP) Press B or b to select Settings. Local Time Setting This setting allows you to specify the correct time zone for your time zone ...
Press C or c to select a menu icon (PICTURE, SOUND, APPLICATIONS, PREFERENCES, SETUP) Press B or b to select Settings. Local Time Setting This setting allows you to specify the correct time zone for your time zone ...
User Manual
Page 35
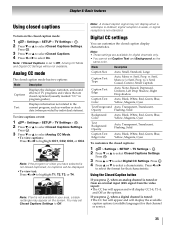
... b to highlight CC1, CC2, CC3, or CC4. w. Analog CC mode The closed caption mode has two options: Mode Description Captions Displays the dialogue, narration, and sound effects of TV programs and videos that characteristic. Digital CC settings You can customize the closed captions: 1 > Settings > SETUP > TV Settings > . w/o Serif, Casual, Cursive, Small...
... b to highlight CC1, CC2, CC3, or CC4. w. Analog CC mode The closed caption mode has two options: Mode Description Captions Displays the dialogue, narration, and sound effects of TV programs and videos that characteristic. Digital CC settings You can customize the closed captions: 1 > Settings > SETUP > TV Settings > . w/o Serif, Casual, Cursive, Small...
User Manual
Page 41
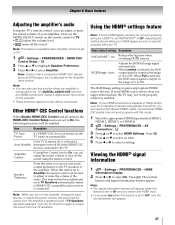
... remote control to TV. • VOL VOL adjust the volume level. • turns off and on automatically. When this item is set to output the sound from the amplifier's speakers even if TV Speakers has been selected. This item will not be output from the TV speakers. When Full is selected.... Note: If your HDMI connection is turned off, it is set to On and you watch and HDMI input. • If you can adjust the sound volume or turn off all items in the range of 16 to 255. OK 3 Press B or b to select On. The RGB Range setting requires appropriate...
... remote control to TV. • VOL VOL adjust the volume level. • turns off and on automatically. When this item is set to output the sound from the amplifier's speakers even if TV Speakers has been selected. This item will not be output from the TV speakers. When Full is selected.... Note: If your HDMI connection is turned off, it is set to On and you watch and HDMI input. • If you can adjust the sound volume or turn off all items in the range of 16 to 255. OK 3 Press B or b to select On. The RGB Range setting requires appropriate...
User Manual
Page 42
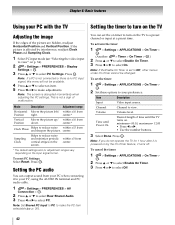
... these options to turn on the screen. "Selecting the video input to reduce noise and minimize periodic vertical stripes on the TV You can output sound from center. Note: The screen is not a sign of malfunction. To reset PC Settings: Select Reset. If the picture is powered on p. 34). 2 > Settings > PREFERENCES...
... these options to turn on the screen. "Selecting the video input to reduce noise and minimize periodic vertical stripes on the TV You can output sound from center. Note: The screen is not a sign of malfunction. To reset PC Settings: Select Reset. If the picture is powered on p. 34). 2 > Settings > PREFERENCES...

User Manual
Page 45
... you to change the picture size (i.e., changing the height/width ratio) for each input on the format of the signal being received. Chapter 7: Picture and sound controls Selecting the picture size You can save separate picture size preferences for any of the picture sizes) depends on p. 47) or try viewing the...
... you to change the picture size (i.e., changing the height/width ratio) for each input on the format of the signal being received. Chapter 7: Picture and sound controls Selecting the picture size You can save separate picture size preferences for any of the picture sizes) depends on p. 47) or try viewing the...

User Manual
Page 46
no overscanning). • This is hidden. Chapter 7: Picture and sound controls Picture Size Native (for 480i (HDMI), 480p (HDMI), 720p, 1080i, and 1080p signal programs) Picture Size TheaterWide 1 (for 4:3 format programs) • If receiving a 1080i, ...
no overscanning). • This is hidden. Chapter 7: Picture and sound controls Picture Size Native (for 480i (HDMI), 480p (HDMI), 720p, 1080i, and 1080p signal programs) Picture Size TheaterWide 1 (for 4:3 format programs) • If receiving a 1080i, ...
User Manual
Page 47
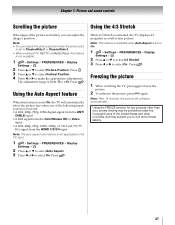
... picture 1 When watching the TV, press B to select Picture Position. Press . When 4:3 Stretch is set to On, the TV will unfreeze automatically. Chapter 7: Picture and sound controls Scrolling the picture Using the 4:3 Stretch If the edges of the picture are hidden, you to civil and criminal liability. 47 OK 2 Press B or...
... picture 1 When watching the TV, press B to select Picture Position. Press . When 4:3 Stretch is set to On, the TV will unfreeze automatically. Chapter 7: Picture and sound controls Scrolling the picture Using the 4:3 Stretch If the edges of the picture are hidden, you to civil and criminal liability. 47 OK 2 Press B or...
User Manual
Page 48
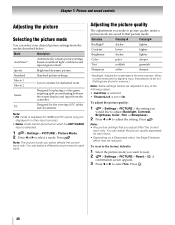
... timing between the screen display and input from the modes described below. Sports Bright and dynamic picture. Game Designed for each input. Chapter 7: Picture and sound controls Adjusting the picture Selecting the picture mode You can select your desired picture settings from the controller.
... timing between the screen display and input from the modes described below. Sports Bright and dynamic picture. Game Designed for each input. Chapter 7: Picture and sound controls Adjusting the picture Selecting the picture mode You can select your desired picture settings from the controller.
User Manual
Page 49
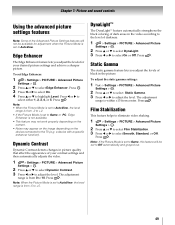
... select either 1, 2, 3, 4, or 5. Press C or c to select Edge Enhancer. OK 2 Press B or b to select Film Stabilization. 3 Press C or c to adjust the level. Chapter 7: Picture and sound controls Using the advanced picture settings features Note: Some of the Advanced Picture Settings features will be available for your contrast settings and then automatically...
... select either 1, 2, 3, 4, or 5. Press C or c to select Edge Enhancer. OK 2 Press B or b to select Film Stabilization. 3 Press C or c to adjust the level. Chapter 7: Picture and sound controls Using the advanced picture settings features Note: Some of the Advanced Picture Settings features will be available for your contrast settings and then automatically...

User Manual
Page 50
... C or c to 120 frames per second, virtually eliminating motion blur without adding flicker or reducing image brightness. 1 > Settings > PICTURE > Advanced Picture Settings > . Chapter 7: Picture and sound controls ClearFrame™ feature The ClearFrame 120 Hz anti-blur technology doubles the frame rate from 0 to suit ambient light conditions. 1 > Settings > PICTURE > Advanced Picture...
... C or c to 120 frames per second, virtually eliminating motion blur without adding flicker or reducing image brightness. 1 > Settings > PICTURE > Advanced Picture Settings > . Chapter 7: Picture and sound controls ClearFrame™ feature The ClearFrame 120 Hz anti-blur technology doubles the frame rate from 0 to suit ambient light conditions. 1 > Settings > PICTURE > Advanced Picture...
User Manual
Page 51
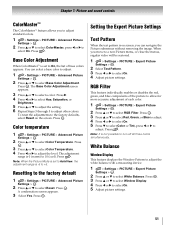
... Expert Picture Settings Test Pattern When the test pattern is -5 to +5. OK 2 Press B or b to select ColorMaster, press C or c to select On. Chapter 7: Picture and sound controls ColorMaster™ The ColorMaster™ feature allows you move to a non-Picture menu, or close the menus, regular video will be restored. 1 > Settings > PICTURE...
... Expert Picture Settings Test Pattern When the test pattern is -5 to +5. OK 2 Press B or b to select ColorMaster, press C or c to select On. Chapter 7: Picture and sound controls ColorMaster™ The ColorMaster™ feature allows you move to a non-Picture menu, or close the menus, regular video will be restored. 1 > Settings > PICTURE...


