User Manual
Page 11
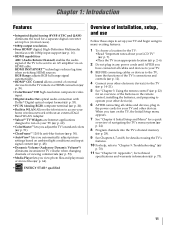
... TV, the Initial Setup menu appears. 7 See "Chapter 4: Initial Setup and Menu" for a quick overview of installation, setup, and use Follow these steps to an AV amplifier via HDMI connection (p. 39). •ColorStream® HD high-resolution component video input. •Digital Audio Out optical audio connection with 1080p input support...
... TV, the Initial Setup menu appears. 7 See "Chapter 4: Initial Setup and Menu" for a quick overview of installation, setup, and use Follow these steps to an AV amplifier via HDMI connection (p. 39). •ColorStream® HD high-resolution component video input. •Digital Audio Out optical audio connection with 1080p input support...
User Manual
Page 15
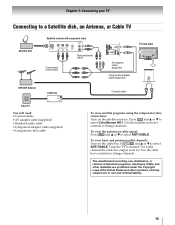
...receiver with component video Y PB PR AUDIO OUT L Satellite COMPONENT VIDEO VIDEO R IN OUT Standard audio cable Component video cable TV back panel AV adapter cable (supplied) Component adapter cable (supplied) VHF/UHF Antenna Cable TV Cable box CH 3 CH 4 IN OUT You will need: &#...8226;Coaxial cables •AV adapter cable (supplied) •Standard audio cable •Component adapter cable (supplied) •Component video cable Coaxial cable To view satellite programs using...
...receiver with component video Y PB PR AUDIO OUT L Satellite COMPONENT VIDEO VIDEO R IN OUT Standard audio cable Component video cable TV back panel AV adapter cable (supplied) Component adapter cable (supplied) VHF/UHF Antenna Cable TV Cable box CH 3 CH 4 IN OUT You will need: &#...8226;Coaxial cables •AV adapter cable (supplied) •Standard audio cable •Component adapter cable (supplied) •Component video cable Coaxial cable To view satellite programs using...
User Manual
Page 17
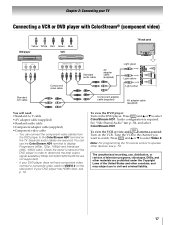
... A/V cable W Y COMPONENT VIDEO Y PB PR AUDIO OUT L R G B R W R Standard audio cable Component video cable W R AV adapter cable (supplied) Light green Light yellow Light yellow R B G Component adapter cable (supplied) AV adapter cable (supplied) R You will need: •Standard A/V cable •AV adapter cable (supplied) •Standard audio cable •Component adapter cable (supplied) •Component...
... A/V cable W Y COMPONENT VIDEO Y PB PR AUDIO OUT L R G B R W R Standard audio cable Component video cable W R AV adapter cable (supplied) Light green Light yellow Light yellow R B G Component adapter cable (supplied) AV adapter cable (supplied) R You will need: •Standard A/V cable •AV adapter cable (supplied) •Standard audio cable •Component adapter cable (supplied) •Component...
User Manual
Page 19
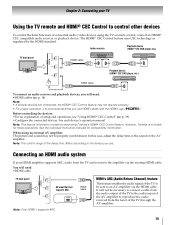
Before controlling the devices: •For an explanation of the sound on the AV amplifier. However, Toshiba is not liable for compatibility information. When using the TV's remote control, connect an HDMI® CEC compatible audio receiver or playback device.... other devices To control the basic functions of connected audio/video devices using an external AV amplifier: The picture and sound may not operate properly. • For proper operation, it is limited to models incorporating Toshiba's HDMI® CEC Control feature. Chapter 2: Connecting your HDMI amplifier supports ARC, ...
Before controlling the devices: •For an explanation of the sound on the AV amplifier. However, Toshiba is not liable for compatibility information. When using the TV's remote control, connect an HDMI® CEC compatible audio receiver or playback device.... other devices To control the basic functions of connected audio/video devices using an external AV amplifier: The picture and sound may not operate properly. • For proper operation, it is limited to models incorporating Toshiba's HDMI® CEC Control feature. Chapter 2: Connecting your HDMI amplifier supports ARC, ...

User Manual
Page 26
... Sleep Timer HDMI-CEC Control Setup Network Setup Netflix Setup VUDU Deactivation Wallpaper Setup Channel Browser Setup PIN Setting Parental Control and Locks Display Settings AV Connection Auto Input Energy Saving Settings HDMI Information Display Page 62 60 64 32 33 42 43 39 56 61 61 69 32 36 36...
... Sleep Timer HDMI-CEC Control Setup Network Setup Netflix Setup VUDU Deactivation Wallpaper Setup Channel Browser Setup PIN Setting Parental Control and Locks Display Settings AV Connection Auto Input Energy Saving Settings HDMI Information Display Page 62 60 64 32 33 42 43 39 56 61 61 69 32 36 36...
User Manual
Page 29
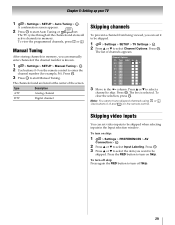
... the 8 column. The box is known. 1 > Settings > SETUP > Manual Tuning > . To turn off skip: Press again the RED button to turn on skip: 1 > Settings > PREFERENCES > AV Connection > . To turn off Skip. 29 Channel Options Ch. Press OK . Skipping video inputs You can manually enter channels if the channel number is selected...
... the 8 column. The box is known. 1 > Settings > SETUP > Manual Tuning > . To turn off skip: Press again the RED button to turn on skip: 1 > Settings > PREFERENCES > AV Connection > . To turn off Skip. 29 Channel Options Ch. Press OK . Skipping video inputs You can manually enter channels if the channel number is selected...
User Manual
Page 30
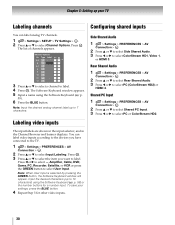
... Label 5-1 DTV 6 ATV 6-1 DTV 8 ATV 9 ATV 10 ATV 11 ATV 12 ATV 3 Press B or b to select a channel to the TV. 1 > Settings > PREFERENCES > AV Connection > . p. 59). 6 Press the BLUE button. You can label analog TV channels. 1 > Settings > SETUP > TV Settings > . OK 2 Press B or b to 7 ... inputs according to the devices you want to select User Input. Channel Options Ch. Shared PC Input 1 > Settings > PREFERENCES > AV Connection > . Note: Input the desired analog channel label up to select Input Labeling. Labeling video inputs The input labels are shown...
... Label 5-1 DTV 6 ATV 6-1 DTV 8 ATV 9 ATV 10 ATV 11 ATV 12 ATV 3 Press B or b to select a channel to the TV. 1 > Settings > PREFERENCES > AV Connection > . p. 59). 6 Press the BLUE button. You can label analog TV channels. 1 > Settings > SETUP > TV Settings > . OK 2 Press B or b to 7 ... inputs according to the devices you want to select User Input. Channel Options Ch. Shared PC Input 1 > Settings > PREFERENCES > AV Connection > . Note: Input the desired analog channel label up to select Input Labeling. Labeling video inputs The input labels are shown...
User Manual
Page 41
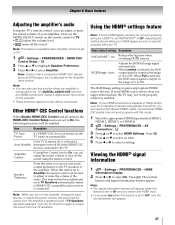
... 1080p and/or your HDMI source device does not support this mode. 1 Select the appropriate HDMI input mode (HDMI 1, HDMI 2, HDMI 3, or HDMI 4). 2 > Settings > PREFERENCES > AV Connection > . OK 2 Press B or b to highlight Speaker Preference. 3 Press C or c to the TV's DIGITAL AUDIO OUT terminal (not HDMI connection). Note: Confirm that a connected HDMI...
... 1080p and/or your HDMI source device does not support this mode. 1 Select the appropriate HDMI input mode (HDMI 1, HDMI 2, HDMI 3, or HDMI 4). 2 > Settings > PREFERENCES > AV Connection > . OK 2 Press B or b to highlight Speaker Preference. 3 Press C or c to the TV's DIGITAL AUDIO OUT terminal (not HDMI connection). Note: Confirm that a connected HDMI...
User Manual
Page 42
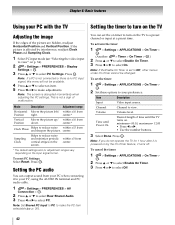
... connected or there is affected by the On Timer feature, it to your TV, using the AUDIO IN terminal and PC audio cable. 1 > Settings > PREFERENCES > AV Connection > . To reset PC Settings: Select Reset. Sampling Clock Helps to turn on the screen. p. 30). To set the on timer to reduce noise and...
... connected or there is affected by the On Timer feature, it to your TV, using the AUDIO IN terminal and PC audio cable. 1 > Settings > PREFERENCES > AV Connection > . To reset PC Settings: Select Reset. Sampling Clock Helps to turn on the screen. p. 30). To set the on timer to reduce noise and...
User Manual
Page 53
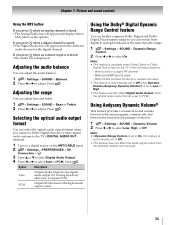
... to analog broadcasts at the same dynamic range. 1 > Settings > SOUND > Dynamic Range Control. 2 Press C or c to a digital source on the ANT/CABLE input. 2 > Settings > PREFERENCES > AV Connection > . Selecting the optical audio output format You can select the optical audio output format when you can further compress Dolby Digital and Dolby Digital...
... to analog broadcasts at the same dynamic range. 1 > Settings > SOUND > Dynamic Range Control. 2 Press C or c to a digital source on the ANT/CABLE input. 2 > Settings > PREFERENCES > AV Connection > . Selecting the optical audio output format You can select the optical audio output format when you can further compress Dolby Digital and Dolby Digital...
User Manual
Page 74
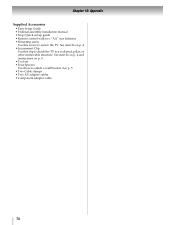
... • Mounting screw Use this clip to attach the TV to a wall stud, pillar, or other immovable structure. See p. 5. • Two Cable clamps • Two AV adapter cables • Component adapter cable 74 Chapter 10: Appendix Supplied Accessories • Easy Setup Guide • Pedestal assembly installation manual • Stop/Quick set...
... • Mounting screw Use this clip to attach the TV to a wall stud, pillar, or other immovable structure. See p. 5. • Two Cable clamps • Two AV adapter cables • Component adapter cable 74 Chapter 10: Appendix Supplied Accessories • Easy Setup Guide • Pedestal assembly installation manual • Stop/Quick set...


