User Manual
Page 10
...sound 54 Chapter 8: Advanced features 55 Using your home network 55 Setting up the Network 56 Wireless Setup 56 Advanced Network Setup 58 Network Connection Test 59 Using the software keyboard 59 Performing a Software Upgrade 60 Viewing the... chart 77 Operating other devices 79 Programming the remote to operate other devices . . . 79 Device code setup 79 Searching for a device code 80 Locking the volume keys 80 Clearing the remote's programming 80 Resetting to...States Warranty for LCD Televisions 88 Limited Canadian Warranty for Toshiba Brand Flat Panel Televisions 89 Index 92 10
...sound 54 Chapter 8: Advanced features 55 Using your home network 55 Setting up the Network 56 Wireless Setup 56 Advanced Network Setup 58 Network Connection Test 59 Using the software keyboard 59 Performing a Software Upgrade 60 Viewing the... chart 77 Operating other devices 79 Programming the remote to operate other devices . . . 79 Device code setup 79 Searching for a device code 80 Locking the volume keys 80 Clearing the remote's programming 80 Resetting to...States Warranty for LCD Televisions 88 Limited Canadian Warranty for Toshiba Brand Flat Panel Televisions 89 Index 92 10
User Manual
Page 11
...location for the TV: • Read "Important notes about your TV (- p. 7). • Place the TV in WLAN Allows the television to access your home wireless network without an external Dual Band WLAN Adapter. •Yahoo!® TV Widgets are Internet applications designed to run on your LCD TV" (- p. 2-6). 2 Do...the TV remote via an HDMI cable. RGB Range adjusts RGB full range signal automatically. •HDMI® CEC Control allows control of installation, setup, and use Follow these steps to set -top box (in the power cords for your TV and other electronic device(s) to the TV (-...
...location for the TV: • Read "Important notes about your TV (- p. 7). • Place the TV in WLAN Allows the television to access your home wireless network without an external Dual Band WLAN Adapter. •Yahoo!® TV Widgets are Internet applications designed to run on your LCD TV" (- p. 2-6). 2 Do...the TV remote via an HDMI cable. RGB Range adjusts RGB full range signal automatically. •HDMI® CEC Control allows control of installation, setup, and use Follow these steps to set -top box (in the power cords for your TV and other electronic device(s) to the TV (-...

User Manual
Page 26
... remote control or TV control panel. 1st Layer 2nd Layer 3rd Layer Page Network Media Player Wallpaper Timer Settings NET TV Network Setup Wireless Information Photo Movie Music On Timer Sleep Timer Game Timer PICTURE SOUND 60 56 57 (Device select) 67 (Device select) 65... Layer Widgets NET TV Media Player Channel Browser Favorites Browser On Timer Sleep Timer HDMI-CEC Control Setup Network Setup Netflix Setup VUDU Deactivation Wallpaper Setup Channel Browser Setup PIN Setting Parental Control and Locks Display Settings AV Connection Auto Input Energy Saving Settings HDMI Information ...
... remote control or TV control panel. 1st Layer 2nd Layer 3rd Layer Page Network Media Player Wallpaper Timer Settings NET TV Network Setup Wireless Information Photo Movie Music On Timer Sleep Timer Game Timer PICTURE SOUND 60 56 57 (Device select) 67 (Device select) 65... Layer Widgets NET TV Media Player Channel Browser Favorites Browser On Timer Sleep Timer HDMI-CEC Control Setup Network Setup Netflix Setup VUDU Deactivation Wallpaper Setup Channel Browser Setup PIN Setting Parental Control and Locks Display Settings AV Connection Auto Input Energy Saving Settings HDMI Information ...
User Manual
Page 56
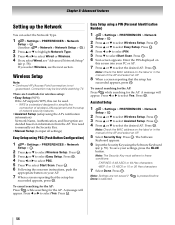
... Point) connection is pressed before 56 You need to manually set the Security Key. •Manual Setup (to select Wireless Setup. OK 2 Press B or b to input all settings) Easy Setup using the AP's notification information) Network Name, Authentication, and Encryption are decided based on information from...or c to select Start Scan. Press . Press . Press . Note: The Security Key must adhere to select Easy Setup. OK Note: Settings are 3 methods for wireless setup: •Easy Setup (WPS) If the AP supports WPS, this screen into your settings, press the BLUE button. OK 3 Press B ...
... Point) connection is pressed before 56 You need to manually set the Security Key. •Manual Setup (to select Wireless Setup. OK 2 Press B or b to input all settings) Easy Setup using the AP's notification information) Network Name, Authentication, and Encryption are decided based on information from...or c to select Start Scan. Press . Press . Press . Note: The Security Key must adhere to select Easy Setup. OK Note: Settings are 3 methods for wireless setup: •Easy Setup (WPS) If the AP supports WPS, this screen into your settings, press the BLUE button. OK 3 Press B ...

User Manual
Page 57
... Certain encryption types are only compatible with the AP Mode Working mode (11a, 11b, 11g, 11n) Channel The channel in Wireless Setup can be changed to highlight Authentication. To save your settings, press the BLUE button. Press C or c to select Open/...When Encryption is connected to the AP. Press . Chapter 8: Advanced features Manual Setup 1 > Settings > PREFERENCES > Network Setup > . OK 2 Press B or b to select Manual Setup. Press . OK 3 Press B or b to select Wireless Setup. OK 4 Press B or b to highlight Encryption. OK The Software Keyboard window...
... Certain encryption types are only compatible with the AP Mode Working mode (11a, 11b, 11g, 11n) Channel The channel in Wireless Setup can be changed to highlight Authentication. To save your settings, press the BLUE button. Press C or c to select Open/...When Encryption is connected to the AP. Press . Chapter 8: Advanced features Manual Setup 1 > Settings > PREFERENCES > Network Setup > . OK 2 Press B or b to select Manual Setup. Press . OK 3 Press B or b to select Wireless Setup. OK 4 Press B or b to highlight Encryption. OK The Software Keyboard window...
User Manual
Page 71
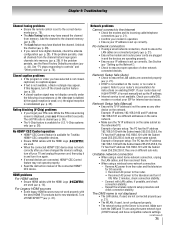
... in and turn it ON. Example: IP address 192.168.0.100 and IP address 192.168.0.101 are connected properly (- Repeat the wireless network setup procedure and check connection stability. Chapter 9: Troubleshooting Channel tuning problems • Ensure the remote control is set up correctly. Add the ...; Check to ensure the LAN cables are different addresses on the same network. • Make sure the TV IP address is available for Toshiba HDMI® CEC compatible devices. • Ensure HDMI cables with the Subnet mask 255.255.253.0; If the problem persists, clear all ...
... in and turn it ON. Example: IP address 192.168.0.100 and IP address 192.168.0.101 are connected properly (- Repeat the wireless network setup procedure and check connection stability. Chapter 9: Troubleshooting Channel tuning problems • Ensure the remote control is set up correctly. Add the ...; Check to ensure the LAN cables are different addresses on the same network. • Make sure the TV IP address is available for Toshiba HDMI® CEC compatible devices. • Ensure HDMI cables with the Subnet mask 255.255.253.0; If the problem persists, clear all ...
User Manual
Page 72
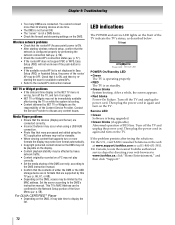
... the DMS instruction manual. • Confirm that supports two or more than 32 sharing devices at www.support.toshiba.com or call 1-800-631-3811. •In Canada, locate the nearest Toshiba authorized service depot by this TV (- click "Home Entertainment," and then click "Support." 72 p. 59). ...-On Failure. Turn off the TV and unplug the power cord. Service LED • Green Software is ON. • After starting wireless network setup, confirm that are connected. If the problem persists after turning the TV on the display. • Content playback stability may take time to...
... the DMS instruction manual. • Confirm that supports two or more than 32 sharing devices at www.support.toshiba.com or call 1-800-631-3811. •In Canada, locate the nearest Toshiba authorized service depot by this TV (- click "Home Entertainment," and then click "Support." 72 p. 59). ...-On Failure. Turn off the TV and unplug the power cord. Service LED • Green Software is ON. • After starting wireless network setup, confirm that are connected. If the problem persists after turning the TV on the display. • Content playback stability may take time to...

User Manual
Page 92
... Stabilization 49 FREEZE 47 G GameTimer 39 H HDMI connection 16 HDMI settings feature 41 HDMI® CEC Control 39 I Initial Setup 24 Input Lock 38 INSTAPORT 41 L Labeling 30 Language 28 92 LED Indication 72 Location 28 M Manual Tuning 29 Media Player... 64 Movie 65 Music 66 Photo 67 MPEG NR 50 MTS 52 MUTE 52 N NET TV 60 Network Setup 56 O On Timer 42 P Panel Lock 39 PC audio 42 PC connection 20 PC settings 42 Picture mode 48 ...TV status information 44 V V-Chip blocking 36 Voice Enhancement 54 W Wallpaper 69 White Balance 51 Wireless Information 57
... Stabilization 49 FREEZE 47 G GameTimer 39 H HDMI connection 16 HDMI settings feature 41 HDMI® CEC Control 39 I Initial Setup 24 Input Lock 38 INSTAPORT 41 L Labeling 30 Language 28 92 LED Indication 72 Location 28 M Manual Tuning 29 Media Player... 64 Movie 65 Music 66 Photo 67 MPEG NR 50 MTS 52 MUTE 52 N NET TV 60 Network Setup 56 O On Timer 42 P Panel Lock 39 PC audio 42 PC connection 20 PC settings 42 Picture mode 48 ...TV status information 44 V V-Chip blocking 36 Voice Enhancement 54 W Wallpaper 69 White Balance 51 Wireless Information 57


