User Manual
Page 2
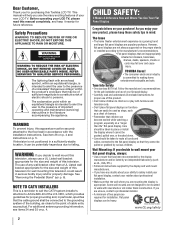
...items 34 and 35 on p. 4. 2 CHILD SAFETY: It Makes A Difference How and Where You Use Your Flat Panel Display Congratulations on p. 5. TOSHIBA Cares! • The consumer electronics industry is committed to the manufacturer's recommendations. • Flat panel displays that can become excited while watching a ...as a chest of drawers. • Remember that they cannot be securely attached to falling. As you use of this Toshiba LCD TV. This manual will help you enjoy your flat panel display so that children can easily be of sufficient magnitude to safely install your...
...items 34 and 35 on p. 4. 2 CHILD SAFETY: It Makes A Difference How and Where You Use Your Flat Panel Display Congratulations on p. 5. TOSHIBA Cares! • The consumer electronics industry is committed to the manufacturer's recommendations. • Flat panel displays that can become excited while watching a ...as a chest of drawers. • Remember that they cannot be securely attached to falling. As you use of this Toshiba LCD TV. This manual will help you enjoy your flat panel display so that children can easily be of sufficient magnitude to safely install your...
User Manual
Page 5
...blanket. 3) Follow the instructions provided with the pedestal. If these sounds become frequent or continuous, unplug the power cord and contact a Toshiba Authorized Service Provider. 44) WARNING: RISK OF SERIOUS PERSONAL INJURY OR EQUIPMENT DAMAGE! When selecting a location for the size and weight... and Follow the pedestal assembly instructions included with your LCD TV on or off switch, it is in this manual to a Toshiba Authorized Service Provider. 47) If you have the TV serviced: • Ask the service technician to use , the TV may result in item 37 on p. 4. Choosing a...
...blanket. 3) Follow the instructions provided with the pedestal. If these sounds become frequent or continuous, unplug the power cord and contact a Toshiba Authorized Service Provider. 44) WARNING: RISK OF SERIOUS PERSONAL INJURY OR EQUIPMENT DAMAGE! When selecting a location for the size and weight... and Follow the pedestal assembly instructions included with your LCD TV on or off switch, it is in this manual to a Toshiba Authorized Service Provider. 47) If you have the TV serviced: • Ask the service technician to use , the TV may result in item 37 on p. 4. Choosing a...
User Manual
Page 9
...28 Menu language 28 Local Time Setting 28 Location 28 ANT/CABLE IN 28 Storing channels in memory (optional 28 Auto Tuning 28 Manual Tuning 29 Skipping channels 29 Skipping video inputs 29 Labeling channels 30 Labeling video inputs 30 Configuring shared inputs 30 Setting the Auto Input...code 36 Entering a new PIN code 36 Changing or deleting your PIN code 36 Forgotten PIN code 36 Using parental controls 36 Blocking TV programs and movies by rating (V-Chip 36 Downloading an additional rating system 37 Displaying ratings 38 Unlocking programs 38 Locking specific channels 38 ...
...28 Menu language 28 Local Time Setting 28 Location 28 ANT/CABLE IN 28 Storing channels in memory (optional 28 Auto Tuning 28 Manual Tuning 29 Skipping channels 29 Skipping video inputs 29 Labeling channels 30 Labeling video inputs 30 Configuring shared inputs 30 Setting the Auto Input...code 36 Entering a new PIN code 36 Changing or deleting your PIN code 36 Forgotten PIN code 36 Using parental controls 36 Blocking TV programs and movies by rating (V-Chip 36 Downloading an additional rating system 37 Displaying ratings 38 Unlocking programs 38 Locking specific channels 38 ...
User Manual
Page 14
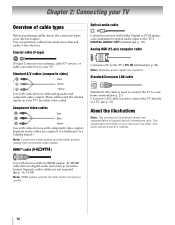
...with Dolby Digital or PCM (pulsecode modulation) optical audio input to the TV's DIGITAL AUDIO OUT terminal (- HDMI® cable ( ) Connects a PC to your TV. Standard/Crossover LAN cable Standard LAN cable is a Toshiba brand.) Note: Component video cables provide better picture quality than composite ... to your TV) are representative of cable types Before purchasing cables, know the connector types your devices require. p. 20). Crossover LAN cable is used to connect the TV to a PC (- The input/output terminals on your home network (- See each device's owner's manual. Note:...
...with Dolby Digital or PCM (pulsecode modulation) optical audio input to the TV's DIGITAL AUDIO OUT terminal (- HDMI® cable ( ) Connects a PC to your TV. Standard/Crossover LAN cable Standard LAN cable is a Toshiba brand.) Note: Component video cables provide better picture quality than composite ... to your TV) are representative of cable types Before purchasing cables, know the connector types your devices require. p. 20). Crossover LAN cable is used to connect the TV to a PC (- The input/output terminals on your home network (- See each device's owner's manual. Note:...
User Manual
Page 17
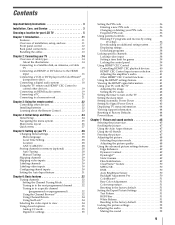
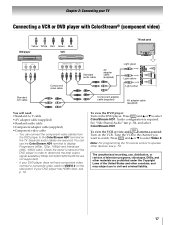
..., see p. 16. Press INPUT and B or b to select ColorStream HD1. Press INPUT and B or b to select Video 2. See "Side Shared Audio" (- If your TV Connecting a VCR or DVD player with ColorStream® (component video) Y W R G B Yellow White Red Green Blue DVD player VCR...Component adapter cable (supplied) •Component video cable - Tune the VCR to the channel you to civil and criminal liability. 17 Check the owner's manual of the United States and other materials are prohibited under the Copyright Laws of the DVD player in order to display Progressive (480p, 720p, 1080p...
..., see p. 16. Press INPUT and B or b to select ColorStream HD1. Press INPUT and B or b to select Video 2. See "Side Shared Audio" (- If your TV Connecting a VCR or DVD player with ColorStream® (component video) Y W R G B Yellow White Red Green Blue DVD player VCR...Component adapter cable (supplied) •Component video cable - Tune the VCR to the channel you to civil and criminal liability. 17 Check the owner's manual of the United States and other materials are prohibited under the Copyright Laws of the DVD player in order to display Progressive (480p, 720p, 1080p...
User Manual
Page 19
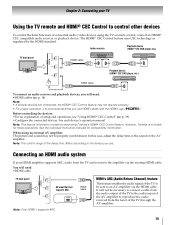
... (Audio Return Channel) feature This feature enables the audio signal of the TV to be sent to models incorporating Toshiba's HDMI® CEC Control feature. Audio receiver Playback device (HDMI® CEC DVD player,etc.) TV back panel HDMI cable HDMI OUT HDMI IN HDMI OUT HDMI cable Playback ...are connected, the HDMI® CEC Control feature may not be properly synchronized. See the individual instruction manuals for those operations. Connecting an HDMI audio system If your TV Using the TV remote and HDMI® CEC Control to the amplifier via the HDMI cable. You will need : ...
... (Audio Return Channel) feature This feature enables the audio signal of the TV to be sent to models incorporating Toshiba's HDMI® CEC Control feature. Audio receiver Playback device (HDMI® CEC DVD player,etc.) TV back panel HDMI cable HDMI OUT HDMI IN HDMI OUT HDMI cable Playback ...are connected, the HDMI® CEC Control feature may not be properly synchronized. See the individual instruction manuals for those operations. Connecting an HDMI audio system If your TV Using the TV remote and HDMI® CEC Control to the amplifier via the HDMI cable. You will need : ...
User Manual
Page 27
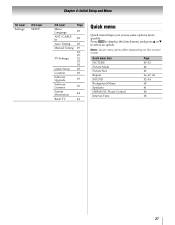
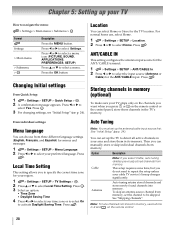
... 4: Initial Setup and Menu 1st Layer Settings 2nd Layer SETUP 3rd Layer Menu Language ANT/CABLE In Auto Tuning Manual Tuning TV Settings Quick Setup Location Software Upgrade Software Licenses System Information Reset TV Page 28 28 28 29 28, 29, 32, 35, 38 28 28 60 60 44 44 Quick menu Quick...
... 4: Initial Setup and Menu 1st Layer Settings 2nd Layer SETUP 3rd Layer Menu Language ANT/CABLE In Auto Tuning Manual Tuning TV Settings Quick Setup Location Software Upgrade Software Licenses System Information Reset TV Page 28 28 28 29 28, 29, 32, 35, 38 28 28 60 60 44 44 Quick menu Quick...
User Manual
Page 28
...menus and messages 1 > Settings > SETUP > Menu Language. 2 Press C or c to detect all active channels in its memory. Location You can manually store or skip individual channels from memory, set up the antenna/cable input source first. See "Initial Setup" (-p. 24). Press . Press . Auto ...Tuning Note: You must set up the TV to select your area and store them in your preferred language. Then you select Cable, auto tuning deletes previously stored channels from three...
...menus and messages 1 > Settings > SETUP > Menu Language. 2 Press C or c to detect all active channels in its memory. Location You can manually store or skip individual channels from memory, set up the antenna/cable input source first. See "Initial Setup" (-p. 24). Press . Press . Auto ...Tuning Note: You must set up the TV to select your area and store them in your preferred language. Then you select Cable, auto tuning deletes previously stored channels from three...
User Manual
Page 29
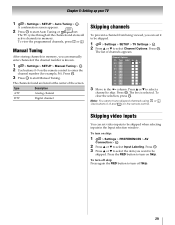
.... OK A confirmation screen appears. 2 Press OK to start Manual Tuning. The TV cycles through all the channels and stores all active channels in the... Analog channel Digital channel Skipping channels To prevent a channel from being viewed, you can manually enter channels if the channel number is selected. Press the RED button to turn on ...the remote control to select the item you can set video inputs to be skipped. 1 > Settings > SETUP > TV Settings > . Channel Options Ch. on skip: 1 > Settings > PREFERENCES > AV Connection > . Press . To turn off...
.... OK A confirmation screen appears. 2 Press OK to start Manual Tuning. The TV cycles through all the channels and stores all active channels in the... Analog channel Digital channel Skipping channels To prevent a channel from being viewed, you can manually enter channels if the channel number is selected. Press the RED button to turn on ...the remote control to select the item you can set video inputs to be skipped. 1 > Settings > SETUP > TV Settings > . Channel Options Ch. on skip: 1 > Settings > PREFERENCES > AV Connection > . Press . To turn off...

User Manual
Page 32
...the mode. OK 32 Using the Channel Browser™ The Channel Browser™ is a helpful navigational interface for analog and digital channels when the TV is saved. p. 39). 5 Select On or Off. 6 To return to select a mode. Mode Description Standard Auto (default) Digital You ... Channel Tuning Mode. OK 2 Press B or b to select digital channel 1251, press 1, 2, 5, -, 1.) Press . Digital channels have priority when manually entering a channel number using the 0-9 buttons on the remote control or TV control panel. Tuning in the TV's channel memory (- OK •Press or .
...the mode. OK 32 Using the Channel Browser™ The Channel Browser™ is a helpful navigational interface for analog and digital channels when the TV is saved. p. 39). 5 Select On or Off. 6 To return to select a mode. Mode Description Standard Auto (default) Digital You ... Channel Tuning Mode. OK 2 Press B or b to select digital channel 1251, press 1, 2, 5, -, 1.) Press . Digital channels have priority when manually entering a channel number using the 0-9 buttons on the remote control or TV control panel. Tuning in the TV's channel memory (- OK •Press or .
User Manual
Page 56
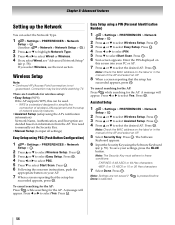
...the Network Type. 1 > Settings > PREFERENCES > Network Setup > . OK Note: Check the MAC address on the label or in the manual of network security features. •Assisted Setup (setup using PBC (Push Button Configuration) 1 > Settings > PREFERENCES > Network Setup > ....be used. - OK Easy Setup using the Software Keyboard (- Press . Chapter 8: Advanced features Setting up the Network You can be lost while watching TV. OK Assisted Setup 1 > Settings > PREFERENCES > Network Setup > . The Software Keyboard appears. 6 Input the Security Key using a PIN (Personal...
...the Network Type. 1 > Settings > PREFERENCES > Network Setup > . OK Note: Check the MAC address on the label or in the manual of network security features. •Assisted Setup (setup using PBC (Push Button Configuration) 1 > Settings > PREFERENCES > Network Setup > ....be used. - OK Easy Setup using the Software Keyboard (- Press . Chapter 8: Advanced features Setting up the Network You can be lost while watching TV. OK Assisted Setup 1 > Settings > PREFERENCES > Network Setup > . The Software Keyboard appears. 6 Input the Security Key using a PIN (Personal...

User Manual
Page 57
... or WPA2- To save your settings, press the BLUE button. 6 Press B or b to highlight Authentication. Press C or c to select Manual Setup. Note: • Certain encryption types are only compatible with the AP Mode Working mode (11a, 11b, 11g, 11n) Channel The channel...the AP. is connected to highlight Encryption. Item Description Status Connected is displayed when the TV is pressed before Wireless Information The settings configured in use DHCP. OK 2 Press B or b to AES (Under manual setup). 57 Press . Disabled is None. 10 Select Done. Press . Chapter 8: ...
... or WPA2- To save your settings, press the BLUE button. 6 Press B or b to highlight Authentication. Press C or c to select Manual Setup. Note: • Certain encryption types are only compatible with the AP Mode Working mode (11a, 11b, 11g, 11n) Channel The channel...the AP. is connected to highlight Encryption. Item Description Status Connected is displayed when the TV is pressed before Wireless Information The settings configured in use DHCP. OK 2 Press B or b to AES (Under manual setup). 57 Press . Disabled is None. 10 Select Done. Press . Chapter 8: ...

User Manual
Page 58
...highlight IP Address. 6 Press C or c to highlight the field you must not use the same IP address for the TV. 1 > Settings > PREFERENCES > Network Setup > . Note: If you manually set the IP address, you want to change and use the number buttons to input the IP address. OK 2 Press B... or b to select IP Address Setup. Manual setup: 1 > Settings > PREFERENCES > Network Setup > . OK 3 Press B or b to select Advanced Network Setup. OK 3 Press B or b to ...
...highlight IP Address. 6 Press C or c to highlight the field you must not use the same IP address for the TV. 1 > Settings > PREFERENCES > Network Setup > . Note: If you manually set the IP address, you want to change and use the number buttons to input the IP address. OK 2 Press B... or b to select IP Address Setup. Manual setup: 1 > Settings > PREFERENCES > Network Setup > . OK 3 Press B or b to select Advanced Network Setup. OK 3 Press B or b to ...
User Manual
Page 64
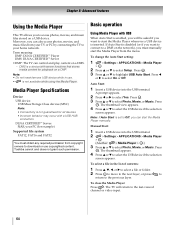
...or video input. 64 To change the Auto Start setting: 1 > Settings > APPLICATIONS > Media Player > . Manual Start: 1 Insert a USB device into the USB terminal. Press OK . Term meaning: DMP: DLNA CERTIFIED™...or b to select Photo, Movie, or Music. Chapter 8: Advanced features Using the Media Player This TV allows you can start the Media Player from the menu. DLNA CERTIFIED™ Server: NAS, your home... the Media Player whenever a USB device is not available while using the Media Player. Toshiba cannot and does not grant such permission. OK 3 Press B or b to select ...
...or video input. 64 To change the Auto Start setting: 1 > Settings > APPLICATIONS > Media Player > . Manual Start: 1 Insert a USB device into the USB terminal. Press OK . Term meaning: DMP: DLNA CERTIFIED™...or b to select Photo, Movie, or Music. Chapter 8: Advanced features Using the Media Player This TV allows you can start the Media Player from the menu. DLNA CERTIFIED™ Server: NAS, your home... the Media Player whenever a USB device is not available while using the Media Player. Toshiba cannot and does not grant such permission. OK 3 Press B or b to select ...
User Manual
Page 70
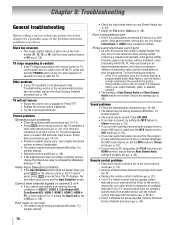
...8226; If you are watching (such as expected, perform the Reset Factory Defaults procedure (- p. 22). • Your TV's remote control may be not correct. Refer to the owner's manual for the program you select that the Rear Shared Audio setting is connected to an external A/V device (e.g. p. 35).... broadcast difficulties. Video Input Selection problems • If the Input Selection window does not appear when you cannot turn on . If the TV is plugged in their programming. p. 30). Sound problems • Check the antenna/cable connections (- 15-20). • The station...
...8226; If you are watching (such as expected, perform the Reset Factory Defaults procedure (- p. 22). • Your TV's remote control may be not correct. Refer to the owner's manual for the program you select that the Rear Shared Audio setting is connected to an external A/V device (e.g. p. 35).... broadcast difficulties. Video Input Selection problems • If the Input Selection window does not appear when you cannot turn on . If the TV is plugged in their programming. p. 30). Sound problems • Check the antenna/cable connections (- 15-20). • The station...
User Manual
Page 71
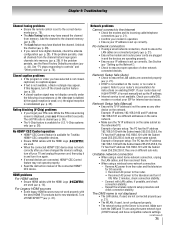
... is available for Internet service issues. p. 41). No network connection • If using a wired network connection, check to your ISP for Toshiba HDMI® CEC compatible devices. • Ensure HDMI cables with the HDMI Logo ( ) are used . • When the connected HDMI... are connected, HDMI® CEC Control feature may have selected is not closedcaptioned, no router is present. Network Setup fails (Manual) • Ensure the TV IP address is cleared (- Closed caption problems • If the program or video you cannot tune digital channels, check the ...
... is available for Internet service issues. p. 41). No network connection • If using a wired network connection, check to your ISP for Toshiba HDMI® CEC compatible devices. • Ensure HDMI cables with the HDMI Logo ( ) are used . • When the connected HDMI... are connected, HDMI® CEC Control feature may have selected is not closedcaptioned, no router is present. Network Setup fails (Manual) • Ensure the TV IP address is cleared (- Closed caption problems • If the program or video you cannot tune digital channels, check the ...
User Manual
Page 72
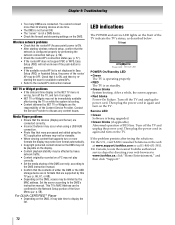
...when using a USB HUB connection. • Photo files that were processed and edited using the PC's application software may take time to the DMS instruction manual. • Confirm that the contents of either the DMS or the USB storage device are connected. p. 66, 67, or 68). • Depending... turn on while the system is ON, and then try restarting the scan for available routers/APs. • Refer to www.toshiba.ca; NET TV or Widget problems • If the date and time display on standby. • Green blinks System booting. After a while, the screen appears. •...
...when using a USB HUB connection. • Photo files that were processed and edited using the PC's application software may take time to the DMS instruction manual. • Confirm that the contents of either the DMS or the USB storage device are connected. p. 66, 67, or 68). • Depending... turn on while the system is ON, and then try restarting the scan for available routers/APs. • Refer to www.toshiba.ca; NET TV or Widget problems • If the date and time display on standby. • Green blinks System booting. After a while, the screen appears. •...
User Manual
Page 74
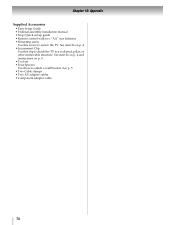
... item 26 on p. 5. • Tool set up guide • Remote control with two "AA" size batteries • Mounting screw Use this clip to attach the TV to a wall stud, pillar, or other immovable structure. See item 26 on p. 4 and instructions on p. 4. • Securement Clip Use this screw to secure the...
... item 26 on p. 5. • Tool set up guide • Remote control with two "AA" size batteries • Mounting screw Use this clip to attach the TV to a wall stud, pillar, or other immovable structure. See item 26 on p. 4 and instructions on p. 4. • Securement Clip Use this screw to secure the...

User Manual
Page 92
... 24 Input Lock 38 INSTAPORT 41 L Labeling 30 Language 28 92 LED Indication 72 Location 28 M Manual Tuning 29 Media Player 64 Movie 65 Music 66 Photo 67 MPEG NR 50 MTS 52 MUTE 52 N NET TV 60 Network Setup 56 O On Timer 42 P Panel Lock 39 PC audio 42 PC connection... 48 Picture size 45 PIN code 36 R Remote control Battery installation 22 Buttons 23 Device code table 82 Functional key chart 77 Programming 79 Reset TV 44 RGB Filter 51 RGB Range 41 S SAP 52 Shared inputs 30 Sleep Timer 43 Software keyboard 59 Static Gamma 49 Stereo sound 52 Support...
... 24 Input Lock 38 INSTAPORT 41 L Labeling 30 Language 28 92 LED Indication 72 Location 28 M Manual Tuning 29 Media Player 64 Movie 65 Music 66 Photo 67 MPEG NR 50 MTS 52 MUTE 52 N NET TV 60 Network Setup 56 O On Timer 42 P Panel Lock 39 PC audio 42 PC connection... 48 Picture size 45 PIN code 36 R Remote control Battery installation 22 Buttons 23 Device code table 82 Functional key chart 77 Programming 79 Reset TV 44 RGB Filter 51 RGB Range 41 S SAP 52 Shared inputs 30 Sleep Timer 43 Software keyboard 59 Static Gamma 49 Stereo sound 52 Support...


