
User Manual
Page 1
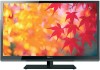
...46SL417U 55SL417U For an overview of your TV. For details, please contact your TV antenna installer, cable provider, or satellite provider. © 2011 TOSHIBA CORPORATION All Rights Reserved Owner's Record The model number and serial number are on the back and side of steps for setting up your Toshiba ...dealer about this TV. Refer to these numbers in the spaces below. Record these numbers whenever you communicate with your new TV, see page 11. www.support.toshiba.com Model number: Serial number: TD/M VX1A00205000 ...
...46SL417U 55SL417U For an overview of your TV. For details, please contact your TV antenna installer, cable provider, or satellite provider. © 2011 TOSHIBA CORPORATION All Rights Reserved Owner's Record The model number and serial number are on the back and side of steps for setting up your Toshiba ...dealer about this TV. Refer to these numbers in the spaces below. Record these numbers whenever you communicate with your new TV, see page 11. www.support.toshiba.com Model number: Serial number: TD/M VX1A00205000 ...
User Manual
Page 2
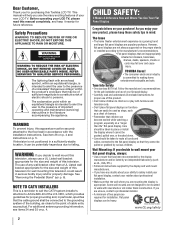
... SHOCK DO NOT OPEN. WARNING To prevent injury, this television, always use the many exciting features of cable entry as practical. TOSHIBA Cares! • The consumer electronics industry is committed to the floor/wall in the literature accompanying the appliance. This manual will help... read this manual completely, and keep these safety tips in a sufficiently stable location, it cannot be taken to walls with furniture and television sets. • Don't place flat panel display, always: • Use a mount that has been recommended by the display manufacturer and...
... SHOCK DO NOT OPEN. WARNING To prevent injury, this television, always use the many exciting features of cable entry as practical. TOSHIBA Cares! • The consumer electronics industry is committed to the floor/wall in the literature accompanying the appliance. This manual will help... read this manual completely, and keep these safety tips in a sufficiently stable location, it cannot be taken to walls with furniture and television sets. • Don't place flat panel display, always: • Use a mount that has been recommended by the display manufacturer and...
User Manual
Page 5
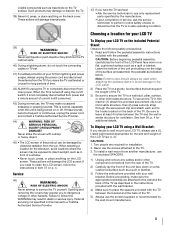
... installation. 2. Two people are attached to the TV. 3. If these sounds become frequent or continuous, unplug the power cord and contact a Toshiba Authorized Service Provider. 44) WARNING: RISK OF SERIOUS PERSONAL INJURY OR EQUIPMENT DAMAGE! To Display your LCD TV, always use the screws attached ... Unplug and remove any kind into the TV cabinet slots. 40) During a lightning storm, do not touch the connecting cables or TV set. 41) For added protection of the surface and assemble the pedestal as insecticide on the included Pedestal Stand: Observe the following safety precautions...
... installation. 2. Two people are attached to the TV. 3. If these sounds become frequent or continuous, unplug the power cord and contact a Toshiba Authorized Service Provider. 44) WARNING: RISK OF SERIOUS PERSONAL INJURY OR EQUIPMENT DAMAGE! To Display your LCD TV, always use the screws attached ... Unplug and remove any kind into the TV cabinet slots. 40) During a lightning storm, do not touch the connecting cables or TV set. 41) For added protection of the surface and assemble the pedestal as insecticide on the included Pedestal Stand: Observe the following safety precautions...
User Manual
Page 6
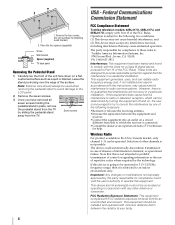
... surface such as a quilt or blanket. Federal Communications Commission Statement FCC Compliance Statement Toshiba television models 42SL417U, 46SL417U, and 55SL417U comply with FCC radiation exposure limits set forth for compliance could automatically discontinue transmission in 5.15-5.25GHz frequency range, then it...or an experienced radio/TV technician for a Class B digital device, pursuant to radio or television reception, which the receiver is : Toshiba America Information Systems, Inc. 9740 Irvine Blvd., Irvine, CA 92618. Place the four spacers (supplied). Ph: 1-800-631-3811...
... surface such as a quilt or blanket. Federal Communications Commission Statement FCC Compliance Statement Toshiba television models 42SL417U, 46SL417U, and 55SL417U comply with FCC radiation exposure limits set forth for compliance could automatically discontinue transmission in 5.15-5.25GHz frequency range, then it...or an experienced radio/TV technician for a Class B digital device, pursuant to radio or television reception, which the receiver is : Toshiba America Information Systems, Inc. 9740 Irvine Blvd., Irvine, CA 92618. Place the four spacers (supplied). Ph: 1-800-631-3811...
User Manual
Page 7
.... ENERGY STAR® User Information ENERGY STAR User Information Statement: the factory default settings of precision technology; To return to [Home] mode settings, select [AutoView] picture mode, and set Auto Brightness Sensor to operate this TV. 7 Environmental Protection Agency. therefore, Toshiba is not responsible for perceived issues resulting from a normal viewing distance. This is...
.... ENERGY STAR® User Information ENERGY STAR User Information Statement: the factory default settings of precision technology; To return to [Home] mode settings, select [AutoView] picture mode, and set Auto Brightness Sensor to operate this TV. 7 Environmental Protection Agency. therefore, Toshiba is not responsible for perceived issues resulting from a normal viewing distance. This is...
User Manual
Page 9
...Using Channel Return 34 Using SurfLock 34 Selecting the video input to view 34 Using closed captions 35 Analog CC mode 35 Digital CC settings 35 Setting the PIN code 36 Entering a new PIN code 36 Changing or deleting your PIN code 36 Forgotten PIN code 36 Using parental ... by rating (V-Chip 36 Downloading an additional rating system 37 Displaying ratings 38 Unlocking programs 38 Locking specific channels 38 Locking video input 38 Setting a time limit for games 39 Locking the control panel 39 Using HDMI® CEC Control 39 Controlling HDMI® CEC playback devices 40...
...Using Channel Return 34 Using SurfLock 34 Selecting the video input to view 34 Using closed captions 35 Analog CC mode 35 Digital CC settings 35 Setting the PIN code 36 Entering a new PIN code 36 Changing or deleting your PIN code 36 Forgotten PIN code 36 Using parental ... by rating (V-Chip 36 Downloading an additional rating system 37 Displaying ratings 38 Unlocking programs 38 Locking specific channels 38 Locking video input 38 Setting a time limit for games 39 Locking the control panel 39 Using HDMI® CEC Control 39 Controlling HDMI® CEC playback devices 40...
User Manual
Page 10
... feature 53 Using Audyssey Dynamic Volume 53 Using advanced sound features 54 Using surround sound 54 Chapter 8: Advanced features 55 Using your home network 55 Setting up the Network 56 Wireless Setup 56 Advanced Network Setup 58 Network Connection Test 59 Using the software keyboard 59 Performing a Software Upgrade 60 Viewing... default 80 Operating the TV with combination buttons 81 Remote control codes 82 Limited United States Warranty for LCD Televisions 88 Limited Canadian Warranty for Toshiba Brand Flat Panel Televisions 89 Index 92 10
... feature 53 Using Audyssey Dynamic Volume 53 Using advanced sound features 54 Using surround sound 54 Chapter 8: Advanced features 55 Using your home network 55 Setting up the Network 56 Wireless Setup 56 Advanced Network Setup 58 Network Connection Test 59 Using the software keyboard 59 Performing a Software Upgrade 60 Viewing... default 80 Operating the TV with combination buttons 81 Remote control codes 82 Limited United States Warranty for LCD Televisions 88 Limited Canadian Warranty for Toshiba Brand Flat Panel Televisions 89 Index 92 10
User Manual
Page 11
...cables and devices, plug in an appropriate location (- p. 22) for an overview of installation, setup, and use Follow these steps to set -top box (in most cases). •1080p output resolution. •Four HDMI® digital, High-Definition Multimedia Interfaces with Dolby®... Digital optical output format (- Chapter 1: Introduction Features •Integrated digital tuning (8VSB ATSC and QAM) eliminates the need for a separate digital converter set up your TV and begin using the TV's features. 10 For help, refer to "Chapter 9: Troubleshooting" (- p. 12). 4 Connect your TV ...
...cables and devices, plug in an appropriate location (- p. 22) for an overview of installation, setup, and use Follow these steps to set -top box (in most cases). •1080p output resolution. •Four HDMI® digital, High-Definition Multimedia Interfaces with Dolby®... Digital optical output format (- Chapter 1: Introduction Features •Integrated digital tuning (8VSB ATSC and QAM) eliminates the need for a separate digital converter set up your TV and begin using the TV's features. 10 For help, refer to "Chapter 9: Troubleshooting" (- p. 12). 4 Connect your TV ...
User Manual
Page 15
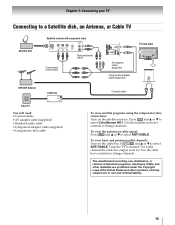
.... To view basic and premium cable channels: Turn on the satellite receiver. Tune the TV to channel 3 or 4 (the channel the cable box output is set to civil and criminal liability. 15 Use the cable box's controls to change channels. The unauthorized recording, use, distribution, or revision of television programs, videotapes...
.... To view basic and premium cable channels: Turn on the satellite receiver. Tune the TV to channel 3 or 4 (the channel the cable box output is set to civil and criminal liability. 15 Use the cable box's controls to change channels. The unauthorized recording, use, distribution, or revision of television programs, videotapes...
User Manual
Page 16
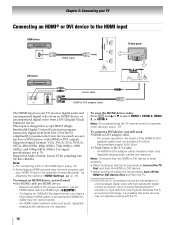
... device, you will need : •HDMI-to-DVI adapter cable - This input is designed to accept HDCP (HighBandwidth Digital-Content Protection) program material in HDMI Settings. (- Try disabling the options in digital form from a DVI (Digital Visual Interface) device. Recommendation: For proper operation, use an HDMI cable with the HDMI Logo...
... device, you will need : •HDMI-to-DVI adapter cable - This input is designed to accept HDCP (HighBandwidth Digital-Content Protection) program material in HDMI Settings. (- Try disabling the options in digital form from a DVI (Digital Visual Interface) device. Recommendation: For proper operation, use an HDMI cable with the HDMI Logo...
User Manual
Page 20
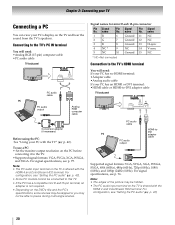
... adapter (if necessary) Before using the PC: See "Using your PC with the HDMI 4 and ColorStream HD2 terminal. To use a PC: • Set the monitor output resolution on the TV is shared with the TV" (- Signal names for mini D-sub 15-pin connector Pin Signal No. p. 42). ...before connecting it to the TV. •Supported signal formats: VGA, SVGA, XGA, WXGA, and SXGA. name Pin Signal No. For signal specifications, see "Setting the PC audio" (- name Pin Signal No. For configuration, see p. 76. Chapter 2: Connecting your TV Connecting a PC You can view your PC has ...
... adapter (if necessary) Before using the PC: See "Using your PC with the HDMI 4 and ColorStream HD2 terminal. To use a PC: • Set the monitor output resolution on the TV is shared with the TV" (- Signal names for mini D-sub 15-pin connector Pin Signal No. p. 42). ...before connecting it to the TV. •Supported signal formats: VGA, SVGA, XGA, WXGA, and SXGA. name Pin Signal No. For signal specifications, see "Setting the PC audio" (- name Pin Signal No. For configuration, see p. 76. Chapter 2: Connecting your TV Connecting a PC You can view your PC has ...
User Manual
Page 23
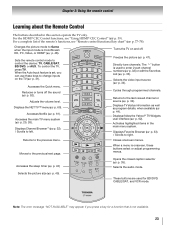
Sets the remote control mode to left. p. 31). Accesses the Quick menu. Adjusts the volume level. Displays the NET TV™ menu (- Accesses the main TV ... HD, PC, Video, or HDMI® (- Selects the audio mode. p. 32) or edit the Favorites List (- Selects the video input source (- p. 62). When a menu is set, you press a key for a function that is used for BD/DVD, CABLE/SAT, and VCR mode. When the Auto Input feature is onscreen, these keys...
Sets the remote control mode to left. p. 31). Accesses the Quick menu. Adjusts the volume level. Displays the NET TV™ menu (- Accesses the main TV ... HD, PC, Video, or HDMI® (- Selects the audio mode. p. 32) or edit the Favorites List (- Selects the video input source (- p. 62). When a menu is set, you press a key for a function that is used for BD/DVD, CABLE/SAT, and VCR mode. When the Auto Input feature is onscreen, these keys...
User Manual
Page 24
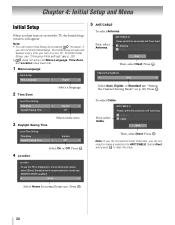
...® qualified) Home 5 ANT/CABLE To select Antenna: First, select Antenna. OK Channel Tuning Mode Auto Select Auto, Digital, or Standard (- "Setting the Channel Tuning Mode" on your TV. Chapter 4: Initial Setup and Menu Initial Setup When you do not need to make a selection for ANT/CABLE.... Note: • You can stop Initial Setup by pressing . To finish Initial Setup, see "Changing Initial settings" (- Eastern Off Select On or Off. OK Note: If you do not finish Initial Setup, the Initial Setup screen will appear. Select Next and...
...® qualified) Home 5 ANT/CABLE To select Antenna: First, select Antenna. OK Channel Tuning Mode Auto Select Auto, Digital, or Standard (- "Setting the Channel Tuning Mode" on your TV. Chapter 4: Initial Setup and Menu Initial Setup When you do not need to make a selection for ANT/CABLE.... Note: • You can stop Initial Setup by pressing . To finish Initial Setup, see "Changing Initial settings" (- Eastern Off Select On or Off. OK Note: If you do not finish Initial Setup, the Initial Setup screen will appear. Select Next and...
User Manual
Page 25
.... •If you selected Cable previously, select Antenna. 4 Scan again. 7 Support Information The Support Information screen appears. OK 3 Repeat set up to select Yes. This can be confirmed from the following operation at any problem. Chapter 4: Initial Setup and Menu 6 Start Scan Auto...;Check the antenna/cable connections, and scan again. •Connect the TV to stop scanning, press scanning. Press . on the remote Wallpaper Timer Settings Network Media Player •Press B, b, C, or c on the remote control or TV control panel to the previous menu page, press or b....
.... •If you selected Cable previously, select Antenna. 4 Scan again. 7 Support Information The Support Information screen appears. OK 3 Repeat set up to select Yes. This can be confirmed from the following operation at any problem. Chapter 4: Initial Setup and Menu 6 Start Scan Auto...;Check the antenna/cable connections, and scan again. •Connect the TV to stop scanning, press scanning. Press . on the remote Wallpaper Timer Settings Network Media Player •Press B, b, C, or c on the remote control or TV control panel to the previous menu page, press or b....

User Manual
Page 26
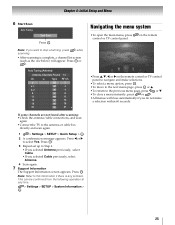
...menus (illustrated below), press on the remote control or TV control panel. 1st Layer 2nd Layer 3rd Layer Page Network Media Player Wallpaper Timer Settings NET TV Network Setup Wireless Information Photo Movie Music On Timer Sleep Timer Game Timer PICTURE SOUND 60 56 57 (Device select) 67 (... Sleep Timer HDMI-CEC Control Setup Network Setup Netflix Setup VUDU Deactivation Wallpaper Setup Channel Browser Setup PIN Setting Parental Control and Locks Display Settings AV Connection Auto Input Energy Saving Settings HDMI Information Display Page 62 60 64 32 33 42 43 39 56 61 61 69 32 36...
...menus (illustrated below), press on the remote control or TV control panel. 1st Layer 2nd Layer 3rd Layer Page Network Media Player Wallpaper Timer Settings NET TV Network Setup Wireless Information Photo Movie Music On Timer Sleep Timer Game Timer PICTURE SOUND 60 56 57 (Device select) 67 (... Sleep Timer HDMI-CEC Control Setup Network Setup Netflix Setup VUDU Deactivation Wallpaper Setup Channel Browser Setup PIN Setting Parental Control and Locks Display Settings AV Connection Auto Input Energy Saving Settings HDMI Information Display Page 62 60 64 32 33 42 43 39 56 61 61 69 32 36...
User Manual
Page 27
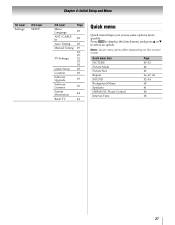
.... Note: Quick menu items differ depending on the current mode. Chapter 4: Initial Setup and Menu 1st Layer Settings 2nd Layer SETUP 3rd Layer Menu Language ANT/CABLE In Auto Tuning Manual Tuning TV Settings Quick Setup Location Software Upgrade Software Licenses System Information Reset TV Page 28 28 28 29 28, 29...
.... Note: Quick menu items differ depending on the current mode. Chapter 4: Initial Setup and Menu 1st Layer Settings 2nd Layer SETUP 3rd Layer Menu Language ANT/CABLE In Auto Tuning Manual Tuning TV Settings Quick Setup Location Software Upgrade Software Licenses System Information Reset TV Page 28 28 28 29 28, 29...
User Manual
Page 28
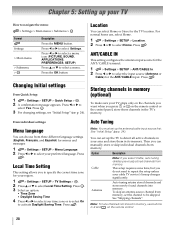
... an option: • Time Zone • Daylight Saving Time 4 Press C or c to select your TV How to navigate the menu: > Settings > Main menu > Submenu > OK Format Settings > Main menu > Submenu > OK Description Press the MENU button. Then you select Cable, auto tuning deletes previously stored channels from memory... not stored in the TV's memory. Antenna Auto tuning retains stored channels and stores newly found channels into memory. Local Time Setting This setting allows you press CH or CH on the remote control. 28 Press . This setup requires some time, but you do not...
... an option: • Time Zone • Daylight Saving Time 4 Press C or c to select your TV How to navigate the menu: > Settings > Main menu > Submenu > OK Format Settings > Main menu > Submenu > OK Description Press the MENU button. Then you select Cable, auto tuning deletes previously stored channels from memory... not stored in the TV's memory. Antenna Auto tuning retains stored channels and stores newly found channels into memory. Local Time Setting This setting allows you press CH or CH on the remote control. 28 Press . This setup requires some time, but you do not...
User Manual
Page 29
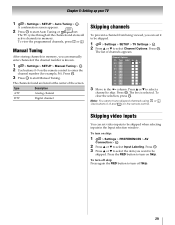
... channel Digital channel Skipping channels To prevent a channel from being viewed, you can set video inputs to be skipped. 1 > Settings > SETUP > TV Settings > . OK 2 Press B or b to the 8 column. The box is known. 1 > Settings > SETUP > Manual Tuning > . OK The list of the screen. Channel Options...OK 2 Press B or b to skip. CH Use buttons 0-9 and - OK 2 Use buttons 0-9 on Skip. Skipping video inputs You can set it to start Manual Tuning. OK A confirmation screen appears. 2 Press OK to be skipped. The TV cycles through all the channels and stores...
... channel Digital channel Skipping channels To prevent a channel from being viewed, you can set video inputs to be skipped. 1 > Settings > SETUP > TV Settings > . OK 2 Press B or b to the 8 column. The box is known. 1 > Settings > SETUP > Manual Tuning > . OK The list of the screen. Channel Options...OK 2 Press B or b to skip. CH Use buttons 0-9 and - OK 2 Use buttons 0-9 on Skip. Skipping video inputs You can set it to start Manual Tuning. OK A confirmation screen appears. 2 Press OK to be skipped. The TV cycles through all the channels and stores...
User Manual
Page 30
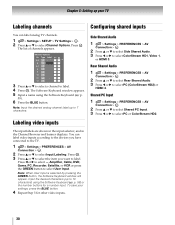
...9 ATV 10 ATV 11 ATV 12 ATV 3 Press B or b to select a channel to select PC or ColorStream HD2. Side Shared Audio 1 > Settings > PREFERENCES > AV Connection > . Labeling video inputs The input labels are shown in the input selector, and in the Channel Browser and banner displays. .... The Software Keyboard window appears. 5 Input a name using the Software Keyboard (- You can label analog TV channels. 1 > Settings > SETUP > TV Settings > . To save your TV Labeling channels Configuring shared inputs You can label video inputs according to the devices you want to select...
...9 ATV 10 ATV 11 ATV 12 ATV 3 Press B or b to select a channel to select PC or ColorStream HD2. Side Shared Audio 1 > Settings > PREFERENCES > AV Connection > . Labeling video inputs The input labels are shown in the input selector, and in the Channel Browser and banner displays. .... The Software Keyboard window appears. 5 Input a name using the Software Keyboard (- You can label analog TV channels. 1 > Settings > SETUP > TV Settings > . To save your TV Labeling channels Configuring shared inputs You can label video inputs according to the devices you want to select...

User Manual
Page 31
... Input to On. 3 Press B or b to select the mode you press and hold the MODE SELECT button for 2 seconds and release it. Chapter 5: Setting up your TV Setting the Auto Input feature You can change TV inputs using the MODE SELECT buttons on the remote control: TV, CABLE/SAT, BD/ DVD, AUX... input for a specific MODE SELECT button, the TV automatically switches to the input when you want to the ANT/CABLE input. To set . 4 Press C or c to select an input source for that mode. 5 Repeat the procedure for each MODE SELECT button: Mode Inputs TV ANT/CABLE CABLE/SAT ...
... Input to On. 3 Press B or b to select the mode you press and hold the MODE SELECT button for 2 seconds and release it. Chapter 5: Setting up your TV Setting the Auto Input feature You can change TV inputs using the MODE SELECT buttons on the remote control: TV, CABLE/SAT, BD/ DVD, AUX... input for a specific MODE SELECT button, the TV automatically switches to the input when you want to the ANT/CABLE input. To set . 4 Press C or c to select an input source for that mode. 5 Repeat the procedure for each MODE SELECT button: Mode Inputs TV ANT/CABLE CABLE/SAT ...


