Owner's Manual - English
Page 3
...does not fit into the apparatus, the apparatus has been exposed to rain or moisture, does not operate normally, or has been dropped. The LCD panel inside the TV contains glass and a toxic liquid. fully insert. 16) WARNING: To prevent the spread of fire, keep candles or other outlet unless the ... Make sure the tie is dropped and the cabinet or enclosure surface has been damaged or the TV does not operate normally, take the following precautions: • ALWAYS turn off the TV and unplug the power cord to avoid possible electric shock or fire. • NEVER allow your body to come in...
...does not fit into the apparatus, the apparatus has been exposed to rain or moisture, does not operate normally, or has been dropped. The LCD panel inside the TV contains glass and a toxic liquid. fully insert. 16) WARNING: To prevent the spread of fire, keep candles or other outlet unless the ... Make sure the tie is dropped and the cabinet or enclosure surface has been damaged or the TV does not operate normally, take the following precautions: • ALWAYS turn off the TV and unplug the power cord to avoid possible electric shock or fire. • NEVER allow your body to come in...
Owner's Manual - English
Page 4
... WARNING: RISK OF ELECTRIC SHOCK! Opening and removing the covers may vary until the LCD warms up static charges (see Section 810 of the National Electric Code). Care For better...to perform routine safety checks to make sure you are never in a position where your TOSHIBA TV, follow this WARNING may be damaged by the approved method for the television, avoid locations... be regulated due to follow these sounds become frequent or continuous, unplug the power cord and contact a Toshiba Authorized Service Center. 35) WARNING: RISK OF SERIOUS PERSONAL INJURY OR EQUIPMENT DAMAGE...
... WARNING: RISK OF ELECTRIC SHOCK! Opening and removing the covers may vary until the LCD warms up static charges (see Section 810 of the National Electric Code). Care For better...to perform routine safety checks to make sure you are never in a position where your TOSHIBA TV, follow this WARNING may be damaged by the approved method for the television, avoid locations... be regulated due to follow these sounds become frequent or continuous, unplug the power cord and contact a Toshiba Authorized Service Center. 35) WARNING: RISK OF SERIOUS PERSONAL INJURY OR EQUIPMENT DAMAGE...
Owner's Manual - English
Page 6
...occur in a particular installation. however, there may be determined by removing and applying power to the equipment, the user is connected. • Consult the dealer or an experienced radio/TV technician for help. Note: Interactive video games that involve shooting a "gun" type..., 47HL167, and 52HL167 Televisions comply with the instructions, may cause harmful interference to radio communications. This is a structural property of LCD technology, is not a sign of LCD Display technology and are not visible when the picture is : Toshiba America Consumer Products, L.L.C. 82 Totowa Rd....
...occur in a particular installation. however, there may be determined by removing and applying power to the equipment, the user is connected. • Consult the dealer or an experienced radio/TV technician for help. Note: Interactive video games that involve shooting a "gun" type..., 47HL167, and 52HL167 Televisions comply with the instructions, may cause harmful interference to radio communications. This is a structural property of LCD technology, is not a sign of LCD Display technology and are not visible when the picture is : Toshiba America Consumer Products, L.L.C. 82 Totowa Rd....
Owner's Manual - English
Page 7
... to Toshiba 9 Features of your new TV 9 Overview of steps for installing, setting up, and using your new TV 10 TV front and side panel controls and connections 11 TV back panel connections 12 Chapter 2: Connecting your TV 13... signal meter 44 Viewing the system status 44 Selecting the Power-On Mode 45 Chapter 6: Using the TV's features 46 Selecting the video input source to view 46 Labeling... the video input sources 46 Tuning channels 47 Tuning channels using the Channel Browser 47 Tuning to the ...
... to Toshiba 9 Features of your new TV 9 Overview of steps for installing, setting up, and using your new TV 10 TV front and side panel controls and connections 11 TV back panel connections 12 Chapter 2: Connecting your TV 13... signal meter 44 Viewing the system status 44 Selecting the Power-On Mode 45 Chapter 6: Using the TV's features 46 Selecting the video input source to view 46 Labeling... the video input sources 46 Tuning channels 47 Tuning channels using the Channel Browser 47 Tuning to the ...
Owner's Manual - English
Page 10
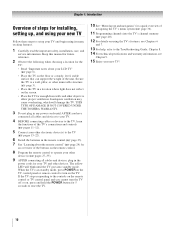
...8 Program the remote control to the TV (- THIS TYPE OF DAMAGE IS NOT COVERED UNDER THE TOSHIBA WARRANTY. 3 Do not plug in standby mode, press POWER on the TV. If the TV stops responding to the controls on the remote control or TV control panel and you have connected all ...cables and devices, plug in the remote control (- page 23). 7 See "Learning about your LCD TV" (- Secure the TV to reset the TV...
...8 Program the remote control to the TV (- THIS TYPE OF DAMAGE IS NOT COVERED UNDER THE TOSHIBA WARRANTY. 3 Do not plug in standby mode, press POWER on the TV. If the TV stops responding to the controls on the remote control or TV control panel and you have connected all ...cables and devices, plug in the remote control (- page 23). 7 See "Learning about your LCD TV" (- Secure the TV to reset the TV...
Owner's Manual - English
Page 11
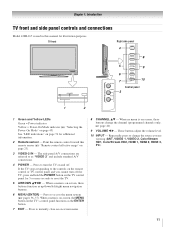
... to turn off . page 40). 9 VOLUME C c - "Selecting the Power-On Mode" on page 45) See "LED indications" on the TV control panel for additional information. 2 Remote sensor - If the TV stops responding to the controls on the remote control or TV control panel and you are referred to as up/down/left...on-screen, the MENU button on page 23). 3 VIDEO-2 IN - pages 36-37). Press to instantly close an on and off the TV, press and hold the POWER button on page 74 for 5 or more seconds to change the channel (programmed channels only; - The side panel A/V connections are viewing ...
... to turn off . page 40). 9 VOLUME C c - "Selecting the Power-On Mode" on page 45) See "LED indications" on the TV control panel for additional information. 2 Remote sensor - If the TV stops responding to the controls on the remote control or TV control panel and you are referred to as up/down/left...on-screen, the MENU button on page 23). 3 VIDEO-2 IN - pages 36-37). Press to instantly close an on and off the TV, press and hold the POWER button on page 74 for 5 or more seconds to change the channel (programmed channels only; - The side panel A/V connections are viewing ...
Owner's Manual - English
Page 12
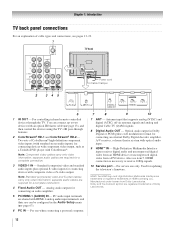
... outputs for updating the television's firmware. Optical audio output in the Audio Setup menu (- Also see pages 13-22. 1 TV back 2 345 Power cord Cable Clamper 6 1 IR OUT - HDMI, the HDMI logo and High-Definition Multimedia Interface are trademarks or registered trademarks of...- separate audio cables are required for connecting devices with component video output, such as a Toshiba DVD player with ColorStream®. page 63). 6 PC IN - Chapter 1: Introduction TV back panel connections For an explanation of cable types and connections, see item 5. For controlling ...
... outputs for updating the television's firmware. Optical audio output in the Audio Setup menu (- Also see pages 13-22. 1 TV back 2 345 Power cord Cable Clamper 6 1 IR OUT - HDMI, the HDMI logo and High-Definition Multimedia Interface are trademarks or registered trademarks of...- separate audio cables are required for connecting devices with component video output, such as a Toshiba DVD player with ColorStream®. page 63). 6 PC IN - Chapter 1: Introduction TV back panel connections For an explanation of cable types and connections, see item 5. For controlling ...
Owner's Manual - English
Page 17
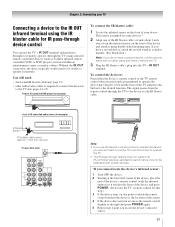
...cables as Toshiba infrared remotecontrolled VCRs or DVD players) enclosed within an entertainment center or similar cabinet. Front of IR-controlled audio device (for example) Infrared sensor IR blaster cable wand (approx.1 inch from device) TV upper back panel Note: • If you use the TV's remote ...have a second device, coil the second wand with the infrared emitter) so it touches the front of the device and press POWER. (Do not use the TV's IR OUT terminal (infrared passthrough) to remotely operate (through feature does not support all IR-controlled devices; To control the...
...cables as Toshiba infrared remotecontrolled VCRs or DVD players) enclosed within an entertainment center or similar cabinet. Front of IR-controlled audio device (for example) Infrared sensor IR blaster cable wand (approx.1 inch from device) TV upper back panel Note: • If you use the TV's remote ...have a second device, coil the second wand with the infrared emitter) so it touches the front of the device and press POWER. (Do not use the TV's IR OUT terminal (infrared passthrough) to remotely operate (through feature does not support all IR-controlled devices; To control the...
Owner's Manual - English
Page 24
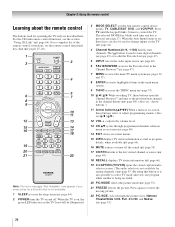
... information (- Chapter 3: Using the remote control Learning about the remote control The buttons used to change inputs on the TV (- page 64). 2 POWER turns the TV on and off the sound (- The = button is being recorded. 20 PIC MODE selects the picture mode (- pages 36 and 37). ...(- For a complete list of the remote control's functions, see the section "Using CE-Link" (- page 64). page 47). 5 INPUT selects the video input source (- page 66). 19 C.CAPTION (TV/VCR) opens the closed caption/audio selector screen. (The audio selector is not available for a function that is pressed. ...
... information (- Chapter 3: Using the remote control Learning about the remote control The buttons used to change inputs on the TV (- page 64). 2 POWER turns the TV on and off the sound (- The = button is being recorded. 20 PIC MODE selects the picture mode (- pages 36 and 37). ...(- For a complete list of the remote control's functions, see the section "Using CE-Link" (- page 64). page 47). 5 INPUT selects the video input source (- page 66). 19 C.CAPTION (TV/VCR) opens the closed caption/audio selector screen. (The audio selector is not available for a function that is pressed. ...
Owner's Manual - English
Page 25
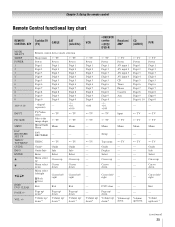
... the remote control Remote Control functional key chart REMOTE CONTROL KEY Toshiba TV (TV) CABLE SAT (satellite) MODE SELECT SLEEP POWER 1 2 3 4 5 6 7 8 9 0 100/-/+10 INPUT PIC SIZE MENU FAV BROWSER/ SET UP THINC/ TOP MENU GUIDE INFO ENTER B b C3 #c EXIT/ DVD CLEAR PAGE +/- s TV s TV Menu s TV Power Digit 1 Digit 2 Digit 3 Digit 4 Digit 5 Digit 6 Digit 7 Digit 8 Digit 9 Digit 0 -/--, +10...
... the remote control Remote Control functional key chart REMOTE CONTROL KEY Toshiba TV (TV) CABLE SAT (satellite) MODE SELECT SLEEP POWER 1 2 3 4 5 6 7 8 9 0 100/-/+10 INPUT PIC SIZE MENU FAV BROWSER/ SET UP THINC/ TOP MENU GUIDE INFO ENTER B b C3 #c EXIT/ DVD CLEAR PAGE +/- s TV s TV Menu s TV Power Digit 1 Digit 2 Digit 3 Digit 4 Digit 5 Digit 6 Digit 7 Digit 8 Digit 9 Digit 0 -/--, +10...
Owner's Manual - English
Page 36
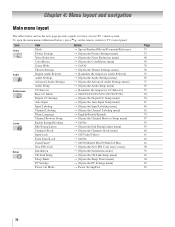
...layout The tables below ), press Y on the next page provide a quick overview of your TV's menu system. Icon Video Audio Preferences Locks Setup Item Mode Picture Settings Noise Reduction ColorMaster ...Limits Channels Block Input Lock Front Panel Lock GameTimer® New PIN Code Installation CE-Link Setup Sleep Timer PC Settings Power-On Mode Option S Sports/Standard/Movie/Document/Preference S [Opens the Picture Settings menu] S [Opens the Noise ...menu] S [Opens the Sleep Timer menu] S [Opens the PC Settings menu] S Power-Saving/Fast Page 53 53 68 69 70 50 55 56 71 56 55 54 54 41 46 42 39...
...layout The tables below ), press Y on the next page provide a quick overview of your TV's menu system. Icon Video Audio Preferences Locks Setup Item Mode Picture Settings Noise Reduction ColorMaster ...Limits Channels Block Input Lock Front Panel Lock GameTimer® New PIN Code Installation CE-Link Setup Sleep Timer PC Settings Power-On Mode Option S Sports/Standard/Movie/Document/Preference S [Opens the Picture Settings menu] S [Opens the Noise ...menu] S [Opens the Sleep Timer menu] S [Opens the PC Settings menu] S Power-Saving/Fast Page 53 53 68 69 70 50 55 56 71 56 55 54 54 41 46 42 39...
Owner's Manual - English
Page 39
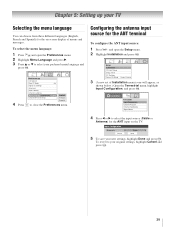
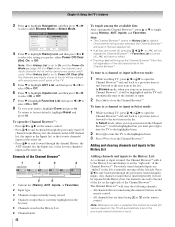
... the menu language You can choose from three different languages (English, French and Spanish) for the on the TV. Preferences CC Selector Base CC Mode Digital CC Settings Auto Input Input Labeling Channel Labeling Menu Language Channel Browser Setup Off English English Fran&#...press T. To select the menu language: 1 Press Y and open the Setup menu. 2 Highlight Installation and press T. Setup Installation CE-Link Setup Sleep Timer PC Settings Power-On Mode Power-Saving 3 (A new set of menus and messages. To revert to select your original settings, highlight Cancel and press T. 39
... the menu language You can choose from three different languages (English, French and Spanish) for the on the TV. Preferences CC Selector Base CC Mode Digital CC Settings Auto Input Input Labeling Channel Labeling Menu Language Channel Browser Setup Off English English Fran&#...press T. To select the menu language: 1 Press Y and open the Setup menu. 2 Highlight Installation and press T. Setup Installation CE-Link Setup Sleep Timer PC Settings Power-On Mode Power-Saving 3 (A new set of menus and messages. To revert to select your original settings, highlight Cancel and press T. 39
Owner's Manual - English
Page 40
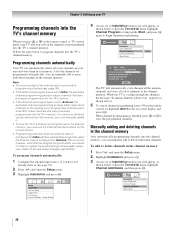
...the antenna channels, and store all active channels in your Cable TV service lineup changes significantly. To add or delete channels in the channel memory. Setup Installation CE-Link Setup Sleep Timer PC Settings Power-On Mode Power-Saving 4 (A new set of Channels Found - 73 Scanning Digital... Channels Found Channel - 118 Abort The TV will appear, as shown below.) Open the Terrestrial menu, highlight Channel Program ...
...the antenna channels, and store all active channels in your Cable TV service lineup changes significantly. To add or delete channels in the channel memory. Setup Installation CE-Link Setup Sleep Timer PC Settings Power-On Mode Power-Saving 4 (A new set of Channels Found - 73 Scanning Digital... Channels Found Channel - 118 Abort The TV will appear, as shown below.) Open the Terrestrial menu, highlight Channel Program ...
Owner's Manual - English
Page 41
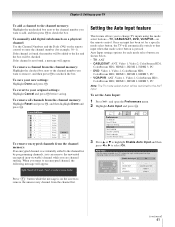
... then press C or c to your original settings: Highlight Cancel and press T before saving. Enable Auto Input On SLEEP POWER MODE SELECT CABLE/SAT DVD TV VCR/PVR TV CABLE/SAT DVD VCR/PVR -ColorStream HD1 HDMI 1 Video 1 Reset Done (continued) 41 To save your new settings:... is accidentally added to the channel list by programming channels, you can remove the unwanted encrypted (non-viewable) channel while you are shown below. • TV: ANT • CABLE/SAT: ANT, Video 1, Video 2, ColorStream HD1, ColorStream HD2, HDMI 1, HDMI 2, HDMI 3, PC • DVD: Video 1, Video 2, ...
... then press C or c to your original settings: Highlight Cancel and press T before saving. Enable Auto Input On SLEEP POWER MODE SELECT CABLE/SAT DVD TV VCR/PVR TV CABLE/SAT DVD VCR/PVR -ColorStream HD1 HDMI 1 Video 1 Reset Done (continued) 41 To save your new settings:... is accidentally added to the channel list by programming channels, you can remove the unwanted encrypted (non-viewable) channel while you are shown below. • TV: ANT • CABLE/SAT: ANT, Video 1, Video 2, ColorStream HD1, ColorStream HD2, HDMI 1, HDMI 2, HDMI 3, PC • DVD: Video 1, Video 2, ...
Owner's Manual - English
Page 42
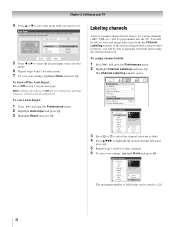
.../DOWN to set. To turn off the Auto Input: Select Off in the list, you want to change channels. You will be programmed into the TV. To assign channel labels: 1 Press Y and open the Preferences menu. 2 Highlight Auto Input and press T. 3 Highlight Reset and press T. Chapter 5: Setting up your...be grayed out. To reset Auto Input: 1 Press Y and open the Preferences menu. 2 Highlight Channel Labeling and press T. Enable Auto Input On SLEEP POWER MODE SELECT CABLE/SAT DVD TV VCR/PVR TV CABLE/SAT DVD VCR/PVR -ColorStream HD1 HDMI 1 Video 1 Reset Done 5 Press C or c to enable your...
.../DOWN to set. To turn off the Auto Input: Select Off in the list, you want to change channels. You will be programmed into the TV. To assign channel labels: 1 Press Y and open the Preferences menu. 2 Highlight Auto Input and press T. 3 Highlight Reset and press T. Chapter 5: Setting up your...be grayed out. To reset Auto Input: 1 Press Y and open the Preferences menu. 2 Highlight Channel Labeling and press T. Enable Auto Input On SLEEP POWER MODE SELECT CABLE/SAT DVD TV VCR/PVR TV CABLE/SAT DVD VCR/PVR -ColorStream HD1 HDMI 1 Video 1 Reset Done 5 Press C or c to enable your...
Owner's Manual - English
Page 45
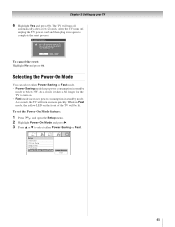
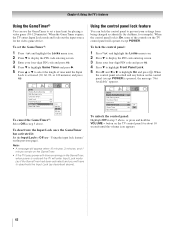
...Power-Saving or Fast mode. • Power-Saving mode keeps power consumption in to below 3W. After the TV turns off automatically after a few seconds. Selecting the Power-On Mode You can select either Power-Saving or Fast. Setup Installation CE-Link Setup Sleep Timer PC Settings Power-On Mode Power-Saving Power...-Saving Fast 45 While in standby mode. Chapter 5: Setting up your TV 6 Highlight Yes and press T. The TV will turn on more quickly. As a result, it takes a bit longer for the TV to confirm. System ...
...Power-Saving or Fast mode. • Power-Saving mode keeps power consumption in to below 3W. After the TV turns off automatically after a few seconds. Selecting the Power-On Mode You can select either Power-Saving or Fast. Setup Installation CE-Link Setup Sleep Timer PC Settings Power-On Mode Power-Saving Power...-Saving Fast 45 While in standby mode. Chapter 5: Setting up your TV 6 Highlight Yes and press T. The TV will turn on more quickly. As a result, it takes a bit longer for the TV to confirm. System ...
Owner's Manual - English
Page 48
..."right side" of the Channel Browser™. The Channel Browser™ will be saved every power on the remote control. Chapter 6: Using the TV's features 3 Press B to highlight Navigation, and then press C or c to select either Power Off Clear (On), On, or Off. page 45) is tuned, the Channel Browser™...; All channels that is set to On and the Power-On Mode (- To open the Channel Browser™ and surf back to a previous item or surf forward to the left side. To tune to a channel or input in Browse mode: 1 While watching TV, press 3 C or # c to open the Channel Browser&#...
..."right side" of the Channel Browser™. The Channel Browser™ will be saved every power on the remote control. Chapter 6: Using the TV's features 3 Press B to highlight Navigation, and then press C or c to select either Power Off Clear (On), On, or Off. page 45) is tuned, the Channel Browser™...; All channels that is set to On and the Power-On Mode (- To open the Channel Browser™ and surf back to a previous item or surf forward to the left side. To tune to a channel or input in Browse mode: 1 While watching TV, press 3 C or # c to open the Channel Browser&#...
Owner's Manual - English
Page 49
...input. • Once 32 channels or inputs are tuned.This feature also works for external inputs. 49 Tuning to "Power Off Clear (On)," turning off the TV will be cleared and the button will switch back and forth between two channels without entering an actual channel number each...-either through the automatic channel scan (- Note:This feature will clear the History List. The previous channel will return to program into the TV's channel memory (- Switching between the last two channels that channel quickly from any other channel by the dash (=) button and then the ...
...input. • Once 32 channels or inputs are tuned.This feature also works for external inputs. 49 Tuning to "Power Off Clear (On)," turning off the TV will be cleared and the button will switch back and forth between two channels without entering an actual channel number each...-either through the automatic channel scan (- Note:This feature will clear the History List. The previous channel will return to program into the TV's channel memory (- Switching between the last two channels that channel quickly from any other channel by the dash (=) button and then the ...
Owner's Manual - English
Page 62
... appear when 10 minutes, 3 minutes, and 1 minute remain on the GameTimer. • If the TV loses power with time remaining on the TV control panel for about 10 seconds until the Input Lock is restored the TV will enter Input Lock mode (as if the GameTimer had been activated) and you will operate... except POWER. button on the GameTimer, when power is activated (30, 60, 90, or 120 minutes) and press T. When the control panel lock...
... appear when 10 minutes, 3 minutes, and 1 minute remain on the GameTimer. • If the TV loses power with time remaining on the TV control panel for about 10 seconds until the Input Lock is restored the TV will enter Input Lock mode (as if the GameTimer had been activated) and you will operate... except POWER. button on the GameTimer, when power is activated (30, 60, 90, or 120 minutes) and press T. When the control panel lock...
Owner's Manual - English
Page 63
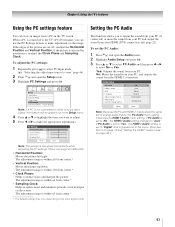
...is affected by interference, readjust the Clock Phase and Sampling Clock. Yes: Outputs the sound from the HDMI-1 connection. Chapter 6: Using the TV's features Using the PC settings feature Setting the PC Audio You can use the PC Settings feature to make the appropriate adjustments. The adjustment ...177;10 from center.* * The default settings may vary depending on page 43.) 63 Setup Installation CE-Link Setup Sleep Timer PC Settings Power-On Mode Power-Saving Note: If a PC is not connected or there is not a sign of the picture are cut off, readjust the Horizontal Position...
...is affected by interference, readjust the Clock Phase and Sampling Clock. Yes: Outputs the sound from the HDMI-1 connection. Chapter 6: Using the TV's features Using the PC settings feature Setting the PC Audio You can use the PC Settings feature to make the appropriate adjustments. The adjustment ...177;10 from center.* * The default settings may vary depending on page 43.) 63 Setup Installation CE-Link Setup Sleep Timer PC Settings Power-On Mode Power-Saving Note: If a PC is not connected or there is not a sign of the picture are cut off, readjust the Horizontal Position...


