Owner's Manual - English
Page 7
...to Toshiba 9 Features of your new TV 9 Overview of steps for installing, setting up, and using your new TV 10 TV front and side panel controls and connections 11 TV back panel connections 12 Chapter 2: Connecting your TV ... DVI device to the HDMI input 19 CE-Link connection 20 Connecting a digital audio system 21 Connecting an audio system 21 Connecting a personal computer (PC 22 Chapter 3: Using ... Using the TV's features 46 Selecting the video input source to view 46 Labeling the video input sources 46 Tuning channels 47 Tuning channels using the Channel Browser 47 Tuning to the...
...to Toshiba 9 Features of your new TV 9 Overview of steps for installing, setting up, and using your new TV 10 TV front and side panel controls and connections 11 TV back panel connections 12 Chapter 2: Connecting your TV ... DVI device to the HDMI input 19 CE-Link connection 20 Connecting a digital audio system 21 Connecting an audio system 21 Connecting a personal computer (PC 22 Chapter 3: Using ... Using the TV's features 46 Selecting the video input source to view 46 Labeling the video input sources 46 Tuning channels 47 Tuning channels using the Channel Browser 47 Tuning to the...

Owner's Manual - English
Page 9
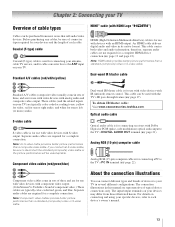
... put the Call Letters (e.g. page 68). • PC IN (Analog RGB) computer terminal (- page 22). • Channel Labeling allows you 're watching (- ABC, HBO, etc.) on the market. The menu for this Toshiba LCD TV, one of the most cases). • 1080p output resolution. • Three HDMI™ digital, high-definition multimedia interfaces 1080p input...
... put the Call Letters (e.g. page 68). • PC IN (Analog RGB) computer terminal (- page 22). • Channel Labeling allows you 're watching (- ABC, HBO, etc.) on the market. The menu for this Toshiba LCD TV, one of the most cases). • 1080p output resolution. • Three HDMI™ digital, high-definition multimedia interfaces 1080p input...
Owner's Manual - English
Page 11
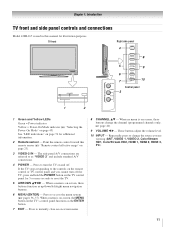
... viewing (ANT, VIDEO 1, VIDEO 2, ColorStream HD1, ColorStream HD2, HDMI 1, HDMI 2, HDMI 3, PC). 11 Press to as the ENTER button. 7 EXIT - pages 36-37). When no menu is on the TV control panel for illustration purposes. If the TV stops responding to the controls on the remote control or TV control panel and you are referred to turn...
... viewing (ANT, VIDEO 1, VIDEO 2, ColorStream HD1, ColorStream HD2, HDMI 1, HDMI 2, HDMI 3, PC). 11 Press to as the ENTER button. 7 EXIT - pages 36-37). When no menu is on the TV control panel for illustration purposes. If the TV stops responding to the controls on the remote control or TV control panel and you are referred to turn...
Owner's Manual - English
Page 12
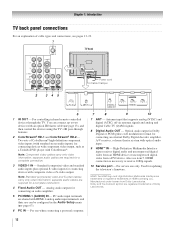
... IR blaster cable (- separate audio cables are required for connecting an audio amplifier. 5 PC/HDMI-1 (AUDIO) IN - Note: Standard (composite) video and S-video cables carry only video information; Also see pages 13-22. 1 TV back 2 345 Power cord Cable Clamper 6 1 IR OUT - For use only. ...configured in Dolby Digital or PCM (pulse-code modulation) format for connecting devices with component video output, such as a Toshiba DVD player with HDMI-1 analog audio input terminals, and their use can connect up to receive 1080p signals. 10 Service port - Chapter 1: Introduction...
... IR blaster cable (- separate audio cables are required for connecting an audio amplifier. 5 PC/HDMI-1 (AUDIO) IN - Note: Standard (composite) video and S-video cables carry only video information; Also see pages 13-22. 1 TV back 2 345 Power cord Cable Clamper 6 1 IR OUT - For use only. ...configured in Dolby Digital or PCM (pulse-code modulation) format for connecting devices with component video output, such as a Toshiba DVD player with HDMI-1 analog audio input terminals, and their use can connect up to receive 1080p signals. 10 Service port - Chapter 1: Introduction...
Owner's Manual - English
Page 13
..., red for stereo right audio, and white for use with devices with HDMI Logo " ") HDMI (High-Definition Multimedia Interface) cable is for stereo left (or mono) audio. S-video cable S-video cable is Toshiba's brand of component video.) These cables are for use with video devices ... blaster cable is for use with video devices with Dolby Digital or PCM (pulse-code modulation) optical audio input to the TV's PC IN terminal (- Note: HDMI cable provides better picture performance than a standard (composite) video or S-video cable. This cable carries both video and audio ...
..., red for stereo right audio, and white for use with devices with HDMI Logo " ") HDMI (High-Definition Multimedia Interface) cable is for stereo left (or mono) audio. S-video cable S-video cable is Toshiba's brand of component video.) These cables are for use with video devices ... blaster cable is for use with video devices with Dolby Digital or PCM (pulse-code modulation) optical audio input to the TV's PC IN terminal (- Note: HDMI cable provides better picture performance than a standard (composite) video or S-video cable. This cable carries both video and audio ...
Owner's Manual - English
Page 19
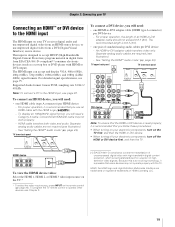
... standardized for reception of uncompressed digital video with the TV. Supported Audio format: Linear PCM, sampling rate 32/44.1/ 48 kHz Note: To connect a PC to the HDMI input, see page 75. To program the TV remote control to -DVI adapter cable (HDMI type A connector) per DVI device - For proper... operation, it is possible that some devices may not work properly. - page 43). TV lower back panel To connect a DVI...
... standardized for reception of uncompressed digital video with the TV. Supported Audio format: Linear PCM, sampling rate 32/44.1/ 48 kHz Note: To connect a PC to the HDMI input, see page 75. To program the TV remote control to -DVI adapter cable (HDMI type A connector) per DVI device - For proper... operation, it is possible that some devices may not work properly. - page 43). TV lower back panel To connect a DVI...
Owner's Manual - English
Page 21
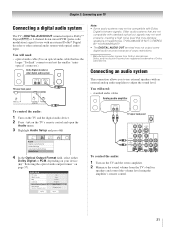
Older audio systems that are registered trademarks of copy restrictions. * Manufactured under license from the TV's built-in speakers and control the volume level using the amplifier's remote control. 21 Audio Setup PC Audio HDMI 1 Audio MTS Language Optical Output Format Dolby Digital Dynamic Range Control Reset No Auto Stereo English Dolby Digital Compressed...
Older audio systems that are registered trademarks of copy restrictions. * Manufactured under license from the TV's built-in speakers and control the volume level using the amplifier's remote control. 21 Audio Setup PC Audio HDMI 1 Audio MTS Language Optical Output Format Dolby Digital Dynamic Range Control Reset No Auto Stereo English Dolby Digital Compressed...
Owner's Manual - English
Page 22
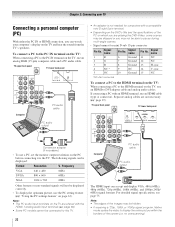
...(i.e. Chapter 2: Connecting your computer's display on the TV and hear the sound from the TV's speakers. To connect a PC to the PC IN terminal on the TV: When connecting a PC to the PC IN terminal on the TV, use an HDMI-to the HDMI terminal on the TV, use an analog RGB (15-pin) computer cable... and a PC audio cable. "Using the PC settings feature" on the TV: When connecting a PC to...
...(i.e. Chapter 2: Connecting your computer's display on the TV and hear the sound from the TV's speakers. To connect a PC to the PC IN terminal on the TV: When connecting a PC to the PC IN terminal on the TV, use an HDMI-to the HDMI terminal on the TV, use an analog RGB (15-pin) computer cable... and a PC audio cable. "Using the PC settings feature" on the TV: When connecting a PC to...
Owner's Manual - English
Page 41
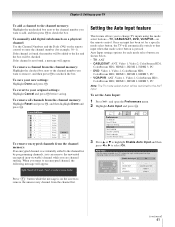
... (non-viewable) channel while you are shown below. • TV: ANT • CABLE/SAT: ANT, Video 1, Video 2, ColorStream HD1, ColorStream HD2, HDMI 1, HDMI 2, HDMI 3, PC • DVD: Video 1, Video 2, ColorStream HD1, ColorStream HD2, HDMI 1, HDMI 2, HDMI 3, PC • VCR/PVR: ANT, Video 1, Video 2, ColorStream HD1, ColorStream HD2, HDMI 1, HDMI 2, HDMI 3, PC Note: The TV mode select button will appear. Press 1 on the remote control...
... (non-viewable) channel while you are shown below. • TV: ANT • CABLE/SAT: ANT, Video 1, Video 2, ColorStream HD1, ColorStream HD2, HDMI 1, HDMI 2, HDMI 3, PC • DVD: Video 1, Video 2, ColorStream HD1, ColorStream HD2, HDMI 1, HDMI 2, HDMI 3, PC • VCR/PVR: ANT, Video 1, Video 2, ColorStream HD1, ColorStream HD2, HDMI 1, HDMI 2, HDMI 3, PC Note: The TV mode select button will appear. Press 1 on the remote control...
Owner's Manual - English
Page 43
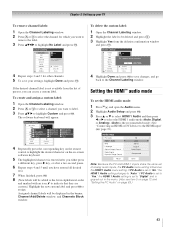
... CH UP/DOWN to change channels. No Yes Custom Clear All Done 4 Highlight Done and press T to save your TV To remove channel labels: 1 Open the Channel Labeling window. 2 Press < or , to select the channel for other... MTS Language Optical Output Format Dolby Digital Dynamic Range Control Reset No Auto Stereo English Dolby Digital Compressed Done Note: Because the PC and HDMI-1 inputs share the same set to the Channel Labeling window. Channel Labeling {No Label} A&E ANT 24 ABC1 1 A&E 2EdAit BCHCRTaN Cbanccel2 ABCFA4MG H I g h iPchr4easnsgeCHchUanPn/De5lOs.WJNKto L j k l 5...
... CH UP/DOWN to change channels. No Yes Custom Clear All Done 4 Highlight Done and press T to save your TV To remove channel labels: 1 Open the Channel Labeling window. 2 Press < or , to select the channel for other... MTS Language Optical Output Format Dolby Digital Dynamic Range Control Reset No Auto Stereo English Dolby Digital Compressed Done Note: Because the PC and HDMI-1 inputs share the same set to the Channel Labeling window. Channel Labeling {No Label} A&E ANT 24 ABC1 1 A&E 2EdAit BCHCRTaN Cbanccel2 ABCFA4MG H I g h iPchr4easnsgeCHchUanPn/De5lOs.WJNKto L j k l 5...
Owner's Manual - English
Page 46
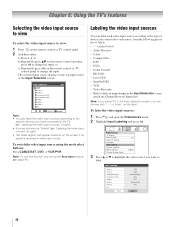
... source to view: 1 Press + on the remote control or TV control panel to change the input; To label the video input sources: 1 Press Y and open the Preferences menu. 2 Highlight Input Labeling and press T. Input Labeling Video 1 Video 2 ColorStream HD 1 ColorStream HD 2 HDMI 1 HDMI 2 HDMI 3 PC Reset VCR Cable Video Recorder Hide DTV Satellite/DSS DVD...
... source to view: 1 Press + on the remote control or TV control panel to change the input; To label the video input sources: 1 Press Y and open the Preferences menu. 2 Highlight Input Labeling and press T. Input Labeling Video 1 Video 2 ColorStream HD 1 ColorStream HD 2 HDMI 1 HDMI 2 HDMI 3 PC Reset VCR Cable Video Recorder Hide DTV Satellite/DSS DVD...
Owner's Manual - English
Page 47
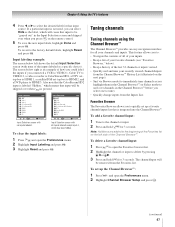
...Y and open the Preferences menu. 2 Highlight Channel Browser Setup and press T. (continued) 47 Favorites Browser The Favorites Browser allows you press + on the left shows the default Input ...and inputs. Input Selection ANT 0 ANT 1 Video 1 2 Video 2 3 ColorStream HD1 4 ColorStream HD2 5 HDMI 1 6 HDMI 2 7 HDMI 3 8 PC 0 - 8 / INPUT to Select Navigate Input Selection screen with none of how you could label the inputs ... skipped over when + is pressed. To set -top box to HDMI 2, and a DVD player to HDMI 3. Chapter 6: Using the TV's features 4 Press C or c to select the desired label for...
...Y and open the Preferences menu. 2 Highlight Channel Browser Setup and press T. (continued) 47 Favorites Browser The Favorites Browser allows you press + on the left shows the default Input ...and inputs. Input Selection ANT 0 ANT 1 Video 1 2 Video 2 3 ColorStream HD1 4 ColorStream HD2 5 HDMI 1 6 HDMI 2 7 HDMI 3 8 PC 0 - 8 / INPUT to Select Navigate Input Selection screen with none of how you could label the inputs ... skipped over when + is pressed. To set -top box to HDMI 2, and a DVD player to HDMI 3. Chapter 6: Using the TV's features 4 Press C or c to select the desired label for...

Owner's Manual - English
Page 51
... are hidden. To revert to fill the width of the screen, but not stretched taller. • None of the picture is supported only for HDMI and ColorStream inputs. • Depending on the input signals, the border of the screen (i.e. If the signal being received is other than 1080i, ...picture within the borders of the picture may be grayed out in the Picture Size screen. • This mode is hidden. Chapter 6: Using the TV's features TheaterWide 3 picture size (for letter box programs with subtitles) • The picture is especially useful for external HD sources such as HD-...
... are hidden. To revert to fill the width of the screen, but not stretched taller. • None of the picture is supported only for HDMI and ColorStream inputs. • Depending on the input signals, the border of the screen (i.e. If the signal being received is other than 1080i, ...picture within the borders of the picture may be grayed out in the Picture Size screen. • This mode is hidden. Chapter 6: Using the TV's features TheaterWide 3 picture size (for letter box programs with subtitles) • The picture is especially useful for external HD sources such as HD-...
Owner's Manual - English
Page 53
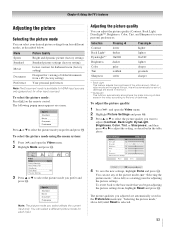
...Mode and press T. "Selecting the picture mode," above . You can select your personal preferences. Chapter 6: Using the TV's features Adjusting the picture Selecting the picture mode You can select a different picture mode for each input. Sports Standard ...Movie Document Preference Press B or b to your desired picture settings from a PC (factory setting) Your personal preferences Note:The Document mode is selected. 53 Picture Settings Contrast 100 ...left ) until Reset is available for HDMI input sources only (grayed out for other input sources).
...Mode and press T. "Selecting the picture mode," above . You can select your personal preferences. Chapter 6: Using the TV's features Adjusting the picture Selecting the picture mode You can select a different picture mode for each input. Sports Standard ...Movie Document Preference Press B or b to your desired picture settings from a PC (factory setting) Your personal preferences Note:The Document mode is selected. 53 Picture Settings Contrast 100 ...left ) until Reset is available for HDMI input sources only (grayed out for other input sources).
Owner's Manual - English
Page 56
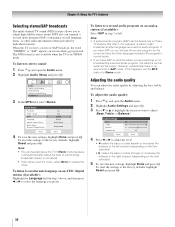
... stations). Audio Digital Audio Selector Audio Settings Advanced Audio Settings Audio Setup 3 In the MTS field, select Stereo. Audio Setup PC Audio HDMI 1 Audio MTS Language Optical Output Format Dolby Digital Dynamic Range Control No Auto Stereo English Dolby Digital Compressed Reset Done 4 To... or c to reduce the noise. Note: • You can be output. Note: • A second audio program (SAP) can typically leave the TV in Stereo mode because it . For example, a station might broadcast another language as a second audio program. To listen to an alternate language on an...
... stations). Audio Digital Audio Selector Audio Settings Advanced Audio Settings Audio Setup 3 In the MTS field, select Stereo. Audio Setup PC Audio HDMI 1 Audio MTS Language Optical Output Format Dolby Digital Dynamic Range Control No Auto Stereo English Dolby Digital Compressed Reset Done 4 To... or c to reduce the noise. Note: • You can be output. Note: • A second audio program (SAP) can typically leave the TV in Stereo mode because it . For example, a station might broadcast another language as a second audio program. To listen to an alternate language on an...
Owner's Manual - English
Page 57
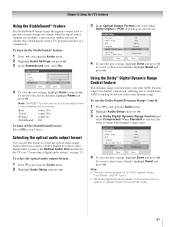
...audio adjustments to the following factory settings: Bass center (50) Treble center (50) Balance center (0) StableSound . . Audio Setup PC Audio HDMI 1 Audio MTS Language Optical Output Format Dolby Digital Dynamic Range Control No Auto Stereo English Dolby Digital Compressed Reset Done 4 To save...Control will be further compressed, allowing you connect a Dolby Digital decoder or other digital audio system to the Optical Audio Out terminal on the TV (see "Connecting a digital audio system" on the StableSound® feature: 1 Press Y and open the Audio menu. 2 Highlight Audio ...
...audio adjustments to the following factory settings: Bass center (50) Treble center (50) Balance center (0) StableSound . . Audio Setup PC Audio HDMI 1 Audio MTS Language Optical Output Format Dolby Digital Dynamic Range Control No Auto Stereo English Dolby Digital Compressed Reset Done 4 To save...Control will be further compressed, allowing you connect a Dolby Digital decoder or other digital audio system to the Optical Audio Out terminal on the TV (see "Connecting a digital audio system" on the StableSound® feature: 1 Press Y and open the Audio menu. 2 Highlight Audio ...
Owner's Manual - English
Page 61
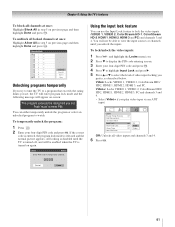
... an unlocked program to lock the video inputs (VIDEO 1, VIDEO 2, ColorStream HD-1, ColorStream HD-2, HDMI 1, HDMI 2, HDMI 3 and PC) and channels 3 and 4. You will not be enabled when the TV is turned off, and will appear on-screen: This program exceeds the rating limit you prefer, ... able to enter PIN. Chapter 6: Using the TV's features To block all channels at once: Highlight Allow All in step 5 on previous page and then highlight Done and press T. Video+: Locks VIDEO 1, VIDEO 2, ColorStream HD1/ HD2, HDMI 1, HDMI 2, HDMI 3, PC and channels 3 and 4. • Select Video...
... an unlocked program to lock the video inputs (VIDEO 1, VIDEO 2, ColorStream HD-1, ColorStream HD-2, HDMI 1, HDMI 2, HDMI 3 and PC) and channels 3 and 4. You will not be enabled when the TV is turned off, and will appear on-screen: This program exceeds the rating limit you prefer, ... able to enter PIN. Chapter 6: Using the TV's features To block all channels at once: Highlight Allow All in step 5 on previous page and then highlight Done and press T. Video+: Locks VIDEO 1, VIDEO 2, ColorStream HD1/ HD2, HDMI 1, HDMI 2, HDMI 3, PC and channels 3 and 4. • Select Video...
Owner's Manual - English
Page 63
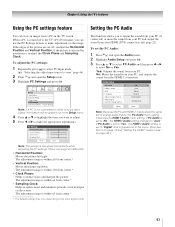
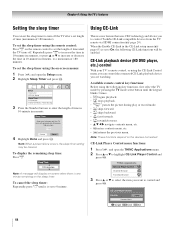
...right. "Selecting the video input source to select PC input mode (- This is connected to the TV's PC IN terminal, you can view an image from a PC on page 43.) 63 No: Mutes the sound from your HDMI (DVI) connection. (- If PC Audio is set to "Yes," the HDMI 1 Audio setting is set to "No," ...out in the menu. (Also see item 5 on page 12 and "Setting the HDMI™ Audio mode" on the TV screen. Setup Installation CE-Link Setup Sleep Timer PC Settings Power-On Mode Power-Saving Note: If a PC is not connected or there is affected by interference, readjust the Clock Phase and Sampling...
...right. "Selecting the video input source to select PC input mode (- This is connected to the TV's PC IN terminal, you can view an image from a PC on page 43.) 63 No: Mutes the sound from your HDMI (DVI) connection. (- If PC Audio is set to "Yes," the HDMI 1 Audio setting is set to "No," ...out in the menu. (Also see item 5 on page 12 and "Setting the HDMI™ Audio mode" on the TV screen. Setup Installation CE-Link Setup Sleep Timer PC Settings Power-On Mode Power-Saving Note: If a PC is not connected or there is affected by interference, readjust the Clock Phase and Sampling...
Owner's Manual - English
Page 64
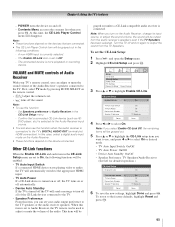
...the sleep timer: Repeatedly press [ until it is set the length of 180 minutes). page 20). Setup Installation CE-Link Setup Sleep Timer PC Settings Power-On Mode Power-Saving 3 Press the Number buttons to highlight CE-Link Player Control and press T. Sleep Timer Enter total minutes ... T. THINC Applications CE-Link Player Control Channel Browser Favorites Browser 3 Press B or b to select the item you to control Toshiba CE-Link compatible devices from the TV remote via HDMI connection (- To set the sleep timer using the remote control: Press [ on the remote control to set to 0 minute....
...the sleep timer: Repeatedly press [ until it is set the length of 180 minutes). page 20). Setup Installation CE-Link Setup Sleep Timer PC Settings Power-On Mode Power-Saving 3 Press the Number buttons to highlight CE-Link Player Control and press T. Sleep Timer Enter total minutes ... T. THINC Applications CE-Link Player Control Channel Browser Favorites Browser 3 Press B or b to select the item you to control Toshiba CE-Link compatible devices from the TV remote via HDMI connection (- To set the sleep timer using the remote control: Press [ on the remote control to set to 0 minute....
Owner's Manual - English
Page 65
... the Audio Receiver input source. • You can be used to Audio Receiver, the TV remote can also use this time, the CE-Link Player Control menu will be Setup Installation CE-Link Setup Sleep Timer PC Settings Power-On Mode Power-Saving 3 Press B or b to the factory defaults, highlight...when you can set the CE-Link Setup: 1 Press Y and open the Setup menu. 2 Highlight CE-Link Setup and press T. A non-HDMI input is not a playback or recording device. First, select TV mode by pressing MODE SELECT on the device connected. This item will be grayed out. 5 Press B or b to the...
... the Audio Receiver input source. • You can be used to Audio Receiver, the TV remote can also use this time, the CE-Link Player Control menu will be Setup Installation CE-Link Setup Sleep Timer PC Settings Power-On Mode Power-Saving 3 Press B or b to the factory defaults, highlight...when you can set the CE-Link Setup: 1 Press Y and open the Setup menu. 2 Highlight CE-Link Setup and press T. A non-HDMI input is not a playback or recording device. First, select TV mode by pressing MODE SELECT on the device connected. This item will be grayed out. 5 Press B or b to the...


