Owner's Manual - English
Page 7
...Toshiba 9 Features of your new TV 9 Overview of steps for installing, setting up, and using your new TV 10 TV front and side panel controls and connections 11 TV back panel connections 12 Chapter 2: Connecting your TV 13 Overview of cable... terminal using the IR blaster cable for IR pass-through device control 17 Connecting a camcorder 18 Connecting an HDMI™ or DVI device to the HDMI input 19 CE-Link connection ...TV's features 46 Selecting the video input source to view 46 Labeling the video input sources 46 Tuning channels 47 Tuning channels using the Channel Browser 47 ...
...Toshiba 9 Features of your new TV 9 Overview of steps for installing, setting up, and using your new TV 10 TV front and side panel controls and connections 11 TV back panel connections 12 Chapter 2: Connecting your TV 13 Overview of cable... terminal using the IR blaster cable for IR pass-through device control 17 Connecting a camcorder 18 Connecting an HDMI™ or DVI device to the HDMI input 19 CE-Link connection ...TV's features 46 Selecting the video input source to view 46 Labeling the video input sources 46 Tuning channels 47 Tuning channels using the Channel Browser 47 ...

Owner's Manual - English
Page 9
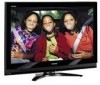
...ColorMaster™ allows you to enhance contrast while you're adjusting the color (- The menu for this Toshiba LCD TV, one of the most innovative LCD TVs on -demand, a cable operator's enhanced program guide and data-enhanced television services may require the use of a set -top ... HDMI™ digital, high-definition multimedia interfaces 1080p input support (- A security card provided by direct connection to a cable system providing such programming. Features of your new TV The following are just a few of the many exciting features of your new Toshiba widescreen, integrated HD, LCD TV:...
...ColorMaster™ allows you to enhance contrast while you're adjusting the color (- The menu for this Toshiba LCD TV, one of the most innovative LCD TVs on -demand, a cable operator's enhanced program guide and data-enhanced television services may require the use of a set -top ... HDMI™ digital, high-definition multimedia interfaces 1080p input support (- A security card provided by direct connection to a cable system providing such programming. Features of your new TV The following are just a few of the many exciting features of your new Toshiba widescreen, integrated HD, LCD TV:...
Owner's Manual - English
Page 12
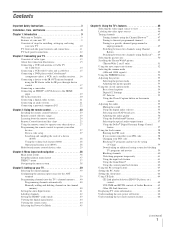
... video output, such as a Toshiba DVD player with composite video or S-video output. PC audio input terminals are required for connecting devices with ColorStream®. HDMI connection is necessary to two devices with optical audio input. 9 HDMI™ IN - Chapter 1: Introduction TV back panel connections For an explanation of cable types and connections, see item...
... video output, such as a Toshiba DVD player with composite video or S-video output. PC audio input terminals are required for connecting devices with ColorStream®. HDMI connection is necessary to two devices with optical audio input. 9 HDMI™ IN - Chapter 1: Introduction TV back panel connections For an explanation of cable types and connections, see item...
Owner's Manual - English
Page 13
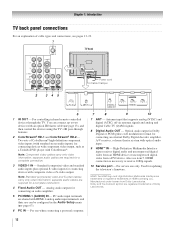
... terminals on your TV. Before purchasing any cables, be sure of connector types required by your devices may differ from most stores that sell audio/video devices. Note: HDMI cable provides better picture performance than a standard (composite) video or S-video cable. S-video cable S-video cable is Toshiba's brand of component video.) These cables are for a complete HDMI device connection (- page...
... terminals on your TV. Before purchasing any cables, be sure of connector types required by your devices may differ from most stores that sell audio/video devices. Note: HDMI cable provides better picture performance than a standard (composite) video or S-video cable. S-video cable S-video cable is Toshiba's brand of component video.) These cables are for a complete HDMI device connection (- page...
Owner's Manual - English
Page 16
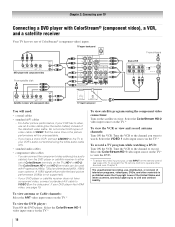
... video input source, press INPUT on the remote control (- page 24). If your DVD player has HDMI video, see Chapter 3. Select the ColorStream HD-2 video input source on the TV.* To view the DVD player: Turn ON the DVD player. Select the VIDEO 1 video input source...OUT OUT Satellite receiver with Progressive (480p, 720p) and Interlaced (480i, 1080i) scan systems. A 1080i signal will need: • coaxial cables • standard A/V cables - To program the TV remote control to operate other countries, and may subject you want to either set of ColorStream® (component video) inputs...
... video input source, press INPUT on the remote control (- page 24). If your DVD player has HDMI video, see Chapter 3. Select the ColorStream HD-2 video input source on the TV.* To view the DVD player: Turn ON the DVD player. Select the VIDEO 1 video input source...OUT OUT Satellite receiver with Progressive (480p, 720p) and Interlaced (480i, 1080i) scan systems. A 1080i signal will need: • coaxial cables • standard A/V cables - To program the TV remote control to operate other countries, and may subject you want to either set of ColorStream® (component video) inputs...
Owner's Manual - English
Page 19
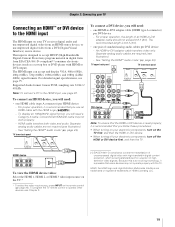
... you will need : • one HDMI-to-DVI adapter cable (HDMI type A connector) per HDMI device - page 24). See "Setting the HDMI™ audio mode" (- TV lower back panel To connect a DVI device, you use an HDMI cable with high-bandwidth digital content protection, which...HDMI cable (type A connector) per DVI device - An HDMI-to-DVI adapter cable transfers video only. Chapter 2: Connecting your TV Connecting an HDMI™ or DVI device to the HDMI input The HDMI input on your electronic components, turn off the HDMI or DVI device first, and then the TV. HDMI cable...
... you will need : • one HDMI-to-DVI adapter cable (HDMI type A connector) per HDMI device - page 24). See "Setting the HDMI™ audio mode" (- TV lower back panel To connect a DVI device, you use an HDMI cable with high-bandwidth digital content protection, which...HDMI cable (type A connector) per DVI device - An HDMI-to-DVI adapter cable transfers video only. Chapter 2: Connecting your TV Connecting an HDMI™ or DVI device to the HDMI input The HDMI input on your electronic components, turn off the HDMI or DVI device first, and then the TV. HDMI cable...
Owner's Manual - English
Page 20
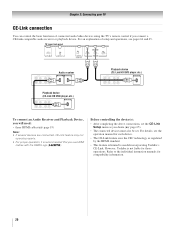
... controlling the device(s): • After completing the above connections, set . However, Toshiba is recommended that you desire (- For an explanation of connected audio/video devices using the TV's remote control if you will need: • three HDMI cables (- Refer to models incorporating Toshiba's CE-Link. page 65). • The connected devices must also be set...
... controlling the device(s): • After completing the above connections, set . However, Toshiba is recommended that you desire (- For an explanation of connected audio/video devices using the TV's remote control if you will need: • three HDMI cables (- Refer to models incorporating Toshiba's CE-Link. page 65). • The connected devices must also be set...
Owner's Manual - English
Page 21
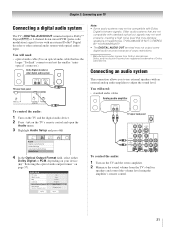
... from Dolby Laboratories. You will need : • standard audio cables Analog audio amplifier To control the audio: 1 Turn on the TV and the digital audio device. 2 Press Y on your TV Connecting a digital audio system The TV's DIGITAL AUDIO OUT terminal outputs a Dolby®* Digital g or... 2-channel down-mixed PCM (pulse-code modulation) signal for use external speakers with Dolby Digital bitstream signals. Audio Setup PC Audio HDMI 1 Audio MTS Language...
... from Dolby Laboratories. You will need : • standard audio cables Analog audio amplifier To control the audio: 1 Turn on the TV and the digital audio device. 2 Press Y on your TV Connecting a digital audio system The TV's DIGITAL AUDIO OUT terminal outputs a Dolby®* Digital g or... 2-channel down-mixed PCM (pulse-code modulation) signal for use external speakers with Dolby Digital bitstream signals. Audio Setup PC Audio HDMI 1 Audio MTS Language...
Owner's Manual - English
Page 22
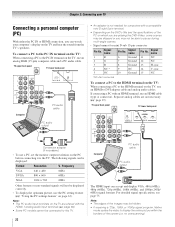
... may be hidden. • If receiving a 720p, 1080i, or 1080p signal program, Native mode scales the video to this TV. 22 Computer PC audio cable PC audio output The HDMI input can accept and display VGA, 480i (60Hz), 480p (60Hz), 720p (60Hz), 1080i (60Hz), and 1080p (24Hz/ 60Hz...models cannot be displayed correctly. • To display the optimum picture, use an HDMI cable (type A connector). Note: • The edges of the PC on the TV: When connecting a PC to DVI adapter cable and analog audio cables. The following signals can watch your computer's display on page 63). Note: ...
... may be hidden. • If receiving a 720p, 1080i, or 1080p signal program, Native mode scales the video to this TV. 22 Computer PC audio cable PC audio output The HDMI input can accept and display VGA, 480i (60Hz), 480p (60Hz), 720p (60Hz), 1080i (60Hz), and 1080p (24Hz/ 60Hz...models cannot be displayed correctly. • To display the optimum picture, use an HDMI cable (type A connector). Note: • The edges of the PC on the TV: When connecting a PC to DVI adapter cable and analog audio cables. The following signals can watch your computer's display on page 63). Note: ...
Owner's Manual - English
Page 41
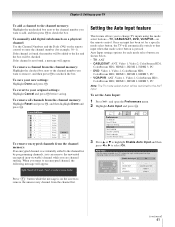
... • TV: ANT • CABLE/SAT: ANT, Video 1, Video 2, ColorStream HD1, ColorStream HD2, HDMI 1, HDMI 2, HDMI 3, PC • DVD: Video 1, Video 2, ColorStream HD1, ColorStream HD2, HDMI 1, HDMI 2, HDMI 3, PC • VCR/PVR: ANT, Video 1, Video 2, ColorStream HD1, ColorStream HD2, HDMI 1, HDMI 2, HDMI 3, PC Note: The TV mode select button... pressed. Enable Auto Input On SLEEP POWER MODE SELECT CABLE/SAT DVD TV VCR/PVR TV CABLE/SAT DVD VCR/PVR -ColorStream HD1 HDMI 1 Video 1 Reset Done (continued) 41 Chapter 5: Setting up your TV To add a channel to the channel memory: Highlight ...
... • TV: ANT • CABLE/SAT: ANT, Video 1, Video 2, ColorStream HD1, ColorStream HD2, HDMI 1, HDMI 2, HDMI 3, PC • DVD: Video 1, Video 2, ColorStream HD1, ColorStream HD2, HDMI 1, HDMI 2, HDMI 3, PC • VCR/PVR: ANT, Video 1, Video 2, ColorStream HD1, ColorStream HD2, HDMI 1, HDMI 2, HDMI 3, PC Note: The TV mode select button... pressed. Enable Auto Input On SLEEP POWER MODE SELECT CABLE/SAT DVD TV VCR/PVR TV CABLE/SAT DVD VCR/PVR -ColorStream HD1 HDMI 1 Video 1 Reset Done (continued) 41 Chapter 5: Setting up your TV To add a channel to the channel memory: Highlight ...
Owner's Manual - English
Page 42
...Preferences menu. 2 Highlight Auto Input and press T. 3 Highlight Reset and press T. Enable Auto Input On SLEEP POWER MODE SELECT CABLE/SAT DVD TV VCR/PVR TV CABLE/SAT DVD VCR/PVR -ColorStream HD1 HDMI 1 Video 1 Reset Done 5 Press C or c to change channels. To turn off the Auto Input: Select Off in ... for that can be able to set. Auto Input Use this menu to Off will be grayed out. Note: Setting the feature to enable your TV's automatic input switching feature when changing modes on previous page. Labeling channels A list of labels that mode. 6 Repeat steps 4 and 5 for ...
...Preferences menu. 2 Highlight Auto Input and press T. 3 Highlight Reset and press T. Enable Auto Input On SLEEP POWER MODE SELECT CABLE/SAT DVD TV VCR/PVR TV CABLE/SAT DVD VCR/PVR -ColorStream HD1 HDMI 1 Video 1 Reset Done 5 Press C or c to change channels. To turn off the Auto Input: Select Off in ... for that can be able to set. Auto Input Use this menu to Off will be grayed out. Note: Setting the feature to enable your TV's automatic input switching feature when changing modes on previous page. Labeling channels A list of labels that mode. 6 Repeat steps 4 and 5 for ...
Owner's Manual - English
Page 46
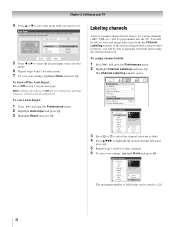
...change the input. To switch the video input source using the mode select buttons: Press CABLE/SAT, DVD, or VCR/PVR. Input Labeling Video 1 Video 2 ColorStream HD 1 ColorStream HD 2 HDMI 1 HDMI 2 HDMI 3 PC Reset VCR Cable Video Recorder Hide DTV Satellite/DSS DVD -- or c) Repeatedly press + on the ...remote control and then press T to Select Navigate Note: • You can choose only "- -" or "Hide" as the label. or b) Repeatedly press Bb on the remote control or TV...
...change the input. To switch the video input source using the mode select buttons: Press CABLE/SAT, DVD, or VCR/PVR. Input Labeling Video 1 Video 2 ColorStream HD 1 ColorStream HD 2 HDMI 1 HDMI 2 HDMI 3 PC Reset VCR Cable Video Recorder Hide DTV Satellite/DSS DVD -- or c) Repeatedly press + on the ...remote control and then press T to Select Navigate Note: • You can choose only "- -" or "Hide" as the label. or b) Repeatedly press Bb on the remote control or TV...
Owner's Manual - English
Page 47
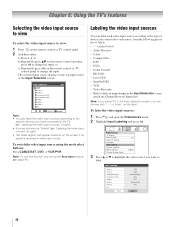
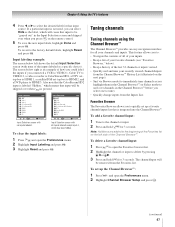
...8482; before you to: • Navigate the contents of all your recently viewed channels/inputs from the Favorites list. To revert to HDMI 3. Input Selection 0 ANT 1 VCR 2 Cable 3 Video Recorder 4 ColorStream HD2 (Hidden) 5 DTV 6 Satellite/DSS 7 DVD 8 PC ANT 0 - 8 / INPUT to ...Preferences menu. 2 Highlight Channel Browser Setup and press T. (continued) 47 Favorites Browser The Favorites Browser allows you connected a VCR to VIDEO 1, Cable TV to VIDEO 2, a video recorder to ColorStream HD1, a DTV settop box to HDMI 1, a satellite/DSS set up a favorite channels/inputs list that ...
...8482; before you to: • Navigate the contents of all your recently viewed channels/inputs from the Favorites list. To revert to HDMI 3. Input Selection 0 ANT 1 VCR 2 Cable 3 Video Recorder 4 ColorStream HD2 (Hidden) 5 DTV 6 Satellite/DSS 7 DVD 8 PC ANT 0 - 8 / INPUT to ...Preferences menu. 2 Highlight Channel Browser Setup and press T. (continued) 47 Favorites Browser The Favorites Browser allows you connected a VCR to VIDEO 1, Cable TV to VIDEO 2, a video recorder to ColorStream HD1, a DTV settop box to HDMI 1, a satellite/DSS set up a favorite channels/inputs list that ...

Owner's Manual - English
Page 52
...turn on page 50. Using the FREEZE feature To use the FREEZE feature: 1 When viewing the TV, press B to make the picture a still picture. 2 To return to antenna or cable input sources. Theater Settings Picture Size Picture Scroll Cinema Mode Auto Aspect Ratio Mode: Sports Natural --...720p, 1080i, 1080p, or VGA signal from a DVD player connected to the VIDEO 1, VIDEO 2, ColorStream HD-1, ColorStream HD-2 (component video), or HDMI inputs on the TV, smoother motion can be prohibited under "Selecting the picture size" on the auto aspect ratio feature: 1 Press Y and open the Video menu. 2...
...turn on page 50. Using the FREEZE feature To use the FREEZE feature: 1 When viewing the TV, press B to make the picture a still picture. 2 To return to antenna or cable input sources. Theater Settings Picture Size Picture Scroll Cinema Mode Auto Aspect Ratio Mode: Sports Natural --...720p, 1080i, 1080p, or VGA signal from a DVD player connected to the VIDEO 1, VIDEO 2, ColorStream HD-1, ColorStream HD-2 (component video), or HDMI inputs on the TV, smoother motion can be prohibited under "Selecting the picture size" on the auto aspect ratio feature: 1 Press Y and open the Video menu. 2...
Owner's Manual - English
Page 66
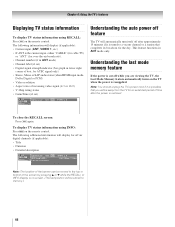
...cut off after the power is possible that completes its broadcast for ATSC signal only) • Stereo, Mono or SAP audio status (when HDMI input mode, Dolby Digital or PCM) • Video resolution • Aspect ratio of box; for the day. Understanding the auto power off feature... control. The following information will display (if applicable): • Current input (ANT, VIDEO 1, etc.) • If ANT is the current input, either "CABLE" (for cable TV) or "ANT" (for an extended period of the screen by pressing B or b while the RECALL or INFO display is on-screen. (The last position...
...cut off after the power is possible that completes its broadcast for ATSC signal only) • Stereo, Mono or SAP audio status (when HDMI input mode, Dolby Digital or PCM) • Video resolution • Aspect ratio of box; for the day. Understanding the auto power off feature... control. The following information will display (if applicable): • Current input (ANT, VIDEO 1, etc.) • If ANT is the current input, either "CABLE" (for cable TV) or "ANT" (for an extended period of the screen by pressing B or b while the RECALL or INFO display is on-screen. (The last position...
Owner's Manual - English
Page 68
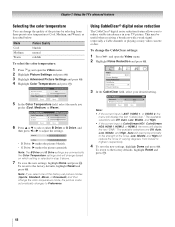
... selections are Off, Auto, Low, Middle, and High. • If the current input is ColorStream HD1, ColorStream HD2, HDMI 1, HDMI 2, or HDMI 3, the menu will react proportionally to the factory defaults, highlight Reset and press T. 68 Noise Reduction CableClear MPEG Noise Reduction Reset..., or Warm). This may be useful when receiving a broadcast with a weak signal (especially a Cable channel) or playing a noisy video cassette or disc. Chapter 7: Using the TV's advanced features Selecting the color temperature You can change based on which setting is selected in your desired...
... selections are Off, Auto, Low, Middle, and High. • If the current input is ColorStream HD1, ColorStream HD2, HDMI 1, HDMI 2, or HDMI 3, the menu will react proportionally to the factory defaults, highlight Reset and press T. 68 Noise Reduction CableClear MPEG Noise Reduction Reset..., or Warm). This may be useful when receiving a broadcast with a weak signal (especially a Cable channel) or playing a noisy video cassette or disc. Chapter 7: Using the TV's advanced features Selecting the color temperature You can change based on which setting is selected in your desired...
Owner's Manual - English
Page 72
... using a ColorStream or HDMI video connection instead. page 23). page 54). For device connection details, see Chapter 2. • Antenna reception may be muted. page 24). • Do not connect both a standard video cable and an S-video cable to one or more seconds to reset the TV. Picture and sound are...indications while in reboot from standby • When you plug the power cord in, the yellow LED will not turn off -air broadcast or Cable TV), you can set the CableClear®/DNR feature to AUTO to reduce visible interference in , and then press p. • The remote control ...
... using a ColorStream or HDMI video connection instead. page 23). page 54). For device connection details, see Chapter 2. • Antenna reception may be muted. page 24). • Do not connect both a standard video cable and an S-video cable to one or more seconds to reset the TV. Picture and sound are...indications while in reboot from standby • When you plug the power cord in, the yellow LED will not turn off -air broadcast or Cable TV), you can set the CableClear®/DNR feature to AUTO to reduce visible interference in , and then press p. • The remote control ...

Owner's Manual - English
Page 73
... is available for the U.S. page 59). No CE-Link operation • The CE-Link feature is available for Toshiba CE-Link compatible devices. • Make sure the HDMI cables with the device (- page 44). page 40). • The channel may have been erased from the channel list...8226; Make sure the remote control is not available, a black rectangle may not operate properly. 73 page 40). Chapter 8: Troubleshooting • Your TV remote control may not display correctly in the following situations: a) when a videotape has been dubbed; page 54). page 54). • If text...
... is available for the U.S. page 59). No CE-Link operation • The CE-Link feature is available for Toshiba CE-Link compatible devices. • Make sure the HDMI cables with the device (- page 44). page 40). • The channel may have been erased from the channel list...8226; Make sure the remote control is not available, a black rectangle may not operate properly. 73 page 40). Chapter 8: Troubleshooting • Your TV remote control may not display correctly in the following situations: a) when a videotape has been dubbed; page 54). page 54). • If text...
Owner's Manual - English
Page 75
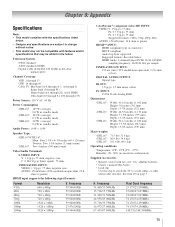
... 10 W + 10 W Speaker Type 42HL167/47HL167: Main: Four 2-3/8 × 4-3/4 inches (60 × 120 mm) Tweeter: Two 1-1/4 inches (33 mm) round 52HL167: Two 4 inches (100 mm) round Video/Audio Terminals S-VIDEO INPUT: Y: 1 V(p-p), 75 ohm, negative sync. HDMI Audio: 2-channel Linear-PCM; 32/44.1/48 ...This model may not be compatible with the specifications listed below . H. in-the-clear, unencrypted) Channel Coverage VHF: 2 through 13 UHF: 14 through 69 Cable TV: Mid band (A-8 through A-1, A through I) Super band (J through W) Hyper band (AA through ZZ, AAA, BBB) Ultra band (65 through 94, 100...
... 10 W + 10 W Speaker Type 42HL167/47HL167: Main: Four 2-3/8 × 4-3/4 inches (60 × 120 mm) Tweeter: Two 1-1/4 inches (33 mm) round 52HL167: Two 4 inches (100 mm) round Video/Audio Terminals S-VIDEO INPUT: Y: 1 V(p-p), 75 ohm, negative sync. HDMI Audio: 2-channel Linear-PCM; 32/44.1/48 ...This model may not be compatible with the specifications listed below . H. in-the-clear, unencrypted) Channel Coverage VHF: 2 through 13 UHF: 14 through 69 Cable TV: Mid band (A-8 through A-1, A through I) Super band (J through W) Hyper band (AA through ZZ, AAA, BBB) Ultra band (65 through 94, 100...

Owner's Manual - English
Page 80
... 56 Audio system connection 21 Auto aspect 52 Auto Input 41 Auto power off 66 B Back of the TV 11 G Game Mode feature 70 GameTimer 62 H HDMI audio mode 43 HDMI cable 13 HDMI™ connection 19 I INFO button 66 INPUT button 46 Installation, care, and service 3 Installation, setup ...18 CE-Link connection 20 CE-Link feature 64 CH Bb buttons 24, 49 CH RTN button 24, 49 Channel Browser Setup 47 Channel Browser 47 Channel labeling 42 Channel Number buttons .......... 24, 49 Channel programming Automatic programming 40 Manually adding and deleting... 40 Cinema mode 52...
... 56 Audio system connection 21 Auto aspect 52 Auto Input 41 Auto power off 66 B Back of the TV 11 G Game Mode feature 70 GameTimer 62 H HDMI audio mode 43 HDMI cable 13 HDMI™ connection 19 I INFO button 66 INPUT button 46 Installation, care, and service 3 Installation, setup ...18 CE-Link connection 20 CE-Link feature 64 CH Bb buttons 24, 49 CH RTN button 24, 49 Channel Browser Setup 47 Channel Browser 47 Channel labeling 42 Channel Number buttons .......... 24, 49 Channel programming Automatic programming 40 Manually adding and deleting... 40 Cinema mode 52...


