
Owner's Manual - English
Page 2
... Listed wall bracket appropriate for the size and weight of this television for wall mounting this Toshiba LCD TV. a Do not allow children to the point of the U.S. a Share our safety message about television safety. The exclamation point within the product's enclosure that a curious child may be connected to the grounding system of the building, as close to climb on dressers, bookcases, shelves, desks, audio speakers...
... Listed wall bracket appropriate for the size and weight of this television for wall mounting this Toshiba LCD TV. a Do not allow children to the point of the U.S. a Share our safety message about television safety. The exclamation point within the product's enclosure that a curious child may be connected to the grounding system of the building, as close to climb on dressers, bookcases, shelves, desks, audio speakers...
Owner's Manual - English
Page 4
... rest on or roll over the power cord, and never place the TV where the power cord is being turned on the cabinet. or b) cables, wires, or any home theater component connected to service the TV yourself. Never spray volatile compounds such as insecticide on or off. Opening and removing the covers may make sure the antenna system is not a sign of malfunction...
... rest on or roll over the power cord, and never place the TV where the power cord is being turned on the cabinet. or b) cables, wires, or any home theater component connected to service the TV yourself. Never spray volatile compounds such as insecticide on or off. Opening and removing the covers may make sure the antenna system is not a sign of malfunction...
Owner's Manual - English
Page 7
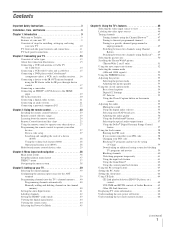
... the picture mode 53 Adjusting the picture quality 53 Using the closed caption mode 54 Base closed captions 54 Digital CC Settings 54 CC Selector 55 Using the Closed Caption button on the remote control 55 Adjusting the audio 55 Muting the sound 55 Using the digital audio selector 55 Selecting stereo/SAP broadcasts 56 Adjusting the audio quality 56 Using the StableSound® feature 57 Selecting the optical audio output format 57 Using the Dolby® Digital Dynamic Range Control feature 57 Using the Locks menu 58...
... the picture mode 53 Adjusting the picture quality 53 Using the closed caption mode 54 Base closed captions 54 Digital CC Settings 54 CC Selector 55 Using the Closed Caption button on the remote control 55 Adjusting the audio 55 Muting the sound 55 Using the digital audio selector 55 Selecting stereo/SAP broadcasts 56 Adjusting the audio quality 56 Using the StableSound® feature 57 Selecting the optical audio output format 57 Using the Dolby® Digital Dynamic Range Control feature 57 Using the Locks menu 58...
Owner's Manual - English
Page 10
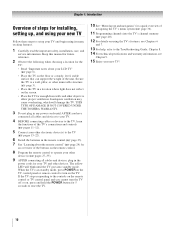
... the TV's channel memory (- page 36). 11 Programming channels into standby mode. THIS TYPE OF DAMAGE IS NOT COVERED UNDER THE TOSHIBA WARRANTY. 3 Do not plug in a location where light does not reflect on , press and hold the POWER button for the TV: • Read "Important notes about the remote control" (- Chapter 1: Introduction Overview of the TV's connections and controls (- Secure the TV to the TV (- page 24) for installing, setting up, and using the TV...
... the TV's channel memory (- page 36). 11 Programming channels into standby mode. THIS TYPE OF DAMAGE IS NOT COVERED UNDER THE TOSHIBA WARRANTY. 3 Do not plug in a location where light does not reflect on , press and hold the POWER button for the TV: • Read "Important notes about the remote control" (- Chapter 1: Introduction Overview of the TV's connections and controls (- Secure the TV to the TV (- page 24) for installing, setting up, and using the TV...
Owner's Manual - English
Page 12
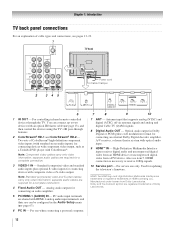
... sets of cable types and connections, see item 5. separate audio cables are required for a complete connection. 4 Fixed Audio OUT - You can be configured in Dolby Digital or PCM (pulse-code modulation) format for updating the television's firmware. For service use only. separate audio cables are required for a complete connection. 3 VIDEO-1 IN - Optical audio output in the Audio Setup menu (- Used for connecting an external Dolby Digital decoder, amplifier, A/V receiver, or home theater system with optical audio input. 9 HDMI™ IN - Chapter 1: Introduction TV back panel...
... sets of cable types and connections, see item 5. separate audio cables are required for a complete connection. 4 Fixed Audio OUT - You can be configured in Dolby Digital or PCM (pulse-code modulation) format for updating the television's firmware. For service use only. separate audio cables are required for a complete connection. 3 VIDEO-1 IN - Optical audio output in the Audio Setup menu (- Used for connecting an external Dolby Digital decoder, amplifier, A/V receiver, or home theater system with optical audio input. 9 HDMI™ IN - Chapter 1: Introduction TV back panel...
Owner's Manual - English
Page 13
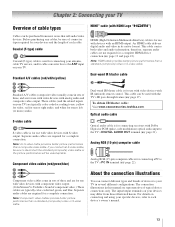
... Toshiba's brand of component video.) These cables are typically color-coded red, green, and blue. therefore, separate audio cables are typically color-coded according to use with devices with IR (infrared) remote control. If you connect an S-video cable, be sure to disconnect the standard (composite) video cable or the picture performance will be purchased from those illustrated herein. Component video cables come in its native format. Chapter 2: Connecting your TV Overview of cable types Cables can be used for connecting your antenna, cable TV service...
... Toshiba's brand of component video.) These cables are typically color-coded red, green, and blue. therefore, separate audio cables are typically color-coded according to use with devices with IR (infrared) remote control. If you connect an S-video cable, be sure to disconnect the standard (composite) video cable or the picture performance will be purchased from those illustrated herein. Component video cables come in its native format. Chapter 2: Connecting your TV Overview of cable types Cables can be used for connecting your antenna, cable TV service...
Owner's Manual - English
Page 15
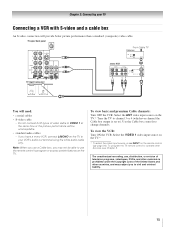
... view basic and premium Cable channels: Turn OFF the VCR. Select the VIDEO 1 video input source on the TV.* * To select the video input source, press INPUT on the TV to VIDEO 1 at the same time or the picture performance will need: • coaxial cables • S-video cable - Do not connect both types of video cable to your TV Connecting a VCR with S-video and a cable box An S-video connection will provide better picture performance than a standard (composite) video cable. If you to change channels. TV upper back panel From Cable TV Cable box...
... view basic and premium Cable channels: Turn OFF the VCR. Select the VIDEO 1 video input source on the TV.* * To select the video input source, press INPUT on the TV to VIDEO 1 at the same time or the picture performance will need: • coaxial cables • S-video cable - Do not connect both types of video cable to your TV Connecting a VCR with S-video and a cable box An S-video connection will provide better picture performance than a standard (composite) video cable. If you to change channels. TV upper back panel From Cable TV Cable box...
Owner's Manual - English
Page 22
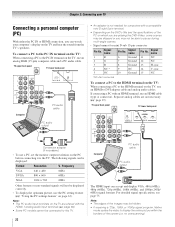
...) signal formats. Note: • The PC audio input terminals on page 63). Chapter 2: Connecting your computer's display on the TV, use an HDMI-to display the entire picture within the borders of the screen (i.e. To connect a PC to the PC IN terminal on the TV, use a PC, set the monitor output resolution on which you may be skipped or you are not necessary (- TV upper back panel TV lower back panel Computer PC audio cable...
...) signal formats. Note: • The PC audio input terminals on page 63). Chapter 2: Connecting your computer's display on the TV, use an HDMI-to display the entire picture within the borders of the screen (i.e. To connect a PC to the PC IN terminal on the TV, use a PC, set the monitor output resolution on which you may be skipped or you are not necessary (- TV upper back panel TV lower back panel Computer PC audio cable...
Owner's Manual - English
Page 24
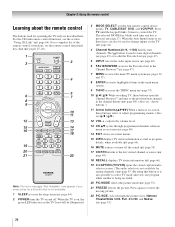
... main menu system. 9 THINC accesses the THINC menu (- Chapter 3: Using the remote control Learning about the remote control The buttons used for a function that is not available. 1 SLEEP accesses the sleep timer (- The selected MODE key blinks each time any key is on, the green LED indicator on the TV front will be used to select TV mode and view one program while another is on the TV (- page 40). 14 EXIT closes on and off the sound...
... main menu system. 9 THINC accesses the THINC menu (- Chapter 3: Using the remote control Learning about the remote control The buttons used for a function that is not available. 1 SLEEP accesses the sleep timer (- The selected MODE key blinks each time any key is on, the green LED indicator on the TV front will be used to select TV mode and view one program while another is on the TV (- page 40). 14 EXIT closes on and off the sound...
Owner's Manual - English
Page 36
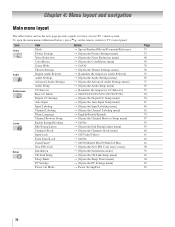
... remote control or TV control panel. Chapter 4: Menu layout and navigation Main menu layout The tables below ), press Y on the next page provide a quick overview of your TV's menu system. Icon Video Audio Preferences Locks Setup Item Mode Picture Settings Noise Reduction ColorMaster Game Mode Theater Settings Digital Audio Selector Audio Settings Advanced Audio Settings Audio Setup CC Selector Base CC Mode Digital CC Settings Auto Input Input Labeling Channel Labeling Menu Language Channel Browser Setup Enable Rating Blocking Edit Rating Limits Channels Block Input Lock Front Panel Lock...
... remote control or TV control panel. Chapter 4: Menu layout and navigation Main menu layout The tables below ), press Y on the next page provide a quick overview of your TV's menu system. Icon Video Audio Preferences Locks Setup Item Mode Picture Settings Noise Reduction ColorMaster Game Mode Theater Settings Digital Audio Selector Audio Settings Advanced Audio Settings Audio Setup CC Selector Base CC Mode Digital CC Settings Auto Input Input Labeling Channel Labeling Menu Language Channel Browser Setup Enable Rating Blocking Edit Rating Limits Channels Block Input Lock Front Panel Lock...
Owner's Manual - English
Page 40
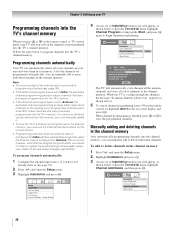
... remote control or TV control panel, your TV will stop only on the remote control. • Programming channels when the antenna input is configured for Cable will take substantially longer than when the antenna input is finished, you have to repeat the programming process again unless your Cable TV service lineup changes significantly. To program channels automatically: 1 Configure the antenna input source, if you should not have not already done so (- Setup Installation CE-Link Setup Sleep Timer PC Settings Power-On Mode Power...
... remote control or TV control panel, your TV will stop only on the remote control. • Programming channels when the antenna input is configured for Cable will take substantially longer than when the antenna input is finished, you have to repeat the programming process again unless your Cable TV service lineup changes significantly. To program channels automatically: 1 Configure the antenna input source, if you should not have not already done so (- Setup Installation CE-Link Setup Sleep Timer PC Settings Power-On Mode Power...
Owner's Manual - English
Page 43
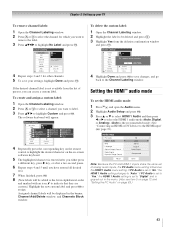
... channels. 5 To save changes, and go back to change channels. Channel Labeling TIMES TLC TMC TMCX TMCXw TMCw TNT TNTHD TOCDEFG ANT 24 Delete the selected custom label? Press CH UP/DOWN to the Channel Labeling window. Audio Setup PC Audio HDMI 1 Audio MTS Language Optical Output Format Dolby Digital Dynamic Range Control Reset No Auto Stereo English Dolby Digital Compressed Done Note: Because the PC and HDMI-1 inputs share the same set...
... channels. 5 To save changes, and go back to change channels. Channel Labeling TIMES TLC TMC TMCX TMCXw TMCw TNT TNTHD TOCDEFG ANT 24 Delete the selected custom label? Press CH UP/DOWN to the Channel Labeling window. Audio Setup PC Audio HDMI 1 Audio MTS Language Optical Output Format Dolby Digital Dynamic Range Control Reset No Auto Stereo English Dolby Digital Compressed Done Note: Because the PC and HDMI-1 inputs share the same set...
Owner's Manual - English
Page 55
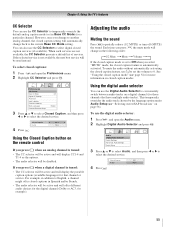
... best service will display the possible caption options (available languages) for more information on the remote control If you change to another analog channel, the closed caption services (if available). To mute the audio without automatically activating the closed caption modes. See "Using the closed captions: 1 Press Y and open the Audio menu. 2 Highlight Digital Audio Selector and press T. Chapter 6: Using the TV's features CC Selector You can use the CC Selector to temporarily override the default analog caption mode (set the volume...
... best service will display the possible caption options (available languages) for more information on the remote control If you change to another analog channel, the closed caption services (if available). To mute the audio without automatically activating the closed caption modes. See "Using the closed captions: 1 Press Y and open the Audio menu. 2 Highlight Digital Audio Selector and press T. Chapter 6: Using the TV's features CC Selector You can use the CC Selector to temporarily override the default analog caption mode (set the volume...
Owner's Manual - English
Page 63
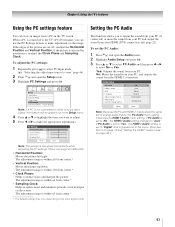
... default settings may vary depending on page 43.) 63 Setup Installation CE-Link Setup Sleep Timer PC Settings Power-On Mode Power-Saving Note: If a PC is not connected or there is set to "No," the HDMI 1 Audio setting changes to "Auto." This function allows you can view an image from the HDMI-1 connection. If PC Audio is set to "Yes," the HDMI 1 Audio setting is no pc input signal, this feature will be grayed out in the menu...
... default settings may vary depending on page 43.) 63 Setup Installation CE-Link Setup Sleep Timer PC Settings Power-On Mode Power-Saving Note: If a PC is not connected or there is set to "No," the HDMI 1 Audio setting changes to "Auto." This function allows you can view an image from the HDMI-1 connection. If PC Audio is set to "Yes," the HDMI 1 Audio setting is no pc input signal, this feature will be grayed out in the menu...
Owner's Manual - English
Page 65
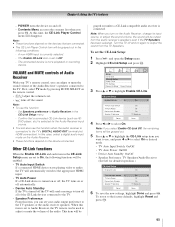
... the factory defaults, highlight Reset and press T. 65 In this time, the CE-Link Player Control menu will be enabled. • TV Auto Input Switch If a connected HDMI device starts playing video or audio, the TV will automatically switch to Audio Receiver, the TV remote can also use this function: - Note: If you select Enable CE-Link Off, the remaining items will be used to adjust or mute the volume of Audio Receiver With your audio output preference to output the sound...
... the factory defaults, highlight Reset and press T. 65 In this time, the CE-Link Player Control menu will be enabled. • TV Auto Input Switch If a connected HDMI device starts playing video or audio, the TV will automatically switch to Audio Receiver, the TV remote can also use this function: - Note: If you select Enable CE-Link Off, the remaining items will be used to adjust or mute the volume of Audio Receiver With your audio output preference to output the sound...
Owner's Manual - English
Page 72
..., video games, DVDs), you plug the power cord in, the yellow LED will change to the next video input source and display the Input Selection window. 72 Cannot view external signals or channel 3 or 4 • If you notice this feature to help to an external A/V device (e.g., DVD player, video game system, set correctly (- You may help synchronize the sound to one or more seconds to the correct device mode (- If you cannot view signals from external devices connected to VIDEO 1, VIDEO 2, ColorStream®, HDMI 1, HDMI 2, HDMI...
..., video games, DVDs), you plug the power cord in, the yellow LED will change to the next video input source and display the Input Selection window. 72 Cannot view external signals or channel 3 or 4 • If you notice this feature to help to an external A/V device (e.g., DVD player, video game system, set correctly (- You may help synchronize the sound to one or more seconds to the correct device mode (- If you cannot view signals from external devices connected to VIDEO 1, VIDEO 2, ColorStream®, HDMI 1, HDMI 2, HDMI...
Owner's Manual - English
Page 76
... or had the serial number removed, altered, defaced, or rendered illegible. Reception problems caused by inadequate antenna systems, misaligned satellite dishes, cable 76 television distribution, VCRs, DVD players/recorders, personal computer level IEEE-1394 devices, and any manner whatsoever. How to the LCD Television or parts caused by fires, misuse, accident, Acts of God (such as follows: all of the operating instructions in the...
... or had the serial number removed, altered, defaced, or rendered illegible. Reception problems caused by inadequate antenna systems, misaligned satellite dishes, cable 76 television distribution, VCRs, DVD players/recorders, personal computer level IEEE-1394 devices, and any manner whatsoever. How to the LCD Television or parts caused by fires, misuse, accident, Acts of God (such as follows: all of the operating instructions in the...
Owner's Manual - English
Page 77
... ASP. Reception problems caused by these warranties. b. Depending on which the TOSHIBA label or logo, rating label or serial number have been defaced or removed; Service of a Television on the type of repair required, the service will be performed by an ASP. (3) The warranties from TCL are effective only if the Television is (i) purchased as set installation, setup, adjustment of customer controls, and installation or repair of antenna systems are not...
... ASP. Reception problems caused by these warranties. b. Depending on which the TOSHIBA label or logo, rating label or serial number have been defaced or removed; Service of a Television on the type of repair required, the service will be performed by an ASP. (3) The warranties from TCL are effective only if the Television is (i) purchased as set installation, setup, adjustment of customer controls, and installation or repair of antenna systems are not...
Owner's Manual - English
Page 78
... BY LAW, STATUTORY OR OTHERWISE, THIS WRITTEN WARRANTY SUPERCEDES AND SPECIFICALLY DISCLAIMS ANY OTHER WARRANTY, CONDITION OR REPRESENTATION NOT STATED IN THIS WARRANTY, WHETHER MADE BY TCL, TOSHIBA CORPORATION, THEIR AFFILIATES, ADRs AND ASPs AND ...INSTRUCTIONS IN THE APPLICABLE USER GUIDES AND/OR MANUALS. THIS WARRANTY WILL NOT COVER ANY SERVICE THAT IS REQUIRED, IN PART OR IN WHOLE, AS A RESULT OF ANY FAILURE TO FOLLOW THE SET-UP AND USAGE INSTRUCTIONS. IF THE TELEVISION FAILS TO WORK AS WARRANTED ABOVE, YOUR SOLE AND EXCLUSIVE REMEDY SHALL BE REPAIR OR REPLACEMENT OF THE DEFECTIVE PART...
... BY LAW, STATUTORY OR OTHERWISE, THIS WRITTEN WARRANTY SUPERCEDES AND SPECIFICALLY DISCLAIMS ANY OTHER WARRANTY, CONDITION OR REPRESENTATION NOT STATED IN THIS WARRANTY, WHETHER MADE BY TCL, TOSHIBA CORPORATION, THEIR AFFILIATES, ADRs AND ASPs AND ...INSTRUCTIONS IN THE APPLICABLE USER GUIDES AND/OR MANUALS. THIS WARRANTY WILL NOT COVER ANY SERVICE THAT IS REQUIRED, IN PART OR IN WHOLE, AS A RESULT OF ANY FAILURE TO FOLLOW THE SET-UP AND USAGE INSTRUCTIONS. IF THE TELEVISION FAILS TO WORK AS WARRANTED ABOVE, YOUR SOLE AND EXCLUSIVE REMEDY SHALL BE REPAIR OR REPLACEMENT OF THE DEFECTIVE PART...

Owner's Manual - English
Page 80
... Unlocking programs temporarily 61 Video inputs, locking 61 Locks menu 58 M MODE SELECT 24, 27 MPEG noise reduction 69 MTS feature 56 MUTE button 55 O Optical audio cable 13 Optical audio output format 57 P PC Audio 63 PC connection 22 PC settings 63 Picture adjustment 53 Picture mode 53 Picture quality 53 Picture scroll 51 Picture size selection 50 POWER button 11, 24 Power-On Mode 45 R RECALL button 66 Remote control Battery installation 23 Effective range 23 Learning about the buttons .......24 Operational feature 28 Volume lock feature 28 Reset Factory Defaults...
... Unlocking programs temporarily 61 Video inputs, locking 61 Locks menu 58 M MODE SELECT 24, 27 MPEG noise reduction 69 MTS feature 56 MUTE button 55 O Optical audio cable 13 Optical audio output format 57 P PC Audio 63 PC connection 22 PC settings 63 Picture adjustment 53 Picture mode 53 Picture quality 53 Picture scroll 51 Picture size selection 50 POWER button 11, 24 Power-On Mode 45 R RECALL button 66 Remote control Battery installation 23 Effective range 23 Learning about the buttons .......24 Operational feature 28 Volume lock feature 28 Reset Factory Defaults...


