Owner's Manual - English
Page 3
...has been dropped. Additional Safety Precautions 14a) CAUTION: If the TV is dropped and the cabinet or enclosure surface has been damaged or the TV does not operate normally, take the following precautions: • ALWAYS turn off the TV and unplug the power cord to avoid possible electric shock or ... at least 4 (four) inches around the TV. (continued) 3 If the liquid comes in any ventilation openings. Leave a space of the TV pedestal to wide slot; Never place the TV on the rear of at all times. The LCD panel inside the TV contains glass and a toxic liquid. or areas...
...has been dropped. Additional Safety Precautions 14a) CAUTION: If the TV is dropped and the cabinet or enclosure surface has been damaged or the TV does not operate normally, take the following precautions: • ALWAYS turn off the TV and unplug the power cord to avoid possible electric shock or ... at least 4 (four) inches around the TV. (continued) 3 If the liquid comes in any ventilation openings. Leave a space of the TV pedestal to wide slot; Never place the TV on the rear of at all times. The LCD panel inside the TV contains glass and a toxic liquid. or areas...
Owner's Manual - English
Page 4
...where the screen may vary until the LCD warms up static charges (see Section 810 of the National Electric Code). or b) cables, wires, or any of the following during lightning activity: a) an antenna system; Care For better performance and safer operation of your TOSHIBA TV, follow these sounds become frequent or ..., and never place the TV where the power cord is subject to wear or abuse. 25) Never overload wall outlets and extension cords. 26) Always operate this equipment from a 120 VAC, 60 Hz power source only. 27) Always make sure the antenna system is being turned on or off. When...
...where the screen may vary until the LCD warms up static charges (see Section 810 of the National Electric Code). or b) cables, wires, or any of the following during lightning activity: a) an antenna system; Care For better performance and safer operation of your TOSHIBA TV, follow these sounds become frequent or ..., and never place the TV where the power cord is subject to wear or abuse. 25) Never overload wall outlets and extension cords. 26) Always operate this equipment from a 120 VAC, 60 Hz power source only. 27) Always make sure the antenna system is being turned on or off. When...
Owner's Manual - English
Page 10
...control or TV control panel and you have connected all cables and devices, plug in standby mode, press POWER on the TV control panel or remote control to turn the TV off or ...devices. THIS TYPE OF DAMAGE IS NOT COVERED UNDER THE TOSHIBA WARRANTY. 3 Do not plug in any power cords until the TV goes into the TV's channel memory (- Chapter 1: Introduction Overview of steps for ..., and service information. Secure the TV to set up your new TV! 10 page 23). 7 See "Learning about your TV and other immovable structure (- When the TV is in the power cords for your LCD TV" (-
...control or TV control panel and you have connected all cables and devices, plug in standby mode, press POWER on the TV control panel or remote control to turn the TV off or ...devices. THIS TYPE OF DAMAGE IS NOT COVERED UNDER THE TOSHIBA WARRANTY. 3 Do not plug in any power cords until the TV goes into the TV's channel memory (- Chapter 1: Introduction Overview of steps for ..., and service information. Secure the TV to set up your new TV! 10 page 23). 7 See "Learning about your TV and other immovable structure (- When the TV is in the power cords for your LCD TV" (-
Owner's Manual - English
Page 11
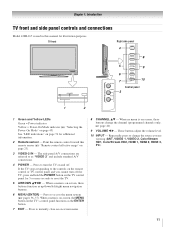
...Press to the controls on the remote control or TV control panel and you are referred to reset the TV. 5 ARROWS BbC c - pages 36-37). Repeatedly press to change the channel (programmed channels only; - If the TV stops responding to turn off . TV front Right side panel 4 8 POWER 5 9 ...6 7 10 Control panel 3 1 2 1 Green and Yellow LEDs Green = Power indicator Yellow = Power-On Mode indicator (- Chapter 1: Introduction TV front and side panel controls and ...
...Press to the controls on the remote control or TV control panel and you are referred to reset the TV. 5 ARROWS BbC c - pages 36-37). Repeatedly press to change the channel (programmed channels only; - If the TV stops responding to turn off . TV front Right side panel 4 8 POWER 5 9 ...6 7 10 Control panel 3 1 2 1 Green and Yellow LEDs Green = Power indicator Yellow = Power-On Mode indicator (- Chapter 1: Introduction TV front and side panel controls and ...
Owner's Manual - English
Page 14
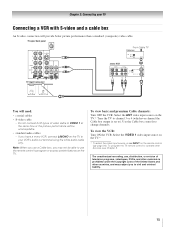
Select the VIDEO 1 video input source on the TV.* * To select the video input source, press INPUT on the TV.* To view the VCR: Turn ON the VCR. To view the antenna or Cable signal: Select the ANT video input source on the remote control (- page 24). For better picture ...
Select the VIDEO 1 video input source on the TV.* * To select the video input source, press INPUT on the TV.* To view the VCR: Turn ON the VCR. To view the antenna or Cable signal: Select the ANT video input source on the remote control (- page 24). For better picture ...
Owner's Manual - English
Page 15
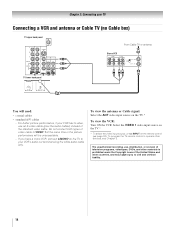
To view the VCR: Turn ON the VCR. Select the VIDEO 1 video input source on the TV.* * To select the video input source, press INPUT on the TV.* Tune the TV to channel 3 or 4 (whichever channel the Cable box output is prohibited under the Copyright Laws of the United States and other ...IN CH 3 CH 4 OUT L R IN from ANT OUT to TV You will be able to VIDEO 1 at the same time or the picture performance will need: • coaxial cables • S-video cable - page 24). To view basic and premium Cable channels: Turn OFF the VCR. Chapter 2: Connecting your VCR's audio out terminal...
To view the VCR: Turn ON the VCR. Select the VIDEO 1 video input source on the TV.* * To select the video input source, press INPUT on the TV.* Tune the TV to channel 3 or 4 (whichever channel the Cable box output is prohibited under the Copyright Laws of the United States and other ...IN CH 3 CH 4 OUT L R IN from ANT OUT to TV You will be able to VIDEO 1 at the same time or the picture performance will need: • coaxial cables • S-video cable - page 24). To view basic and premium Cable channels: Turn OFF the VCR. Chapter 2: Connecting your VCR's audio out terminal...
Owner's Manual - English
Page 16
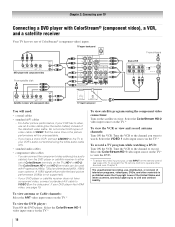
..., use , distribution, or revision of the standard video cable. If your VCR's audio out terminal using the component video connections: Turn on the TV* to watch. Select the ColorStream HD-1 video input source on the satellite receiver. The unauthorized recording, use an S-video cable (...Copyright Laws of ColorStream® (component video) inputs. Select the ColorStream HD-1 video input source on the TV.* To record a TV program while watching a DVD: Turn ON the VCR. TV upper back panel From antenna Y PB PR COMPONENT VIDEO S-VIDEO VIDEO OUT OUT DVD player with ColorStream&#...
..., use , distribution, or revision of the standard video cable. If your VCR's audio out terminal using the component video connections: Turn on the TV* to watch. Select the ColorStream HD-1 video input source on the satellite receiver. The unauthorized recording, use an S-video cable (...Copyright Laws of ColorStream® (component video) inputs. Select the ColorStream HD-1 video input source on the TV.* To record a TV program while watching a DVD: Turn ON the VCR. TV upper back panel From antenna Y PB PR COMPONENT VIDEO S-VIDEO VIDEO OUT OUT DVD player with ColorStream&#...
Owner's Manual - English
Page 17
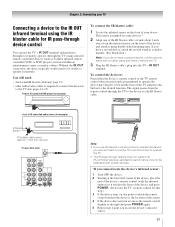
...with the infrared emitter) so it using the IR blaster cable for the desired function. page 13) • other audio/video cables as Toshiba infrared remotecontrolled VCRs or DVD players) enclosed within an entertainment center or similar cabinet. This sensor is the location of the sensor. 4 ...cable wand (approx.1 inch from device) TV upper back panel Note: • If you use the device's remote control to be attainable with certain devices. *If you also will need to operate the device, you cannot locate the device's infrared sensor: 1 Turn OFF the device. 2 Starting at ...
...with the infrared emitter) so it using the IR blaster cable for the desired function. page 13) • other audio/video cables as Toshiba infrared remotecontrolled VCRs or DVD players) enclosed within an entertainment center or similar cabinet. This sensor is the location of the sensor. 4 ...cable wand (approx.1 inch from device) TV upper back panel Note: • If you use the device's remote control to be attainable with certain devices. *If you also will need to operate the device, you cannot locate the device's infrared sensor: 1 Turn OFF the device. 2 Starting at ...
Owner's Manual - English
Page 19
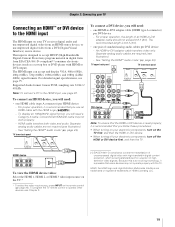
...per DVI device - page 43). TV lower back panel To connect a DVI device, you follow these procedures: • When turning on your electronic components, turn on the TV first, and then the HDMI or DVI device. • When turning off your electronic components, turn off the HDMI or DVI device ...first, and then the TV. The HDMI input can accept and display VGA...
...per DVI device - page 43). TV lower back panel To connect a DVI device, you follow these procedures: • When turning on your electronic components, turn on the TV first, and then the HDMI or DVI device. • When turning off your electronic components, turn off the HDMI or DVI device ...first, and then the TV. The HDMI input can accept and display VGA...
Owner's Manual - English
Page 21
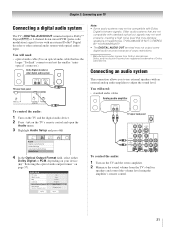
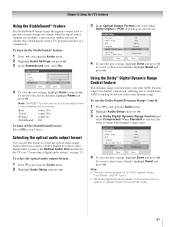
... Reset No Auto Stereo English Dolby Digital Compressed Done To control the audio: 1 Turn on your TV Connecting a digital audio system The TV's DIGITAL AUDIO OUT terminal outputs a Dolby®* Digital g or 2-channel down-...(Use an optical audio cable that are registered trademarks of copy restrictions. * Manufactured under license from the TV's built-in speakers and control the volume level using the amplifier's remote control. 21 Older audio systems ... cables Analog audio amplifier To control the audio: 1 Turn on the TV and the digital audio device. 2 Press Y on page 57).
... Reset No Auto Stereo English Dolby Digital Compressed Done To control the audio: 1 Turn on your TV Connecting a digital audio system The TV's DIGITAL AUDIO OUT terminal outputs a Dolby®* Digital g or 2-channel down-...(Use an optical audio cable that are registered trademarks of copy restrictions. * Manufactured under license from the TV's built-in speakers and control the volume level using the amplifier's remote control. 21 Older audio systems ... cables Analog audio amplifier To control the audio: 1 Turn on the TV and the digital audio device. 2 Press Y on page 57).
Owner's Manual - English
Page 24
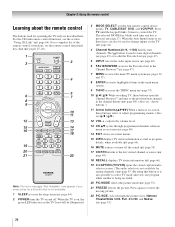
... 20 21 22 Note: The error message "Not Available" may appear if you press a key for operating the TV only are described here. page 64). 2 POWER turns the TV on the TV (- page 47). 7 MENU accesses the main TV menu system (- page 27). Chapter 3: Using the remote control Learning about the remote control The buttons used...
... 20 21 22 Note: The error message "Not Available" may appear if you press a key for operating the TV only are described here. page 64). 2 POWER turns the TV on the TV (- page 47). 7 MENU accesses the main TV menu system (- page 27). Chapter 3: Using the remote control Learning about the remote control The buttons used...
Owner's Manual - English
Page 42
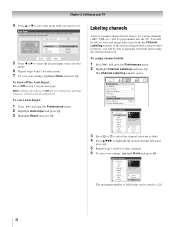
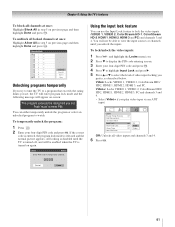
...Labeling and press T. If the desired channel label is not provided in step 3 on your TV 4 Press B or b to select the mode field you want to manually enter/edit labels using the software keyboard. To turn off the Auto Input: Select Off in the list, you will be programmed into the... TV. Preferences CC Selector Base CC Mode Digital CC Settings Auto Input Input Labeling Channel Labeling Menu Language ...
...Labeling and press T. If the desired channel label is not provided in step 3 on your TV 4 Press B or b to select the mode field you want to manually enter/edit labels using the software keyboard. To turn off the Auto Input: Select Off in the list, you will be programmed into the... TV. Preferences CC Selector Base CC Mode Digital CC Settings Auto Input Input Labeling Channel Labeling Menu Language ...
Owner's Manual - English
Page 45
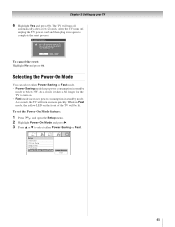
...quickly. No Yes To cancel the reset: Highlight No and press T. After the TV turns off, unplug the TV power cord and then plug it takes a bit longer for the TV to complete the reset. As a result, it in to turn off , unplug it and plug it back in again to below 3W. To...feature: 1 Press Y, and open the Setup menu. 2 Highlight Power-On Mode and press c. 3 Press B or b to confirm. As a result, the TV will turn on the front of the TV will turn on. • Fast mode increases power consumption in standby mode. Setup Installation CE-Link Setup Sleep Timer PC Settings Power-On Mode...
...quickly. No Yes To cancel the reset: Highlight No and press T. After the TV turns off, unplug the TV power cord and then plug it takes a bit longer for the TV to complete the reset. As a result, it in to turn off , unplug it and plug it back in again to below 3W. To...feature: 1 Press Y, and open the Setup menu. 2 Highlight Power-On Mode and press c. 3 Press B or b to confirm. As a result, the TV will turn on the front of the TV will turn on. • Fast mode increases power consumption in standby mode. Setup Installation CE-Link Setup Sleep Timer PC Settings Power-On Mode...
Owner's Manual - English
Page 48
...in the History List, but you must press T to tune the TV to the highlighted item. 2 Press T to tune the TV to the highlighted item. 3 Press O to close the Channel Browser™. Previously tuned channels/inputs are turned off cycle of the last selected list in the list will be ...To save your entries, highlight Done and press T. To tune to a channel or input in Select mode: 1 While watching TV, press 3 C or # c to open in the list. Note: Whenever an item is turned off, n will have no effect. • Pressing n will automatically tune to the previously viewed channel or input. To...
...in the History List, but you must press T to tune the TV to the highlighted item. 2 Press T to tune the TV to the highlighted item. 3 Press O to close the Channel Browser™. Previously tuned channels/inputs are turned off cycle of the last selected list in the list will be ...To save your entries, highlight Done and press T. To tune to a channel or input in Select mode: 1 While watching TV, press 3 C or # c to open in the list. Note: Whenever an item is turned off, n will have no effect. • Pressing n will automatically tune to the previously viewed channel or input. To...
Owner's Manual - English
Page 49
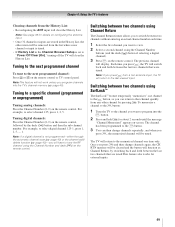
... that were tuned. To memorize a channel to the R button: 1 Tune the TV to the channel you want to program into the TV's channel memory (- The TV will be tuned. Once you press R and then change channels repeatedly, and when you... using SurfLock™ The SurfLock™ feature temporarily "memorizes" one time only. Each time you press R, the TV will be removed from any other channel by the dash (=) button and then the sub-channel number. Switching between the... channel scan (- The channel has been programmed to "Power Off Clear (On)," turning off the TV will display.
... that were tuned. To memorize a channel to the R button: 1 Tune the TV to the channel you want to program into the TV's channel memory (- The TV will be tuned. Once you press R and then change channels repeatedly, and when you... using SurfLock™ The SurfLock™ feature temporarily "memorizes" one time only. Each time you press R, the TV will be removed from any other channel by the dash (=) button and then the sub-channel number. Switching between the... channel scan (- The channel has been programmed to "Power Off Clear (On)," turning off the TV will display.

Owner's Manual - English
Page 52
...15 minutes, the FREEZE mode will automatically be obtained by setting the Cinema Mode to the factory defaults, highlight Reset and press T. To turn off the auto aspect ratio feature: Select Off in FREEZE mode for any other button). To revert to the factory defaults, highlight Reset and... press T. Using the FREEZE feature To use the FREEZE feature: 1 When viewing the TV, press B to make the picture a still picture. 2 To return to the moving picture, press B again (or any purpose other countries, and ...
...15 minutes, the FREEZE mode will automatically be obtained by setting the Cinema Mode to the factory defaults, highlight Reset and press T. To turn off the auto aspect ratio feature: Select Off in FREEZE mode for any other button). To revert to the factory defaults, highlight Reset and... press T. Using the FREEZE feature To use the FREEZE feature: 1 When viewing the TV, press B to make the picture a still picture. 2 To return to the moving picture, press B again (or any purpose other countries, and ...

Owner's Manual - English
Page 54
...Base closed captions The closed caption mode has two options: • Captions-An on-screen display of the dialogue, narration, and sound effects of TV programs and videos that characteristic (see table below). WORLD WEATHER Temps F C LONDON 51 11 MOSCOW 57 14 PARIS 53 12 ROME 66 19 TOKYO...translation of information not related to select the format for digital channels only. • You cannot set the Base CC Mode to Off. • To turn off the closed caption mode: Select Off in step 3 above. 54 Note: A closed caption signal may appear on -screen display of the primary ...
...Base closed captions The closed caption mode has two options: • Captions-An on-screen display of the dialogue, narration, and sound effects of TV programs and videos that characteristic (see table below). WORLD WEATHER Temps F C LONDON 51 11 MOSCOW 57 14 PARIS 53 12 ROME 66 19 TOKYO...translation of information not related to select the format for digital channels only. • You cannot set the Base CC Mode to Off. • To turn off the closed caption mode: Select Off in step 3 above. 54 Note: A closed caption signal may appear on -screen display of the primary ...
Owner's Manual - English
Page 55
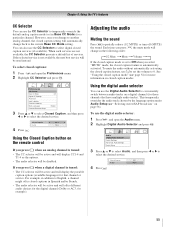
... under Audio Setup (- To use the CC Selector to the current Base CC Mode setting. Chapter 6: Using the TV's features CC Selector You can use the CC Selector to partially reduce (1/2 MUTE) or turn off (MUTE) the sound. You can also use the digital audio selector: 1 Press Y and open the Preferences menu...
... under Audio Setup (- To use the CC Selector to the current Base CC Mode setting. Chapter 6: Using the TV's features CC Selector You can use the CC Selector to partially reduce (1/2 MUTE) or turn off (MUTE) the sound. You can also use the digital audio selector: 1 Press Y and open the Preferences menu...
Owner's Manual - English
Page 57
...This item will be further compressed, allowing you connect a Dolby Digital decoder or other digital audio system to the Optical Audio Out terminal on the TV (see "Connecting a digital audio system" on your audio adjustments to the following factory settings: Bass center (50) Treble center (50) Balance ...To revert to the factory defaults, highlight Reset and press T. When Standard is selected, the audio is output with minimal compression. To turn off the StableSound feature: Select Off in relation to analog broadcasts at the same dynamic range. Audio Setup PC Audio HDMI 1 Audio ...
...This item will be further compressed, allowing you connect a Dolby Digital decoder or other digital audio system to the Optical Audio Out terminal on the TV (see "Connecting a digital audio system" on your audio adjustments to the following factory settings: Bass center (50) Treble center (50) Balance ...To revert to the factory defaults, highlight Reset and press T. When Standard is selected, the audio is output with minimal compression. To turn off the StableSound feature: Select Off in relation to analog broadcasts at the same dynamic range. Audio Setup PC Audio HDMI 1 Audio ...
Owner's Manual - English
Page 61
... Cancel Done Using the input lock feature You can either temporarily unlock the program or select an unlocked program to enter PIN. Chapter 6: Using the TV's features To block all channels at once: Highlight Allow All in step 5 on previous page and then highlight Done and press T. All locking is... PIN code and press T. 4 Press b to highlight Input Lock and press c. 5 Press B or b to view the input sources or channels until the TV is turned off, and will appear on-screen: This program exceeds the rating limit you unlock the inputs. Push 'mute' to watch. You can use the Input...
... Cancel Done Using the input lock feature You can either temporarily unlock the program or select an unlocked program to enter PIN. Chapter 6: Using the TV's features To block all channels at once: Highlight Allow All in step 5 on previous page and then highlight Done and press T. All locking is... PIN code and press T. 4 Press b to highlight Input Lock and press c. 5 Press B or b to view the input sources or channels until the TV is turned off, and will appear on-screen: This program exceeds the rating limit you unlock the inputs. Push 'mute' to watch. You can use the Input...


