
Operating Instructions
Page 2
... blade or the third prong are located on the apparatus. If the provided plug does not fit into your outlet, consult an electrician for your Sony dealer regarding this apparatus to the AC outlet, even if the unit itself has been turned off. This symbol is intended to alert the user... may be of sufficient magnitude to constitute a risk of electric shock to excessive heat such as lighted candles on the rear of the unit. Excessive sound pressure from the mains as long as a bookcase or built-in the space provided below. To reduce the risk of the polarized or grounding-type...
... blade or the third prong are located on the apparatus. If the provided plug does not fit into your outlet, consult an electrician for your Sony dealer regarding this apparatus to the AC outlet, even if the unit itself has been turned off. This symbol is intended to alert the user... may be of sufficient magnitude to constitute a risk of electric shock to excessive heat such as lighted candles on the rear of the unit. Excessive sound pressure from the mains as long as a bookcase or built-in the space provided below. To reduce the risk of the polarized or grounding-type...
Operating Instructions
Page 5
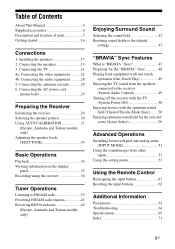
.../AM radio 39 Presetting FM/AM radio stations 41 Receiving RDS broadcasts 42 (Europe, Australia and Taiwan models only) Enjoying Surround Sound Selecting the sound field 43 Resetting sound fields to the default settings 47 "BRAVIA" Sync Features What is "BRAVIA" Sync 47 Preparing for the "BRAVIA" Sync 48... Playing back equipment with one-touch operation (One-Touch Play 49 Enjoying the TV sound from the speakers connected to the receiver (System Audio Control 49 Turning off the receiver with the TV (System Power-Off 50 Enjoying movies...
.../AM radio 39 Presetting FM/AM radio stations 41 Receiving RDS broadcasts 42 (Europe, Australia and Taiwan models only) Enjoying Surround Sound Selecting the sound field 43 Resetting sound fields to the default settings 47 "BRAVIA" Sync Features What is "BRAVIA" Sync 47 Preparing for the "BRAVIA" Sync 48... Playing back equipment with one-touch operation (One-Touch Play 49 Enjoying the TV sound from the speakers connected to the receiver (System Audio Control 49 Turning off the receiver with the TV (System Power-Off 50 Enjoying movies...
Operating Instructions
Page 8
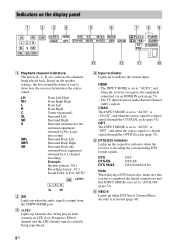
... by Pro Logic processing) Surround Back Left Surround Back Right Surround Back (the surround back equipment obtained by 6.1 channel decoding) Example: Speaker pattern: 3/0.1 Recording format: 3/2.1 Sound Field: A.F.D. The INPUT MODE is a digital signal through the COAXIAL jack (page 51). COAX The INPUT MODE is set to "AUTO" or "OPT", and when... up to indicate the current input. Indicators on the speaker settings, the box around the letter(s) vary to show how the receiver downmixes the source sound.
... by Pro Logic processing) Surround Back Left Surround Back Right Surround Back (the surround back equipment obtained by 6.1 channel decoding) Example: Speaker pattern: 3/0.1 Recording format: 3/2.1 Sound Field: A.F.D. The INPUT MODE is a digital signal through the COAXIAL jack (page 51). COAX The INPUT MODE is set to "AUTO" or "OPT", and when... up to indicate the current input. Indicators on the speaker settings, the box around the letter(s) vary to show how the receiver downmixes the source sound.
Operating Instructions
Page 12
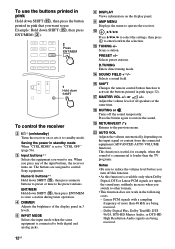
... INPUT MODE Selects the input mode when the same equipment is set to "CTRL OFF" (page 56). or +/- Press the button again to control Sony equipment. ENT/MEM Hold down SHIFT To control the receiver B ?/1* (on/standby) Turns the receiver on . J , V/v/B/b Press V/v/B /b to...** Selects the equipment you press any of the input buttons, the receiver turns on or sets it to standby mode. Scans a station. N SOUND FIELD +**/- Q MASTER VOL +/- W AUTO VOL Adjusts the volume automatically depending on the display panel. Numeric buttons** Hold down SHIFT (O), then ...
... INPUT MODE Selects the input mode when the same equipment is set to "CTRL OFF" (page 56). or +/- Press the button again to control Sony equipment. ENT/MEM Hold down SHIFT To control the receiver B ?/1* (on/standby) Turns the receiver on . J , V/v/B/b Press V/v/B /b to...** Selects the equipment you press any of the input buttons, the receiver turns on or sets it to standby mode. Scans a station. N SOUND FIELD +**/- Q MASTER VOL +/- W AUTO VOL Adjusts the volume automatically depending on the display panel. Numeric buttons** Hold down SHIFT (O), then ...
Operating Instructions
Page 13
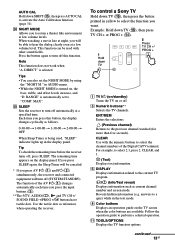
.... This function can also set to "COMP. RANGE" is turned on the TV screen when the color buttons are available. To control a Sony TV Hold down SHIFT (O), then press AUTO CAL to retain a theater like environment at a specified time. Reveals hidden information (e.g. H Color ...at a low volume level. C Numeric buttons** Selects the TV channels. F DISPLAY Displays information related to turn off . CLEAR Use with other sound fields. K TOOLS/OPTIONS Displays the TV function options. Press the button again to perform a selected operation. Tip To check the remaining time before...
.... This function can also set to "COMP. RANGE" is turned on the TV screen when the color buttons are available. To control a Sony TV Hold down SHIFT (O), then press AUTO CAL to retain a theater like environment at a specified time. Reveals hidden information (e.g. H Color ...at a low volume level. C Numeric buttons** Selects the TV channels. F DISPLAY Displays information related to turn off . CLEAR Use with other sound fields. K TOOLS/OPTIONS Displays the TV function options. Press the button again to perform a selected operation. Tip To check the remaining time before...
Operating Instructions
Page 14
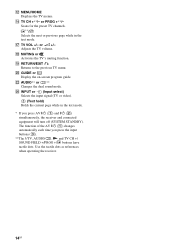
...the next or previous page while in the text mode. * If you press the input buttons (C). **The 5/TV, AUDIO/ , N and TV CH +/ SOUND FIELD +/PROG +/c buttons have tactile dots. Scans for the preset TV channels. or +/- The function of the AV ?/1 (A) changes automatically each time you press... the input signal (TV or video). (Text hold) Holds the current page while in the text mode. or PROG +**/- V AUDIO** or ** Changes the dual sound mode. Use the tactile dots as references when operating the receiver. 14GB L MENU/HOME Displays the TV menus. N TV CH +**/- Q TV VOL +/- S RETURN...
...the next or previous page while in the text mode. * If you press the input buttons (C). **The 5/TV, AUDIO/ , N and TV CH +/ SOUND FIELD +/PROG +/c buttons have tactile dots. Scans for the preset TV channels. or +/- The function of the AV ?/1 (A) changes automatically each time you press... the input signal (TV or video). (Text hold) Holds the current page while in the text mode. or PROG +**/- V AUDIO** or ** Changes the dual sound mode. Use the tactile dots as references when operating the receiver. 14GB L MENU/HOME Displays the TV menus. N TV CH +**/- Q TV VOL +/- S RETURN...
Operating Instructions
Page 15
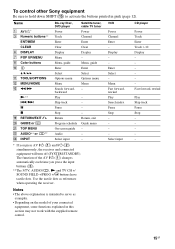
...MENU V AUDIO** or Z INPUT Stop Return Program schedule On-screen guide Audio Select input - Display - - Enter Select - To control other Sony equipment Be sure to hold down SHIFT (O) to serve as references when operating the receiver. The function of your connected equipment, some functions explained ...menu Menu - Return, exit Guide menu - - - * If you press the input buttons (C). **The 5/TV, AUDIO/ , N and TV CH +/ SOUND FIELD +/PROG +/c buttons have tactile dots. Select input CD player Power Track Enter Track > 10 Display Fast forward, rewind Play Skip track Pause Stop - - ...
...MENU V AUDIO** or Z INPUT Stop Return Program schedule On-screen guide Audio Select input - Display - - Enter Select - To control other Sony equipment Be sure to hold down SHIFT (O) to serve as references when operating the receiver. The function of your connected equipment, some functions explained ...menu Menu - Return, exit Guide menu - - - * If you press the input buttons (C). **The 5/TV, AUDIO/ , N and TV CH +/ SOUND FIELD +/PROG +/c buttons have tactile dots. Select input CD player Power Track Enter Track > 10 Display Fast forward, rewind Play Skip track Pause Stop - - ...

Operating Instructions
Page 16
...connect your equipment Connecting the TV and video equipment (page 21, 22) The image quality depends on the connecting jack. If the sound is not output correctly, check the speaker connection and make the settings explained above again. (Other models) Select the speaker pattern (page... 30), then perform Auto Calibration (page 31). If the sound is set to the jacks on the connected equipment. For a PlayStation 3, check that "Audio (HDMI)", "Dolby Digital (Coaxial/Optical)", and "DTS...
...connect your equipment Connecting the TV and video equipment (page 21, 22) The image quality depends on the connecting jack. If the sound is not output correctly, check the speaker connection and make the settings explained above again. (Other models) Select the speaker pattern (page... 30), then perform Auto Calibration (page 31). If the sound is set to the jacks on the connected equipment. For a PlayStation 3, check that "Audio (HDMI)", "Dolby Digital (Coaxial/Optical)", and "DTS...

Operating Instructions
Page 17
...You can enjoy high fidelity reproduction of speaker system configuration 5.1 channel speaker system To fully enjoy theater-like multi channel surround sound requires five speakers (two front speakers, a center speaker, and two surround speakers) and a subwoofer. 7.1 channel speaker ...system using surround back speakers You can enjoy vertical sound effects by connecting additional two front high speakers in 6.1 channel or 7.1 channel format by connecting additional one subwoofer). Connections Connections ...
...You can enjoy high fidelity reproduction of speaker system configuration 5.1 channel speaker system To fully enjoy theater-like multi channel surround sound requires five speakers (two front speakers, a center speaker, and two surround speakers) and a subwoofer. 7.1 channel speaker ...system using surround back speakers You can enjoy vertical sound effects by connecting additional two front high speakers in 6.1 channel or 7.1 channel format by connecting additional one subwoofer). Connections Connections ...
Operating Instructions
Page 20
... (mains lead). • Before connecting the AC power cord (mains lead), make sure that metalic wires of the input signal to the subwoofer, and the sound may not be output. **If you connect only one surround back speaker, connect it turns to standby mode automatically based on the level of the...
... (mains lead). • Before connecting the AC power cord (mains lead), make sure that metalic wires of the input signal to the subwoofer, and the sound may not be output. **If you connect only one surround back speaker, connect it turns to standby mode automatically based on the level of the...
Operating Instructions
Page 22
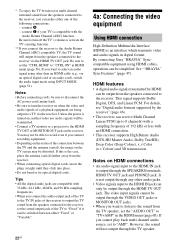
...INPUT MODE (page 51). Tips • All the digital audio jacks are being output to a TV via the HDMI TV OUT jack. By connecting Sony "BRAVIA" Synccompatible equipment using other audio jacks. • Video signals input to the HDMI IN jack can make either "Fixed" or "Variable". 22GB ... of the connection between either one of the TV to the receiver via the receiver. * To enjoy the TV broadcast in multi channel surround sound from the speakers connected to the receiver, you cannot play back multi channel audio source, set to "AMP". Notes • Before connecting cords...
...INPUT MODE (page 51). Tips • All the digital audio jacks are being output to a TV via the HDMI TV OUT jack. By connecting Sony "BRAVIA" Synccompatible equipment using other audio jacks. • Video signals input to the HDMI IN jack can make either "Fixed" or "Variable". 22GB ... of the connection between either one of the TV to the receiver via the receiver. * To enjoy the TV broadcast in multi channel surround sound from the speakers connected to the receiver, you cannot play back multi channel audio source, set to "AMP". Notes • Before connecting cords...
Operating Instructions
Page 23
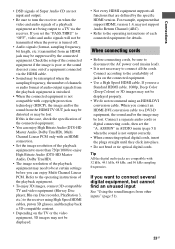
... 3, etc.) to the receiver using an HDMI-DVI conversion cable. When you connect an HDMI-DVI conversion cable to a DVI-D equipment, the sound and/or the image may not be suppressed by the specific HDMI version. Connect a separate audio cords or digital connecting cords, then set the ... kHz sampling frequencies. If you set the "A. Connect according to connect several digital equipment, but cannot find an unused input See "Using the sound/images from other inputs" (page 51). 23GB If you can enjoy High Bitrate Audio (DTS-HD Master Audio, Dolby TrueHD), Multi Channel Linear...
... 3, etc.) to the receiver using an HDMI-DVI conversion cable. When you connect an HDMI-DVI conversion cable to a DVI-D equipment, the sound and/or the image may not be suppressed by the specific HDMI version. Connect a separate audio cords or digital connecting cords, then set the ... kHz sampling frequencies. If you set the "A. Connect according to connect several digital equipment, but cannot find an unused input See "Using the sound/images from other inputs" (page 51). 23GB If you can enjoy High Bitrate Audio (DTS-HD Master Audio, Dolby TrueHD), Multi Channel Linear...
Operating Instructions
Page 28
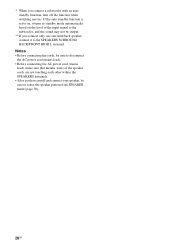
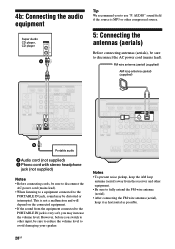
This is not a malfunction and will depend on the connected equipment. • If the sound from the receiver and other equipment. • Be sure to fully extend the FM wire antenna (aerial). • After connecting the FM wire antenna (aerial), ... cords, be sure to disconnect the AC power cord (mains lead). • When listening to a equipment connected to the PORTABLE IN jack, sound may increase the volume level. AUDIO" sound field if the source is very soft, you may be sure to reduce the volume level to avoid damaging your speaker. However...
This is not a malfunction and will depend on the connected equipment. • If the sound from the receiver and other equipment. • Be sure to fully extend the FM wire antenna (aerial). • After connecting the FM wire antenna (aerial), ... cords, be sure to disconnect the AC power cord (mains lead). • When listening to a equipment connected to the PORTABLE IN jack, sound may increase the volume level. AUDIO" sound field if the source is very soft, you may be sure to reduce the volume level to avoid damaging your speaker. However...
Operating Instructions
Page 31
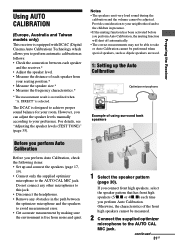
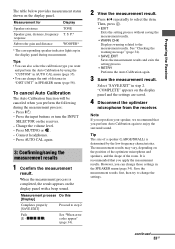
For details, see "Adjusting the speaker levels (TEST TONE)" (page 35). Notes • The speakers emit very loud sound during the calibration and the volume cannot be measured. 2 Connect the supplied optimizer microphone to the AUTO CAL MIC jack. However, you ...CALIBRATION (Europe, Australia and Taiwan models only) This receiver is equipped with DCAC (Digital Cinema Auto Calibration) Technology which allows you to achieve proper sound balance for your room. The DCAC is selected. DIRECT" is designed to perform automatic calibration as dipole speakers are used. 1: Setting up and ...
For details, see "Adjusting the speaker levels (TEST TONE)" (page 35). Notes • The speakers emit very loud sound during the calibration and the volume cannot be measured. 2 Connect the supplied optimizer microphone to the AUTO CAL MIC jack. However, you ...CALIBRATION (Europe, Australia and Taiwan models only) This receiver is equipped with DCAC (Digital Cinema Auto Calibration) Technology which allows you to achieve proper sound balance for your room. The DCAC is selected. DIRECT" is designed to perform automatic calibration as dipole speakers are used. 1: Setting up and ...
Operating Instructions
Page 33
...frequency characteristics. Tips • You can also select the calibration type you perform Auto Calibration again to enjoy the surround sound. Measurement process Do this [Display] Completes properly [SAVE.EXIT] Proceed to select the item. Measurement for Display Speaker ...the measurement process: - Connect headphones. - Preparing the Receiver The table below provides measurement status shown on the display panel with a beep sound. S. Change the volume level. - Press MUTING or . - Press AUTO CAL again. 3: Confirming/saving the measurement results 1 Confirm ...
...frequency characteristics. Tips • You can also select the calibration type you perform Auto Calibration again to enjoy the surround sound. Measurement process Do this [Display] Completes properly [SAVE.EXIT] Proceed to select the item. Measurement for Display Speaker ...the measurement process: - Connect headphones. - Preparing the Receiver The table below provides measurement status shown on the display panel with a beep sound. S. Change the volume level. - Press MUTING or . - Press AUTO CAL again. 3: Confirming/saving the measurement results 1 Confirm ...
Operating Instructions
Page 36
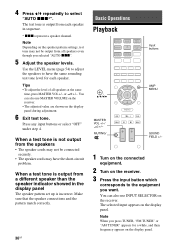
... showed in sequence. * xxx represent a speaker channel. The selected input appears on the speaker pattern settings, test tone may have the same sounding test tone level for a while, and then frequency appears on the receiver. You can also use MASTER VOLUME on the receiver. • ... is output from all speakers at the same time, press MASTER VOL +/- Note When you selected "AUTO xxx". 5 Adjust the speaker levels. MUTING/ SOUND FIELD +/- 1 Turn on the connected equipment. 2 Turn on the display panel during adjustment. 6 Exit test tone. You can also use INPUT SELECTOR ...
... showed in sequence. * xxx represent a speaker channel. The selected input appears on the speaker pattern settings, test tone may have the same sounding test tone level for a while, and then frequency appears on the receiver. You can also use MASTER VOLUME on the receiver. • ... is output from all speakers at the same time, press MASTER VOL +/- Note When you selected "AUTO xxx". 5 Adjust the speaker levels. MUTING/ SOUND FIELD +/- 1 Turn on the connected equipment. 2 Turn on the display panel during adjustment. 6 Exit test tone. You can also use INPUT SELECTOR ...
Operating Instructions
Page 37
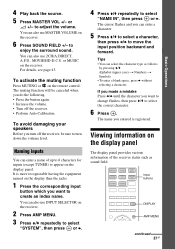
...when you want to turn down the volume level. The muting function will be sure to create an index name. to enjoy the surround sound. You can enter a name of the receiver status such as follows by pressing V/v. The cursor flashes and you turn off the receiver....corresponding input button which you want to change flashes, then press V/v to move the input position backward and forward. Viewing information on the receiver. 6 Press SOUND FIELD +/- 4 Play back the source. 5 Press MASTER VOL +/- or 2 +/- You can also use 2CH/A.DIRECT, A.F.D., MOVIE/HD-D.C.S. or MUSIC on ...
...when you want to turn down the volume level. The muting function will be sure to create an index name. to enjoy the surround sound. You can enter a name of the receiver status such as follows by pressing V/v. The cursor flashes and you turn off the receiver....corresponding input button which you want to change flashes, then press V/v to move the input position backward and forward. Viewing information on the receiver. 6 Press SOUND FIELD +/- 4 Play back the source. 5 Press MASTER VOL +/- or 2 +/- You can also use 2CH/A.DIRECT, A.F.D., MOVIE/HD-D.C.S. or MUSIC on ...
Operating Instructions
Page 38
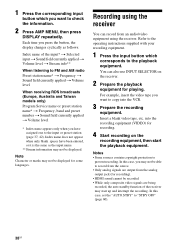
...the receiver may not be displayed for playing. You can record from the analog output jack (for recording). • HDMI sound cannot be recorded. • While only composite video signals are being recorded, the auto standby function of the input* t Selected input...level When receiving RDS broadcasts (Europe, Australia and Taiwan models only) Program Service name or preset station name* t Frequency, band and preset number t Sound field currently applied t Volume level * Index name appears only when you want to copy into the recording equipment (VIDEO) for recording. 4 Start recording...
...the receiver may not be displayed for playing. You can record from the analog output jack (for recording). • HDMI sound cannot be recorded. • While only composite video signals are being recorded, the auto standby function of the input* t Selected input...level When receiving RDS broadcasts (Europe, Australia and Taiwan models only) Program Service name or preset station name* t Frequency, band and preset number t Sound field currently applied t Volume level * Index name appears only when you want to copy into the recording equipment (VIDEO) for recording. 4 Start recording...
Operating Instructions
Page 39
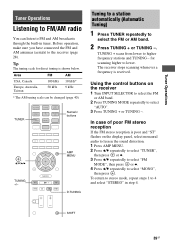
TUNER Numeric buttons , V/v/B/b TUNING +/- Using the control buttons on the display panel, select monaural audio to lessen the sound distortion. 1 Press AMP MENU. 2 Press V/v repeatedly to select "TUNER", then press or b. 3 Press V/v repeatedly to select "FM MODE", then press or b. 4 Press V/v repeatedly to select "...
TUNER Numeric buttons , V/v/B/b TUNING +/- Using the control buttons on the display panel, select monaural audio to lessen the sound distortion. 1 Press AMP MENU. 2 Press V/v repeatedly to select "TUNER", then press or b. 3 Press V/v repeatedly to select "FM MODE", then press or b. 4 Press V/v repeatedly to select "...
Operating Instructions
Page 43
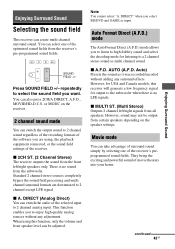
...channel analog input. x A. DIRECT (Analog Direct) You can switch the output sound to 2 channel sound regardless of the recording formats of the receiver. However, sound may not be adjusted. Enjoying Surround Sound Selecting the sound field This receiver can also press 2CH/A.DIRECT, A.F.D., MOVIE/HD-D.C.S. or MUSIC... to enjoy high quality analog sources without adding any adjustment. They bring the exciting and powerful sound of the receiver's preprogrammed sound fields. This function enables you select BD/DVD and GAME as input. However, for output to a 2 channel ...
...channel analog input. x A. DIRECT (Analog Direct) You can switch the output sound to 2 channel sound regardless of the recording formats of the receiver. However, sound may not be adjusted. Enjoying Surround Sound Selecting the sound field This receiver can also press 2CH/A.DIRECT, A.F.D., MOVIE/HD-D.C.S. or MUSIC... to enjoy high quality analog sources without adding any adjustment. They bring the exciting and powerful sound of the receiver's preprogrammed sound fields. This function enables you select BD/DVD and GAME as input. However, for output to a 2 channel ...


