
Operating Instructions
Page 8
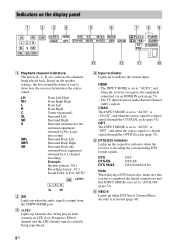
... signal is activated (page 44). 8GB AUTO SW LFE LCR SL SR B SW Lights up when DTS Neo:6 Cinema/Music decoder is output from the SUBWOOFER jack. The INPUT MODE is set to "AUTO" or "OPT", and when the source signal is set to "ANALOG" (page 51). COAX The INPUT MODE...
... signal is activated (page 44). 8GB AUTO SW LFE LCR SL SR B SW Lights up when DTS Neo:6 Cinema/Music decoder is output from the SUBWOOFER jack. The INPUT MODE is set to "AUTO" or "OPT", and when the source signal is set to "ANALOG" (page 51). COAX The INPUT MODE...

Operating Instructions
Page 17
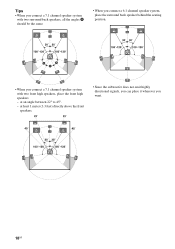
...back speakers (7.1 channel). 7.1 channel speaker system using surround back speakers You can enjoy vertical sound effects by connecting additional one subwoofer). Example of speaker system configuration 5.1 channel speaker system To fully enjoy theater-like multi channel surround sound requires five speakers (two... front speakers, a center speaker, and two surround speakers) and a subwoofer. 7.1 channel speaker system using front high speakers You can enjoy high fidelity reproduction of DVD or Blu-ray Disc software recorded...
...back speakers (7.1 channel). 7.1 channel speaker system using surround back speakers You can enjoy vertical sound effects by connecting additional one subwoofer). Example of speaker system configuration 5.1 channel speaker system To fully enjoy theater-like multi channel surround sound requires five speakers (two... front speakers, a center speaker, and two surround speakers) and a subwoofer. 7.1 channel speaker system using front high speakers You can enjoy high fidelity reproduction of DVD or Blu-ray Disc software recorded...
Operating Instructions
Page 18
at least 1 meter (3.3 feet) directly above the front speakers. • Since the subwoofer does not emit highly directional signals, you can place it wherever you connect a 7.1 channel speaker system with two front high speakers, place the front high speakers - at an angle between 22° to 45°. - Tips • When you connect a 7.1 channel speaker system with two surround back speakers, all the angles A should be the same. • When you connect a 6.1 channel speaker system, place the surround back speaker behind the seating position. • When you want. 18GB
at least 1 meter (3.3 feet) directly above the front speakers. • Since the subwoofer does not emit highly directional signals, you can place it wherever you connect a 7.1 channel speaker system with two front high speakers, place the front high speakers - at an angle between 22° to 45°. - Tips • When you connect a 7.1 channel speaker system with two surround back speakers, all the angles A should be the same. • When you connect a 6.1 channel speaker system, place the surround back speaker behind the seating position. • When you want. 18GB
Operating Instructions
Page 19
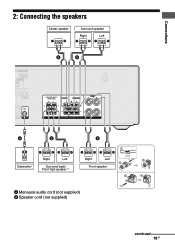
Connections 2: Connecting the speakers Center speaker Surround speaker Right Left B B A B Subwoofer * Right Left Surround back/ Front high speaker** B 1 10 mm (13/32") Right Left 4 2 3 Front speaker 2 4 3 A Monaural audio cord (not supplied) B Speaker cord (not supplied) continued 19GB
Connections 2: Connecting the speakers Center speaker Surround speaker Right Left B B A B Subwoofer * Right Left Surround back/ Front high speaker** B 1 10 mm (13/32") Right Left 4 2 3 Front speaker 2 4 3 A Monaural audio cord (not supplied) B Speaker cord (not supplied) continued 19GB
Operating Instructions
Page 20
... standby mode automatically based on the level of the speaker cords are not touching each other within the SPEAKERS terminals. • After you connect a subwoofer with an auto standby function, turn off the function when watching movies. Notes • Before connecting the cords, be sure to disconnect the AC... cord (mains lead). • Before connecting the AC power cord (mains lead), make sure that metalic wires of the input signal to the subwoofer, and the sound may not be output. **If you connect only one surround back speaker, connect it to select the speaker pattern from SPEAKER ...
... standby mode automatically based on the level of the speaker cords are not touching each other within the SPEAKERS terminals. • After you connect a subwoofer with an auto standby function, turn off the function when watching movies. Notes • Before connecting the cords, be sure to disconnect the AC... cord (mains lead). • Before connecting the AC power cord (mains lead), make sure that metalic wires of the input signal to the subwoofer, and the sound may not be output. **If you connect only one surround back speaker, connect it to select the speaker pattern from SPEAKER ...
Operating Instructions
Page 30
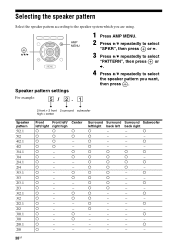
... press or b. 3 Press V/v repeatedly to select "PATTERN", then press or b. 4 Press V/v repeatedly to select the speaker pattern you want, then press . a a - - - a a a a a a a - a a a a a a a - a a - a - - a - - a a - a - - a a - - - - - - a - - - - - - - a a - - - a - - - - 30GB Surround Surround Surround Subwoofer left/right back left / right high a a a a Center a a - - a a a - - a a a - - a a - - - a a - - a a - - For example: 5 / 2. 1 2 front + 2 front 2 surround...
... press or b. 3 Press V/v repeatedly to select "PATTERN", then press or b. 4 Press V/v repeatedly to select the speaker pattern you want, then press . a a - - - a a a a a a a - a a a a a a a - a a - a - - a - - a a - a - - a a - - - - - - a - - - - - - - a a - - - a - - - - 30GB Surround Surround Surround Subwoofer left/right back left / right high a a a a Center a a - - a a a - - a a a - - a a - - - a a - - a a - - For example: 5 / 2. 1 2 front + 2 front 2 surround...
Operating Instructions
Page 32
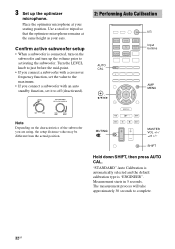
...". Turn the LEVEL knob to just before the mid-point. • If you connect a subwoofer with a crossover frequency function, set the value to the maximum. • If you connect a subwoofer with an auto standby function, set it to off (deactivated). 2: Performing Auto Calibration ?/1 Input... buttons AUTO CAL , V/v/B/b AMP MENU Note Depending on the subwoofer and turn on the characteristics of the subwoofer you are using, the setup distance value may be different from the actual position. MUTING/ MASTER VOL +/-/ 2 +/-...
...". Turn the LEVEL knob to just before the mid-point. • If you connect a subwoofer with a crossover frequency function, set the value to the maximum. • If you connect a subwoofer with an auto standby function, set it to off (deactivated). 2: Performing Auto Calibration ?/1 Input... buttons AUTO CAL , V/v/B/b AMP MENU Note Depending on the subwoofer and turn on the characteristics of the subwoofer you are using, the setup distance value may be different from the actual position. MUTING/ MASTER VOL +/-/ 2 +/-...
Operating Instructions
Page 33
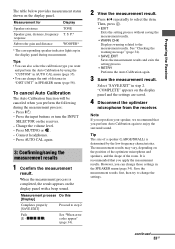
... change the settings. Save the measurement results first, then try to the measurement results. Measurement for Display Speaker existence TONE Speaker gain, distance, frequency response Subwoofer gain and distance T. Tips • You can change the unit of distance in "DIST.UNIT" in the SPEAKER menu (page 54). Press ?/1. - Change the volume...
... change the settings. Save the measurement results first, then try to the measurement results. Measurement for Display Speaker existence TONE Speaker gain, distance, frequency response Subwoofer gain and distance T. Tips • You can change the unit of distance in "DIST.UNIT" in the SPEAKER menu (page 54). Press ?/1. - Change the volume...
Operating Instructions
Page 34
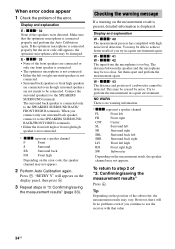
...connected only to the SPEAKERS SURROUND BACK/FRONT HIGH L terminals. • Either the front left high RH Front right high SW Subwoofer Depending on the position of the speakers were detected. The distance between the speaker and the microphone may be connected. When error ...display panel, then press . 3 Repeat steps in "3: Confirming/saving the measurement results" (page 33). xxx* 33 • None of a subwoofer cannot be too close. NO WARN There is not connected. • Surround back speakers or front high speakers are connected even though surround speakers are...
...connected only to the SPEAKERS SURROUND BACK/FRONT HIGH L terminals. • Either the front left high RH Front right high SW Subwoofer Depending on the position of the speakers were detected. The distance between the speaker and the microphone may be connected. When error ...display panel, then press . 3 Repeat steps in "3: Confirming/saving the measurement results" (page 33). xxx* 33 • None of a subwoofer cannot be too close. NO WARN There is not connected. • Surround back speakers or front high speakers are connected even though surround speakers are...
Operating Instructions
Page 43
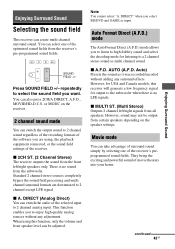
...or MUSIC on the speaker settings. x 2CH ST. (2 Channel Stereo) The receiver outputs the sound from the front left /right signals from the subwoofer. x A.F.D. Movie mode You can create multi channel surround sound. When using , the playback equipment connected, or the sound field settings of the receiver...the sound field processing and multi channel surround formats are using this receiver will generate a low frequency signal for listening to the subwoofer when there is no LFE signals. This function enables you want. DIRECT" when you to listen to high fidelity sound and...
...or MUSIC on the speaker settings. x 2CH ST. (2 Channel Stereo) The receiver outputs the sound from the front left /right signals from the subwoofer. x A.F.D. Movie mode You can create multi channel surround sound. When using , the playback equipment connected, or the sound field settings of the receiver...the sound field processing and multi channel surround formats are using this receiver will generate a low frequency signal for listening to the subwoofer when there is no LFE signals. This function enables you want. DIRECT" when you to listen to high fidelity sound and...
Operating Instructions
Page 45
..."SMALL". - To turn off frequency as high as possible. x HP 2CH (Headphones 2CH) This mode is selected automatically if you connect a subwoofer This receiver will be available. • The sound fields for movie/music Press SOUND FIELD +/- If you use headphones and when "A. However, the... sound will generate a low frequency signal for output to the subwoofer when there is no sound is selected automatically if you use headphones (except Analog Direct). "MULTI ST.", "PLII MV", "PLII MS", "PLIIX...
..."SMALL". - To turn off frequency as high as possible. x HP 2CH (Headphones 2CH) This mode is selected automatically if you connect a subwoofer This receiver will be available. • The sound fields for movie/music Press SOUND FIELD +/- If you use headphones and when "A. However, the... sound will generate a low frequency signal for output to the subwoofer when there is no sound is selected automatically if you use headphones (except Analog Direct). "MULTI ST.", "PLII MV", "PLII MS", "PLIIX...

Operating Instructions
Page 54
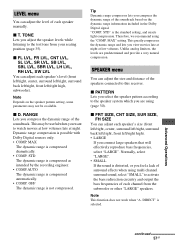
... speaker levelb) [SBL LVL] Surround back right speaker levelb) [SBR LVL] Front left high speaker levelb) [LH LVL] Front right high speaker levelb) [RH LVL] Subwoofer levelb) [SW LVL] Dynamic range compressor [D. OFF For details, see the referencing page in each menu. For details, see page 30. CAL] (page 31) LEVEL...
... speaker levelb) [SBL LVL] Surround back right speaker levelb) [SBR LVL] Front left high speaker levelb) [LH LVL] Front right high speaker levelb) [RH LVL] Subwoofer levelb) [SW LVL] Dynamic range compressor [D. OFF For details, see the referencing page in each menu. For details, see page 30. CAL] (page 31) LEVEL...

Operating Instructions
Page 55
... speaker distanceb) [SBL DIST.] Surround back right speaker distanceb) [SBR DIST.] Front left high speaker distanceb) [LH DIST.] Front right high speaker distanceb) [RH DIST.] Subwoofer distanceb) [SW DIST.] Distance unit [DIST.UNIT] METER, FEET METERe) Front speakers crossover frequencyf) [FRT CRS.] CRS. 40 Hz to CRS. 200 Hz (10 Hz...
... speaker distanceb) [SBL DIST.] Surround back right speaker distanceb) [SBR DIST.] Front left high speaker distanceb) [LH DIST.] Front right high speaker distanceb) [RH DIST.] Subwoofer distanceb) [SW DIST.] Distance unit [DIST.UNIT] METER, FEET METERe) Front speakers crossover frequencyf) [FRT CRS.] CRS. 40 Hz to CRS. 200 Hz (10 Hz...
Operating Instructions
Page 57
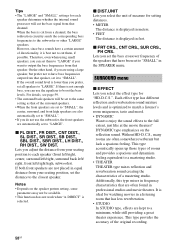
... late at low volumes. This may not be useful when you adjust the speaker levels while listening to the test tone from the subwoofer or other "LARGE" speakers. STD The dynamic range is compressed as intended by the recording engineer. • COMP.AUTO The dynamic...SIZE, FH SIZE You can adjust each speaker's size (front left/right, center, surround left/right, surround back left/right, front left /right high, subwoofer). Normally, select "LARGE". • SMALL If the sound is compressed dramatically. • COMP. Advanced Operations continued 57GB x T. MAX The dynamic range is...
... late at low volumes. This may not be useful when you adjust the speaker levels while listening to the test tone from the subwoofer or other "LARGE" speakers. STD The dynamic range is compressed as intended by the recording engineer. • COMP.AUTO The dynamic...SIZE, FH SIZE You can adjust each speaker's size (front left/right, center, surround left/right, surround back left/right, front left /right high, subwoofer). Normally, select "LARGE". • SMALL If the sound is compressed dramatically. • COMP. Advanced Operations continued 57GB x T. MAX The dynamic range is...
Operating Instructions
Page 58
... a mastering studio. For details, see page 59. • The surround back speakers will cut from your seating position, set to the subwoofer or other hand, if you are using small speakers, you prefer, set to output the bass frequencies from that has less reverberation. •... "LARGE" and "SMALL" settings for each speaker (front left/right, center, surround left/right, surround back left/ right, front left/right high, subwoofer). If there is selected. x DIST.UNIT Lets you can set it is optimized to match a listener's room uniqueness, taste and mood. • DYNAMIC...
... a mastering studio. For details, see page 59. • The surround back speakers will cut from your seating position, set to the subwoofer or other hand, if you are using small speakers, you prefer, set to output the bass frequencies from that has less reverberation. •... "LARGE" and "SMALL" settings for each speaker (front left/right, center, surround left/right, surround back left/ right, front left/right high, subwoofer). If there is selected. x DIST.UNIT Lets you can set it is optimized to match a listener's room uniqueness, taste and mood. • DYNAMIC...
Operating Instructions
Page 64
..., etc., to the digital input jacks of this troubleshooting guide to help you remedy the problem. Should any problem persist, consult your subwoofer. • Depending on your nearest Sony dealer. TONE" in the LEVEL menu (page 35). • Adjust the speaker level (page 54). • Check that the... subwoofer is connected correctly and securely. • Make sure you have connected to both the L and R jacks of an analog equipment, analog equipment ...
..., etc., to the digital input jacks of this troubleshooting guide to help you remedy the problem. Should any problem persist, consult your subwoofer. • Depending on your nearest Sony dealer. TONE" in the LEVEL menu (page 35). • Adjust the speaker level (page 54). • Check that the... subwoofer is connected correctly and securely. • Make sure you have connected to both the L and R jacks of an analog equipment, analog equipment ...
Operating Instructions
Page 69
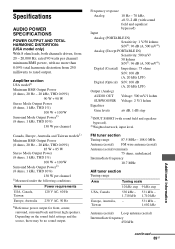
...)) Digital (Coaxial) Impedance: 75 ohms S/N: 100 dB (A, 20 kHz LPF) Digital (Optical) S/N: 100 dB (A, 20 kHz LPF) Output (Analog) AUDIO OUT Voltage: 500 mV/1 kohm SUBWOOFER Voltage: 2 V/1 kohm Equalizer Gain levels ±6 dB, 1 dB step 3)INPUT SHORT (with no sound output. FM tuner section Tuning range 87.5 MHz - 108.0 MHz Antenna...
...)) Digital (Coaxial) Impedance: 75 ohms S/N: 100 dB (A, 20 kHz LPF) Digital (Optical) S/N: 100 dB (A, 20 kHz LPF) Output (Analog) AUDIO OUT Voltage: 500 mV/1 kohm SUBWOOFER Voltage: 2 V/1 kohm Equalizer Gain levels ±6 dB, 1 dB step 3)INPUT SHORT (with no sound output. FM tuner section Tuning range 87.5 MHz - 108.0 MHz Antenna...
Quick Setup Guide
Page 1
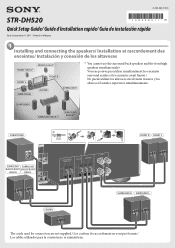
... se suministran. 4-263-363-11(1) STR-DH520 Quick Setup Guide/ Guide d'installation rapide/ Guía de instalación rápida Sony Corporation © 2011 Printed in Malaysia 1 Installing and connecting the speakers/ Installation et raccordement des enceintes/ Instalación y conexión de los altavoces FRONT HIGH L* FRONT HIGH R* FRONT L SUBWOOFER FRONT R CENTER SURROUND R * You...
... se suministran. 4-263-363-11(1) STR-DH520 Quick Setup Guide/ Guide d'installation rapide/ Guía de instalación rápida Sony Corporation © 2011 Printed in Malaysia 1 Installing and connecting the speakers/ Installation et raccordement des enceintes/ Instalación y conexión de los altavoces FRONT HIGH L* FRONT HIGH R* FRONT L SUBWOOFER FRONT R CENTER SURROUND R * You...


