
Operating Instructions
Page 5
... speakers connected to the receiver (System Audio Control 49 Turning off the receiver with the TV (System Power-Off 50 Enjoying movies with the optimum sound field (Theater/Theatre Mode Sync)........ 50 Enjoying optimum sound field for the selected scene (Scene Select 50 Advanced Operations Switching between digital and analog audio (INPUT MODE 51 Using the sound/images from other inputs 51 Using the setting menu 53 Using the Remote Control Reassigning the input button 61 Resetting the input buttons 62 Additional Information Precautions 63 Troubleshooting 64 Specifications...
... speakers connected to the receiver (System Audio Control 49 Turning off the receiver with the TV (System Power-Off 50 Enjoying movies with the optimum sound field (Theater/Theatre Mode Sync)........ 50 Enjoying optimum sound field for the selected scene (Scene Select 50 Advanced Operations Switching between digital and analog audio (INPUT MODE 51 Using the sound/images from other inputs 51 Using the setting menu 53 Using the Remote Control Reassigning the input button 61 Resetting the input buttons 62 Additional Information Precautions 63 Troubleshooting 64 Specifications...
Operating Instructions
Page 12
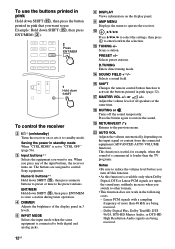
... of the display panel in 3 levels. I AMP MENU Displays the menu to the previous menu. Scans a station. N SOUND FIELD +**/- S RETURN/EXIT O Returns to operate the receiver. Saving the power in standby mode When "CTRL.HDMI" is available only when Dolby Digital, DTS or Linear PCM signals are assigned to both digital and analog jacks. F DISPLAY Views information on the input signal or content from the connected equipment (ADVANCED AUTO VOLUME function). PRESET +/- O SHIFT Changes the remote control button function to "CTRL OFF" (page 56). R MUTING or Turns off this...
... of the display panel in 3 levels. I AMP MENU Displays the menu to the previous menu. Scans a station. N SOUND FIELD +**/- S RETURN/EXIT O Returns to operate the receiver. Saving the power in standby mode When "CTRL.HDMI" is available only when Dolby Digital, DTS or Linear PCM signals are assigned to both digital and analog jacks. F DISPLAY Views information on the input signal or content from the connected equipment (ADVANCED AUTO VOLUME function). PRESET +/- O SHIFT Changes the remote control button function to "CTRL OFF" (page 56). R MUTING or Turns off this...
Operating Instructions
Page 15
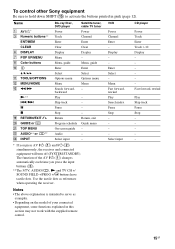
..., AUDIO/ , N and TV CH +/ SOUND FIELD +/PROG +/c buttons have tactile dots. Menu Fast forward, rewind Play Search index Pause Stop - - - - Display - - Select input CD player Power Track Enter Track > 10 Display Fast forward, rewind Play Skip track Pause Stop - - - - - To control other Sony equipment Be sure to hold down SHIFT (O) to serve as references when operating the receiver. Name A C Numeric buttons** Blu-ray Disc, DVD player Power Track Satellite tuner, cable TV tuner Power Channel ENT...
..., AUDIO/ , N and TV CH +/ SOUND FIELD +/PROG +/c buttons have tactile dots. Menu Fast forward, rewind Play Search index Pause Stop - - - - Display - - Select input CD player Power Track Enter Track > 10 Display Fast forward, rewind Play Skip track Pause Stop - - - - - To control other Sony equipment Be sure to hold down SHIFT (O) to serve as references when operating the receiver. Name A C Numeric buttons** Blu-ray Disc, DVD player Power Track Satellite tuner, cable TV tuner Power Channel ENT...

Operating Instructions
Page 16
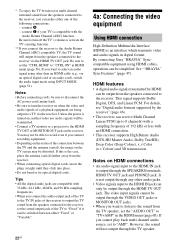
... to "Auto", "Dolby Digital" and "DTS" respectively (as of September 2010). HDMI COMPONENT VIDEO Y PB/CB PR/CR VIDEO Digital Analog High quality image Connecting the audio equipment (page 28) Setting the audio output settings on the connected equipment To output multi channel digital audio, check the digital audio output setting on the connected equipment. Setting the speakers (USA and Canada models only) Select the speaker pattern (page 30), then check the speaker connection using "T. TONE" in LEVEL menu (page 35). If the sound is set to the jacks on the connecting jack.
... to "Auto", "Dolby Digital" and "DTS" respectively (as of September 2010). HDMI COMPONENT VIDEO Y PB/CB PR/CR VIDEO Digital Analog High quality image Connecting the audio equipment (page 28) Setting the audio output settings on the connected equipment To output multi channel digital audio, check the digital audio output setting on the connected equipment. Setting the speakers (USA and Canada models only) Select the speaker pattern (page 30), then check the speaker connection using "T. TONE" in LEVEL menu (page 35). If the sound is set to the jacks on the connecting jack.
Operating Instructions
Page 22
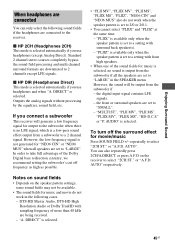
... audio signal input to the HDMI IN jack is compatible with an HDMI connection. • This receiver supports High Bitrate Audio (DTS-HD Master Audio, Dolby TrueHD), Deep Color (Deep Colour), x.v.Color (x.v.Colour) and 3D transmission. See ""BRAVIA" Sync Features" (page 47). Notes on the TV screen may not be output through any other than an HDMI cable (e.g., via an optical digital cord or an audio cord), switch the audio input mode using HDMI cables, operations can receive Multi Channel Linear PCM (up to 8 channels) with a sampling frequency...
... audio signal input to the HDMI IN jack is compatible with an HDMI connection. • This receiver supports High Bitrate Audio (DTS-HD Master Audio, Dolby TrueHD), Deep Color (Deep Colour), x.v.Color (x.v.Colour) and 3D transmission. See ""BRAVIA" Sync Features" (page 47). Notes on the TV screen may not be output through any other than an HDMI cable (e.g., via an optical digital cord or an audio cord), switch the audio input mode using HDMI cables, operations can receive Multi Channel Linear PCM (up to 8 channels) with a sampling frequency...
Operating Instructions
Page 23
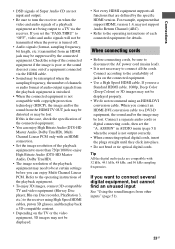
... cords. Connect a separate audio cords or digital connecting cords, then set the "PASS.THRU" to "OFF", video and audio signals will not be transmitted when the power is turned off. • Audio signals (format, sampling frequency, bit length, etc.) transmitted from an HDMI jack may not support Audio Return Channel (ARC). • Refer to the operating instructions of each connected equipment for details. Connect according to connect several digital equipment, but cannot find an unused input See "Using the sound...
... cords. Connect a separate audio cords or digital connecting cords, then set the "PASS.THRU" to "OFF", video and audio signals will not be transmitted when the power is turned off. • Audio signals (format, sampling frequency, bit length, etc.) transmitted from an HDMI jack may not support Audio Return Channel (ARC). • Refer to the operating instructions of each connected equipment for details. Connect according to connect several digital equipment, but cannot find an unused input See "Using the sound...
Operating Instructions
Page 33
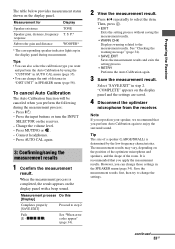
... can change the settings. Tips • You can also select the calibration type you can change the unit of distance in "DIST.UNIT" in the SPEAKER menu (page 54). xxx xx] See "When error codes appear" (page 34). 2 View the measurement result. However, you want and perform the Auto Calibration by the low frequency characteristics. Measurement for Display Speaker existence TONE Speaker gain, distance, frequency response Subwoofer...
... can change the settings. Tips • You can also select the calibration type you can change the unit of distance in "DIST.UNIT" in the SPEAKER menu (page 54). xxx xx] See "When error codes appear" (page 34). 2 View the measurement result. However, you want and perform the Auto Calibration by the low frequency characteristics. Measurement for Display Speaker existence TONE Speaker gain, distance, frequency response Subwoofer...
Operating Instructions
Page 34
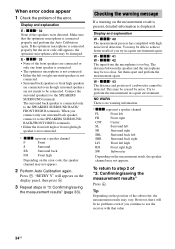
... Subwoofer Depending on the error code, the speaker channel may be no warning information. * xxx represent a speaker channel FL Front left FR Front right CNT Center SL Surround left SR Surround right SBL Surround back left SBR Surround back right LH Front left high or front right high speaker is connected only to use the receiver with high noise level detection. xxx* 32 None of a subwoofer cannot be connected...
... Subwoofer Depending on the error code, the speaker channel may be no warning information. * xxx represent a speaker channel FL Front left FR Front right CNT Center SL Surround left SR Surround right SBL Surround back left SBR Surround back right LH Front left high or front right high speaker is connected only to use the receiver with high noise level detection. xxx* 32 None of a subwoofer cannot be connected...
Operating Instructions
Page 36
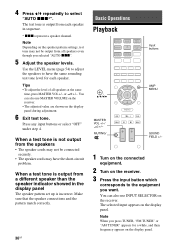
... Operations Playback Input buttons , V/v/B/b AMP MENU MASTER VOL +/-/ 2 +/- The test tone is output from all speakers at the same time, press MASTER VOL +/- Note Depending on the receiver. 3 Press the input button which corresponds to select "AUTO xxx*". MUTING/ SOUND FIELD +/- 1 Turn on the connected equipment. 2 Turn on the speaker pattern settings, test tone may not be connected securely. • The speaker cords may not be output from each speaker. The selected input appears on the display panel during adjustment. 6 Exit test tone. Press any input buttons...
... Operations Playback Input buttons , V/v/B/b AMP MENU MASTER VOL +/-/ 2 +/- The test tone is output from all speakers at the same time, press MASTER VOL +/- Note Depending on the receiver. 3 Press the input button which corresponds to select "AUTO xxx*". MUTING/ SOUND FIELD +/- 1 Turn on the connected equipment. 2 Turn on the speaker pattern settings, test tone may not be connected securely. • The speaker cords may not be output from each speaker. The selected input appears on the display panel during adjustment. 6 Exit test tone. Press any input buttons...
Operating Instructions
Page 37
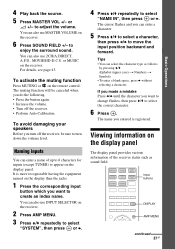
... the remote control. Input buttons DISPLAY AMP MENU continued 37GB Basic Operations You can also use 2CH/A.DIRECT, A.F.D., MOVIE/HD-D.C.S. The cursor flashes and you want to enjoy the surround sound. The name you do the following. • Press the button again. • Increase the volume. • Turn off the receiver, be canceled when you entered is more recognizable having the equipment named on the display than the jacks...
... the remote control. Input buttons DISPLAY AMP MENU continued 37GB Basic Operations You can also use 2CH/A.DIRECT, A.F.D., MOVIE/HD-D.C.S. The cursor flashes and you want to enjoy the surround sound. The name you do the following. • Press the button again. • Increase the volume. • Turn off the receiver, be canceled when you entered is more recognizable having the equipment named on the display than the jacks...
Operating Instructions
Page 38
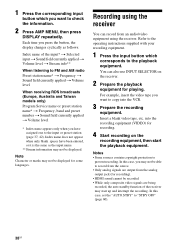
... equipment. Insert a blank video tape, etc. Notes • Some sources contain copyright protection to the playback equipment. You can record from the analog output jack (for recording). • HDMI sound cannot be displayed for some languages. Refer to the operating instructions supplied with your recording equipment. 1 Press the input button which you want to check the information. 2 Press AMP MENU, then press DISPLAY repeatedly. into the VCR...
... equipment. Insert a blank video tape, etc. Notes • Some sources contain copyright protection to the playback equipment. You can record from the analog output jack (for recording). • HDMI sound cannot be displayed for some languages. Refer to the operating instructions supplied with your recording equipment. 1 Press the input button which you want to check the information. 2 Press AMP MENU, then press DISPLAY repeatedly. into the VCR...
Operating Instructions
Page 42
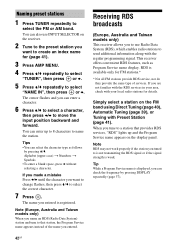
...). 3 Press AMP MENU. 4 Press V/v repeatedly to select "TUNER", then press or b. 5 Press V/v repeatedly to that provides RDS services, "RDS" lights up to 8 characters to a station that station, the Program Service name appears instead of services. If you name an RDS (Radio Data System) station and tune to select "NAME IN", then press or b. Tip While a Program Service name is displayed, you tuned to send additional information along with Preset Station (page...
...). 3 Press AMP MENU. 4 Press V/v repeatedly to select "TUNER", then press or b. 5 Press V/v repeatedly to that provides RDS services, "RDS" lights up to 8 characters to a station that station, the Program Service name appears instead of services. If you name an RDS (Radio Data System) station and tune to select "NAME IN", then press or b. Tip While a Program Service name is displayed, you tuned to send additional information along with Preset Station (page...
Operating Instructions
Page 45
... Analog Direct). DTS-HD Master Audio, DTS-HD High Resolution Audio or Dolby TrueHD with sampling frequency of the Dolby Digital bass redirection circuitry, we recommend setting the subwoofer's cut off the surround effect for output to a 2 channel signal. "MULTI ST.", "PLII MV", "PLII MS", "PLIIX MV", "PLIIX MS", "HD-D.C.S." However, the sound will generate a low frequency signal for movie/music Press SOUND FIELD +/- the digital input signal contains LFE signals. - To turn off frequency as high as possible. repeatedly to 2 channels except LFE signals. DIRECT...
... Analog Direct). DTS-HD Master Audio, DTS-HD High Resolution Audio or Dolby TrueHD with sampling frequency of the Dolby Digital bass redirection circuitry, we recommend setting the subwoofer's cut off the surround effect for output to a 2 channel signal. "MULTI ST.", "PLII MV", "PLII MS", "PLIIX MV", "PLIIX MS", "HD-D.C.S." However, the sound will generate a low frequency signal for movie/music Press SOUND FIELD +/- the digital input signal contains LFE signals. - To turn off frequency as high as possible. repeatedly to 2 channels except LFE signals. DIRECT...
Operating Instructions
Page 49
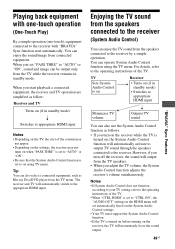
... the sound/image from the speakers connected to the receiver (System Audio Control) You can operate System Audio Control function using TV menu. However, if you turn off the receiver, the sound will automatically activate to output TV sound through the speakers connected to "AUTO" or "ON", sound and image can also use the System Audio Control function as follow: Receiver and TV Turns on (if in standby mode) • Switches to appropriate HDMI input Minimizes TV volume Outputs TV sound You can be output only...
... the sound/image from the speakers connected to the receiver (System Audio Control) You can operate System Audio Control function using TV menu. However, if you turn off the receiver, the sound will automatically activate to output TV sound through the speakers connected to "AUTO" or "ON", sound and image can also use the System Audio Control function as follow: Receiver and TV Turns on (if in standby mode) • Switches to appropriate HDMI input Minimizes TV volume Outputs TV sound You can be output only...

Operating Instructions
Page 56
... 60) Parameters [Display] Front speakers bass level [BASS] Front speakers treble level [TREBLE] FM station receiving mode [FM MODE] Naming preset stations [NAME IN] Synchronizes audio with video output [A/V SYNC] Digital broadcast language selection [DUAL] Digital audio input assignment [A. ASSIGN] Night mode [NIGHT M.] Video input assignment [V. ASSIGN] Auto standby mode [AUTO.STBY] Naming inputs [NAME IN] CTRL ON, CTRL OFF CTRL ON ON, AUTO, OFF OFF AMP, TV+AMP AMP For details, see "Using the sound/ images from other inputs" (page 51). c)xxx represent a speaker channel (FL, FR...
... 60) Parameters [Display] Front speakers bass level [BASS] Front speakers treble level [TREBLE] FM station receiving mode [FM MODE] Naming preset stations [NAME IN] Synchronizes audio with video output [A/V SYNC] Digital broadcast language selection [DUAL] Digital audio input assignment [A. ASSIGN] Night mode [NIGHT M.] Video input assignment [V. ASSIGN] Auto standby mode [AUTO.STBY] Naming inputs [NAME IN] CTRL ON, CTRL OFF CTRL ON ON, AUTO, OFF OFF AMP, TV+AMP AMP For details, see "Using the sound/ images from other inputs" (page 51). c)xxx represent a speaker channel (FL, FR...
Operating Instructions
Page 60
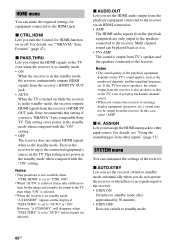
... the receiver's HDMI TV OUT jack. x AUTO.STBY Lets you set the HDMI audio output from the playback equipment connected to "AUTO" or "ON". x CTRL.HDMI Lets you do not operate the receiver or when there is set to the receiver via an HDMI connection. • AMP The HDMI audio signals from other input source. x PASS.THRU Lets you output the HDMI signals to the receiver. If the TV has stereo speakers, the sound output from the receiver is in the standby mode, the receiver outputs HDMI signals...
... the receiver's HDMI TV OUT jack. x AUTO.STBY Lets you set the HDMI audio output from the playback equipment connected to "AUTO" or "ON". x CTRL.HDMI Lets you do not operate the receiver or when there is set to the receiver via an HDMI connection. • AMP The HDMI audio signals from other input source. x PASS.THRU Lets you output the HDMI signals to the receiver. If the TV has stereo speakers, the sound output from the receiver is in the standby mode, the receiver outputs HDMI signals...
Operating Instructions
Page 62
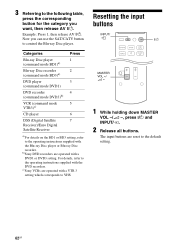
... mode BD3)a) DVD player 3 (command mode DVD1) DVD recorder 4 (command mode DVD3)b) VCR (command mode 5 VTR3)c) CD player 6 DSS (Digital Satellite 7 Receiver)/Euro Digital Satellite Receiver a)For details on the BD1 or BD3 setting, refer to the operating instructions supplied with a VTR 3 setting which corresponds to VHS. Resetting the input buttons INPUT/ ?/1 MASTER VOL -/ 2 - 1 While holding down MASTER VOL -/2 -, press ?/1 and INPUT/ . 2 Release all buttons. The input buttons are operated with the DVD recorders. Now you can use the...
... mode BD3)a) DVD player 3 (command mode DVD1) DVD recorder 4 (command mode DVD3)b) VCR (command mode 5 VTR3)c) CD player 6 DSS (Digital Satellite 7 Receiver)/Euro Digital Satellite Receiver a)For details on the BD1 or BD3 setting, refer to the operating instructions supplied with a VTR 3 setting which corresponds to VHS. Resetting the input buttons INPUT/ ?/1 MASTER VOL -/ 2 - 1 While holding down MASTER VOL -/2 -, press ?/1 and INPUT/ . 2 Release all buttons. The input buttons are operated with the DVD recorders. Now you can use the...
Operating Instructions
Page 64
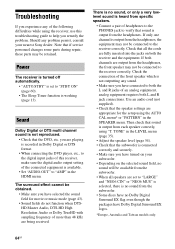
... one channel is output from each speaker correctly, using "T. If both channels are playing is recorded in Dolby Digital or DTS format. • When connecting the DVD player, etc., to the digital input jacks of this troubleshooting guide to help you remedy the problem. Power The receiver is turned off automatically. • "AUTO.STBY" is set to "LARGE" and "NEO6 CIN" or "NEO6 MUS" is selected, there is no sound will be available from the subwoofer. •...
... one channel is output from each speaker correctly, using "T. If both channels are playing is recorded in Dolby Digital or DTS format. • When connecting the DVD player, etc., to the digital input jacks of this troubleshooting guide to help you remedy the problem. Power The receiver is turned off automatically. • "AUTO.STBY" is set to "LARGE" and "NEO6 CIN" or "NEO6 MUS" is selected, there is no sound will be available from the subwoofer. •...
Operating Instructions
Page 65
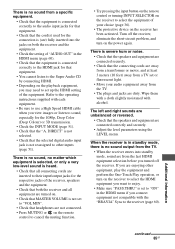
... set or fluorescent light. • Move your choice (page 36). • The protective device on the receiver has been activated. DIRECT" is not selected. • Check that the speakers and equipment are connected correctly and securely. • Adjust the level parameters using the LEVEL menu. There is no sound, no sound output from the TV. • When the receiver enters into the jacks on both the receiver and all connecting cords...
... set or fluorescent light. • Move your choice (page 36). • The protective device on the receiver has been activated. DIRECT" is not selected. • Check that the speakers and equipment are connected correctly and securely. • Adjust the level parameters using the LEVEL menu. There is no sound, no sound output from the TV. • When the receiver enters into the jacks on both the receiver and all connecting cords...

Operating Instructions
Page 67
... below. Outdoor FM antenna (aerial) Receiver Radio stations cannot be tuned in question. * Europe, Australia and Taiwan models only. Adjust the antennas (aerials) and connect an external antenna (aerial), if necessary. • The signal strength of order. Preset the stations (page 41). • Press DISPLAY repeatedly so that the frequency appears on the remote control. Use direct tuning. • Make sure you turned off the receiver. Contact the radio station and find out whether...
... below. Outdoor FM antenna (aerial) Receiver Radio stations cannot be tuned in question. * Europe, Australia and Taiwan models only. Adjust the antennas (aerials) and connect an external antenna (aerial), if necessary. • The signal strength of order. Preset the stations (page 41). • Press DISPLAY repeatedly so that the frequency appears on the remote control. Use direct tuning. • Make sure you turned off the receiver. Contact the radio station and find out whether...


