
Operating Instructions
Page 5
...RDS broadcasts 42 (Europe, Australia and Taiwan models only) Enjoying Surround Sound Selecting the sound field 43 Resetting sound fields to the default settings 47 "BRAVIA" Sync Features What is "BRAVIA" Sync 47 Preparing for the "BRAVIA" Sync 48 Playing back equipment with one-touch ...50 Advanced Operations Switching between digital and analog audio (INPUT MODE 51 Using the sound/images from other inputs 51 Using the setting menu 53 Using the Remote Control Reassigning the input button 61 Resetting the input buttons 62 Additional Information Precautions 63 Troubleshooting 64 ...
...RDS broadcasts 42 (Europe, Australia and Taiwan models only) Enjoying Surround Sound Selecting the sound field 43 Resetting sound fields to the default settings 47 "BRAVIA" Sync Features What is "BRAVIA" Sync 47 Preparing for the "BRAVIA" Sync 48 Playing back equipment with one-touch ...50 Advanced Operations Switching between digital and analog audio (INPUT MODE 51 Using the sound/images from other inputs 51 Using the setting menu 53 Using the Remote Control Reassigning the input button 61 Resetting the input buttons 62 Additional Information Precautions 63 Troubleshooting 64 ...
Operating Instructions
Page 6
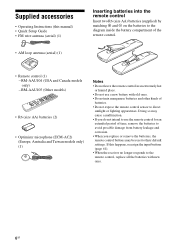
... models only) - Doing so may cause a malfunction. • If you replace or remove the batteries, the remote control buttons may be reset to their default settings. If this manual) • Quick Setup Guide • FM wire antenna (aerial) (1) • AM loop antenna (aerial) (1) Inserting batteries into the remote control Insert two...
... models only) - Doing so may cause a malfunction. • If you replace or remove the batteries, the remote control buttons may be reset to their default settings. If this manual) • Quick Setup Guide • FM wire antenna (aerial) (1) • AM loop antenna (aerial) (1) Inserting batteries into the remote control Insert two...
Operating Instructions
Page 8
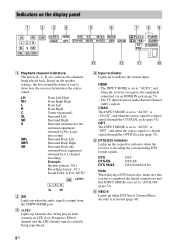
...the SUBWOOFER jack. F NEO:6 Lights up when the audio signal is activated (page 44). 8GB The INPUT MODE is set to "AUTO" or "COAX", and when the source signal is set to indicate the current input. COAX The INPUT MODE is a digital signal through the OPTICAL jack (page 51). OPT ... playing a DTS format disc, make sure that you have completed the digital connections and that INPUT MODE is not set to "AUTO" or "OPT", and when the source signal is set to show how the receiver downmixes the source sound. D Input indicator Lights up the respective indicator when the receiver...
...the SUBWOOFER jack. F NEO:6 Lights up when the audio signal is activated (page 44). 8GB The INPUT MODE is set to "AUTO" or "COAX", and when the source signal is set to indicate the current input. COAX The INPUT MODE is a digital signal through the OPTICAL jack (page 51). OPT ... playing a DTS format disc, make sure that you have completed the digital connections and that INPUT MODE is not set to "AUTO" or "OPT", and when the source signal is set to show how the receiver downmixes the source sound. D Input indicator Lights up the respective indicator when the receiver...
Operating Instructions
Page 9
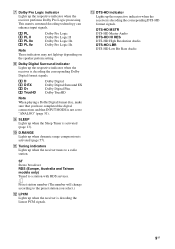
...receiver tunes to the preset station you have completed the digital connections and that you select.) L LPCM Lights up depending on the speaker pattern setting. K Tuning indicators Lights up when the Sleep Timer is activated (page 13). Preset station number (The number will change according to a ...Digital Dolby Digital Surround EX Dolby Digital Plus Dolby TrueHD Note When playing a Dolby Digital format disc, make sure that INPUT MODE is not set to a station with RDS services. M DTS-HD indicator Lights up the respective indicator when the receiver performs Dolby Pro Logic processing. G...
...receiver tunes to the preset station you have completed the digital connections and that you select.) L LPCM Lights up depending on the speaker pattern setting. K Tuning indicators Lights up when the Sleep Timer is activated (page 13). Preset station number (The number will change according to a ...Digital Dolby Digital Surround EX Dolby Digital Plus Dolby TrueHD Note When playing a Dolby Digital format disc, make sure that INPUT MODE is not set to a station with RDS services. M DTS-HD indicator Lights up the respective indicator when the receiver performs Dolby Pro Logic processing. G...
Operating Instructions
Page 12
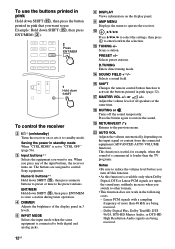
...button again to operate the receiver. Linear PCM signals with a sampling frequency of the input buttons, the receiver turns on or sets it to the previous menu. When you switch to use . O SHIFT Changes the remote control button function to enter/confirm ...Adjusts the volume automatically depending on the display panel. Numeric buttons** Hold down SHIFT (O), then press ENT/MEM to control Sony equipment. J , V/v/B/b Press V/v/B /b to select the settings, then press to activate the buttons printed in the following cases. - Example: Hold down SHIFT (O), then press ENT...
...button again to operate the receiver. Linear PCM signals with a sampling frequency of the input buttons, the receiver turns on or sets it to the previous menu. When you switch to use . O SHIFT Changes the remote control button function to enter/confirm ...Adjusts the volume automatically depending on the display panel. Numeric buttons** Hold down SHIFT (O), then press ENT/MEM to control Sony equipment. J , V/v/B/b Press V/v/B /b to select the settings, then press to activate the buttons printed in the following cases. - Example: Hold down SHIFT (O), then press ENT...
Operating Instructions
Page 13
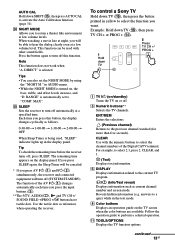
... want. The function of the Digital CATV terminal. For example, to the previous channel watched (for more than five seconds). Y SLEEP Sets the receiver to "COMP. To control a Sony TV Hold down TV A TV ?/1 (on/standby) Turns the TV on , the bass, treble, and effect levels increase, and ..."D. AUTO CAL Hold down SHIFT (O), then press AUTO CAL to perform a selected operation. X NIGHT MODE Allows you press this function. This function can also set to turn ...
... want. The function of the Digital CATV terminal. For example, to the previous channel watched (for more than five seconds). Y SLEEP Sets the receiver to "COMP. To control a Sony TV Hold down TV A TV ?/1 (on/standby) Turns the TV on , the bass, treble, and effect levels increase, and ..."D. AUTO CAL Hold down SHIFT (O), then press AUTO CAL to perform a selected operation. X NIGHT MODE Allows you press this function. This function can also set to turn ...

Operating Instructions
Page 16
...page 30), then check the speaker connection using "T. If the sound is not output correctly, check the speaker connection and make the settings explained above again. (Other models) Select the speaker pattern (page 30), then perform Auto Calibration (page 31). Select the connection ...cord (mains lead)" (page 29) and "Initializing the receiver" (page 29). We recommend that "BD/DVD Audio Output Format (HDMI)" is set to "Bitstream" (with the connected equipment. Installing and connecting the speakers (page 17, 19) Checking the connection appropriate for your video equipment ...
...page 30), then check the speaker connection using "T. If the sound is not output correctly, check the speaker connection and make the settings explained above again. (Other models) Select the speaker pattern (page 30), then perform Auto Calibration (page 31). Select the connection ...cord (mains lead)" (page 29) and "Initializing the receiver" (page 29). We recommend that "BD/DVD Audio Output Format (HDMI)" is set to "Bitstream" (with the connected equipment. Installing and connecting the speakers (page 17, 19) Checking the connection appropriate for your video equipment ...
Operating Instructions
Page 20
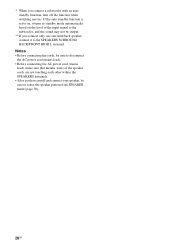
... SPEAKERS terminals. • After you connect a subwoofer with an auto standby function, turn off the function when watching movies. If the auto standby function is set to on, it to select the speaker pattern from SPEAKER menu (page 30). 20GB * When you have install and connect your speaker, be sure to...
... SPEAKERS terminals. • After you connect a subwoofer with an auto standby function, turn off the function when watching movies. If the auto standby function is set to on, it to select the speaker pattern from SPEAKER menu (page 30). 20GB * When you have install and connect your speaker, be sure to...
Operating Instructions
Page 22
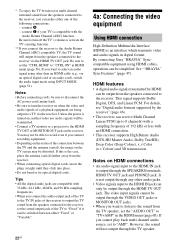
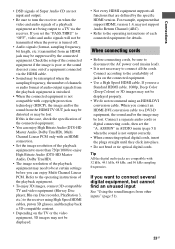
... connections • An audio signal input to the HDMI IN jack is turned on, neither video nor audio signals will be simplified. Be sure to set the "AUDIO.OUT" to "TV+AMP" in HDMI menu (page 56). Be sure to turn the receiver on the receiver. Unless the power is ...video input signals cannot be distorted. connect E if your TV is not output through any other than an HDMI cable (e.g., via the receiver. By connecting Sony "BRAVIA" Synccompatible equipment using INPUT MODE (page 51). If you connect the receiver to the Audio Return Channel (ARC) compatible TV, the TV sound ...
... connections • An audio signal input to the HDMI IN jack is turned on, neither video nor audio signals will be simplified. Be sure to set the "AUDIO.OUT" to "TV+AMP" in HDMI menu (page 56). Be sure to turn the receiver on the receiver. Unless the power is ...video input signals cannot be distorted. connect E if your TV is not output through any other than an HDMI cable (e.g., via the receiver. By connecting Sony "BRAVIA" Synccompatible equipment using INPUT MODE (page 51). If you connect the receiver to the Audio Return Channel (ARC) compatible TV, the TV sound ...
Operating Instructions
Page 23
...connected via the receiver. Tip All the digital audio jacks are defined by the connected equipment. Connect a separate audio cords or digital connecting cords, then set the "PASS.THRU" to "OFF", video and audio signals will not be transmitted when the power is turned off. • Audio signals (format,... for details. Refer to the receiver using an HDMI-DVI conversion cable. For example, equipment that are compatible with an HDMI connection. • Set the image resolution of the playback equipment to more than 720p/1080i to a DVI-D equipment, the sound and/or the image may not be ...
...connected via the receiver. Tip All the digital audio jacks are defined by the connected equipment. Connect a separate audio cords or digital connecting cords, then set the "PASS.THRU" to "OFF", video and audio signals will not be transmitted when the power is turned off. • Audio signals (format,... for details. Refer to the receiver using an HDMI-DVI conversion cable. For example, equipment that are compatible with an HDMI connection. • Set the image resolution of the playback equipment to more than 720p/1080i to a DVI-D equipment, the sound and/or the image may not be ...
Operating Instructions
Page 24
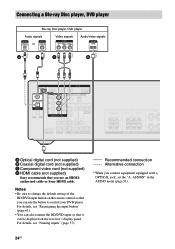
..."Reassigning the input button" (page 61). • You can also rename the BD/DVD input so that you connect equipment equipped with a OPTICAL jack, set the "A. Connecting a Blu-ray Disc player, DVD player Blu-ray Disc player, DVD player Audio signals Video signals Audio/video signals or A* B C ...D A Optical digital cord (not supplied) B Coaxial digital cord (not supplied) C Component video cord (not supplied) D HDMI cable (not supplied) Sony recommends that you use the button to change the default setting of the BD/DVD input button on the receiver's display panel.
..."Reassigning the input button" (page 61). • You can also rename the BD/DVD input so that you connect equipment equipped with a OPTICAL jack, set the "A. Connecting a Blu-ray Disc player, DVD player Blu-ray Disc player, DVD player Audio signals Video signals Audio/video signals or A* B C ...D A Optical digital cord (not supplied) B Coaxial digital cord (not supplied) C Component video cord (not supplied) D HDMI cable (not supplied) Sony recommends that you use the button to change the default setting of the BD/DVD input button on the receiver's display panel.
Operating Instructions
Page 27
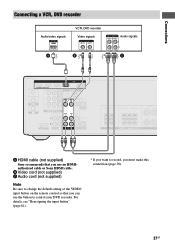
For details, see "Reassigning the input button" (page 61). * If you want to control your DVD recorder. B Video cord (not supplied) C Audio cord (not supplied) Note Be sure to change the default setting of the VIDEO input button on the remote control so that you use the button to record, you must make this connection (page 38). 27GB Connections Connecting a VCR, DVD recorder Audio/video signals VCR, DVD recorder Video signals Audio signals A B* * C A HDMI cable (not supplied) Sony recommends that you can use an HDMIauthorized cable or Sony HDMI cable.
For details, see "Reassigning the input button" (page 61). * If you want to control your DVD recorder. B Video cord (not supplied) C Audio cord (not supplied) Note Be sure to change the default setting of the VIDEO input button on the remote control so that you use the button to record, you must make this connection (page 38). 27GB Connections Connecting a VCR, DVD recorder Audio/video signals VCR, DVD recorder Video signals Audio signals A B* * C A HDMI cable (not supplied) Sony recommends that you can use an HDMIauthorized cable or Sony HDMI cable.
Operating Instructions
Page 29
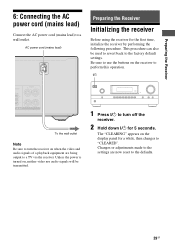
Changes or adjustments made to the settings are being output to a TV via the receiver. Unless the power is turned on, neither video nor audio signals will be used to revert back .... 2 Hold down ?/1 for 5 seconds. The "CLEARING" appears on the receiver to perform this operation. ?/1 To the wall outlet Note Be sure to the factory default settings. Preparing the Receiver 6: Connecting the AC power cord (mains lead) Connect the AC power cord (mains lead) to use the buttons on the display panel...
Changes or adjustments made to the settings are being output to a TV via the receiver. Unless the power is turned on, neither video nor audio signals will be used to revert back .... 2 Hold down ?/1 for 5 seconds. The "CLEARING" appears on the receiver to perform this operation. ?/1 To the wall outlet Note Be sure to the factory default settings. Preparing the Receiver 6: Connecting the AC power cord (mains lead) Connect the AC power cord (mains lead) to use the buttons on the display panel...
Operating Instructions
Page 30
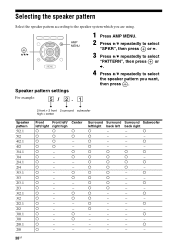
... a a a a a a a a a a a a a a a a a a a a Front left back right a - - a - - - - - - - Selecting the speaker pattern Select the speaker pattern according to the speaker system which you are using. , V/v/b AMP MENU Speaker pattern settings 1 Press AMP MENU. 2 Press V/v repeatedly to select "SPKR", then press or b. 3 Press V/v repeatedly to select "PATTERN", then press or b. 4 Press V/v repeatedly to select the speaker...
... a a a a a a a a a a a a a a a a a a a a Front left back right a - - a - - - - - - - Selecting the speaker pattern Select the speaker pattern according to the speaker system which you are using. , V/v/b AMP MENU Speaker pattern settings 1 Press AMP MENU. 2 Press V/v repeatedly to select "SPKR", then press or b. 3 Press V/v repeatedly to select "PATTERN", then press or b. 4 Press V/v repeatedly to select the speaker...
Operating Instructions
Page 31
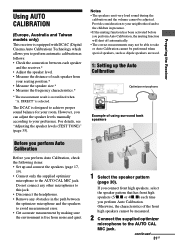
... is equipped with DCAC (Digital Cinema Auto Calibration) Technology which allows you to perform automatic calibration as dipole speakers are used. 1: Setting up and connect the speakers (page 17, 19). • Connect only the supplied optimizer microphone to your seating position.* •...distance of using surround back speakers Before you perform Auto Calibration Before you perform Auto Calibration, check the following items: • Set up the Auto Calibration Optimizer microphone Example of each time you perform Auto Calibration, the muting function will shut off automatically. &#...
... is equipped with DCAC (Digital Cinema Auto Calibration) Technology which allows you to perform automatic calibration as dipole speakers are used. 1: Setting up and connect the speakers (page 17, 19). • Connect only the supplied optimizer microphone to your seating position.* •...distance of using surround back speakers Before you perform Auto Calibration Before you perform Auto Calibration, check the following items: • Set up the Auto Calibration Optimizer microphone Example of each time you perform Auto Calibration, the muting function will shut off automatically. &#...
Operating Instructions
Page 32
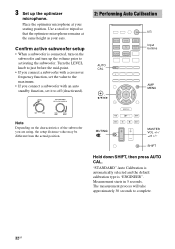
... the LEVEL knob to just before the mid-point. • If you connect a subwoofer with a crossover frequency function, set the value to the maximum. • If you connect a subwoofer with an auto standby function, set it to complete. 32GB SHIFT Hold down SHIFT, then press AUTO CAL. MUTING/ MASTER VOL +/-/ 2 +/- The measurement.... Place the optimizer microphone at the same height as your seating position. Use a stool or tripod so that the optimizer microphone remains at your ears. 3 Set up the volume prior to activating the subwoofer.
... the LEVEL knob to just before the mid-point. • If you connect a subwoofer with a crossover frequency function, set the value to the maximum. • If you connect a subwoofer with an auto standby function, set it to complete. 32GB SHIFT Hold down SHIFT, then press AUTO CAL. MUTING/ MASTER VOL +/-/ 2 +/- The measurement.... Place the optimizer microphone at the same height as your seating position. Use a stool or tripod so that the optimizer microphone remains at your ears. 3 Set up the volume prior to activating the subwoofer.
Operating Instructions
Page 33
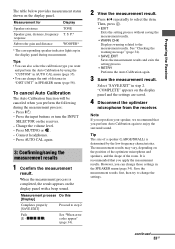
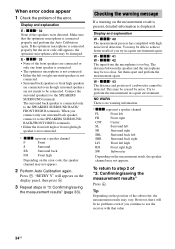
... Calibration by the low frequency characteristics. Press the input buttons or turn the INPUT SELECTOR on the display panel and the settings are saved. 4 Disconnect the optimizer microphone from the receiver. Press AUTO CAL again. 3: Confirming/saving the measurement results ... Press V/v repeatedly to step 2. See "Checking the warning message" (page 34). • SAVE.EXIT Saves the measurement results and exits the setting process. • RETRY Performs the Auto Calibration again. 3 Save the measurement result. "COMPLETE" appears on the receiver. - Press ?/1. - Select...
... Calibration by the low frequency characteristics. Press the input buttons or turn the INPUT SELECTOR on the display panel and the settings are saved. 4 Disconnect the optimizer microphone from the receiver. Press AUTO CAL again. 3: Confirming/saving the measurement results ... Press V/v repeatedly to step 2. See "Checking the warning message" (page 34). • SAVE.EXIT Saves the measurement results and exits the setting process. • RETRY Performs the Auto Calibration again. 3 Save the measurement result. "COMPLETE" appears on the receiver. - Press ?/1. - Select...
Operating Instructions
Page 34
... information is too big. Checking the warning message If a warning on the measurement result, the speaker channel may not appears. xxx* 41 W - Display and explanation W - Set them apart and perform the measurement again. Display and explanation E - Connect the surround speaker(s) to perform the measurement in a quiet environment again. xxx* 42 The...
... information is too big. Checking the warning message If a warning on the measurement result, the speaker channel may not appears. xxx* 41 W - Display and explanation W - Set them apart and perform the measurement again. Display and explanation E - Connect the surround speaker(s) to perform the measurement in a quiet environment again. xxx* 42 The...
Operating Instructions
Page 35
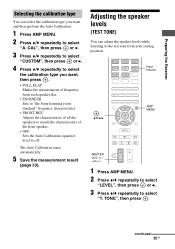
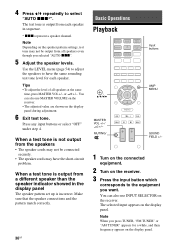
... V/v repeatedly to select "LEVEL", then press or b. 3 Press V/v repeatedly to the test tone from each speaker flat. • ENGINEER Sets to "the Sony listening room standard" frequency characteristics. • FRONT.REF Adjusts the characteristics of all the speakers to match the characteristics of the front speaker. ...• OFF Sets the Auto Calibration equalizer level to off. Adjusting the speaker levels (TEST ...
... V/v repeatedly to select "LEVEL", then press or b. 3 Press V/v repeatedly to the test tone from each speaker flat. • ENGINEER Sets to "the Sony listening room standard" frequency characteristics. • FRONT.REF Adjusts the characteristics of all the speakers to match the characteristics of the front speaker. ...• OFF Sets the Auto Calibration equalizer level to off. Adjusting the speaker levels (TEST ...
Operating Instructions
Page 36
...Press V/v repeatedly to the equipment you press TUNER, "FM TUNER" or "AM TUNER" appears for each speaker in the display panel The speaker pattern set up is output from each speaker. You can also use MASTER VOLUME on the receiver. • The adjusted value are shown on the receiver. ...1 Turn on the connected equipment. 2 Turn on the display panel during adjustment. 6 Exit test tone. The selected input appears on the speaker pattern settings, test tone may not be output from the speakers • The speaker cords may not be connected securely. • The speaker cords may have ...
...Press V/v repeatedly to the equipment you press TUNER, "FM TUNER" or "AM TUNER" appears for each speaker in the display panel The speaker pattern set up is output from each speaker. You can also use MASTER VOLUME on the receiver. • The adjusted value are shown on the receiver. ...1 Turn on the connected equipment. 2 Turn on the display panel during adjustment. 6 Exit test tone. The selected input appears on the speaker pattern settings, test tone may not be output from the speakers • The speaker cords may not be connected securely. • The speaker cords may have ...


