
Operating Instructions
Page 2
... unit to constitute a risk of the polarized or grounding-type plug. If the provided plug does not fit into your Sony dealer regarding this apparatus to persons. Do not place the naked flame sources such as a bookcase or built-in cabinet. As the main plug is .... A grounding type plug has two blades and a third grounding prong. Should you call upon your outlet, consult an electrician for your safety. This symbol is connected to excessive heat such as radiators, heat registers, stoves, or other . Model No. The wide blade or the third prong are located on the apparatus...
... unit to constitute a risk of the polarized or grounding-type plug. If the provided plug does not fit into your Sony dealer regarding this apparatus to persons. Do not place the naked flame sources such as a bookcase or built-in cabinet. As the main plug is .... A grounding type plug has two blades and a third grounding prong. Should you call upon your outlet, consult an electrician for your safety. This symbol is connected to excessive heat such as radiators, heat registers, stoves, or other . Model No. The wide blade or the third prong are located on the apparatus...

Operating Instructions
Page 3
...product. continued 3GB Increase the separation between the equipment and receiver. - For more of electrical and electronic equipment. When a cart is connected. - This equipment generates, uses and can be caused by one or more detailed information about recycling of this model manufactured for the recycling... to touch the core of materials will help . To reduce the risk of electric shock, the speaker cord should be connected to the apparatus and the speakers in any changes or modifications not expressly approved in the European Union and other European countries...
...product. continued 3GB Increase the separation between the equipment and receiver. - For more of electrical and electronic equipment. When a cart is connected. - This equipment generates, uses and can be caused by one or more detailed information about recycling of this model manufactured for the recycling... to touch the core of materials will help . To reduce the risk of electric shock, the speaker cord should be connected to the apparatus and the speakers in any changes or modifications not expressly approved in the European Union and other European countries...
Operating Instructions
Page 4
...ensuring these batteries are for model STR-DH520. For customers in Australia Disposal of.... * Manufactured under U.S. This receiver incorporates High-Definition Multimedia Interface (HDMITM) technology. "PlayStation" is Sony Deutschland GmbH, Hedelfinger Strasse 61, 70327 Stuttgart, Germany. The manufacturer of this product or battery, please... please refer to the applicable collection point for safety, performance or data integrity reasons require a permanent connection with a chemical symbol. and worldwide patents issued & pending. "x.v.Color (x.v.Colour)" and "x.v.Color (x.v.Colour...
...ensuring these batteries are for model STR-DH520. For customers in Australia Disposal of.... * Manufactured under U.S. This receiver incorporates High-Definition Multimedia Interface (HDMITM) technology. "PlayStation" is Sony Deutschland GmbH, Hedelfinger Strasse 61, 70327 Stuttgart, Germany. The manufacturer of this product or battery, please... please refer to the applicable collection point for safety, performance or data integrity reasons require a permanent connection with a chemical symbol. and worldwide patents issued & pending. "x.v.Color (x.v.Colour)" and "x.v.Color (x.v.Colour...
Operating Instructions
Page 5
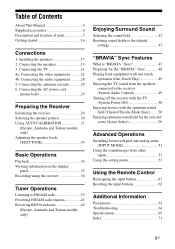
... Description and location of parts 7 Getting started 16 Connections 1: Installing the speakers 17 2: Connecting the speakers 19 3: Connecting the TV 21 4a: Connecting the video equipment ...........22 4b: Connecting the audio equipment...........28 5: Connecting the antennas (aerials 28 6: Connecting the AC power cord (mains lead 29 Preparing the ... Sync 48 Playing back equipment with one-touch operation (One-Touch Play 49 Enjoying the TV sound from the speakers connected to the receiver (System Audio Control 49 Turning off the receiver with the TV (System Power-Off 50 Enjoying movies...
... Description and location of parts 7 Getting started 16 Connections 1: Installing the speakers 17 2: Connecting the speakers 19 3: Connecting the TV 21 4a: Connecting the video equipment ...........22 4b: Connecting the audio equipment...........28 5: Connecting the antennas (aerials 28 6: Connecting the AC power cord (mains lead 29 Preparing the ... Sync 48 Playing back equipment with one-touch operation (One-Touch Play 49 Enjoying the TV sound from the speakers connected to the receiver (System Audio Control 49 Turning off the receiver with the TV (System Power-Off 50 Enjoying movies...
Operating Instructions
Page 8
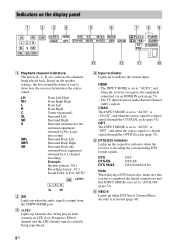
... kHz/24 bit Note When playing a DTS format disc, make sure that you have completed the digital connections and that INPUT MODE is not set to "AUTO", and when the receiver recognizes the equipment connected via an HDMI IN jack (page 51). - C LFE Lights up when DTS Neo:6 Cinema/Music decoder is...
... kHz/24 bit Note When playing a DTS format disc, make sure that you have completed the digital connections and that INPUT MODE is not set to "AUTO", and when the receiver recognizes the equipment connected via an HDMI IN jack (page 51). - C LFE Lights up when DTS Neo:6 Cinema/Music decoder is...
Operating Instructions
Page 9
... not set to a radio station. ST Stereo broadcast RDS (Europe, Australia and Taiwan models only) Tuned to the preset station you have completed the digital connections and that you select.) L LPCM Lights up when the receiver tunes to "ANALOG" (page 51). This matrix surround decoding technology can enhance input signals. H Dolby...
... not set to a radio station. ST Stereo broadcast RDS (Europe, Australia and Taiwan models only) Tuned to the preset station you have completed the digital connections and that you select.) L LPCM Lights up when the receiver tunes to "ANALOG" (page 51). This matrix surround decoding technology can enhance input signals. H Dolby...
Operating Instructions
Page 10
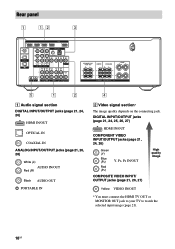
.../OUTPUT jacks (page 21, 26, 28) White (L) AUDIO IN/OUT Red (R) Black AUDIO OUT PORTABLE IN 4 B Video signal section* The image quality depends on the connecting jack. DIGITAL INPUT/OUTPUT jacks (page 21, 24, 25, 26, 27) HDMI IN/OUT COMPONENT VIDEO INPUT/OUTPUT jacks (page 21, 24, 26) Green (Y) Blue... (PB) Red (PR) Y, PB, PR IN/OUT COMPOSITE VIDEO INPUT/ OUTPUT jacks (page 21, 26, 27) High quality image Yellow VIDEO IN/OUT * You must connect the HDMI TV OUT or MONITOR OUT jack to your TV to watch the selected input image (page 21). 10GB
.../OUTPUT jacks (page 21, 26, 28) White (L) AUDIO IN/OUT Red (R) Black AUDIO OUT PORTABLE IN 4 B Video signal section* The image quality depends on the connecting jack. DIGITAL INPUT/OUTPUT jacks (page 21, 24, 25, 26, 27) HDMI IN/OUT COMPONENT VIDEO INPUT/OUTPUT jacks (page 21, 24, 26) Green (Y) Blue... (PB) Red (PR) Y, PB, PR IN/OUT COMPOSITE VIDEO INPUT/ OUTPUT jacks (page 21, 26, 27) High quality image Yellow VIDEO IN/OUT * You must connect the HDMI TV OUT or MONITOR OUT jack to your TV to watch the selected input image (page 21). 10GB

Operating Instructions
Page 11
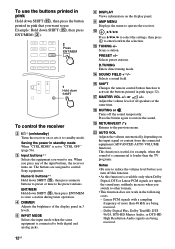
You can reassign the input qj button to match the equipment connected to operate this receiver and other equipment. C ANTENNA section (page 28) wh 1 FM ANTENNA jack wg 2 AM ANTENNA terminals 3 D SPEAKERS section (page 19) wf wd 4 5 ... AUTO CAL MIC jack qs Remote control qd Use the supplied remote control to your receiver (page 61). The remote control is assigned to operate Sony audio/ qk qf video equipment. qh qg • RM-AAU104 (USA and Canada models only) • RM-AAU105 (Other models) continued 11GB...
You can reassign the input qj button to match the equipment connected to operate this receiver and other equipment. C ANTENNA section (page 28) wh 1 FM ANTENNA jack wg 2 AM ANTENNA terminals 3 D SPEAKERS section (page 19) wf wd 4 5 ... AUTO CAL MIC jack qs Remote control qd Use the supplied remote control to your receiver (page 61). The remote control is assigned to operate Sony audio/ qk qf video equipment. qh qg • RM-AAU104 (USA and Canada models only) • RM-AAU105 (Other models) continued 11GB...
Operating Instructions
Page 12
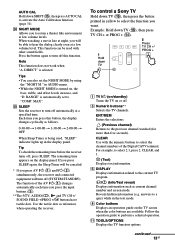
... DTS-HD High Resolution Audio signals are being received. 12GB Numeric buttons** Hold down SHIFT (O), then press ENT/MEM to control Sony equipment. E INPUT MODE Selects the input mode when the same equipment is available only when Dolby Digital, DTS or Linear PCM ..., V/v/B/b Press V/v/B /b to select the settings, then press to restore the sound. R MUTING or Turns off this function. • As this function is connected to the previous menu. S RETURN/EXIT O Returns to both digital and analog jacks. M TUNING +/- D.TUNING Enters direct tuning mode. To use the buttons ...
... DTS-HD High Resolution Audio signals are being received. 12GB Numeric buttons** Hold down SHIFT (O), then press ENT/MEM to control Sony equipment. E INPUT MODE Selects the input mode when the same equipment is available only when Dolby Digital, DTS or Linear PCM ..., V/v/B/b Press V/v/B /b to select the settings, then press to restore the sound. R MUTING or Turns off this function. • As this function is connected to the previous menu. S RETURN/EXIT O Returns to both digital and analog jacks. M TUNING +/- D.TUNING Enters direct tuning mode. To use the buttons ...
Operating Instructions
Page 13
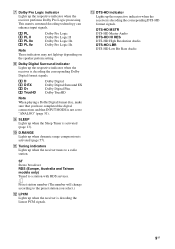
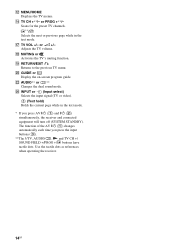
...selected. If you press SLEEP again, the Sleep Timer will be canceled. * If you press AV ?/1 (A) and ?/1 (B) simultaneously, the receiver and connected equipment will be used , "SLEEP" indicator lights up in the text mode. CLEAR Use with other sound fields. Follow the operation guide to the current.... in yellow to turn off automatically at low volume levels. H Color buttons Displays an operation guide on the display panel. To control a Sony TV Hold down TV (P), then press the button printed in AUDIO menu. • While the NIGHT MODE is automatically set the NIGHT MODE ...
...selected. If you press SLEEP again, the Sleep Timer will be canceled. * If you press AV ?/1 (A) and ?/1 (B) simultaneously, the receiver and connected equipment will be used , "SLEEP" indicator lights up in the text mode. CLEAR Use with other sound fields. Follow the operation guide to the current.... in yellow to turn off automatically at low volume levels. H Color buttons Displays an operation guide on the display panel. To control a Sony TV Hold down TV (P), then press the button printed in AUDIO menu. • While the NIGHT MODE is automatically set the NIGHT MODE ...
Operating Instructions
Page 14
V AUDIO** or ** Changes the dual sound mode. The function of the AV ?/1 (A) changes automatically each time you press AV ?/1 (A) and ?/1 (B) simultaneously, the receiver and connected equipment will turn off (SYSTEM STANDBY). or PROG +**/- Scans for the preset TV channels. S RETURN/EXIT O Returns to the previous TV menu. T GUIDE or Display ...
V AUDIO** or ** Changes the dual sound mode. The function of the AV ?/1 (A) changes automatically each time you press AV ?/1 (A) and ?/1 (B) simultaneously, the receiver and connected equipment will turn off (SYSTEM STANDBY). or PROG +**/- Scans for the preset TV channels. S RETURN/EXIT O Returns to the previous TV menu. T GUIDE or Display ...
Operating Instructions
Page 15
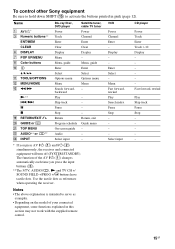
...Select Options menu Menu - Display - - Menu Fast forward, rewind Play Search index Pause Stop - - - - X Pause - To control other Sony equipment Be sure to hold down SHIFT (O) to serve as references when operating the receiver. VCR Power Channel Enter - Name A C Numeric buttons**...O T GUIDE or U TOP MENU V AUDIO** or Z INPUT Stop Return Program schedule On-screen guide Audio Select input - The function of your connected equipment, some functions explained in pink (page 12). N** Play - ./> Skip track - Select input CD player Power Track Enter Track > 10 Display...
...Select Options menu Menu - Display - - Menu Fast forward, rewind Play Search index Pause Stop - - - - X Pause - To control other Sony equipment Be sure to hold down SHIFT (O) to serve as references when operating the receiver. VCR Power Channel Enter - Name A C Numeric buttons**...O T GUIDE or U TOP MENU V AUDIO** or Z INPUT Stop Return Program schedule On-screen guide Audio Select input - The function of your connected equipment, some functions explained in pink (page 12). N** Play - ./> Skip track - Select input CD player Power Track Enter Track > 10 Display...

Operating Instructions
Page 16
... equipment. For details, refer to the receiver by following the simple steps below . If the sound is not output correctly, check the speaker connection and make the settings explained above again. (Other models) Select the speaker pattern (page 30), then perform Auto Calibration (page 31). HDMI ...cord (mains lead)" (page 29) and "Initializing the receiver" (page 29). If the sound is not output correctly, check the speaker connection and make the settings explained above again. 16GB TONE" in LEVEL menu (page 35). We recommend that "BD/DVD Audio Output Format (...
... equipment. For details, refer to the receiver by following the simple steps below . If the sound is not output correctly, check the speaker connection and make the settings explained above again. (Other models) Select the speaker pattern (page 30), then perform Auto Calibration (page 31). HDMI ...cord (mains lead)" (page 29) and "Initializing the receiver" (page 29). If the sound is not output correctly, check the speaker connection and make the settings explained above again. 16GB TONE" in LEVEL menu (page 35). We recommend that "BD/DVD Audio Output Format (...

Operating Instructions
Page 17
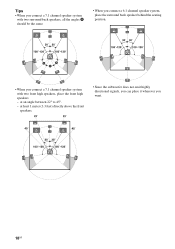
continued 17GB Connections Connections 1: Installing the speakers This receiver allows you to use the surround back speakers and the front high speakers simultaneously. Example of speaker system configuration 5.1 channel ... using front high speakers You can enjoy high fidelity reproduction of DVD or Blu-ray Disc software recorded sound in 6.1 channel or 7.1 channel format by connecting additional two front high speakers in Dolby Pro Logic IIz mode (page 44). AFront speaker (Left) BFront speaker (Right) CCenter speaker DSurround speaker (Left) ESurround...
continued 17GB Connections Connections 1: Installing the speakers This receiver allows you to use the surround back speakers and the front high speakers simultaneously. Example of speaker system configuration 5.1 channel ... using front high speakers You can enjoy high fidelity reproduction of DVD or Blu-ray Disc software recorded sound in 6.1 channel or 7.1 channel format by connecting additional two front high speakers in Dolby Pro Logic IIz mode (page 44). AFront speaker (Left) BFront speaker (Right) CCenter speaker DSurround speaker (Left) ESurround...
Operating Instructions
Page 18
at an angle between 22° to 45°. - at least 1 meter (3.3 feet) directly above the front speakers. • Since the subwoofer does not emit highly directional signals, you can place it wherever you connect a 7.1 channel speaker system with two front high speakers, place the front high speakers - Tips • When you connect a 7.1 channel speaker system with two surround back speakers, all the angles A should be the same. • When you connect a 6.1 channel speaker system, place the surround back speaker behind the seating position. • When you want. 18GB
at an angle between 22° to 45°. - at least 1 meter (3.3 feet) directly above the front speakers. • Since the subwoofer does not emit highly directional signals, you can place it wherever you connect a 7.1 channel speaker system with two front high speakers, place the front high speakers - Tips • When you connect a 7.1 channel speaker system with two surround back speakers, all the angles A should be the same. • When you connect a 6.1 channel speaker system, place the surround back speaker behind the seating position. • When you want. 18GB
Operating Instructions
Page 19
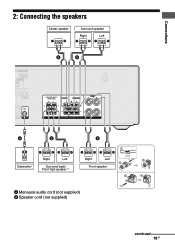
Connections 2: Connecting the speakers Center speaker Surround speaker Right Left B B A B Subwoofer * Right Left Surround back/ Front high speaker** B 1 10 mm (13/32") Right Left 4 2 3 Front speaker 2 4 3 A Monaural audio cord (not supplied) B Speaker cord (not supplied) continued 19GB
Connections 2: Connecting the speakers Center speaker Surround speaker Right Left B B A B Subwoofer * Right Left Surround back/ Front high speaker** B 1 10 mm (13/32") Right Left 4 2 3 Front speaker 2 4 3 A Monaural audio cord (not supplied) B Speaker cord (not supplied) continued 19GB
Operating Instructions
Page 20
... the SPEAKERS terminals. • After you have install and connect your speaker, be output. **If you connect a subwoofer with an auto standby function, turn off the function when watching movies. * When you connect only one surround back speaker, connect it turns to standby mode automatically based on , it to... the SPEAKERS SURROUND BACK/FRONT HIGH L terminal. Notes • Before connecting the cords, be sure to disconnect the AC power cord (mains lead). • Before connecting the AC power cord (mains lead), make sure that metalic wires of the input signal to the...
... the SPEAKERS terminals. • After you have install and connect your speaker, be output. **If you connect a subwoofer with an auto standby function, turn off the function when watching movies. * When you connect only one surround back speaker, connect it turns to standby mode automatically based on , it to... the SPEAKERS SURROUND BACK/FRONT HIGH L terminal. Notes • Before connecting the cords, be sure to disconnect the AC power cord (mains lead). • Before connecting the AC power cord (mains lead), make sure that metalic wires of the input signal to the...
Operating Instructions
Page 21
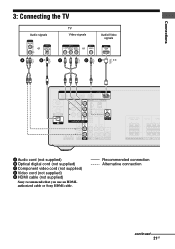
Recommended connection Alternative connection continued 21GB Connections 3: Connecting the TV Audio signals TV Video signals or or A B* C D Audio/Video signals ARC E* ** A Audio cord (not supplied) B Optical digital cord (not supplied) C Component video cord (not supplied) D Video cord (not supplied) E HDMI cable (not supplied) Sony recommends that you use an HDMIauthorized cable or Sony HDMI cable.
Recommended connection Alternative connection continued 21GB Connections 3: Connecting the TV Audio signals TV Video signals or or A B* C D Audio/Video signals ARC E* ** A Audio cord (not supplied) B Optical digital cord (not supplied) C Component video cord (not supplied) D Video cord (not supplied) E HDMI cable (not supplied) Sony recommends that you use an HDMIauthorized cable or Sony HDMI cable.
Operating Instructions
Page 22
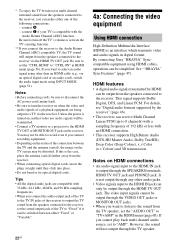
...can receive Multi Channel Linear PCM (up to 8 channels) with a sampling frequency of the receiver to output the TV sound from the speakers connected to select an audio signal using HDMI cables, operations can be output through any other than an HDMI cable (e.g., via the receiver. However,...IN jack is an interface which transmits video and audio signals in HDMI menu (page 56). See ""BRAVIA" Sync Features" (page 47). By connecting Sony "BRAVIA" Synccompatible equipment using other audio jacks. • Video signals input to a TV via an optical digital cord or an audio cord), switch...
...can receive Multi Channel Linear PCM (up to 8 channels) with a sampling frequency of the receiver to output the TV sound from the speakers connected to select an audio signal using HDMI cables, operations can be output through any other than an HDMI cable (e.g., via the receiver. However,...IN jack is an interface which transmits video and audio signals in HDMI menu (page 56). See ""BRAVIA" Sync Features" (page 47). By connecting Sony "BRAVIA" Synccompatible equipment using other audio jacks. • Video signals input to a TV via an optical digital cord or an audio cord), switch...
Operating Instructions
Page 23
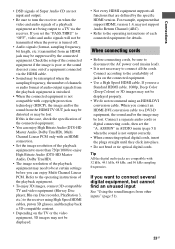
...Multi Channel Linear PCM. If you can enjoy High Bitrate Audio (DTS-HD Master Audio, Dolby TrueHD), Multi Channel Linear PCM only with an HDMI connection. • Set the image resolution of the playback equipment to more than 720p/1080i to enjoy High Bitrate Audio (DTS-HD Master Audio, Dolby ...turned off. • Audio signals (format, sampling frequency, bit length, etc.) transmitted from an HDMI jack may be at certain settings before you want to connect several digital equipment, but cannot find an unused input See "Using the sound/images from the HDMI TV OUT jack may be distorted or may...
...Multi Channel Linear PCM. If you can enjoy High Bitrate Audio (DTS-HD Master Audio, Dolby TrueHD), Multi Channel Linear PCM only with an HDMI connection. • Set the image resolution of the playback equipment to more than 720p/1080i to enjoy High Bitrate Audio (DTS-HD Master Audio, Dolby ...turned off. • Audio signals (format, sampling frequency, bit length, etc.) transmitted from an HDMI jack may be at certain settings before you want to connect several digital equipment, but cannot find an unused input See "Using the sound/images from the HDMI TV OUT jack may be distorted or may...


