

Operating Instructions
Page 3
... the manufacturer, or sold with FCC technical regulations. Reorient or relocate the receiving antenna. - To reduce the risk of electric shock, the speaker cord should be handed over . 13)Unplug this manual could otherwise be determined by hand. By ensuring this model manufactured for a Class B...equipment and receiver. - CAUTION You are designed to conserve natural resources. Instead it shall be connected to the apparatus and the speakers in accordance with the limits for sale in this apparatus during lightning storms or when unused for the environment and human health, ...
... the manufacturer, or sold with FCC technical regulations. Reorient or relocate the receiving antenna. - To reduce the risk of electric shock, the speaker cord should be handed over . 13)Unplug this manual could otherwise be determined by hand. By ensuring this model manufactured for a Class B...equipment and receiver. - CAUTION You are designed to conserve natural resources. Instead it shall be connected to the apparatus and the speakers in accordance with the limits for sale in this apparatus during lightning storms or when unused for the environment and human health, ...
Operating Instructions
Page 5
Table of Contents About This Manual 4 Supplied accessories 6 Description and location of parts 7 Getting started 16 Connections 1: Installing the speakers 17 2: Connecting the speakers 19 3: Connecting the TV 21 4a: Connecting the video equipment ...........22 4b: Connecting the audio equipment...........28 5: Connecting the ...for the "BRAVIA" Sync 48 Playing back equipment with one-touch operation (One-Touch Play 49 Enjoying the TV sound from the speakers connected to the receiver (System Audio Control 49 Turning off the receiver with the TV (System Power-Off 50 Enjoying movies with...
Table of Contents About This Manual 4 Supplied accessories 6 Description and location of parts 7 Getting started 16 Connections 1: Installing the speakers 17 2: Connecting the speakers 19 3: Connecting the TV 21 4a: Connecting the video equipment ...........22 4b: Connecting the audio equipment...........28 5: Connecting the ...for the "BRAVIA" Sync 48 Playing back equipment with one-touch operation (One-Touch Play 49 Enjoying the TV sound from the speakers connected to the receiver (System Audio Control 49 Turning off the receiver with the TV (System Power-Off 50 Enjoying movies with...
Operating Instructions
Page 8
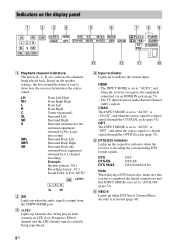
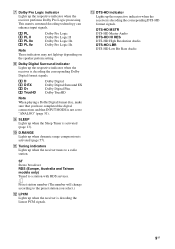
... signal through the COAXIAL jack (page 51). A Playback channel indicators The letters (L, C, R, etc.) indicate the channels being reproduced. Indicators on the speaker settings, the box around the letter(s) vary to show how the receiver downmixes the source sound. HDMI - E DTS(-ES) indicator Lights up to ...Logic processing) Surround Back Left Surround Back Right Surround Back (the surround back equipment obtained by 6.1 channel decoding) Example: Speaker pattern: 3/0.1 Recording format: 3/2.1 Sound Field: A.F.D. F NEO:6 Lights up when the audio signal is activated (page 44). 8GB
... signal through the COAXIAL jack (page 51). A Playback channel indicators The letters (L, C, R, etc.) indicate the channels being reproduced. Indicators on the speaker settings, the box around the letter(s) vary to show how the receiver downmixes the source sound. HDMI - E DTS(-ES) indicator Lights up to ...Logic processing) Surround Back Left Surround Back Right Surround Back (the surround back equipment obtained by 6.1 channel decoding) Example: Speaker pattern: 3/0.1 Recording format: 3/2.1 Sound Field: A.F.D. F NEO:6 Lights up when the audio signal is activated (page 44). 8GB
Operating Instructions
Page 9
... is decoding the Linear PCM signals. Preset station number (The number will change according to a radio station. M DTS-HD indicator Lights up depending on the speaker pattern setting. PL PL II PL IIx PL IIz Dolby Pro Logic Dolby Pro Logic II Dolby Pro Logic IIx Dolby Pro Logic IIz Note...
... is decoding the Linear PCM signals. Preset station number (The number will change according to a radio station. M DTS-HD indicator Lights up depending on the speaker pattern setting. PL PL II PL IIx PL IIz Dolby Pro Logic Dolby Pro Logic II Dolby Pro Logic IIx Dolby Pro Logic IIz Note...
Operating Instructions
Page 11
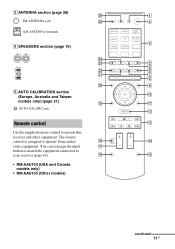
... 1 FM ANTENNA jack wg 2 AM ANTENNA terminals 3 D SPEAKERS section (page 19) wf wd 4 5 ws 6 wa 7 8 w; 9 E AUTO CALIBRATION section 0 (Europe, Australia and Taiwan models only) (page 31) ql qa AUTO CAL MIC jack qs Remote control qd Use the supplied remote control to operate Sony audio/ qk qf video equipment. The remote control...
... 1 FM ANTENNA jack wg 2 AM ANTENNA terminals 3 D SPEAKERS section (page 19) wf wd 4 5 ws 6 wa 7 8 w; 9 E AUTO CALIBRATION section 0 (Europe, Australia and Taiwan models only) (page 31) ql qa AUTO CAL MIC jack qs Remote control qd Use the supplied remote control to operate Sony audio/ qk qf video equipment. The remote control...
Operating Instructions
Page 12
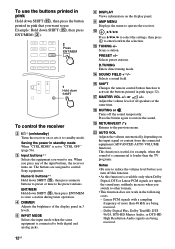
... turn off the sound temporarily. Linear PCM signals with a sampling frequency of a commercial is louder than 48 kHz are assigned to control Sony equipment. ENT/MEM Hold down SHIFT (O), then press ENT/MEM to activate the buttons printed in pink (page 12). E INPUT MODE .... C Input buttons** Selects the equipment you switch to restore the sound. The buttons are being received. 12GB D DIMMER Adjusts the brightness of all speakers at the same time. I AMP MENU Displays the menu to the previous menu. PRESET +/- Selects preset stations. Selects a sound field. or +/- ...
... turn off the sound temporarily. Linear PCM signals with a sampling frequency of a commercial is louder than 48 kHz are assigned to control Sony equipment. ENT/MEM Hold down SHIFT (O), then press ENT/MEM to activate the buttons printed in pink (page 12). E INPUT MODE .... C Input buttons** Selects the equipment you switch to restore the sound. The buttons are being received. 12GB D DIMMER Adjusts the brightness of all speakers at the same time. I AMP MENU Displays the menu to the previous menu. PRESET +/- Selects preset stations. Selects a sound field. or +/- ...

Operating Instructions
Page 16
... are set to "Auto", "Dolby Digital" and "DTS" respectively (as of September 2010). Setting the speakers (USA and Canada models only) Select the speaker pattern (page 30), then check the speaker connection using "T. We recommend that "BD/DVD Audio Output Format (HDMI)" is not output correctly, check ... receiver by following the simple steps below . If the sound is not output correctly, check the speaker connection and make the settings explained above again. (Other models) Select the speaker pattern (page 30), then perform Auto Calibration (page 31). If the sound is set to "...
... are set to "Auto", "Dolby Digital" and "DTS" respectively (as of September 2010). Setting the speakers (USA and Canada models only) Select the speaker pattern (page 30), then check the speaker connection using "T. We recommend that "BD/DVD Audio Output Format (HDMI)" is not output correctly, check ... receiver by following the simple steps below . If the sound is not output correctly, check the speaker connection and make the settings explained above again. (Other models) Select the speaker pattern (page 30), then perform Auto Calibration (page 31). If the sound is set to "...

Operating Instructions
Page 17
... the front high speakers simultaneously. AFront speaker (Left) BFront speaker (Right) CCenter speaker DSurround speaker (Left) ESurround speaker (Right) FSurround back speaker (Left)* GSurround back speaker (Right)* HFront high speaker (Left)* IFront high speaker (Right)* JSubwoofer * You cannot use a 7.1 channel system (7 speakers and one surround back speaker (6.1 channel) or two surround back speakers (7.1 channel). 7.1 channel speaker system using surround back speakers You can enjoy vertical...
... the front high speakers simultaneously. AFront speaker (Left) BFront speaker (Right) CCenter speaker DSurround speaker (Left) ESurround speaker (Right) FSurround back speaker (Left)* GSurround back speaker (Right)* HFront high speaker (Left)* IFront high speaker (Right)* JSubwoofer * You cannot use a 7.1 channel system (7 speakers and one surround back speaker (6.1 channel) or two surround back speakers (7.1 channel). 7.1 channel speaker system using surround back speakers You can enjoy vertical...
Operating Instructions
Page 18
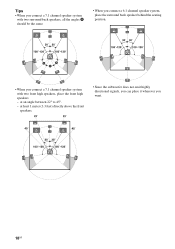
at least 1 meter (3.3 feet) directly above the front speakers. • Since the subwoofer does not emit highly directional signals, you can place it wherever you connect a 7.1 channel speaker system with two surround back speakers, all the angles A should be the same. • When you connect a 6.1 channel speaker system, place the surround back speaker behind the seating position. • When you want. 18GB Tips • When you connect a 7.1 channel speaker system with two front high speakers, place the front high speakers - at an angle between 22° to 45°. -
at least 1 meter (3.3 feet) directly above the front speakers. • Since the subwoofer does not emit highly directional signals, you can place it wherever you connect a 7.1 channel speaker system with two surround back speakers, all the angles A should be the same. • When you connect a 6.1 channel speaker system, place the surround back speaker behind the seating position. • When you want. 18GB Tips • When you connect a 7.1 channel speaker system with two front high speakers, place the front high speakers - at an angle between 22° to 45°. -
Operating Instructions
Page 19
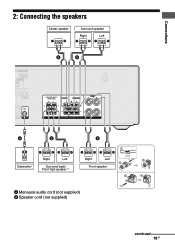
Connections 2: Connecting the speakers Center speaker Surround speaker Right Left B B A B Subwoofer * Right Left Surround back/ Front high speaker** B 1 10 mm (13/32") Right Left 4 2 3 Front speaker 2 4 3 A Monaural audio cord (not supplied) B Speaker cord (not supplied) continued 19GB
Connections 2: Connecting the speakers Center speaker Surround speaker Right Left B B A B Subwoofer * Right Left Surround back/ Front high speaker** B 1 10 mm (13/32") Right Left 4 2 3 Front speaker 2 4 3 A Monaural audio cord (not supplied) B Speaker cord (not supplied) continued 19GB
Operating Instructions
Page 20
... function is set to on, it turns to standby mode automatically based on the level of the speaker cords are not touching each other within the SPEAKERS terminals. • After you have install and connect your speaker, be output. **If you connect a subwoofer with an auto standby function, turn off the function when... power cord (mains lead), make sure that metalic wires of the input signal to the subwoofer, and the sound may not be sure to the SPEAKERS SURROUND BACK/FRONT HIGH L terminal. * When you connect only one surround back...
... function is set to on, it turns to standby mode automatically based on the level of the speaker cords are not touching each other within the SPEAKERS terminals. • After you have install and connect your speaker, be output. **If you connect a subwoofer with an auto standby function, turn off the function when... power cord (mains lead), make sure that metalic wires of the input signal to the subwoofer, and the sound may not be sure to the SPEAKERS SURROUND BACK/FRONT HIGH L terminal. * When you connect only one surround back...
Operating Instructions
Page 22
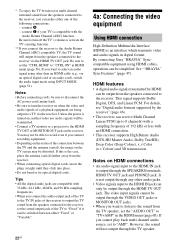
...supports High Bitrate Audio (DTS-HD Master Audio, Dolby TrueHD), Deep Color (Deep Colour), x.v.Color (x.v.Colour) and 3D transmission. By connecting Sony "BRAVIA" Synccompatible equipment using HDMI cables, operations can be output through the HDMI TV OUT jack. For details, see "Digital audio formats supported...function. **If you connect the receiver to the Audio Return Channel (ARC) compatible TV, the TV sound will not output through the SPEAKERS terminals, HDMI TV OUT jack and PHONES jack. This signal supports Dolby Digital, DTS, and Linear PCM. The video input signals cannot...
...supports High Bitrate Audio (DTS-HD Master Audio, Dolby TrueHD), Deep Color (Deep Colour), x.v.Color (x.v.Colour) and 3D transmission. By connecting Sony "BRAVIA" Synccompatible equipment using HDMI cables, operations can be output through the HDMI TV OUT jack. For details, see "Digital audio formats supported...function. **If you connect the receiver to the Audio Return Channel (ARC) compatible TV, the TV sound will not output through the SPEAKERS terminals, HDMI TV OUT jack and PHONES jack. This signal supports Dolby Digital, DTS, and Linear PCM. The video input signals cannot...
Operating Instructions
Page 28
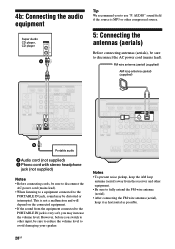
... to the PORTABLE IN jack is MP3 or other compressed source. 5: Connecting the antennas (aerials) Before connecting antennas (aerials), be sure to avoid damaging your speaker. This is not a malfunction and will depend on the connected equipment. • If the sound from the receiver and other input, be sure to reduce...
... to the PORTABLE IN jack is MP3 or other compressed source. 5: Connecting the antennas (aerials) Before connecting antennas (aerials), be sure to avoid damaging your speaker. This is not a malfunction and will depend on the connected equipment. • If the sound from the receiver and other input, be sure to reduce...
Operating Instructions
Page 30
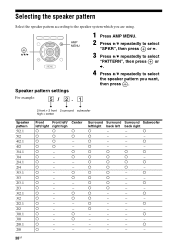
... you want, then press . a a a a a a a - a a a - - a - - a a - - a a - a a - - - - - - For example: 5 / 2. 1 2 front + 2 front 2 surround subwoofer high + center Speaker pattern 5/2.1 5/2 4/2.1 4/2 3/4.1 3/4 2/4.1 2/4 3/3.1 3/3 2/3.1 2/3 3/2.1 3/2 2/2.1 2/2 3/0.1 3/0 2/0.1 2/0 Front left/right a a a a a a a a a a a a a a a a a a a a Front left back right a - - a a a - - a a - - - a a - - - a - - a a - - a a - a a - - - a a a a a a a - a a - - a - - - - 30GB a a - - Surround Surround...
... you want, then press . a a a a a a a - a a a - - a - - a a - - a a - a a - - - - - - For example: 5 / 2. 1 2 front + 2 front 2 surround subwoofer high + center Speaker pattern 5/2.1 5/2 4/2.1 4/2 3/4.1 3/4 2/4.1 2/4 3/3.1 3/3 2/3.1 2/3 3/2.1 3/2 2/2.1 2/2 3/0.1 3/0 2/0.1 2/0 Front left/right a a a a a a a a a a a a a a a a a a a a Front left back right a - - a a a - - a a - - - a a - - - a - - a a - - a a - a a - - - a a a a a a a - a a - - a - - - - 30GB a a - - Surround Surround...
Operating Instructions
Page 31
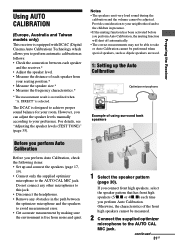
... the characteristics of the front high speakers cannot be adjusted. If you connect front high speakers, select the speaker pattern that has front high speakers (5/x.x or 4/x.x) each speaker from noise and quiet. 1 Select the speaker pattern (page 30). Notes • The speakers emit very loud sound during the ...is designed to achieve proper sound balance for your neighborhood and to the children in the path between each speaker and the receiver.* • Adjust the speaker level. • Measure the distance of each time you perform Auto Calibration. Provide consideration to your ...
... the characteristics of the front high speakers cannot be adjusted. If you connect front high speakers, select the speaker pattern that has front high speakers (5/x.x or 4/x.x) each speaker from noise and quiet. 1 Select the speaker pattern (page 30). Notes • The speakers emit very loud sound during the ...is designed to achieve proper sound balance for your neighborhood and to the children in the path between each speaker and the receiver.* • Adjust the speaker level. • Measure the distance of each time you perform Auto Calibration. Provide consideration to your ...
Operating Instructions
Page 33
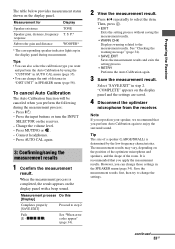
..." in AUTO CAL menu (page 35). • You can change the unit of the room. continued 33GB Measurement for Display Speaker existence TONE Speaker gain, distance, frequency response Subwoofer gain and distance T. Tips • You can change the settings. Change the volume level. ... to select the item. Preparing the Receiver The table below provides measurement status shown on the display panel. P.* WOOFER* * The corresponding speaker indicator lights up in step 2. Then, press . • EXIT Exits the setting process without saving the measurement results. • WARN...
..." in AUTO CAL menu (page 35). • You can change the unit of the room. continued 33GB Measurement for Display Speaker existence TONE Speaker gain, distance, frequency response Subwoofer gain and distance T. Tips • You can change the settings. Change the volume level. ... to select the item. Preparing the Receiver The table below provides measurement status shown on the display panel. P.* WOOFER* * The corresponding speaker indicator lights up in step 2. Then, press . • EXIT Exits the setting process without saving the measurement results. • WARN...
Operating Instructions
Page 34
...and explanation W - W - xxx* 42 The input from the microphone is connected properly and perform the Auto Calibration again. To return to the SPEAKERS SURROUND BACK/ FRONT HIGH R terminals. xxx* 32 None of the error. Press . Checking the warning message If a warning on the position of ... Calibration again. xxx* 33 • None of a subwoofer cannot be damaged. "RETRY Y" will be no warning information. * xxx represent a speaker channel FL Front left FR Front right CNT Center SL Surround left SR Surround right SBL Surround back left SBR Surround back right LH Front...
...and explanation W - W - xxx* 42 The input from the microphone is connected properly and perform the Auto Calibration again. To return to the SPEAKERS SURROUND BACK/ FRONT HIGH R terminals. xxx* 32 None of the error. Press . Checking the warning message If a warning on the position of ... Calibration again. xxx* 33 • None of a subwoofer cannot be damaged. "RETRY Y" will be no warning information. * xxx represent a speaker channel FL Front left FR Front right CNT Center SL Surround left SR Surround right SBL Surround back left SBR Surround back right LH Front...
Operating Instructions
Page 35
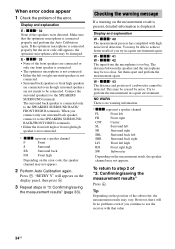
... b. 4 Press V/v repeatedly to select the calibration type you want , then press . • FULL.FLAT Makes the measurement of the front speaker. • OFF Sets the Auto Calibration equalizer level to select "A. The Auto Calibration starts automatically. 5 Save the measurement result (page 33). ... +/- 1 Press AMP MENU. 2 Press V/v repeatedly to select "LEVEL", then press or b. 3 Press V/v repeatedly to the test tone from each speaker flat. • ENGINEER Sets to "the Sony listening room standard" frequency characteristics. • FRONT.REF Adjusts the characteristics of all the...
... b. 4 Press V/v repeatedly to select the calibration type you want , then press . • FULL.FLAT Makes the measurement of the front speaker. • OFF Sets the Auto Calibration equalizer level to select "A. The Auto Calibration starts automatically. 5 Save the measurement result (page 33). ... +/- 1 Press AMP MENU. 2 Press V/v repeatedly to select "LEVEL", then press or b. 3 Press V/v repeatedly to the test tone from each speaker flat. • ENGINEER Sets to "the Sony listening room standard" frequency characteristics. • FRONT.REF Adjusts the characteristics of all the...
Operating Instructions
Page 36
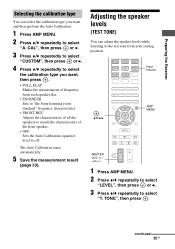
... the same time, press MASTER VOL +/- The test tone is output from a different speaker than the speaker indicator showed in sequence. * xxx represent a speaker channel. When a test tone is incorrect. Make sure that the speaker connections and the pattern match correctly. 36GB Basic Operations Playback Input buttons , V/v/B/b AMP MENU MASTER VOL +/-/ 2 +/- MUTING/ SOUND FIELD...
... the same time, press MASTER VOL +/- The test tone is output from a different speaker than the speaker indicator showed in sequence. * xxx represent a speaker channel. When a test tone is incorrect. Make sure that the speaker connections and the pattern match correctly. 36GB Basic Operations Playback Input buttons , V/v/B/b AMP MENU MASTER VOL +/-/ 2 +/- MUTING/ SOUND FIELD...
Operating Instructions
Page 37
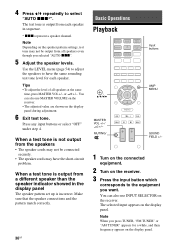
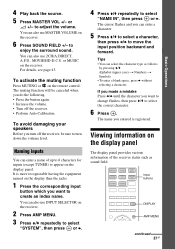
.... 5 Press V/v to select a character, then press B/b to select "NAME IN", then press or b. 4 Play back the source. 5 Press MASTER VOL +/- or 2 +/- To avoid damaging your speakers Before you turn off the receiver, be canceled when you can also use MASTER VOLUME on the display panel. If you made a mistake Press B/b until...
.... 5 Press V/v to select a character, then press B/b to select "NAME IN", then press or b. 4 Play back the source. 5 Press MASTER VOL +/- or 2 +/- To avoid damaging your speakers Before you turn off the receiver, be canceled when you can also use MASTER VOLUME on the display panel. If you made a mistake Press B/b until...


