
Operating Instructions
Page 5
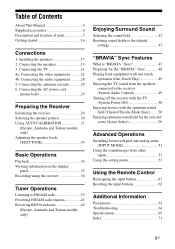
... the antennas (aerials 28 6: Connecting the AC power cord (mains lead 29 Preparing the Receiver Initializing the receiver 29 Selecting the speaker pattern 30 Using AUTO CALIBRATION 31 (Europe, Australia and Taiwan models only) Adjusting the speaker levels (TEST TONE 35 Basic Operations Playback 36 Viewing information on the display panel 37...
... the antennas (aerials 28 6: Connecting the AC power cord (mains lead 29 Preparing the Receiver Initializing the receiver 29 Selecting the speaker pattern 30 Using AUTO CALIBRATION 31 (Europe, Australia and Taiwan models only) Adjusting the speaker levels (TEST TONE 35 Basic Operations Playback 36 Viewing information on the display panel 37...
Operating Instructions
Page 11
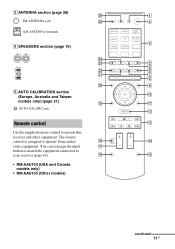
...to match the equipment connected to operate Sony audio/ qk qf video equipment. C ANTENNA section (page 28) wh 1 FM ANTENNA jack wg 2 AM ANTENNA terminals 3 D SPEAKERS section (page 19) wf wd 4 5 ws 6 wa 7 8 w; 9 E AUTO CALIBRATION section 0 (Europe, Australia and Taiwan... models only) (page 31) ql qa AUTO CAL MIC jack qs Remote control qd Use the supplied remote control to operate this receiver and other equipment.
...to match the equipment connected to operate Sony audio/ qk qf video equipment. C ANTENNA section (page 28) wh 1 FM ANTENNA jack wg 2 AM ANTENNA terminals 3 D SPEAKERS section (page 19) wf wd 4 5 ws 6 wa 7 8 w; 9 E AUTO CALIBRATION section 0 (Europe, Australia and Taiwan... models only) (page 31) ql qa AUTO CAL MIC jack qs Remote control qd Use the supplied remote control to operate this receiver and other equipment.
Operating Instructions
Page 13
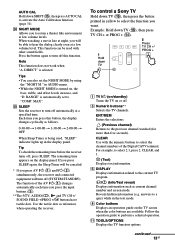
...automatically each time you to retain a theater like environment at night, you will turn off (SYSTEM STANDBY). To control a Sony TV Hold down SHIFT (O), then press AUTO CAL to activate the Auto Calibration function (page 31). ENT/MEM Enters the selections. (Previous channel) Returns to perform a selected operation. CLEAR Use with ...standby) Turns the TV on , the bass, treble, and effect levels increase, and "D. in AUDIO menu. • While the NIGHT MODE is selected. AUTO CAL Hold down TV (P), then press the button printed in yellow to select the function you want.
...automatically each time you to retain a theater like environment at night, you will turn off (SYSTEM STANDBY). To control a Sony TV Hold down SHIFT (O), then press AUTO CAL to activate the Auto Calibration function (page 31). ENT/MEM Enters the selections. (Previous channel) Returns to perform a selected operation. CLEAR Use with ...standby) Turns the TV on , the bass, treble, and effect levels increase, and "D. in AUDIO menu. • While the NIGHT MODE is selected. AUTO CAL Hold down TV (P), then press the button printed in yellow to select the function you want.

Operating Instructions
Page 16
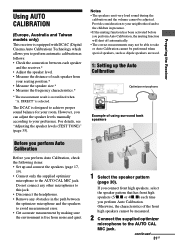
...not output correctly, check the speaker connection and make the settings explained above again. (Other models) Select the speaker pattern (page 30), then perform Auto Calibration (page 31). Preparing the receiver See "6: Connecting the AC power cord (mains lead)" (page 29) and "Initializing the receiver" (page 29...). TONE" in LEVEL menu (page 35). If the sound is set to "Auto", "Dolby Digital" and "DTS" respectively (as of September 2010). See the illustration below . For details, refer to the receiver by following the...
...not output correctly, check the speaker connection and make the settings explained above again. (Other models) Select the speaker pattern (page 30), then perform Auto Calibration (page 31). Preparing the receiver See "6: Connecting the AC power cord (mains lead)" (page 29) and "Initializing the receiver" (page 29...). TONE" in LEVEL menu (page 35). If the sound is set to "Auto", "Dolby Digital" and "DTS" respectively (as of September 2010). See the illustration below . For details, refer to the receiver by following the...
Operating Instructions
Page 31
... and to this jack. • Disconnect the headphones. • Remove any obstacles in presence. • If the muting function has been activated before you perform Auto Calibration. Do not connect any other microphones to the children in the path between each speaker and the receiver.* • Adjust the speaker level. • Measure...
... and to this jack. • Disconnect the headphones. • Remove any obstacles in presence. • If the muting function has been activated before you perform Auto Calibration. Do not connect any other microphones to the children in the path between each speaker and the receiver.* • Adjust the speaker level. • Measure...
Operating Instructions
Page 32
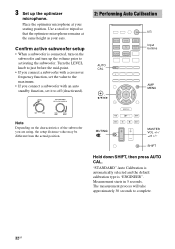
... "ENGINEER". The measurement process will take approximately 30 seconds to off (deactivated). 2: Performing Auto Calibration ?/1 Input buttons AUTO CAL , V/v/B/b AMP MENU Note Depending on the subwoofer and turn up the optimizer microphone. "STANDARD" Auto Calibration is automatically selected and the default calibration type is connected, turn on the characteristics of the subwoofer you are using, the...
... "ENGINEER". The measurement process will take approximately 30 seconds to off (deactivated). 2: Performing Auto Calibration ?/1 Input buttons AUTO CAL , V/v/B/b AMP MENU Note Depending on the subwoofer and turn up the optimizer microphone. "STANDARD" Auto Calibration is automatically selected and the default calibration type is connected, turn on the characteristics of the subwoofer you are using, the...
Operating Instructions
Page 33
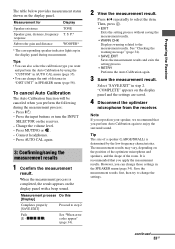
.... - Fails [E - Press V/v repeatedly to the measurement results. Note If you reposition your speaker, we recommend that you perform Auto Calibration again to enjoy the surround sound. It is determined by using the "CUSTOM" in step 2. P.* WOOFER* * The corresponding speaker... measurement results and exits the setting process. • RETRY Performs the Auto Calibration again. 3 Save the measurement result. However, you perform the following during measurement. To cancel Auto Calibration The Auto Calibration function will be canceled when you can change the unit of the room...
.... - Fails [E - Press V/v repeatedly to the measurement results. Note If you reposition your speaker, we recommend that you perform Auto Calibration again to enjoy the surround sound. It is determined by using the "CUSTOM" in step 2. P.* WOOFER* * The corresponding speaker... measurement results and exits the setting process. • RETRY Performs the Auto Calibration again. 3 Save the measurement result. However, you perform the following during measurement. To cancel Auto Calibration The Auto Calibration function will be canceled when you can change the unit of the room...
Operating Instructions
Page 34
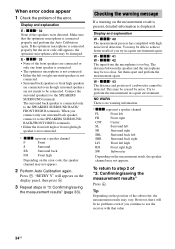
Press . xxx* 41 W - xxx* 42 The input from the microphone is connected properly and perform the Auto Calibration again. W - xxx* 43 The distance and position of the subwoofer, the measurement results may not appears. To return to step 2 of the error. When error... to the SPEAKERS SURROUND BACK/ FRONT HIGH R terminals. Tip Depending on the error code, the speaker channel may be detected. You may not appears. 2 Perform Auto Calibration again. The distance between the speaker and the microphone may be too close. This may be caused by noise. NO WARN There is connected only...
Press . xxx* 41 W - xxx* 42 The input from the microphone is connected properly and perform the Auto Calibration again. W - xxx* 43 The distance and position of the subwoofer, the measurement results may not appears. To return to step 2 of the error. When error... to the SPEAKERS SURROUND BACK/ FRONT HIGH R terminals. Tip Depending on the error code, the speaker channel may be detected. You may not appears. 2 Perform Auto Calibration again. The distance between the speaker and the microphone may be too close. This may be caused by noise. NO WARN There is connected only...
Operating Instructions
Page 35
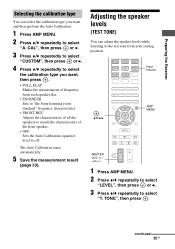
Adjusting the speaker levels (TEST TONE) You can select the calibration type you want and then perform the Auto Calibration. 1 Press AMP MENU. 2 Press V/v repeatedly to select "A. TONE", then press . The Auto Calibration starts automatically. 5 Save the measurement result (page 33). Input buttons , V/v/B/b AMP MENU ...; ENGINEER Sets to "the Sony listening room standard" frequency characteristics. • FRONT.REF Adjusts the characteristics of all the speakers to match the characteristics of the front speaker. • OFF Sets the Auto Calibration equalizer level to off. continued...
Adjusting the speaker levels (TEST TONE) You can select the calibration type you want and then perform the Auto Calibration. 1 Press AMP MENU. 2 Press V/v repeatedly to select "A. TONE", then press . The Auto Calibration starts automatically. 5 Save the measurement result (page 33). Input buttons , V/v/B/b AMP MENU ...; ENGINEER Sets to "the Sony listening room standard" frequency characteristics. • FRONT.REF Adjusts the characteristics of all the speakers to match the characteristics of the front speaker. • OFF Sets the Auto Calibration equalizer level to off. continued...
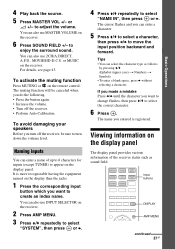
Operating Instructions
Page 37
... the muting function Press MUTING or on the display than the jacks. 1 Press the corresponding input button which you turn off the receiver. • Perform Auto Calibration. Tips • You can also use 2CH/A.DIRECT, A.F.D., MOVIE/HD-D.C.S.
... the muting function Press MUTING or on the display than the jacks. 1 Press the corresponding input button which you turn off the receiver. • Perform Auto Calibration. Tips • You can also use 2CH/A.DIRECT, A.F.D., MOVIE/HD-D.C.S.

Operating Instructions
Page 54
CAL] (page 31) LEVEL [LEVEL] (page 57) SPEAKER [SPKR] (page 57) Parameters [Display] Auto Calibration (Standard) [STANDARD] Auto Calibration (Custom) [CUSTOM] Test toneb) [T. STD, COMP.AUTO, COMP. Overview of the menus The following options are available in the parentheses. OFF For details, see the ...CNT 0 dB SL 0 dB SR 0 dB SB 0 dB SBL 0 dB SBR 0 dB LH 0 dB RH 0 dB SW 0 dB COMP.AUTO 3/4.1 LARGE LARGE 54GB Menu [Display] AUTO CALa) [A. RANGE] Speaker pattern [PATTERN] Front speakers sizeb) [FRT SIZE] Center speaker sizeb) [CNT SIZE] Settings FULL.FLAT, ENGINEER FRONT.REF...
CAL] (page 31) LEVEL [LEVEL] (page 57) SPEAKER [SPKR] (page 57) Parameters [Display] Auto Calibration (Standard) [STANDARD] Auto Calibration (Custom) [CUSTOM] Test toneb) [T. STD, COMP.AUTO, COMP. Overview of the menus The following options are available in the parentheses. OFF For details, see the ...CNT 0 dB SL 0 dB SR 0 dB SB 0 dB SBL 0 dB SBR 0 dB LH 0 dB RH 0 dB SW 0 dB COMP.AUTO 3/4.1 LARGE LARGE 54GB Menu [Display] AUTO CALa) [A. RANGE] Speaker pattern [PATTERN] Front speakers sizeb) [FRT SIZE] Center speaker sizeb) [CNT SIZE] Settings FULL.FLAT, ENGINEER FRONT.REF...

Operating Instructions
Page 56
...] Naming inputs [NAME IN] CTRL ON, CTRL OFF CTRL ON ON, AUTO, OFF OFF AMP, TV+AMP AMP For details, see "Using the sound/ images from other inputs" (page 51). a)Europe, Australia and Taiwan models only. ASSIGN] ..., see "Using the sound/ images from other inputs" (page 51). d)You can only adjust the distance in 0.01 meter interval when you have performed the Auto Calibration and saved the measurement result. c)xxx represent a speaker channel (FL, FR, CNT, SL, SR, SB, SBL, SBR, LH, RH, SW). STBY ON, STBY OFF STBY...
...] Naming inputs [NAME IN] CTRL ON, CTRL OFF CTRL ON ON, AUTO, OFF OFF AMP, TV+AMP AMP For details, see "Using the sound/ images from other inputs" (page 51). a)Europe, Australia and Taiwan models only. ASSIGN] ..., see "Using the sound/ images from other inputs" (page 51). d)You can only adjust the distance in 0.01 meter interval when you have performed the Auto Calibration and saved the measurement result. c)xxx represent a speaker channel (FL, FR, CNT, SL, SR, SB, SBL, SBR, LH, RH, SW). STBY ON, STBY OFF STBY...

Operating Instructions
Page 68
...connected equipment. Tuner-related equipment: up the equipment and TV. The receiver will automatically turn on the connected equipment and TV, you perform Auto Calibration, see "When error codes appear" (page 34) to solve the problem. Refer to the operating instructions supplied with the Control for HDMI ...ON" in the HDMI CEC standard as follows. - AV receiver (audio system): up to 3 equipment - If any problem persists, consult your nearest Sony dealer. Refer to the operating instructions of the connected equipment. • When "CTRL.HDMI" is set to "CTRL OFF", the "BRAVIA" Sync...
...connected equipment. Tuner-related equipment: up the equipment and TV. The receiver will automatically turn on the connected equipment and TV, you perform Auto Calibration, see "When error codes appear" (page 34) to solve the problem. Refer to the operating instructions supplied with the Control for HDMI ...ON" in the HDMI CEC standard as follows. - AV receiver (audio system): up to 3 equipment - If any problem persists, consult your nearest Sony dealer. Refer to the operating instructions of the connected equipment. • When "CTRL.HDMI" is set to "CTRL OFF", the "BRAVIA" Sync...
Operating Instructions
Page 71
mode 43 Analog Direct 43 AUTO CALIBRATION 31 B Blu-ray Disc player connecting 24 C Cable TV tuner connecting 26 Clear memory 29 remote control 62 D Dolby Digital EX 46 DVD player connecting ...24 DVD recorder 27 E Error messages 68 H HD-D.C.S 44 HDMI Signal Pass Through 60 I Initial setup 29 INPUT MODE 51 M Menu AUDIO 59 AUTO CAL 54 EQ 59 HDMI 60 LEVEL 57 SPEAKER 57 SURROUND 58 SYSTEM 60 TUNER 59 VIDEO 59 Movie mode 43 Music mode 44 Muting...
mode 43 Analog Direct 43 AUTO CALIBRATION 31 B Blu-ray Disc player connecting 24 C Cable TV tuner connecting 26 Clear memory 29 remote control 62 D Dolby Digital EX 46 DVD player connecting ...24 DVD recorder 27 E Error messages 68 H HD-D.C.S 44 HDMI Signal Pass Through 60 I Initial setup 29 INPUT MODE 51 M Menu AUDIO 59 AUTO CAL 54 EQ 59 HDMI 60 LEVEL 57 SPEAKER 57 SURROUND 58 SYSTEM 60 TUNER 59 VIDEO 59 Movie mode 43 Music mode 44 Muting...


