
Operating Instructions
Page 1
4-263-361-11(1) Multi Channel AV Receiver Operating Instructions STR-DH520 ©2011 Sony Corporation
4-263-361-11(1) Multi Channel AV Receiver Operating Instructions STR-DH520 ©2011 Sony Corporation
Operating Instructions
Page 2
... operation. Record these instructions. 3) Heed all warnings. 4) Follow all instructions. 5) Do not use attachments/accessories specified by the manufacturer. 2GB Should you call upon your Sony dealer regarding this apparatus near any ventilation openings. The unit is not disconnected from the AC outlet immediately. A grounding type plug has two blades and...
... operation. Record these instructions. 3) Heed all warnings. 4) Follow all instructions. 5) Do not use attachments/accessories specified by the manufacturer. 2GB Should you call upon your Sony dealer regarding this apparatus near any ventilation openings. The unit is not disconnected from the AC outlet immediately. A grounding type plug has two blades and...

Operating Instructions
Page 3
These limits are cautioned that interference will help to radio communications. Also disconnect the AC power cord from the MAINS before disconnecting the speaker cord from the MAINS. 2) Strip 10 to 15 mm of the wire insulation of the speaker cord. 3) Connect the speaker cord to the apparatus and the speakers carefully so as not to touch the core of correctly, you purchased the product. By ensuring this product is encouraged to try to the version of this model manufactured for the environment and human health, which could void your authority to radio or television reception...
These limits are cautioned that interference will help to radio communications. Also disconnect the AC power cord from the MAINS before disconnecting the speaker cord from the MAINS. 2) Strip 10 to 15 mm of the wire insulation of the speaker cord. 3) Connect the speaker cord to the apparatus and the speakers carefully so as not to touch the core of correctly, you purchased the product. By ensuring this product is encouraged to try to the version of this model manufactured for the environment and human health, which could void your authority to radio or television reception...
Operating Instructions
Page 4
.... © DTS, Inc. "x.v.Color (x.v.Colour)" and "x.v.Color (x.v.Colour)" logo are for customers: The following information is Sony Deutschland GmbH, Hedelfinger Strasse 61, 70327 Stuttgart, Germany. On certain batteries this symbol might be used in this manual are ...Sony Corporation, 1-7-1 Konan Minato-ku Tokyo, 108-0075 Japan. Disposal of waste batteries (applicable in the European Union and other U.S. By ensuring these batteries are marked in the manual as those on the packaging indicates that the battery will help to conserve natural resources. Notice for model STR-DH520...
.... © DTS, Inc. "x.v.Color (x.v.Colour)" and "x.v.Color (x.v.Colour)" logo are for customers: The following information is Sony Deutschland GmbH, Hedelfinger Strasse 61, 70327 Stuttgart, Germany. On certain batteries this symbol might be used in this manual are ...Sony Corporation, 1-7-1 Konan Minato-ku Tokyo, 108-0075 Japan. Disposal of waste batteries (applicable in the European Union and other U.S. By ensuring these batteries are marked in the manual as those on the packaging indicates that the battery will help to conserve natural resources. Notice for model STR-DH520...
Operating Instructions
Page 5
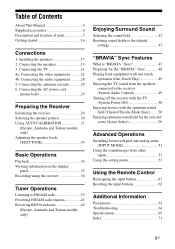
Table of Contents About This Manual 4 Supplied accessories 6 Description and location of parts 7 Getting started 16 Connections 1: Installing the speakers 17 2: Connecting the speakers 19 3: Connecting the TV 21 4a: Connecting the video equipment ...........22 4b: Connecting the audio equipment...........28 5: Connecting the antennas (aerials 28 6: Connecting the AC power cord (mains lead 29 Preparing the Receiver Initializing the receiver 29 Selecting the speaker pattern 30 Using AUTO CALIBRATION 31 (Europe, Australia and Taiwan models only) Adjusting the speaker levels (TEST TONE...
Table of Contents About This Manual 4 Supplied accessories 6 Description and location of parts 7 Getting started 16 Connections 1: Installing the speakers 17 2: Connecting the speakers 19 3: Connecting the TV 21 4a: Connecting the video equipment ...........22 4b: Connecting the audio equipment...........28 5: Connecting the antennas (aerials 28 6: Connecting the AC power cord (mains lead 29 Preparing the Receiver Initializing the receiver 29 Selecting the speaker pattern 30 Using AUTO CALIBRATION 31 (Europe, Australia and Taiwan models only) Adjusting the speaker levels (TEST TONE...
Operating Instructions
Page 6
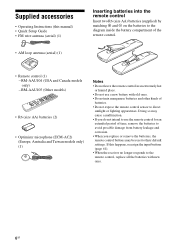
RM-AAU104 (USA and Canada models only) - If this manual) • Quick Setup Guide • FM wire antenna (aerial) (1) • AM loop antenna (aerial) (1) Inserting batteries into the remote control Insert two R6 (size AA) batteries (supplied) by matching 3 and # on the batteries to the diagram inside the battery compartment of the remote control. • Remote control (1) - RM-AAU105 (Other models) • R6 (size AA) batteries (2) • Optimizer microphone (ECM-AC2) (Europe, Australia and Taiwan models only) (1) Notes • Do not leave the remote control in an extremely ...
RM-AAU104 (USA and Canada models only) - If this manual) • Quick Setup Guide • FM wire antenna (aerial) (1) • AM loop antenna (aerial) (1) Inserting batteries into the remote control Insert two R6 (size AA) batteries (supplied) by matching 3 and # on the batteries to the diagram inside the battery compartment of the remote control. • Remote control (1) - RM-AAU105 (Other models) • R6 (size AA) batteries (2) • Optimizer microphone (ECM-AC2) (Europe, Australia and Taiwan models only) (1) Notes • Do not leave the remote control in an extremely ...
Operating Instructions
Page 7
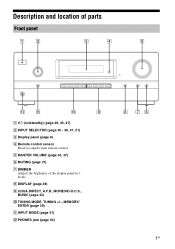
Description and location of the display panel in 3 levels. H DISPLAY (page 38) I 2CH/A.DIRECT, A.F.D., MOVIE/HD-D.C.S., MUSIC (page 43) J TUNING MODE, TUNING +/-, MEMORY/ ENTER (page 39) K INPUT MODE (page 51) L PHONES jack (page 64) 8 76 7GB E MASTER VOLUME (page 36, 37) F MUTING (page 37) G DIMMER Adjusts the brightness of parts Front panel 1 2 3 4 5 qs qa q; 9 A ?/1 (on/standby) (page 29, 40, 47) B INPUT SELECTOR (page 36 - 39, 41, 51) C Display panel (page 8) D Remote control sensor Receives signals from remote control.
Description and location of the display panel in 3 levels. H DISPLAY (page 38) I 2CH/A.DIRECT, A.F.D., MOVIE/HD-D.C.S., MUSIC (page 43) J TUNING MODE, TUNING +/-, MEMORY/ ENTER (page 39) K INPUT MODE (page 51) L PHONES jack (page 64) 8 76 7GB E MASTER VOLUME (page 36, 37) F MUTING (page 37) G DIMMER Adjusts the brightness of parts Front panel 1 2 3 4 5 qs qa q; 9 A ?/1 (on/standby) (page 29, 40, 47) B INPUT SELECTOR (page 36 - 39, 41, 51) C Display panel (page 8) D Remote control sensor Receives signals from remote control.
Operating Instructions
Page 8
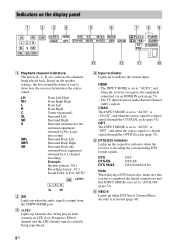
D Input indicator Lights up when DTS Neo:6 Cinema/Music decoder is a digital signal through the COAXIAL jack (page 51). HDMI - COAX The INPUT MODE is set to "AUTO" or "OPT", and when the source signal is activated (page 44). 8GB F NEO:6 Lights up to indicate the current input. LH RH L R C SL SR S SBL SBR SB Front Left High Front Right High Front Left Front Right Center (monaural) Surround Left Surround Right Surround (monaural or the surround equipment obtained by Pro Logic processing) Surround Back Left Surround Back Right Surround Back (the surround back equipment obtained by...
D Input indicator Lights up when DTS Neo:6 Cinema/Music decoder is a digital signal through the COAXIAL jack (page 51). HDMI - COAX The INPUT MODE is set to "AUTO" or "OPT", and when the source signal is activated (page 44). 8GB F NEO:6 Lights up to indicate the current input. LH RH L R C SL SR S SBL SBR SB Front Left High Front Right High Front Left Front Right Center (monaural) Surround Left Surround Right Surround (monaural or the surround equipment obtained by Pro Logic processing) Surround Back Left Surround Back Right Surround Back (the surround back equipment obtained by...
Operating Instructions
Page 9
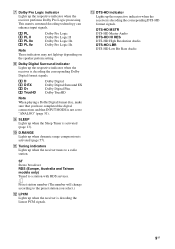
G Dolby Pro Logic indicator Lights up when the Sleep Timer is activated (page 13). This matrix surround decoding technology can enhance input signals. I SLEEP Lights up the respective indicator when the receiver performs Dolby Pro Logic processing. H Dolby Digital Surround indicator Lights up when the receiver is decoding the Linear PCM signals. DTS-HD MSTR DTS-HD Master Audio DTS-HD HI RES DTS-HD High Resolution Audio DTS-HD LBR DTS-HD Low Bit Rate Audio 9GB Preset station number (The number will change according to a radio station. D D EX D+ TrueHD Dolby Digital Dolby...
G Dolby Pro Logic indicator Lights up when the Sleep Timer is activated (page 13). This matrix surround decoding technology can enhance input signals. I SLEEP Lights up the respective indicator when the receiver performs Dolby Pro Logic processing. H Dolby Digital Surround indicator Lights up when the receiver is decoding the Linear PCM signals. DTS-HD MSTR DTS-HD Master Audio DTS-HD HI RES DTS-HD High Resolution Audio DTS-HD LBR DTS-HD Low Bit Rate Audio 9GB Preset station number (The number will change according to a radio station. D D EX D+ TrueHD Dolby Digital Dolby...
Operating Instructions
Page 10
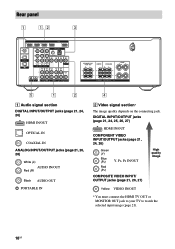
DIGITAL INPUT/OUTPUT jacks (page 21, 24, 25, 26, 27) HDMI IN/OUT COMPONENT VIDEO INPUT/OUTPUT jacks (page 21, 24, 26) Green (Y) Blue (PB) Red (PR) Y, PB, PR IN/OUT COMPOSITE VIDEO INPUT/ OUTPUT jacks (page 21, 26, 27) High quality image Yellow VIDEO IN/OUT * You must connect the HDMI TV OUT or MONITOR OUT jack to your TV to watch the selected input image (page 21). 10GB Rear panel 1 1, 2 3 5 1 2 A Audio signal section DIGITAL INPUT/OUTPUT jacks (page 21, 24, 26) HDMI IN/OUT OPTICAL IN COAXIAL IN ANALOG INPUT/OUTPUT jacks (page 21, 26, 28) White (L) AUDIO IN/OUT Red (R) ...
DIGITAL INPUT/OUTPUT jacks (page 21, 24, 25, 26, 27) HDMI IN/OUT COMPONENT VIDEO INPUT/OUTPUT jacks (page 21, 24, 26) Green (Y) Blue (PB) Red (PR) Y, PB, PR IN/OUT COMPOSITE VIDEO INPUT/ OUTPUT jacks (page 21, 26, 27) High quality image Yellow VIDEO IN/OUT * You must connect the HDMI TV OUT or MONITOR OUT jack to your TV to watch the selected input image (page 21). 10GB Rear panel 1 1, 2 3 5 1 2 A Audio signal section DIGITAL INPUT/OUTPUT jacks (page 21, 24, 26) HDMI IN/OUT OPTICAL IN COAXIAL IN ANALOG INPUT/OUTPUT jacks (page 21, 26, 28) White (L) AUDIO IN/OUT Red (R) ...
Operating Instructions
Page 11
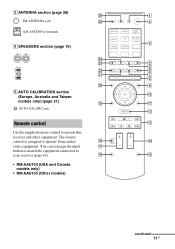
... 0 (Europe, Australia and Taiwan models only) (page 31) ql qa AUTO CAL MIC jack qs Remote control qd Use the supplied remote control to operate Sony audio/ qk qf video equipment. The remote control is assigned to operate this receiver and other equipment. qh qg • RM-AAU104 (USA and Canada...
... 0 (Europe, Australia and Taiwan models only) (page 31) ql qa AUTO CAL MIC jack qs Remote control qd Use the supplied remote control to operate Sony audio/ qk qf video equipment. The remote control is assigned to operate this receiver and other equipment. qh qg • RM-AAU104 (USA and Canada...
Operating Instructions
Page 12
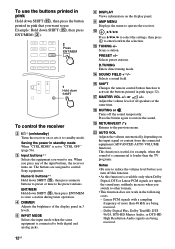
... the receiver on the input signal or content from the connected equipment (ADVANCED AUTO VOLUME function). O SHIFT Changes the remote control button function to control Sony equipment. W AUTO VOL Adjusts the volume automatically depending on or sets it to standby mode.
... the receiver on the input signal or content from the connected equipment (ADVANCED AUTO VOLUME function). O SHIFT Changes the remote control button function to control Sony equipment. W AUTO VOL Adjusts the volume automatically depending on or sets it to standby mode.
Operating Instructions
Page 13
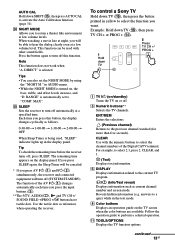
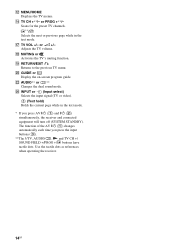
... tactile dots. The remaining time appears on the TV screen when the color buttons are available. The function of the Digital CATV terminal. To control a Sony TV Hold down SHIFT (O), then press AUTO CAL to activate the Auto Calibration function (page 31). answers to select 2.1, press 2, CLEAR, and 1. / (Text) Displays text...
... tactile dots. The remaining time appears on the TV screen when the color buttons are available. The function of the Digital CATV terminal. To control a Sony TV Hold down SHIFT (O), then press AUTO CAL to activate the Auto Calibration function (page 31). answers to select 2.1, press 2, CLEAR, and 1. / (Text) Displays text...
Operating Instructions
Page 14
Selects the next or previous page while in the text mode. * If you press the input buttons (C). **The 5/TV, AUDIO/ , N and TV CH +/ SOUND FIELD +/PROG +/c buttons have tactile dots. Adjusts the TV volume. T GUIDE or Display the on-screen program guide. Scans for the preset TV channels. V AUDIO** or ** Changes the dual sound mode. L MENU/HOME Displays the TV menus. or +/- Z INPUT or (Input select) Selects the input signal (TV or video). (Text hold) Holds the current page while in the text mode. N TV CH +**/- R MUTING or Activates the TV's muting function. Use the ...
Selects the next or previous page while in the text mode. * If you press the input buttons (C). **The 5/TV, AUDIO/ , N and TV CH +/ SOUND FIELD +/PROG +/c buttons have tactile dots. Adjusts the TV volume. T GUIDE or Display the on-screen program guide. Scans for the preset TV channels. V AUDIO** or ** Changes the dual sound mode. L MENU/HOME Displays the TV menus. or +/- Z INPUT or (Input select) Selects the input signal (TV or video). (Text hold) Holds the current page while in the text mode. N TV CH +**/- R MUTING or Activates the TV's muting function. Use the ...
Operating Instructions
Page 15
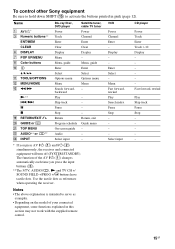
... AV ?/1 (A) changes automatically each time you press AV ?/1 (A) and ?/1 (B) simultaneously, the receiver and connected equipment will turn off (SYSTEM STANDBY). Enter Select - To control other Sony equipment Be sure to hold down SHIFT (O) to serve as references when operating the receiver. Menu, guide Enter V/v/B/b K TOOLS/OPTIONS L MENU/HOME M m/M Select Options menu...
... AV ?/1 (A) changes automatically each time you press AV ?/1 (A) and ?/1 (B) simultaneously, the receiver and connected equipment will turn off (SYSTEM STANDBY). Enter Select - To control other Sony equipment Be sure to hold down SHIFT (O) to serve as references when operating the receiver. Menu, guide Enter V/v/B/b K TOOLS/OPTIONS L MENU/HOME M m/M Select Options menu...

Operating Instructions
Page 16
For a Blu-ray Disc player, check that "Audio (HDMI)", "Dolby Digital (Coaxial/Optical)", and "DTS (Coaxial/Optical)" are set to "Bitstream" (with the connected equipment. Preparing the receiver See "6: Connecting the AC power cord (mains lead)" (page 29) and "Initializing the receiver" (page 29). See the illustration below . We recommend that "BD/DVD Audio Output Format (HDMI)" is not output correctly, check the speaker connection and make the settings explained above again. 16GB Setting the speakers (USA and Canada models only) Select the speaker pattern (page 30), then ...
For a Blu-ray Disc player, check that "Audio (HDMI)", "Dolby Digital (Coaxial/Optical)", and "DTS (Coaxial/Optical)" are set to "Bitstream" (with the connected equipment. Preparing the receiver See "6: Connecting the AC power cord (mains lead)" (page 29) and "Initializing the receiver" (page 29). See the illustration below . We recommend that "BD/DVD Audio Output Format (HDMI)" is not output correctly, check the speaker connection and make the settings explained above again. 16GB Setting the speakers (USA and Canada models only) Select the speaker pattern (page 30), then ...

Operating Instructions
Page 17
continued 17GB Connections Connections 1: Installing the speakers This receiver allows you to use the surround back speakers and the front high speakers simultaneously. Example of speaker system configuration 5.1 channel speaker system To fully enjoy theater-like multi channel surround sound requires five speakers (two front speakers, a center speaker, and two surround speakers) and a subwoofer. 7.1 channel speaker system using surround back speakers You can enjoy high fidelity reproduction of DVD or Blu-ray Disc software recorded sound in Dolby Pro Logic IIz mode (page 44). AFront...
continued 17GB Connections Connections 1: Installing the speakers This receiver allows you to use the surround back speakers and the front high speakers simultaneously. Example of speaker system configuration 5.1 channel speaker system To fully enjoy theater-like multi channel surround sound requires five speakers (two front speakers, a center speaker, and two surround speakers) and a subwoofer. 7.1 channel speaker system using surround back speakers You can enjoy high fidelity reproduction of DVD or Blu-ray Disc software recorded sound in Dolby Pro Logic IIz mode (page 44). AFront...
Operating Instructions
Page 18
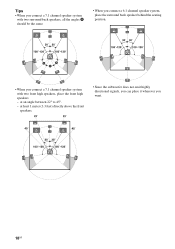
Tips • When you connect a 7.1 channel speaker system with two surround back speakers, all the angles A should be the same. • When you connect a 6.1 channel speaker system, place the surround back speaker behind the seating position. • When you want. 18GB at least 1 meter (3.3 feet) directly above the front speakers. • Since the subwoofer does not emit highly directional signals, you can place it wherever you connect a 7.1 channel speaker system with two front high speakers, place the front high speakers - at an angle between 22° to 45°. -
Tips • When you connect a 7.1 channel speaker system with two surround back speakers, all the angles A should be the same. • When you connect a 6.1 channel speaker system, place the surround back speaker behind the seating position. • When you want. 18GB at least 1 meter (3.3 feet) directly above the front speakers. • Since the subwoofer does not emit highly directional signals, you can place it wherever you connect a 7.1 channel speaker system with two front high speakers, place the front high speakers - at an angle between 22° to 45°. -
Operating Instructions
Page 19
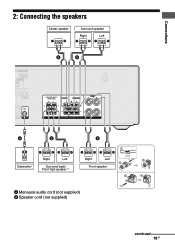
Connections 2: Connecting the speakers Center speaker Surround speaker Right Left B B A B Subwoofer * Right Left Surround back/ Front high speaker** B 1 10 mm (13/32") Right Left 4 2 3 Front speaker 2 4 3 A Monaural audio cord (not supplied) B Speaker cord (not supplied) continued 19GB
Connections 2: Connecting the speakers Center speaker Surround speaker Right Left B B A B Subwoofer * Right Left Surround back/ Front high speaker** B 1 10 mm (13/32") Right Left 4 2 3 Front speaker 2 4 3 A Monaural audio cord (not supplied) B Speaker cord (not supplied) continued 19GB
Operating Instructions
Page 20
If the auto standby function is set to on, it turns to standby mode automatically based on the level of the speaker cords are not touching each other within the SPEAKERS terminals. • After you have install and connect your speaker, be output. **If you connect a subwoofer with an auto standby function, turn off the function when watching movies. * When you connect only one surround back speaker, connect it to the SPEAKERS SURROUND BACK/FRONT HIGH L terminal. Notes • Before connecting the cords, be sure to disconnect the AC power cord (mains lead). • Before connecting the...
If the auto standby function is set to on, it turns to standby mode automatically based on the level of the speaker cords are not touching each other within the SPEAKERS terminals. • After you have install and connect your speaker, be output. **If you connect a subwoofer with an auto standby function, turn off the function when watching movies. * When you connect only one surround back speaker, connect it to the SPEAKERS SURROUND BACK/FRONT HIGH L terminal. Notes • Before connecting the cords, be sure to disconnect the AC power cord (mains lead). • Before connecting the...
