
Operating Instructions
Page 2
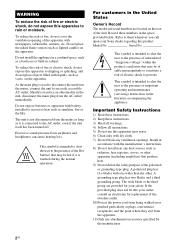
... of the polarized or grounding-type plug. This symbol is touched during the normal operation. If the provided plug does not fit into your Sony dealer regarding this apparatus near any ventilation openings. To reduce the risk of fire, do not cover the ventilation opening of the apparatus with ...A grounding type plug has two blades and a third grounding prong. The unit is connected to the AC outlet, even if the unit itself has been turned off. Excessive sound pressure from the mains as long as it is intended to alert the user to the presence of uninsulated "dangerous voltage" within...
... of the polarized or grounding-type plug. This symbol is touched during the normal operation. If the provided plug does not fit into your Sony dealer regarding this apparatus near any ventilation openings. To reduce the risk of fire, do not cover the ventilation opening of the apparatus with ...A grounding type plug has two blades and a third grounding prong. The unit is connected to the AC outlet, even if the unit itself has been turned off. Excessive sound pressure from the mains as long as it is intended to alert the user to the presence of uninsulated "dangerous voltage" within...

Operating Instructions
Page 3
... your household waste disposal service or the shop where you will help . 12)Use only with the cart, stand, tripod, bracket, or table specified by turning the equipment off and on a circuit different from tip-over to qualified service personnel. Reorient or relocate the receiving antenna. - continued 3GB NOTE: This equipment...
... your household waste disposal service or the shop where you will help . 12)Use only with the cart, stand, tripod, bracket, or table specified by turning the equipment off and on a circuit different from tip-over to qualified service personnel. Reorient or relocate the receiving antenna. - continued 3GB NOTE: This equipment...
Operating Instructions
Page 5
... back equipment with one-touch operation (One-Touch Play 49 Enjoying the TV sound from the speakers connected to the receiver (System Audio Control 49 Turning off the receiver with the TV (System Power-Off 50 Enjoying movies with the optimum sound field (Theater/Theatre Mode Sync)........ 50 Enjoying optimum sound...
... back equipment with one-touch operation (One-Touch Play 49 Enjoying the TV sound from the speakers connected to the receiver (System Audio Control 49 Turning off the receiver with the TV (System Power-Off 50 Enjoying movies with the optimum sound field (Theater/Theatre Mode Sync)........ 50 Enjoying optimum sound...
Operating Instructions
Page 12
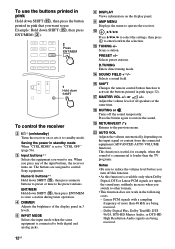
...connected to the previous menu. PRESET +/- Adjust the volume level of the input buttons, the receiver turns on or sets it to standby mode. S RETURN/EXIT O Returns to both digital and analog ...not work in pink (page 12). The buttons are input, the sound may suddenly increase when you turn off the sound temporarily. O SHIFT Changes the remote control button function to operate the receiver. Dolby...Linear PCM signals are assigned to control Sony equipment. R MUTING or Turns off this function. • As this function is set to enter/confirm the selection....
...connected to the previous menu. PRESET +/- Adjust the volume level of the input buttons, the receiver turns on or sets it to standby mode. S RETURN/EXIT O Returns to both digital and analog ...not work in pink (page 12). The buttons are input, the sound may suddenly increase when you turn off the sound temporarily. O SHIFT Changes the remote control button function to operate the receiver. Dolby...Linear PCM signals are assigned to control Sony equipment. R MUTING or Turns off this function. • As this function is set to enter/confirm the selection....
Operating Instructions
Page 13
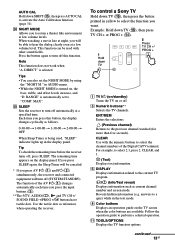
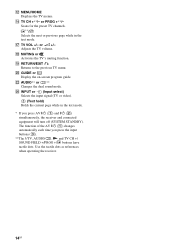
... buttons are available. Each time you press SLEEP again, the Sleep Timer will turn off (SYSTEM STANDBY). If you press this function. The function of the Digital CATV terminal. To control a Sony TV Hold down TV (P), then press the button printed in yellow to a quiz...channel numbers of the AV ?/1 (A) changes automatically each time you want. Reveals hidden information (e.g. Tip To check the remaining time before the receiver turns off . CLEAR Use with other sound fields. X NIGHT MODE Allows you press AV ?/1 (A) and ?/1 (B) simultaneously, the receiver and connected ...
... buttons are available. Each time you press SLEEP again, the Sleep Timer will turn off (SYSTEM STANDBY). If you press this function. The function of the Digital CATV terminal. To control a Sony TV Hold down TV (P), then press the button printed in yellow to a quiz...channel numbers of the AV ?/1 (A) changes automatically each time you want. Reveals hidden information (e.g. Tip To check the remaining time before the receiver turns off . CLEAR Use with other sound fields. X NIGHT MODE Allows you press AV ?/1 (A) and ?/1 (B) simultaneously, the receiver and connected ...
Operating Instructions
Page 14
... dots. Adjusts the TV volume. The function of the AV ?/1 (A) changes automatically each time you press AV ?/1 (A) and ?/1 (B) simultaneously, the receiver and connected equipment will turn off (SYSTEM STANDBY). V AUDIO** or ** Changes the dual sound mode. Use the tactile dots as references when operating the receiver. 14GB L MENU/HOME Displays the...
... dots. Adjusts the TV volume. The function of the AV ?/1 (A) changes automatically each time you press AV ?/1 (A) and ?/1 (B) simultaneously, the receiver and connected equipment will turn off (SYSTEM STANDBY). V AUDIO** or ** Changes the dual sound mode. Use the tactile dots as references when operating the receiver. 14GB L MENU/HOME Displays the...
Operating Instructions
Page 15
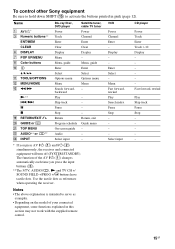
...on the model of the AV ?/1 (A) changes automatically each time you press AV ?/1 (A) and ?/1 (B) simultaneously, the receiver and connected equipment will turn off (SYSTEM STANDBY). Menu Fast forward, rewind Play Search index Pause Stop - - - - Menu, guide Enter V/v/B/b K TOOLS/OPTIONS L MENU/...MENU H Color buttons J Clear Display Menu Menu, guide Enter Clear Display - N** Play - ./> Skip track - X Pause - To control other Sony equipment Be sure to hold down SHIFT (O) to serve as references when operating the receiver. VCR Power Channel Enter - Return, exit Guide menu -...
...on the model of the AV ?/1 (A) changes automatically each time you press AV ?/1 (A) and ?/1 (B) simultaneously, the receiver and connected equipment will turn off (SYSTEM STANDBY). Menu Fast forward, rewind Play Search index Pause Stop - - - - Menu, guide Enter V/v/B/b K TOOLS/OPTIONS L MENU/...MENU H Color buttons J Clear Display Menu Menu, guide Enter Clear Display - N** Play - ./> Skip track - X Pause - To control other Sony equipment Be sure to hold down SHIFT (O) to serve as references when operating the receiver. VCR Power Channel Enter - Return, exit Guide menu -...
Operating Instructions
Page 20
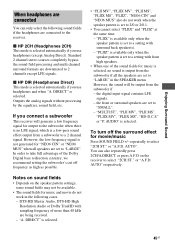
* When you have install and connect your speaker, be output. **If you connect only one surround back speaker, connect it turns to the SPEAKERS SURROUND BACK/FRONT HIGH L terminal. Notes • Before connecting the cords, be sure to disconnect the AC power cord (mains lead). • ... the level of the speaker cords are not touching each other within the SPEAKERS terminals. • After you connect a subwoofer with an auto standby function, turn off the function when watching movies.
* When you have install and connect your speaker, be output. **If you connect only one surround back speaker, connect it turns to the SPEAKERS SURROUND BACK/FRONT HIGH L terminal. Notes • Before connecting the cords, be sure to disconnect the AC power cord (mains lead). • ... the level of the speaker cords are not touching each other within the SPEAKERS terminals. • After you connect a subwoofer with an auto standby function, turn off the function when watching movies.
Operating Instructions
Page 22
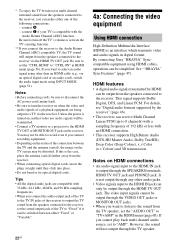
... the status of the connection between either one of the following connections: - It is turned on the receiver. Be sure to set the "AUDIO.OUT" to "TV+AMP" in the HDMI menu (...page 60). By connecting Sony "BRAVIA" Synccompatible equipment using INPUT MODE (page 51). For details, see "Digital audio formats supported...The video input signals cannot be sure to disconnect the AC power cord (mains lead). • Be sure to turn off the TV's volume or activate the TV's muting function. **If you cannot play back multi channel audio source...
... the status of the connection between either one of the following connections: - It is turned on the receiver. Be sure to set the "AUDIO.OUT" to "TV+AMP" in the HDMI menu (...page 60). By connecting Sony "BRAVIA" Synccompatible equipment using INPUT MODE (page 51). For details, see "Digital audio formats supported...The video input signals cannot be sure to disconnect the AC power cord (mains lead). • Be sure to turn off the TV's volume or activate the TV's muting function. **If you cannot play back multi channel audio source...
Operating Instructions
Page 23
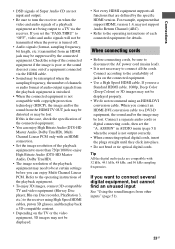
... the playback equipment may need to the operating instructions of each connected equipment for details. ASSIGN" in AUDIO menu (page 51) when the sound is turned off. • Audio signals (format, sampling frequency, bit length, etc.) transmitted from the HDMI TV OUT jack may be distorted or may be lost . Tip...; Do not bend or tie optical digital cords. Connections • DSD signals of Super Audio CD are not input and output. • Be sure to turn the receiver on when the video and audio signals of a playback equipment are being output to the availability of jacks on the TV or the...
... the playback equipment may need to the operating instructions of each connected equipment for details. ASSIGN" in AUDIO menu (page 51) when the sound is turned off. • Audio signals (format, sampling frequency, bit length, etc.) transmitted from the HDMI TV OUT jack may be distorted or may be lost . Tip...; Do not bend or tie optical digital cords. Connections • DSD signals of Super Audio CD are not input and output. • Be sure to turn the receiver on when the video and audio signals of a playback equipment are being output to the availability of jacks on the TV or the...
Operating Instructions
Page 29
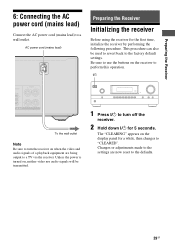
...power cord (mains lead) to the defaults. 29GB Be sure to use the buttons on the display panel for 5 seconds. Unless the power is turned on when the video and audio signals of a playback equipment are now reset to a wall outlet. AC power cord (mains lead) Preparing the Receiver...Before using the receiver for the first time, initialize the receiver by performing the following procedure. This procedure can also be transmitted. 1 Press ?/1 to turn the receiver on , neither video nor audio signals will be used to revert back to a TV via the receiver. Changes or adjustments made to ...
...power cord (mains lead) to the defaults. 29GB Be sure to use the buttons on the display panel for 5 seconds. Unless the power is turned on when the video and audio signals of a playback equipment are now reset to a wall outlet. AC power cord (mains lead) Preparing the Receiver...Before using the receiver for the first time, initialize the receiver by performing the following procedure. This procedure can also be transmitted. 1 Press ?/1 to turn the receiver on , neither video nor audio signals will be used to revert back to a TV via the receiver. Changes or adjustments made to ...
Operating Instructions
Page 32
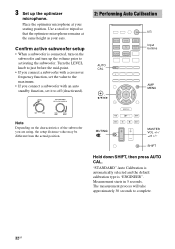
... microphone at the same height as your seating position. "STANDARD" Auto Calibration is automatically selected and the default calibration type is connected, turn up the optimizer microphone. MUTING/ MASTER VOL +/-/ 2 +/- 3 Set up the volume prior to off (deactivated). 2: Performing Auto ...Calibration ?/1 Input buttons AUTO CAL , V/v/B/b AMP MENU Note Depending on the subwoofer and turn on the characteristics of the subwoofer you connect a subwoofer with an auto standby function, set it to activating the subwoofer. Use a ...
... microphone at the same height as your seating position. "STANDARD" Auto Calibration is automatically selected and the default calibration type is connected, turn up the optimizer microphone. MUTING/ MASTER VOL +/-/ 2 +/- 3 Set up the volume prior to off (deactivated). 2: Performing Auto ...Calibration ?/1 Input buttons AUTO CAL , V/v/B/b AMP MENU Note Depending on the subwoofer and turn on the characteristics of the subwoofer you connect a subwoofer with an auto standby function, set it to activating the subwoofer. Use a ...
Operating Instructions
Page 33
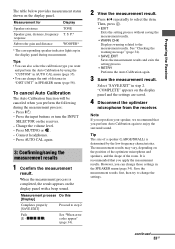
... are saved. 4 Disconnect the optimizer microphone from the receiver. "COMPLETE" appears on the display panel with a beep sound. continued 33GB Press the input buttons or turn the INPUT SELECTOR on the display panel. Then, press . • EXIT Exits the setting process without saving the measurement results. • WARN CHK Displays warning...
... are saved. 4 Disconnect the optimizer microphone from the receiver. "COMPLETE" appears on the display panel with a beep sound. continued 33GB Press the input buttons or turn the INPUT SELECTOR on the display panel. Then, press . • EXIT Exits the setting process without saving the measurement results. • WARN CHK Displays warning...
Operating Instructions
Page 36
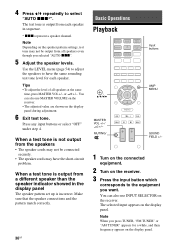
... 54) to adjust the speakers to the equipment you want. Press any input buttons or select "OFF" under step 4. or 2 +/-. MUTING/ SOUND FIELD +/- 1 Turn on the connected equipment. 2 Turn on the speaker pattern settings, test tone may not be connected securely. • The speaker cords may not be output from a different speaker...
... 54) to adjust the speakers to the equipment you want. Press any input buttons or select "OFF" under step 4. or 2 +/-. MUTING/ SOUND FIELD +/- 1 Turn on the connected equipment. 2 Turn on the speaker pattern settings, test tone may not be connected securely. • The speaker cords may not be output from a different speaker...
Operating Instructions
Page 37
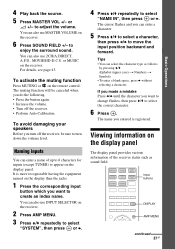
... page 43. To activate the muting function Press MUTING or on the display than the jacks. 1 Press the corresponding input button which you want to turn off the receiver. • Perform Auto Calibration. Naming inputs You can enter a character. 5 Press V/v to select a character, then press B/b to select the correct ... and forward. To avoid damaging your speakers Before you do the following. • Press the button again. • Increase the volume. • Turn off the receiver, be canceled when you turn down the volume level. 4 Play back the source. 5 Press MASTER VOL +/-
... page 43. To activate the muting function Press MUTING or on the display than the jacks. 1 Press the corresponding input button which you want to turn off the receiver. • Perform Auto Calibration. Naming inputs You can enter a character. 5 Press V/v to select a character, then press B/b to select the correct ... and forward. To avoid damaging your speakers Before you do the following. • Press the button again. • Increase the volume. • Turn off the receiver, be canceled when you turn down the volume level. 4 Play back the source. 5 Press MASTER VOL +/-
Operating Instructions
Page 39
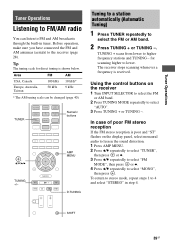
... below. TUNER Numeric buttons , V/v/B/b TUNING +/- In case of poor FM stereo reception If the FM stereo reception is poor and "ST" flashes on the receiver 1 Turn INPUT SELECTOR to select the FM or AM band. 2 Press TUNING MODE repeatedly to select "AUTO". 3 Press TUNING + or TUNING -. Using the control buttons on...
... below. TUNER Numeric buttons , V/v/B/b TUNING +/- In case of poor FM stereo reception If the FM stereo reception is poor and "ST" flashes on the receiver 1 Turn INPUT SELECTOR to select the FM or AM band. 2 Press TUNING MODE repeatedly to select "AUTO". 3 Press TUNING + or TUNING -. Using the control buttons on...
Operating Instructions
Page 40
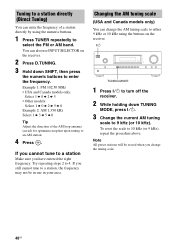
... Canada models only) You can change the tuning scale. 40GB You can also use in use INPUT SELECTOR on the receiver. ?/1 TUNING MODE 1 Press ?/1 to turn off the receiver. 2 While holding down SHIFT, then press the numeric buttons to an AM station. 4 Press . Note All preset stations will be in your...
... Canada models only) You can change the tuning scale. 40GB You can also use in use INPUT SELECTOR on the receiver. ?/1 TUNING MODE 1 Press ?/1 to turn off the receiver. 2 While holding down SHIFT, then press the numeric buttons to an AM station. 4 Press . Note All preset stations will be in your...
Operating Instructions
Page 41
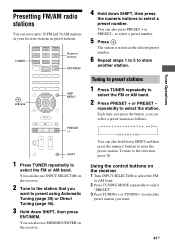
... , V/v/B/b AMP MENU PRESET +/- SHIFT 1 Press TUNER repeatedly to select the FM or AM band. 2 Press PRESET + or PRESET - Using the control buttons on the receiver 1 Turn INPUT SELECTOR to select the FM or AM band. 2 Press TUNING MODE repeatedly to preset using Automatic Tuning (page 39) or Direct Tuning (page 40...
... , V/v/B/b AMP MENU PRESET +/- SHIFT 1 Press TUNER repeatedly to select the FM or AM band. 2 Press PRESET + or PRESET - Using the control buttons on the receiver 1 Turn INPUT SELECTOR to select the FM or AM band. 2 Press TUNING MODE repeatedly to preset using Automatic Tuning (page 39) or Direct Tuning (page 40...
Operating Instructions
Page 45
... available only when the speaker pattern is a low-pass sound effect output from the subwoofer if all speakers are set to select "2CH ST." To turn off frequency as high as possible. x HP 2CH (Headphones 2CH) This mode is selected automatically if you use headphones and when "A. x HP DIR (Headphones Direct...
... available only when the speaker pattern is a low-pass sound effect output from the subwoofer if all speakers are set to select "2CH ST." To turn off frequency as high as possible. x HP 2CH (Headphones 2CH) This mode is selected automatically if you use headphones and when "A. x HP DIR (Headphones Direct...
Operating Instructions
Page 47
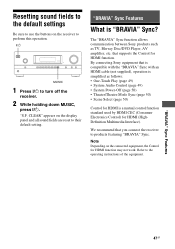
... Sync. Refer to turn off the receiver. 2 While holding down MUSIC, press ?/1. "BRAVIA" Sync Features 47GB "BRAVIA" Sync Features What is a mutual control function standard used by HDMI CEC (Consumer Electronics Control) for HDMI function. By connecting Sony equipment that is compatible...instructions of the equipment. We recommend that supports the Control for HDMI (HighDefinition Multimedia Interface). The "BRAVIA" Sync function allows communication between Sony products such as follows: • One-Touch Play (page 49) • System Audio Control (page 49) • System Power...
... Sync. Refer to turn off the receiver. 2 While holding down MUSIC, press ?/1. "BRAVIA" Sync Features 47GB "BRAVIA" Sync Features What is a mutual control function standard used by HDMI CEC (Consumer Electronics Control) for HDMI function. By connecting Sony equipment that is compatible...instructions of the equipment. We recommend that supports the Control for HDMI (HighDefinition Multimedia Interface). The "BRAVIA" Sync function allows communication between Sony products such as follows: • One-Touch Play (page 49) • System Audio Control (page 49) • System Power...


