
Operating Instructions
Page 1
4-263-361-11(1) Multi Channel AV Receiver Operating Instructions STR-DH520 ©2011 Sony Corporation
4-263-361-11(1) Multi Channel AV Receiver Operating Instructions STR-DH520 ©2011 Sony Corporation

Operating Instructions
Page 3
... help prevent potential negative consequences for long periods of correctly, you purchased the product. Instead it shall be connected to which the receiver is connected. - continued 3GB By ensuring this product. 12)Use only with the cart, stand, tripod, bracket, or table ...spilled or objects have fallen into an outlet on a circuit different from the apparatus and the speakers. Reorient or relocate the receiving antenna. - CAUTION You are designed to provide reasonable protection against harmful interference in accordance with the following FCC statement applies only...
... help prevent potential negative consequences for long periods of correctly, you purchased the product. Instead it shall be connected to which the receiver is connected. - continued 3GB By ensuring this product. 12)Use only with the cart, stand, tripod, bracket, or table ...spilled or objects have fallen into an outlet on a circuit different from the apparatus and the speakers. Reorient or relocate the receiving antenna. - CAUTION You are designed to provide reasonable protection against harmful interference in accordance with the following FCC statement applies only...
Operating Instructions
Page 4
...trademarks of Dolby Laboratories. ** Manufactured under license under license from Dolby Laboratories. "PlayStation" is Sony Corporation, 1-7-1 Konan Minato-ku Tokyo, 108-0075 Japan. The recycling of the materials will...systems) About This Manual • The instructions in this manual are for model STR-DH520. By ensuring these batteries are disposed of Europe model and they have the same ...view the section on how to equipment sold in countries applying EU Directives. On Copyrights This receiver incorporates Dolby* Digital and Pro Logic Surround and the DTS** Digital Surround System. * ...
...trademarks of Dolby Laboratories. ** Manufactured under license under license from Dolby Laboratories. "PlayStation" is Sony Corporation, 1-7-1 Konan Minato-ku Tokyo, 108-0075 Japan. The recycling of the materials will...systems) About This Manual • The instructions in this manual are for model STR-DH520. By ensuring these batteries are disposed of Europe model and they have the same ...view the section on how to equipment sold in countries applying EU Directives. On Copyrights This receiver incorporates Dolby* Digital and Pro Logic Surround and the DTS** Digital Surround System. * ...
Operating Instructions
Page 5
... Connecting the audio equipment...........28 5: Connecting the antennas (aerials 28 6: Connecting the AC power cord (mains lead 29 Preparing the Receiver Initializing the receiver 29 Selecting the speaker pattern 30 Using AUTO CALIBRATION 31 (Europe, Australia and Taiwan models only) Adjusting the speaker levels (TEST TONE... with one-touch operation (One-Touch Play 49 Enjoying the TV sound from the speakers connected to the receiver (System Audio Control 49 Turning off the receiver with the TV (System Power-Off 50 Enjoying movies with the optimum sound field (Theater/Theatre Mode Sync...
... Connecting the audio equipment...........28 5: Connecting the antennas (aerials 28 6: Connecting the AC power cord (mains lead 29 Preparing the Receiver Initializing the receiver 29 Selecting the speaker pattern 30 Using AUTO CALIBRATION 31 (Europe, Australia and Taiwan models only) Adjusting the speaker levels (TEST TONE... with one-touch operation (One-Touch Play 49 Enjoying the TV sound from the speakers connected to the receiver (System Audio Control 49 Turning off the receiver with the TV (System Power-Off 50 Enjoying movies with the optimum sound field (Theater/Theatre Mode Sync...
Operating Instructions
Page 6
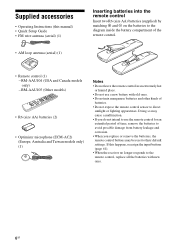
... battery compartment of the remote control. • Remote control (1) - Supplied accessories • Operating Instructions (this happens, reassign the input buttons (page 61). • When the receiver no longer responds to the remote control, replace all the batteries with old ones. • Do not mix manganese batteries and other kinds of batteries...
... battery compartment of the remote control. • Remote control (1) - Supplied accessories • Operating Instructions (this happens, reassign the input buttons (page 61). • When the receiver no longer responds to the remote control, replace all the batteries with old ones. • Do not mix manganese batteries and other kinds of batteries...
Operating Instructions
Page 7
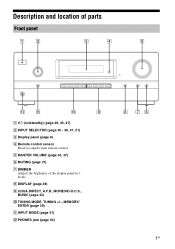
H DISPLAY (page 38) I 2CH/A.DIRECT, A.F.D., MOVIE/HD-D.C.S., MUSIC (page 43) J TUNING MODE, TUNING +/-, MEMORY/ ENTER (page 39) K INPUT MODE (page 51) L PHONES jack (page 64) 8 76 7GB Description and location of the display panel in 3 levels. E MASTER VOLUME (page 36, 37) F MUTING (page 37) G DIMMER Adjusts the brightness of parts Front panel 1 2 3 4 5 qs qa q; 9 A ?/1 (on/standby) (page 29, 40, 47) B INPUT SELECTOR (page 36 - 39, 41, 51) C Display panel (page 8) D Remote control sensor Receives signals from remote control.
H DISPLAY (page 38) I 2CH/A.DIRECT, A.F.D., MOVIE/HD-D.C.S., MUSIC (page 43) J TUNING MODE, TUNING +/-, MEMORY/ ENTER (page 39) K INPUT MODE (page 51) L PHONES jack (page 64) 8 76 7GB Description and location of the display panel in 3 levels. E MASTER VOLUME (page 36, 37) F MUTING (page 37) G DIMMER Adjusts the brightness of parts Front panel 1 2 3 4 5 qs qa q; 9 A ?/1 (on/standby) (page 29, 40, 47) B INPUT SELECTOR (page 36 - 39, 41, 51) C Display panel (page 8) D Remote control sensor Receives signals from remote control.
Operating Instructions
Page 8
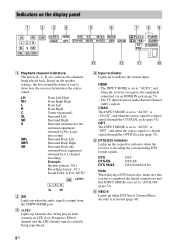
... when the source signal is output from the SUBWOOFER jack. Indicators on the speaker settings, the box around the letter(s) vary to show how the receiver downmixes the source sound. HDMI - The INPUT MODE is decoding the corresponding DTS format signals. LH RH L R C SL SR S SBL SBR SB Front... (page 51). AUTO SW LFE LCR SL SR B SW Lights up the respective indicator when the receiver is set to "ANALOG" (page 51). OPT The INPUT MODE is set to "AUTO", and when the receiver recognizes the equipment connected via an HDMI IN jack (page 51). - F NEO:6 Lights up when...
... when the source signal is output from the SUBWOOFER jack. Indicators on the speaker settings, the box around the letter(s) vary to show how the receiver downmixes the source sound. HDMI - The INPUT MODE is decoding the corresponding DTS format signals. LH RH L R C SL SR S SBL SBR SB Front... (page 51). AUTO SW LFE LCR SL SR B SW Lights up the respective indicator when the receiver is set to "ANALOG" (page 51). OPT The INPUT MODE is set to "AUTO", and when the receiver recognizes the equipment connected via an HDMI IN jack (page 51). - F NEO:6 Lights up when...
Operating Instructions
Page 9
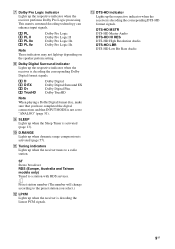
... Bit Rate Audio 9GB This matrix surround decoding technology can enhance input signals. I SLEEP Lights up the respective indicator when the receiver is decoding the corresponding Dolby Digital format signals. M DTS-HD indicator Lights up when the Sleep Timer is decoding the Linear ...Lights up when dynamic range compression is not set to a station with RDS services. J D.RANGE Lights up the respective indicator when the receiver is decoding the corresponding DTS-HD format signals. D D EX D+ TrueHD Dolby Digital Dolby Digital Surround EX Dolby Digital Plus Dolby TrueHD...
... Bit Rate Audio 9GB This matrix surround decoding technology can enhance input signals. I SLEEP Lights up the respective indicator when the receiver is decoding the corresponding Dolby Digital format signals. M DTS-HD indicator Lights up when the Sleep Timer is decoding the Linear ...Lights up when dynamic range compression is not set to a station with RDS services. J D.RANGE Lights up the respective indicator when the receiver is decoding the corresponding DTS-HD format signals. D D EX D+ TrueHD Dolby Digital Dolby Digital Surround EX Dolby Digital Plus Dolby TrueHD...
Operating Instructions
Page 11
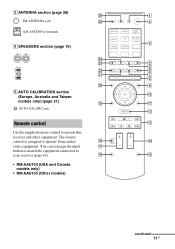
...-AAU105 (Other models) continued 11GB You can reassign the input qj button to match the equipment connected to operate Sony audio/ qk qf video equipment. The remote control is assigned to your receiver (page 61). C ANTENNA section (page 28) wh 1 FM ANTENNA jack wg 2 AM ANTENNA terminals 3 D SPEAKERS section (page 19) wf..., Australia and Taiwan models only) (page 31) ql qa AUTO CAL MIC jack qs Remote control qd Use the supplied remote control to operate this receiver and other equipment.
...-AAU105 (Other models) continued 11GB You can reassign the input qj button to match the equipment connected to operate Sony audio/ qk qf video equipment. The remote control is assigned to your receiver (page 61). C ANTENNA section (page 28) wh 1 FM ANTENNA jack wg 2 AM ANTENNA terminals 3 D SPEAKERS section (page 19) wf..., Australia and Taiwan models only) (page 31) ql qa AUTO CAL MIC jack qs Remote control qd Use the supplied remote control to operate this receiver and other equipment.
Operating Instructions
Page 12
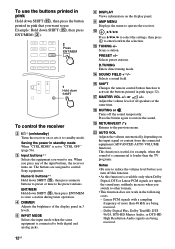
...the display panel. Example: Hold down SHIFT (O), then press ENT/MEM (C). 2 Press ENT/MEM 1 Hold down SHIFT To control the receiver B ?/1* (on/standby) Turns the receiver on . Numeric buttons** Hold down SHIFT (O), then press numeric buttons to preset or tune to the previous menu. M TUNING +/- or...again to both digital and analog jacks. This function is useful, for example, when the sound of a commercial is set to control Sony equipment. When you turn off the sound temporarily. Saving the power in 3 levels. Linear PCM signals with a sampling frequency of the...
...the display panel. Example: Hold down SHIFT (O), then press ENT/MEM (C). 2 Press ENT/MEM 1 Hold down SHIFT To control the receiver B ?/1* (on/standby) Turns the receiver on . Numeric buttons** Hold down SHIFT (O), then press numeric buttons to preset or tune to the previous menu. M TUNING +/- or...again to both digital and analog jacks. This function is useful, for example, when the sound of a commercial is set to control Sony equipment. When you turn off the sound temporarily. Saving the power in 3 levels. Linear PCM signals with a sampling frequency of the...
Operating Instructions
Page 13
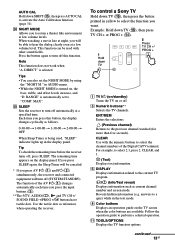
...FIELD +/PROG +/c buttons have tactile dots. MAX". If you press SLEEP again, the Sleep Timer will turn off (SYSTEM STANDBY). To control a Sony TV Hold down TV (P), then press the button printed in AUDIO menu. • While the NIGHT MODE is being used with the numeric buttons ...to activate the Auto Calibration function (page 31). X NIGHT MODE Allows you want. Note This function does not work when "A. Y SLEEP Sets the receiver to retain a theater like environment at a low volume level. The remaining time appears on the TV screen when the color buttons are available. H Color...
...FIELD +/PROG +/c buttons have tactile dots. MAX". If you press SLEEP again, the Sleep Timer will turn off (SYSTEM STANDBY). To control a Sony TV Hold down TV (P), then press the button printed in AUDIO menu. • While the NIGHT MODE is being used with the numeric buttons ...to activate the Auto Calibration function (page 31). X NIGHT MODE Allows you want. Note This function does not work when "A. Y SLEEP Sets the receiver to retain a theater like environment at a low volume level. The remaining time appears on the TV screen when the color buttons are available. H Color...
Operating Instructions
Page 14
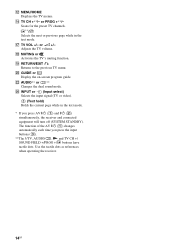
.... or +/- The function of the AV ?/1 (A) changes automatically each time you press AV ?/1 (A) and ?/1 (B) simultaneously, the receiver and connected equipment will turn off (SYSTEM STANDBY). Use the tactile dots as references when operating the receiver. 14GB Scans for the preset TV channels. S RETURN/EXIT O Returns to the previous TV menu. V AUDIO** or...
.... or +/- The function of the AV ?/1 (A) changes automatically each time you press AV ?/1 (A) and ?/1 (B) simultaneously, the receiver and connected equipment will turn off (SYSTEM STANDBY). Use the tactile dots as references when operating the receiver. 14GB Scans for the preset TV channels. S RETURN/EXIT O Returns to the previous TV menu. V AUDIO** or...
Operating Instructions
Page 15
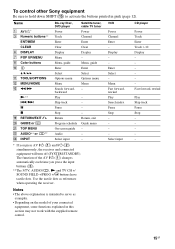
To control other Sony equipment Be sure to hold down SHIFT (O) to serve as references when operating the receiver. Enter Select - Menu Fast forward, rewind Play Search index Pause Stop - - - - X Pause - x S RETURN/EXIT O T GUIDE or U TOP MENU V AUDIO** or... dots as examples. • Depending on the model of the AV ?/1 (A) changes automatically each time you press AV ?/1 (A) and ?/1 (B) simultaneously, the receiver and connected equipment will turn off (SYSTEM STANDBY). Select input CD player Power Track Enter Track > 10 Display Fast forward, rewind Play Skip track Pause...
To control other Sony equipment Be sure to hold down SHIFT (O) to serve as references when operating the receiver. Enter Select - Menu Fast forward, rewind Play Search index Pause Stop - - - - X Pause - x S RETURN/EXIT O T GUIDE or U TOP MENU V AUDIO** or... dots as examples. • Depending on the model of the AV ?/1 (A) changes automatically each time you press AV ?/1 (A) and ?/1 (B) simultaneously, the receiver and connected equipment will turn off (SYSTEM STANDBY). Select input CD player Power Track Enter Track > 10 Display Fast forward, rewind Play Skip track Pause...

Operating Instructions
Page 16
... . TONE" in LEVEL menu (page 35). We recommend that you connect your equipment. Preparing the receiver See "6: Connecting the AC power cord (mains lead)" (page 29) and "Initializing the receiver" (page 29). Setting the speakers (USA and Canada models only) Select the speaker pattern (page ...30), then check the speaker connection using "T. You can enjoy your audio/video equipment connected to the receiver by following the simple steps below . TONE" in LEVEL menu (page 35). Getting started You can check the speaker connection using "T....
... . TONE" in LEVEL menu (page 35). We recommend that you connect your equipment. Preparing the receiver See "6: Connecting the AC power cord (mains lead)" (page 29) and "Initializing the receiver" (page 29). Setting the speakers (USA and Canada models only) Select the speaker pattern (page ...30), then check the speaker connection using "T. You can enjoy your audio/video equipment connected to the receiver by following the simple steps below . TONE" in LEVEL menu (page 35). Getting started You can check the speaker connection using "T....

Operating Instructions
Page 17
... (7.1 channel). 7.1 channel speaker system using surround back speakers You can enjoy vertical sound effects by connecting additional one subwoofer). Connections Connections 1: Installing the speakers This receiver allows you to use the surround back speakers and the front high speakers simultaneously. Example of speaker system configuration 5.1 channel speaker system To fully enjoy...
... (7.1 channel). 7.1 channel speaker system using surround back speakers You can enjoy vertical sound effects by connecting additional one subwoofer). Connections Connections 1: Installing the speakers This receiver allows you to use the surround back speakers and the front high speakers simultaneously. Example of speaker system configuration 5.1 channel speaker system To fully enjoy...
Operating Instructions
Page 22
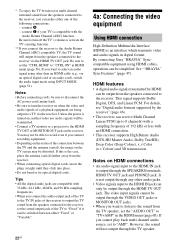
... sure to the receiver, you connect recording equipment. • Depending on the status of the connection between either one of 192 kHz or less with the Audio Return Channel (ARC) function. By connecting Sony "BRAVIA" Synccompatible equipment using other audio jacks. &#...(page 56). Notes • Before connecting cords, be distorted. HDMI features • A digital audio signals transmitted by the receiver" (page 46). • The receiver can be simplified. Be sure to set to 8 channels) with a sampling frequency of the following connections: - For details,...
... sure to the receiver, you connect recording equipment. • Depending on the status of the connection between either one of 192 kHz or less with the Audio Return Channel (ARC) function. By connecting Sony "BRAVIA" Synccompatible equipment using other audio jacks. &#...(page 56). Notes • Before connecting cords, be distorted. HDMI features • A digital audio signals transmitted by the receiver" (page 46). • The receiver can be simplified. Be sure to set to 8 channels) with a sampling frequency of the following connections: - For details,...
Operating Instructions
Page 23
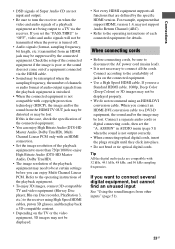
...PCM. When you connect an HDMI-DVI conversion cable to be at certain settings before you want to the receiver using an HDMI-DVI conversion cable. Tip All the digital audio jacks are compatible with copyright protection technology (... poor or the sound does not come out of a equipment connected via the receiver. Connections • DSD signals of Super Audio CD are not input and output. • Be sure to turn... the receiver on when the video and audio signals of a playback equipment are being output to "OFF",...
...PCM. When you connect an HDMI-DVI conversion cable to be at certain settings before you want to the receiver using an HDMI-DVI conversion cable. Tip All the digital audio jacks are compatible with copyright protection technology (... poor or the sound does not come out of a equipment connected via the receiver. Connections • DSD signals of Super Audio CD are not input and output. • Be sure to turn... the receiver on when the video and audio signals of a playback equipment are being output to "OFF",...
Operating Instructions
Page 24
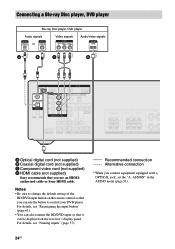
... cord (not supplied) B Coaxial digital cord (not supplied) C Component video cord (not supplied) D HDMI cable (not supplied) Sony recommends that it can use an HDMIauthorized cable or Sony HDMI cable. Notes • Be sure to control your DVD player. Recommended connection Alternative connection * When you use the button to... change the default setting of the BD/DVD input button on the remote control so that you can be displayed on the receiver...
... cord (not supplied) B Coaxial digital cord (not supplied) C Component video cord (not supplied) D HDMI cable (not supplied) Sony recommends that it can use an HDMIauthorized cable or Sony HDMI cable. Notes • Be sure to control your DVD player. Recommended connection Alternative connection * When you use the button to... change the default setting of the BD/DVD input button on the remote control so that you can be displayed on the receiver...
Operating Instructions
Page 28
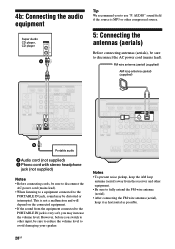
... IN jack, sound may increase the volume level. This is not a malfunction and will depend on the connected equipment. • If the sound from the receiver and other compressed source. 5: Connecting the antennas (aerials) Before connecting antennas (aerials), be distorted or interrupted. However, before you to disconnect the AC power cord...
... IN jack, sound may increase the volume level. This is not a malfunction and will depend on the connected equipment. • If the sound from the receiver and other compressed source. 5: Connecting the antennas (aerials) Before connecting antennas (aerials), be distorted or interrupted. However, before you to disconnect the AC power cord...
Operating Instructions
Page 29
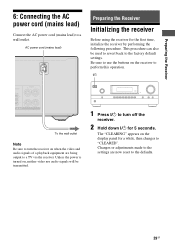
... perform this operation. ?/1 To the wall outlet Note Be sure to turn off the receiver. 2 Hold down ?/1 for 5 seconds. The "CLEARING" appears on when the video and audio signals of a playback equipment are now reset to the factory default...to revert back to the defaults. 29GB AC power cord (mains lead) Preparing the Receiver Initializing the receiver Before using the receiver for a while, then changes to turn the receiver on the display panel for the first time, initialize the receiver by performing the following procedure. This procedure can also be transmitted. 1 Press ?/1 to...
... perform this operation. ?/1 To the wall outlet Note Be sure to turn off the receiver. 2 Hold down ?/1 for 5 seconds. The "CLEARING" appears on when the video and audio signals of a playback equipment are now reset to the factory default...to revert back to the defaults. 29GB AC power cord (mains lead) Preparing the Receiver Initializing the receiver Before using the receiver for a while, then changes to turn the receiver on the display panel for the first time, initialize the receiver by performing the following procedure. This procedure can also be transmitted. 1 Press ?/1 to...


