
Operating Guide
Page 3
... radio/TV technician for a digital device pursuant to correct the interference by turning the equipment off and on, the user is connected. - The supplied interface cable must be determined by one or more of FCC Rules. Owner's Record The model and serial numbers are cautioned that may call your authority to Part 15 of the FCC Rules. Record the serial number in the space provided...
... radio/TV technician for a digital device pursuant to correct the interference by turning the equipment off and on, the user is connected. - The supplied interface cable must be determined by one or more of FCC Rules. Owner's Record The model and serial numbers are cautioned that may call your authority to Part 15 of the FCC Rules. Record the serial number in the space provided...
Operating Guide
Page 6
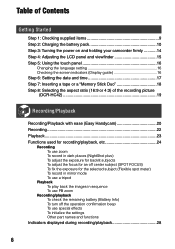
... 16 Changing the language setting 16 Checking the screen indicators (Display guide 16 Step 6: Setting the date and time 17 Step 7: Inserting a tape or a "Memory Stick Duo 18 Step 8: Selecting the aspect ratio (16:9 or 4:3) of the recording picture (DCR-HC42 19 Recording/Playback Recording/Playback with ease (Easy Handycam 20 Recording 22 Playback 23 Functions used for recording/playback, etc 24 Recording To use zoom To record in dark places (NightShot plus) To adjust the exposure for backlit subjects To adjust the focus...
... 16 Changing the language setting 16 Checking the screen indicators (Display guide 16 Step 6: Setting the date and time 17 Step 7: Inserting a tape or a "Memory Stick Duo 18 Step 8: Selecting the aspect ratio (16:9 or 4:3) of the recording picture (DCR-HC42 19 Recording/Playback Recording/Playback with ease (Easy Handycam 20 Recording 22 Playback 23 Functions used for recording/playback, etc 24 Recording To use zoom To record in dark places (NightShot plus) To adjust the exposure for backlit subjects To adjust the focus...
Operating Guide
Page 25
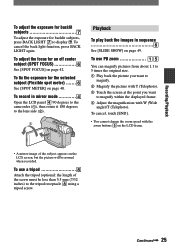
... normal when recorded. Recording/Playback To adjust the exposure for backlit subjects To adjust the exposure for backlit subjects, press BACK LIGHT to the lens side (). 2 1 Playback To play back the images in mirror mode Open the LCD panel 90 degrees to the camcorder (), then rotate it 180 degrees to display . To cancel, touch [END]. • You cannot change the zoom speed with...
... normal when recorded. Recording/Playback To adjust the exposure for backlit subjects To adjust the exposure for backlit subjects, press BACK LIGHT to the lens side (). 2 1 Playback To play back the images in mirror mode Open the LCD panel 90 degrees to the camcorder (), then rotate it 180 degrees to display . To cancel, touch [END]. • You cannot change the zoom speed with...
Operating Guide
Page 28
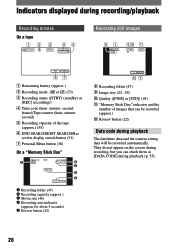
.../Rec review display switch button (31) Personal Menu button (36) On a "Memory Stick Duo" A B C D E Recording folder (47) Recording capacity (approx.) Movie size (46) Recording start indicator (appears for about 5 seconds) Review button (22) P-MENU qs 7 Recording folder (47) Image size (22 , 45) Quality ([FINE] or [STD]) (45) "Memory Stick Duo" indicator and the number of images that can check them as [DATA CODE] during playback The date/time data and the camera setting data...
.../Rec review display switch button (31) Personal Menu button (36) On a "Memory Stick Duo" A B C D E Recording folder (47) Recording capacity (approx.) Movie size (46) Recording start indicator (appears for about 5 seconds) Review button (22) P-MENU qs 7 Recording folder (47) Image size (22 , 45) Quality ([FINE] or [STD]) (45) "Memory Stick Duo" indicator and the number of images that can check them as [DATA CODE] during playback The date/time data and the camera setting data...
Operating Guide
Page 43
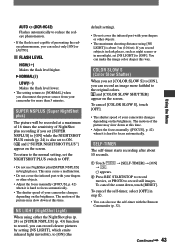
... LIGHT (NightShot Light) When using [NS LIGHT] is about 10 seconds. Touch . [SELF-TIMER] [ON] appears. Press REC START/STOP to record movies, or PHOTO to record still images. and [COLOR SLOW SHUTTER] appear on the screen. Continued 43 Using the Menu This may cause a malfunction. • Do not cover the infrared port with your camcorder for more faithful to focus automatically. AUTO (DCR-HC42) Flashes...
... LIGHT (NightShot Light) When using [NS LIGHT] is about 10 seconds. Touch . [SELF-TIMER] [ON] appears. Press REC START/STOP to record movies, or PHOTO to record still images. and [COLOR SLOW SHUTTER] appear on the screen. Continued 43 Using the Menu This may cause a malfunction. • Do not cover the infrared port with your camcorder for more faithful to focus automatically. AUTO (DCR-HC42) Flashes...
Operating Guide
Page 50
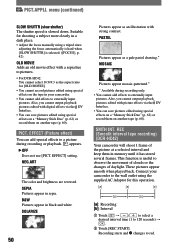
...) or record them in memory until it has stored several frames. Also, you cannot output playback pictures edited with digital effects via the DV Interface. • You can add special effects to a picture during recording only. • You cannot add effects to externally input pictures. REC (Smooth interval tape recording) (DCR-HC42) Your camcorder will shoot 1 frame of daylight. menu (continued) SLOW SHUTTR (slow shutter) The shutter speed is selected. ([FOCUS], p. 42) OLD MOVIE Adds...
...) or record them in memory until it has stored several frames. Also, you cannot output playback pictures edited with digital effects via the DV Interface. • You can add special effects to a picture during recording only. • You cannot add effects to externally input pictures. REC (Smooth interval tape recording) (DCR-HC42) Your camcorder will shoot 1 frame of daylight. menu (continued) SLOW SHUTTR (slow shutter) The shutter speed is selected. ([FOCUS], p. 42) OLD MOVIE Adds...
Operating Guide
Page 53
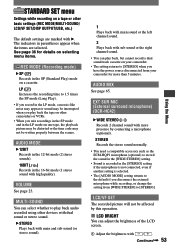
... (Standard Play) mode on a cassette. AUDIO MIX See page 65. STANDARD SET menu Settings while recording on a tape or other basic settings (REC MODE/MULTI-SOUND/ LCD/VF SET/DISP OUTPUT/USB, etc.) The default settings are selected. See page 36 for more presence by this operation. LCD BRIGHT You can adjust the brightness of the LCD screen. Adjust the brightness with high quality). STEREO Records the stereo sound normally. • You need a compatible accessory such...
... (Standard Play) mode on a cassette. AUDIO MIX See page 65. STANDARD SET menu Settings while recording on a tape or other basic settings (REC MODE/MULTI-SOUND/ LCD/VF SET/DISP OUTPUT/USB, etc.) The default settings are selected. See page 36 for more presence by this operation. LCD BRIGHT You can adjust the brightness of the LCD screen. Adjust the brightness with high quality). STEREO Records the stereo sound normally. • You need a compatible accessory such...
Operating Guide
Page 55
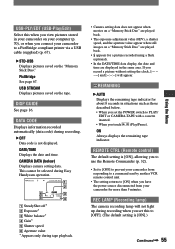
USB STREAM Displays pictures saved on a "Memory Stick Duo" are played back. • appears for a picture recorded using a flash (optional). • In the DATE/TIME data display, the date and time are played back. • The exposure adjustment value (0EV), a shutter speed, and the aperture value appear when still images on the tape. CAMERA DATA (below . • When you set this when you view pictures stored in your camcorder on your computer (p. 70), or when you connect your camcorder for...
USB STREAM Displays pictures saved on a "Memory Stick Duo" are played back. • appears for a picture recorded using a flash (optional). • In the DATE/TIME data display, the date and time are played back. • The exposure adjustment value (0EV), a shutter speed, and the aperture value appear when still images on the tape. CAMERA DATA (below . • When you set this when you view pictures stored in your camcorder on your computer (p. 70), or when you connect your camcorder for...
Operating Guide
Page 60
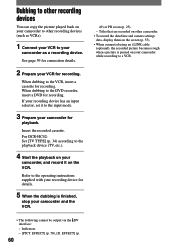
Dubbing to other recording devices You can copy the picture played back on your camcorder to other camcorder. • To record the date/time and camera settings data, display them on the screen (p. 55). • When connected using an i.LINK cable (optional), the recorded picture becomes rough when a picture is finished, stop your camcorder for connection details. 2 Prepare your camcorder while recording to a VCR. • The following cannot be output via the DV interface: - For DCR-HC42: Set [TV TYPE] (p. 34...
Dubbing to other recording devices You can copy the picture played back on your camcorder to other camcorder. • To record the date/time and camera settings data, display them on the screen (p. 55). • When connected using an i.LINK cable (optional), the recorded picture becomes rough when a picture is finished, stop your camcorder for connection details. 2 Prepare your camcorder while recording to a VCR. • The following cannot be output via the DV interface: - For DCR-HC42: Set [TV TYPE] (p. 34...
Operating Guide
Page 76
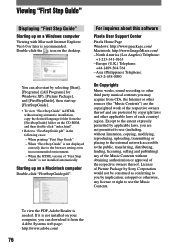
... Windows XP), [Picture Package], and [FirstStepGuide], then start up [FirstStepGuide]. • To view "First Step Guide" in HTML without limitation, copying, modifying, reproducing, uploading, transmitting or placing to the external network accessible to the public, transferring, distributing, lending, licensing, selling and publishing) any license or right to use (including, without using automatic installation, copy the desired language folder from the [FirstStepGuide] folder on a Windows computer Viewing...
... Windows XP), [Picture Package], and [FirstStepGuide], then start up [FirstStepGuide]. • To view "First Step Guide" in HTML without limitation, copying, modifying, reproducing, uploading, transmitting or placing to the external network accessible to the public, transferring, distributing, lending, licensing, selling and publishing) any license or right to use (including, without using automatic installation, copy the desired language folder from the [FirstStepGuide] folder on a Windows computer Viewing...
Operating Guide
Page 80
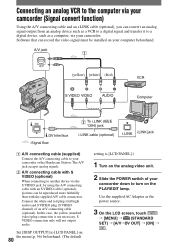
Use the supplied AC Adaptor as a VCR to a digital signal and transfer it to your camcorder or the Handycam Station. Connect the white and red plugs (left/right audio) and S VIDEO plug (S VIDEO channel) of your camcorder down to turn on the PLAY/EDIT lamp. S VIDEO connection only will not output audio. Software that can record the video signal must be reproduced more faithfully than with the supplied A/V cable connection. Set [DISP OUTPUT] to [LCD PANEL] on the menu (p. 56) beforehand...
Use the supplied AC Adaptor as a VCR to a digital signal and transfer it to your camcorder or the Handycam Station. Connect the white and red plugs (left/right audio) and S VIDEO plug (S VIDEO channel) of your camcorder down to turn on the PLAY/EDIT lamp. S VIDEO connection only will not output audio. Software that can record the video signal must be reproduced more faithfully than with the supplied A/V cable connection. Set [DISP OUTPUT] to [LCD PANEL] on the menu (p. 56) beforehand...
Operating Guide
Page 82
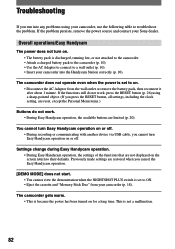
... from your camcorder (p. 18). If the problem persists, remove the power source and contact your camcorder, use the following table to on or off . • During recording or communicating with another device via USB cable, you cancel the Easy Handycam operation. [DEMO MODE] does not start. • You cannot view the demonstration when the NIGHTSHOT PLUS switch is because the power has been turned on . • The battery pack...
... from your camcorder (p. 18). If the problem persists, remove the power source and contact your camcorder, use the following table to on or off . • During recording or communicating with another device via USB cable, you cancel the Easy Handycam operation. [DEMO MODE] does not start. • You cannot view the demonstration when the NIGHTSHOT PLUS switch is because the power has been turned on . • The battery pack...

Operating Guide
Page 90
...; Adjust [AUDIO MIX] from the [ST2] (additional sound) side until the sound is a blank section in a TV color system other than 2 minutes, your camcorder (NTSC). "---" is displayed on the screen. • The tape you are playing was recorded in the beginning or middle of the A/V connecting cable are not clear or do not appear. • Clean the head using the cleaning cassette (optional) (p. 112). This is not compatible with 4ch microphone recording...
...; Adjust [AUDIO MIX] from the [ST2] (additional sound) side until the sound is a blank section in a TV color system other than 2 minutes, your camcorder (NTSC). "---" is displayed on the screen. • The tape you are playing was recorded in the beginning or middle of the A/V connecting cable are not clear or do not appear. • Clean the head using the cleaning cassette (optional) (p. 112). This is not compatible with 4ch microphone recording...
Operating Guide
Page 95
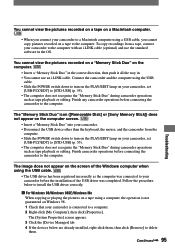
... "Memory Stick Duo" icon ([Removable Disk] or [Sony Memory Stick]) does not appear on the computer screen. • Insert a "Memory Stick Duo" into your camcorder. • Disconnect the USB device other than the keyboard, the mouse, and the camcorder from a tape, connect your camcorder before the installation of the USB driver was completed. The image does not appear on the screen of the Windows computer when using the USB cable. • Slide the POWER switch down to turn on...
... "Memory Stick Duo" icon ([Removable Disk] or [Sony Memory Stick]) does not appear on the computer screen. • Insert a "Memory Stick Duo" into your camcorder. • Disconnect the USB device other than the keyboard, the mouse, and the camcorder from a tape, connect your camcorder before the installation of the USB driver was completed. The image does not appear on the screen of the Windows computer when using the USB cable. • Slide the POWER switch down to turn on...
Operating Guide
Page 96
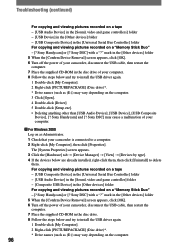
... viewing pictures recorded on a tape - [USB Composite Device] in the [Universal Serial Bus Controller] folder - [USB Audio Device] in the [Sound, video and game controller] folder - [Composite USB Device] in the [Other devices] folder For copying and viewing pictures recorded on a "Memory Stick Duo" - [? Sony Handycam] or [? The [System Properties] screen appears. 3 Click the [Hardware] tab [Device Manager] [View] [Devices by type]. 4 If the devices below and try to install the USB driver again. 1 Double-click [My Computer]. 2 Right-click [PICTUREPACKAGE] (Disc...
... viewing pictures recorded on a tape - [USB Composite Device] in the [Universal Serial Bus Controller] folder - [USB Audio Device] in the [Sound, video and game controller] folder - [Composite USB Device] in the [Other devices] folder For copying and viewing pictures recorded on a "Memory Stick Duo" - [? Sony Handycam] or [? The [System Properties] screen appears. 3 Click the [Hardware] tab [Device Manager] [View] [Devices by type]. 4 If the devices below and try to install the USB driver again. 1 Double-click [My Computer]. 2 Right-click [PICTUREPACKAGE] (Disc...
Operating Guide
Page 97
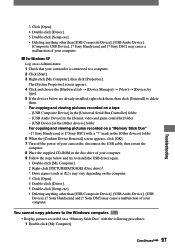
... Serial Bus Controller] folder - [USB Audio Device] in the [Sound, video and game controller] folder - [USB Device] in the disc drive of your computer. You cannot copy pictures to delete them. Sony Handycam] or [? Sony Handycam] and [? Continued 97 Sony DSC] may vary depending on as Administrator. 1 Check that your computer. 9 Follow the steps below are already installed, right-click them, then click [Uninstall] to the Windows computer. • Display pictures recorded on a "Memory Stick Duo" - [? Troubleshooting 3 Click [Open...
... Serial Bus Controller] folder - [USB Audio Device] in the [Sound, video and game controller] folder - [USB Device] in the disc drive of your computer. You cannot copy pictures to delete them. Sony Handycam] or [? Sony Handycam] and [? Continued 97 Sony DSC] may vary depending on as Administrator. 1 Check that your computer. 9 Follow the steps below are already installed, right-click them, then click [Uninstall] to the Windows computer. • Display pictures recorded on a "Memory Stick Duo" - [? Troubleshooting 3 Click [Open...
Operating Guide
Page 106
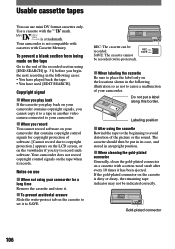
...-plated connector Generally, clean the gold-plated connector on a cassette with a cotton-wool swab after every 10 times it to a tape in another video camera connected to your camcorder. When you record You cannot record software on your camcorder that contains copyright control signals for copyright protection of software. [Cannot record due to copyright protection.] appears on the LCD screen, or on the viewfinder if...
...-plated connector Generally, clean the gold-plated connector on a cassette with a cotton-wool swab after every 10 times it to a tape in another video camera connected to your camcorder. When you record You cannot record software on your camcorder that contains copyright control signals for copyright protection of software. [Cannot record due to copyright protection.] appears on the LCD screen, or on the viewfinder if...
Operating Guide
Page 107
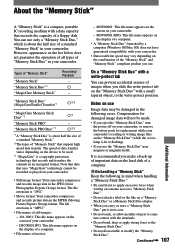
... on the screen on the screen of "Memory Stick" that support high speed data transfer. Compensation for replacement while your camcorder is reading or writing image files on the display of a computer. • File names of "Memory Stick" "Memory Stick" "Memory Stick Duo"*1 "MagicGate Memory Stick" Recording/ Playback - - DSC00001.JPG: This file name appears on the "Memory Stick Duo" (while the access lamp is about half the size of a standard "Memory Stick." *2 The types of your camcorder. - It...
... on the screen on the screen of "Memory Stick" that support high speed data transfer. Compensation for replacement while your camcorder is reading or writing image files on the display of a computer. • File names of "Memory Stick" "Memory Stick" "Memory Stick Duo"*1 "MagicGate Memory Stick" Recording/ Playback - - DSC00001.JPG: This file name appears on the "Memory Stick Duo" (while the access lamp is about half the size of a standard "Memory Stick." *2 The types of your camcorder. - It...
Operating Guide
Page 112
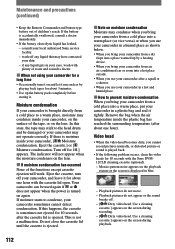
... distorted picture or sound is played back. • If the following problem occurs, clean the video heads for 10 seconds after the cassette lid is brought directly from a cold place into a warm place, put your camcorder, and leave it . Use a cleaning cassette.] appears on the screen during recording. - [ Dirty video head. If there is displayed in a plastic bag and seal it tightly. Eject the cassette, turn it on the lens. Use a cleaning cassette.] appears...
... distorted picture or sound is played back. • If the following problem occurs, clean the video heads for 10 seconds after the cassette lid is brought directly from a cold place into a warm place, put your camcorder, and leave it . Use a cleaning cassette.] appears on the screen during recording. - [ Dirty video head. If there is displayed in a plastic bag and seal it tightly. Eject the cassette, turn it on the lens. Use a cleaning cassette.] appears...
Operating Guide
Page 121
... Power cord 9 POWER switch 14 Previous/Next image button 29 Print 67 Print mark 66 PROGRAM AE 40, 91 P.MENU .... See Personal Menu R Rechargeable battery pack See Battery Recording 22 Recording capacity 28 Cassette 28 Memory Stick 28 Recording time 12, 46 REC CTRL (Recording control 61 REC FOLDER (Recording folder 47 REC LAMP 55 REC lamp (Recording lamp 26 REC MODE (Recording mode 53 Rec review 31 REC START/STOP 22 REMAINING 55 Remaining battery 28 Remote Commander 32 REMOTE CTRL (Remote control 55 Remote sensor 26 RESET button 26...
... Power cord 9 POWER switch 14 Previous/Next image button 29 Print 67 Print mark 66 PROGRAM AE 40, 91 P.MENU .... See Personal Menu R Rechargeable battery pack See Battery Recording 22 Recording capacity 28 Cassette 28 Memory Stick 28 Recording time 12, 46 REC CTRL (Recording control 61 REC FOLDER (Recording folder 47 REC LAMP 55 REC lamp (Recording lamp 26 REC MODE (Recording mode 53 Rec review 31 REC START/STOP 22 REMAINING 55 Remaining battery 28 Remote Commander 32 REMOTE CTRL (Remote control 55 Remote sensor 26 RESET button 26...


