User Manual
Page 8
... 38 Recording/Playback Recording 40 Playback 42 Functions used for recording/playback, etc 44 Recording To use zoom To record sound with your DVD Handycam 12 Choosing a disc 14 Using your DVD Handycam 16 Getting Started Step 1: Checking supplied items 18 Step 2: Charging the battery pack 19 Step 3: Turning the power on, and holding your camcorder 23 Step 4: Adjusting the LCD screen and viewfinder 24 Step 5: Using the touch panel 25 Step 6: Setting the date and time 26 Step 7: Inserting a disc or a "Memory Stick Duo...
... 38 Recording/Playback Recording 40 Playback 42 Functions used for recording/playback, etc 44 Recording To use zoom To record sound with your DVD Handycam 12 Choosing a disc 14 Using your DVD Handycam 16 Getting Started Step 1: Checking supplied items 18 Step 2: Charging the battery pack 19 Step 3: Turning the power on, and holding your camcorder 23 Step 4: Adjusting the LCD screen and viewfinder 24 Step 5: Using the touch panel 25 Step 6: Setting the date and time 26 Step 7: Inserting a disc or a "Memory Stick Duo...
User Manual
Page 9
... Playback To use Playback zoom To play back a series of still images (Slide show) Recording/playback To check the remaining battery To turn off the operation confirmation beep To initialize the settings (RESET) Other part names and functions Checking/Deleting the last scene (Review/Review deleting 48 Indicators displayed during recording/playback 49 Remote Commander (DCR-DVD304E/DVD305E/DVD755E 51 Playing the picture on a TV 52 Playback on DVD devices Making the disc compatible with playback on DVD devices or DVD drives (Finalizing 54 Playing back a disc on DVD devices, etc 58 Playing...
... Playback To use Playback zoom To play back a series of still images (Slide show) Recording/playback To check the remaining battery To turn off the operation confirmation beep To initialize the settings (RESET) Other part names and functions Checking/Deleting the last scene (Review/Review deleting 48 Indicators displayed during recording/playback 49 Remote Commander (DCR-DVD304E/DVD305E/DVD755E 51 Playing the picture on a TV 52 Playback on DVD devices Making the disc compatible with playback on DVD devices or DVD drives (Finalizing 54 Playing back a disc on DVD devices, etc 58 Playing...
User Manual
Page 12
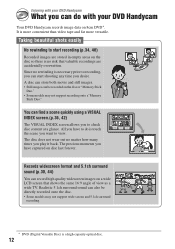
... your DVD Handycam What you to check disc content at a glance. Since no risk that shows the same 16:9 angle of view as a wide TV. You can find a scene quickly using a VISUAL INDEX screen.(p.36, 42) The VISUAL INDEX screen allows you can be directly recorded onto the disc. • Some models may not support recording onto a"Memory Stick Duo." All you want to start shooting any time you...
... your DVD Handycam What you to check disc content at a glance. Since no risk that shows the same 16:9 angle of view as a wide TV. You can find a scene quickly using a VISUAL INDEX screen.(p.36, 42) The VISUAL INDEX screen allows you can be directly recorded onto the disc. • Some models may not support recording onto a"Memory Stick Duo." All you want to start shooting any time you...
User Manual
Page 15
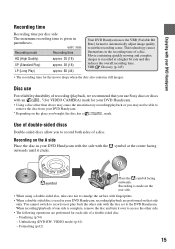
... discs Double-sided discs allow you bought, the disc has a mark. Finalizing (p.54) - When recording/playback of one side is used in the recording time of a disc. Recording mode Recording time HQ (High Quality) approx. 20 (18) SP (Standard Play) approx. 30 (18) LP (Long Play) approx. 60 (44) Your DVD Handycam uses the VBR (Variable Bit Rate) format to automatically adjust image quality to record both sides of a disc. You cannot switch to record...
... discs Double-sided discs allow you bought, the disc has a mark. Finalizing (p.54) - When recording/playback of one side is used in the recording time of a disc. Recording mode Recording time HQ (High Quality) approx. 20 (18) SP (Standard Play) approx. 30 (18) LP (Long Play) approx. 60 (44) Your DVD Handycam uses the VBR (Variable Bit Rate) format to automatically adjust image quality to record both sides of a disc. You cannot switch to record...
User Manual
Page 16
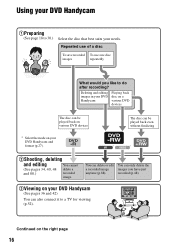
... after recording? Repeated use of a disc To save recorded To use one disc images repeatedly What would you have just anytime (p.88). Continued on your DVD Handycam and format (p.27). recorded (p.48). 3Viewing on your needs. The disc can be played back even without finalizing 2Shooting, deleting and editing You cannot (See pages 34, 40, 48 delete a and 88.) recorded image. Deleting and editing images in your DVD Handycam Playing back disc on a various DVD devices The disc...
... after recording? Repeated use of a disc To save recorded To use one disc images repeatedly What would you have just anytime (p.88). Continued on your DVD Handycam and format (p.27). recorded (p.48). 3Viewing on your needs. The disc can be played back even without finalizing 2Shooting, deleting and editing You cannot (See pages 34, 40, 48 delete a and 88.) recorded image. Deleting and editing images in your DVD Handycam Playing back disc on a various DVD devices The disc...
User Manual
Page 28
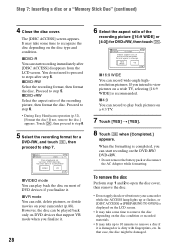
... Easy Handycam operation (p.32), [Format the disc? Proceed to step 5. FORMAT : VIDEO Can playback on the disc type and condition. FORMAT : 16:9 WIDE Select aspect ratio of DVD devices if you intend to view pictures on the DVD-RW/ DVD+RW. • Do not remove the battery pack or disconnect the AC Adaptor while formatting. Format again to steps after [DISC ACCESS] disappears from the LCD screen. You do not need to proceed to change. 16...
... Easy Handycam operation (p.32), [Format the disc? Proceed to step 5. FORMAT : VIDEO Can playback on the disc type and condition. FORMAT : 16:9 WIDE Select aspect ratio of DVD devices if you intend to view pictures on the DVD-RW/ DVD+RW. • Do not remove the battery pack or disconnect the AC Adaptor while formatting. Format again to steps after [DISC ACCESS] disappears from the LCD screen. You do not need to proceed to change. 16...
User Manual
Page 30
while recording movies - when using a DVD+RW - when you use. To play back images on a DVD device or a DVD recorder The way you change the aspect ratio in the following situations. - For details, refer to the instruction manuals supplied with [TV TYPE] set to [OLD MOVIE] (p.76) • Differences in the angle of the arrow to light up the (Movie) lamp. To play back pictures after connecting your camcorder to a TV Set [TV TYPE] to [16...
while recording movies - when using a DVD+RW - when you use. To play back images on a DVD device or a DVD recorder The way you change the aspect ratio in the following situations. - For details, refer to the instruction manuals supplied with [TV TYPE] set to [OLD MOVIE] (p.76) • Differences in the angle of the arrow to light up the (Movie) lamp. To play back pictures after connecting your camcorder to a TV Set [TV TYPE] to [16...
User Manual
Page 32
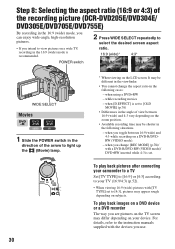
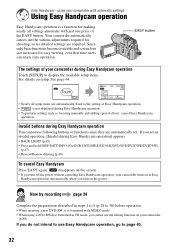
... DCR-DVD205E/DVD304E/DVD305E/DVD705E/DVD755E) (p.47) • Review/Review deleting (p.48) To cancel Easy Handycam Press EASY again. Easy Handycam - using a DVD-RW disc formatted in VR mode, you set . EASY button The settings of the EASY button. Invalid buttons during Easy Handycam operation Touch [SETUP] to display the available setup items. For details on in steps 1 to 8 (p.18 to the setting of Easy Handycam operation. • is formatted with just one press of your camcorder turns...
... DCR-DVD205E/DVD304E/DVD305E/DVD705E/DVD755E) (p.47) • Review/Review deleting (p.48) To cancel Easy Handycam Press EASY again. Easy Handycam - using a DVD-RW disc formatted in VR mode, you set . EASY button The settings of the EASY button. Invalid buttons during Easy Handycam operation Touch [SETUP] to display the available setup items. For details on in steps 1 to 8 (p.18 to the setting of Easy Handycam operation. • is formatted with just one press of your camcorder turns...

User Manual
Page 47
... volume, see page 43. qs Set the POWER switch to display in stereo microphone When an external microphone (supplied or optional) is [ON] (continuous playback). • You cannot operate playback zoom during slide show playback. Recording/Playback 1 Play back the picture you want to magnify. 2 Magnify the picture with T (Telephoto). The slide show . If you press this button once, BATTERY INFO appears on the screen for date and time. (Setup items customized on the LCD screen...
... volume, see page 43. qs Set the POWER switch to display in stereo microphone When an external microphone (supplied or optional) is [ON] (continuous playback). • You cannot operate playback zoom during slide show playback. Recording/Playback 1 Play back the picture you want to magnify. 2 Magnify the picture with T (Telephoto). The slide show . If you press this button once, BATTERY INFO appears on the screen for date and time. (Setup items customized on the LCD screen...

User Manual
Page 52
... you set [TV TYPE] to [4:3]. 52 A/V jack (Yellow) (White) (Red) IN S VIDEO VIDEO AUDIO : Signal flow 1 A/V connecting cable (supplied) Connect to the input jack of the other device. 2 A/V connecting cable with S VIDEO (optional) When connecting to another device via the S VIDEO jack, by using an A/V connecting cable with an S VIDEO cable (optional), higher quality pictures can be connected. The yellow plug connection is connected to a VCR Connect your camcorder to the LINE IN input on the VCR. S VIDEO connection only will view pictures on. 1 Slide the POWER switch to turn...
... you set [TV TYPE] to [4:3]. 52 A/V jack (Yellow) (White) (Red) IN S VIDEO VIDEO AUDIO : Signal flow 1 A/V connecting cable (supplied) Connect to the input jack of the other device. 2 A/V connecting cable with S VIDEO (optional) When connecting to another device via the S VIDEO jack, by using an A/V connecting cable with an S VIDEO cable (optional), higher quality pictures can be connected. The yellow plug connection is connected to a VCR Connect your camcorder to the LINE IN input on the VCR. S VIDEO connection only will view pictures on. 1 Slide the POWER switch to turn...
User Manual
Page 62
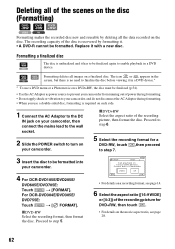
... in Camcorder VIDEO VR OK • For details on your camcorder, then connect the mains lead to the wall socket. 2 Slide the POWER switch to prevent your camcorder. 4 For DCR-DVD105E/DVD205E/ DVD605E/DVD705E: Touch t [FORMAT]. Proceed to step 6. 5 Select the recording format for DVD+RW, then touch . • For details on a DVD+RW, the disc must be finalized again to enable playback in a DVD device.* * To use a DVD menu or...
... in Camcorder VIDEO VR OK • For details on your camcorder, then connect the mains lead to the wall socket. 2 Slide the POWER switch to prevent your camcorder. 4 For DCR-DVD105E/DVD205E/ DVD605E/DVD705E: Touch t [FORMAT]. Proceed to step 6. 5 Select the recording format for DVD+RW, then touch . • For details on a DVD+RW, the disc must be finalized again to enable playback in a DVD device.* * To use a DVD menu or...

User Manual
Page 73
... flash will not function during continuous recording. • The maximum number of the disc or "Memory Stick Duo"(For DCR-DVD304E/ DVD305E/DVD755E). • [EXP.BRKTG] will be able to record continuous images up to [OFF] ( ) when using [STEADYSHOT] (the default setting is set. The indicators in the self-timer mode or when you change [REC MODE] (p.78)/with different exposures at approximately 0.5 seconds intervals. You can record pictures using...
... flash will not function during continuous recording. • The maximum number of the disc or "Memory Stick Duo"(For DCR-DVD304E/ DVD305E/DVD755E). • [EXP.BRKTG] will be able to record continuous images up to [OFF] ( ) when using [STEADYSHOT] (the default setting is set. The indicators in the self-timer mode or when you change [REC MODE] (p.78)/with different exposures at approximately 0.5 seconds intervals. You can record pictures using...

User Manual
Page 94
... monitor device connected, set [DISP OUTPUT] to [LCD PANEL] (the default setting, p.81). • To record the date/time and camera settings data, display them to the audio input jack on the VCR or the TV. 94 Connect the white and red plug (left channel) plug to an HDD (hard disc drive) video recorder, you can be connected. After dubbing them on the hard disc of the recorder. The yellow plug connection is not necessary. Connect your camcorder to another device via the S VIDEO jack, by using an A/V connecting cable...
... monitor device connected, set [DISP OUTPUT] to [LCD PANEL] (the default setting, p.81). • To record the date/time and camera settings data, display them to the audio input jack on the VCR or the TV. 94 Connect the white and red plug (left channel) plug to an HDD (hard disc drive) video recorder, you can be connected. After dubbing them on the hard disc of the recorder. The yellow plug connection is not necessary. Connect your camcorder to another device via the S VIDEO jack, by using an A/V connecting cable...
User Manual
Page 99
Operate the POWER switch. - Refer to a digital video camera or digital still camera, regardless of the image may be cut off and on the screen. Slide the disc cover OPEN switch. - You can print still images without using a computer by connecting a printer directly to your camcorder. • Still images recorded by other than 2304 × 1728 pixels cannot be performed properly. - Disconnect the USB cable (supplied) from the printer. - Remove the "Memory Stick Duo" from your...
Operate the POWER switch. - Refer to a digital video camera or digital still camera, regardless of the image may be cut off and on the screen. Slide the disc cover OPEN switch. - You can print still images without using a computer by connecting a printer directly to your camcorder. • Still images recorded by other than 2304 × 1728 pixels cannot be performed properly. - Disconnect the USB cable (supplied) from the printer. - Remove the "Memory Stick Duo" from your...
User Manual
Page 101
... can view the movie and still images by connecting your camcorder to your computer. • The Macintosh computer does not support the supplied Picture Package and Nero Express 6 software. • The DCR-DVD105E/DVD205E/DVD304E/ DVD605E/DVD705E do with your camcorder to on your computer. • You can copy the disc you recorded with your camcorder to the Macintosh computer with a DVD drive installed" (p.59) to play back images on...
... can view the movie and still images by connecting your camcorder to your computer. • The Macintosh computer does not support the supplied Picture Package and Nero Express 6 software. • The DCR-DVD105E/DVD205E/DVD304E/ DVD605E/DVD705E do with your camcorder to on your computer. • You can copy the disc you recorded with your camcorder to the Macintosh computer with a DVD drive installed" (p.59) to play back images on...

User Manual
Page 102
... size of the image files edited) Display: 4 MB VRAM video card, Minimum 800 × 600 dots, High color (16 bit color, 65 000 colors), DirectDraw display driver capability (this must be provided as standard) When playing still images recorded on a "Memory Stick Duo" on a computer OS: Microsoft Windows 2000 Professional/ Windows XP Home Edition/Windows XP Professional Standard installation is not compatible with it, connect your camcorder with Hi-Speed USB, the data transfer ratio will not operate...
... size of the image files edited) Display: 4 MB VRAM video card, Minimum 800 × 600 dots, High color (16 bit color, 65 000 colors), DirectDraw display driver capability (this must be provided as standard) When playing still images recorded on a "Memory Stick Duo" on a computer OS: Microsoft Windows 2000 Professional/ Windows XP Home Edition/Windows XP Professional Standard installation is not compatible with it, connect your camcorder with Hi-Speed USB, the data transfer ratio will not operate...
User Manual
Page 106
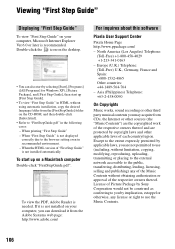
... inquires about this software Pixela User Support Center Pixela Home Page http://www.ppackage.com/ - When printing "First Step Guide" - To view the PDF, Adobe Reader is not installed automatically. Europe (U.K.) Telephone: (Toll-Free) U.K., Germany, France and Spain: +800-1532-4865 Other countries: +44-1489-564-764 - License of the Music Contents without using automatic installation, copy the desired language folder from...
... inquires about this software Pixela User Support Center Pixela Home Page http://www.ppackage.com/ - When printing "First Step Guide" - To view the PDF, Adobe Reader is not installed automatically. Europe (U.K.) Telephone: (Toll-Free) U.K., Germany, France and Spain: +800-1532-4865 Other countries: +44-1489-564-764 - License of the Music Contents without using automatic installation, copy the desired language folder from...
User Manual
Page 123
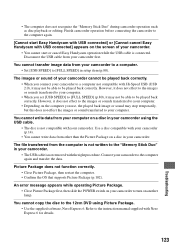
... transfer image data from your camcorder. An error message appears while operating Picture Package. • Close Picture Package first, then slide the POWER switch on another lamp. However, it may not be played back correctly. Use a disc compatible with your camcorder first. Finish camcorder operation before connecting the camcorder to the 12cm DVD using the USB cable. • The disc is not written to the "Memory Stick Duo" in your camcorder. Disconnect the USB cable from your camcorder to a computer. • Set [USB SPEED...
... transfer image data from your camcorder. An error message appears while operating Picture Package. • Close Picture Package first, then slide the POWER switch on another lamp. However, it may not be played back correctly. Use a disc compatible with your camcorder first. Finish camcorder operation before connecting the camcorder to the 12cm DVD using the USB cable. • The disc is not written to the "Memory Stick Duo" in your camcorder. Disconnect the USB cable from your camcorder to a computer. • Set [USB SPEED...

User Manual
Page 133
... you eject the "Memory Stick Duo," turn the power off on your camcorder, or remove the battery pack for replacement while your camcorder is reading or writing image files on the list below does not guarantee the operation of all types of "Memory Stick" that support high speed data transfer. Notes on your camcorder. - You can prevent accidental erasure of images when you make a back-up of a floppy disk. a*2*3 *1 A "Memory Stick Duo" is danger that uses...
... you eject the "Memory Stick Duo," turn the power off on your camcorder, or remove the battery pack for replacement while your camcorder is reading or writing image files on the list below does not guarantee the operation of all types of "Memory Stick" that support high speed data transfer. Notes on your camcorder. - You can prevent accidental erasure of images when you make a back-up of a floppy disk. a*2*3 *1 A "Memory Stick Duo" is danger that uses...
User Manual
Page 148
... TV color system 130 TV TYPE 52 U Unfinalizing 61 USB1.1 80, 102 USB2.0 80, 102 USB cable 18 USB driver 101 USB jack 100 USB SELECT 76 USB SPEED 80 Using abroad 130 V VBR 15, 78 VF B.LIGHT (Viewfinder back light)........ 79 VF WIDE DISP (View finder wide display 80 VIDEO mode 14 Video operation buttons....... 49 Viewfinder 24 Brightness 79 Viewfinder lens adjustment 24 VISUAL INDEX screen 36, 42 Volume 43 VR mode 14
... TV color system 130 TV TYPE 52 U Unfinalizing 61 USB1.1 80, 102 USB2.0 80, 102 USB cable 18 USB driver 101 USB jack 100 USB SELECT 76 USB SPEED 80 Using abroad 130 V VBR 15, 78 VF B.LIGHT (Viewfinder back light)........ 79 VF WIDE DISP (View finder wide display 80 VIDEO mode 14 Video operation buttons....... 49 Viewfinder 24 Brightness 79 Viewfinder lens adjustment 24 VISUAL INDEX screen 36, 42 Volume 43 VR mode 14


