User Manual
Page 8
... this User Manual 8 Removing the Battery Cover 10 Installing the microSD Memory Card 11 Installing the Battery 12 Replacing the Battery Cover 13 Charging the Battery 14 Extending Your Battery Life 17 Switching the Device On or Off 18 Initial Device Configuration 18 Restarting the Device 19 Locking and Unlocking the Device 19 Voicemail 20 Section 2: Understanding Your Device 22 Features of Your Device 22 Front View 24 Back View 27 Side Views 28 Device Display 29 Status Bar 30 Home Screen...
... this User Manual 8 Removing the Battery Cover 10 Installing the microSD Memory Card 11 Installing the Battery 12 Replacing the Battery Cover 13 Charging the Battery 14 Extending Your Battery Life 17 Switching the Device On or Off 18 Initial Device Configuration 18 Restarting the Device 19 Locking and Unlocking the Device 19 Voicemail 20 Section 2: Understanding Your Device 22 Features of Your Device 22 Front View 24 Back View 27 Side Views 28 Device Display 29 Status Bar 30 Home Screen...
User Manual
Page 15
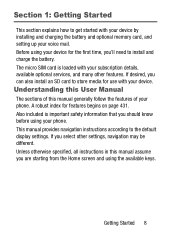
... time, you select other features. Also included is loaded with your subscription details, available optional services, and many other settings, navigation may be different. This manual provides navigation instructions according to get started with your device by installing and charging the battery and optional memory card, and setting up your phone. The micro SIM card is important safety information that you are starting from the Home screen and using your voice mail...
... time, you select other features. Also included is loaded with your subscription details, available optional services, and many other settings, navigation may be different. This manual provides navigation instructions according to get started with your device by installing and charging the battery and optional memory card, and setting up your phone. The micro SIM card is important safety information that you are starting from the Home screen and using your voice mail...

User Manual
Page 16
... User Manual start with the device unlocked, at the Home screen. These are intended to point out important information, share quick methods for the current feature, menu, or sub-menu. • Tips: Provides quick or innovative methods, or useful shortcuts. • Important: Points out important information about the current feature that is set apart from your device, depending on the software version on the software version of data...
... User Manual start with the device unlocked, at the Home screen. These are intended to point out important information, share quick methods for the current feature, menu, or sub-menu. • Tips: Provides quick or innovative methods, or useful shortcuts. • Important: Points out important information about the current feature that is set apart from your device, depending on the software version on the software version of data...

User Manual
Page 87
... or number. • Send message allows you to create a new text message to the selected entry. • Time provides the time and date of the call . - Send number to send the current Contacts entry information to delete the Contacts entry. - Call Functions and Contacts List 80 Similar to a block list, the selected caller will be blocked from making an incoming calls to your phone. • Touch and hold an entry to display the entry-specific contact menu: • Copy to dialing screen to make alterations...
... or number. • Send message allows you to create a new text message to the selected entry. • Time provides the time and date of the call . - Send number to send the current Contacts entry information to delete the Contacts entry. - Call Functions and Contacts List 80 Similar to a block list, the selected caller will be blocked from making an incoming calls to your phone. • Touch and hold an entry to display the entry-specific contact menu: • Copy to dialing screen to make alterations...

User Manual
Page 114
... copy them up speed-dialing. • Send message/email: allows you to send a text /picture message or an email using your Google account. • Contacts to display: allows you to choose to display All contacts, those on Samsung account, ChatON, Google, LDAP, or Microsoft Exchange ActiveSync, or Server. Options include: Only contacts with their respective accounts. Contact Menu Options 1. • Merge accounts: allows you to merge all of your current contacts with phones, List by, Display contacts by, Service numbers, and Contact sharing settings...
... copy them up speed-dialing. • Send message/email: allows you to send a text /picture message or an email using your Google account. • Contacts to display: allows you to choose to display All contacts, those on Samsung account, ChatON, Google, LDAP, or Microsoft Exchange ActiveSync, or Server. Options include: Only contacts with their respective accounts. Contact Menu Options 1. • Merge accounts: allows you to merge all of your current contacts with phones, List by, Display contacts by, Service numbers, and Contact sharing settings...

User Manual
Page 119
From the Home screen, tap . 2. The Mark as name, phone number, or email) and select Done. Tap the radio button next to the entry information you want to be the primary information (such as default screen displays radio buttons next to the contact name, phone number, or other messaging type applications, the application needs to unjoin and select OK. Press and then tap Separate contact. 4. Tap next to the entry...
From the Home screen, tap . 2. The Mark as name, phone number, or email) and select Done. Tap the radio button next to the entry information you want to be the primary information (such as default screen displays radio buttons next to the contact name, phone number, or other messaging type applications, the application needs to unjoin and select OK. Press and then tap Separate contact. 4. Tap next to the entry...

User Manual
Page 120
... contact information, and can send all currently displayed Contact entries. 113 The Namecard attaches to the selected message type and is selected for dialing. From the Home screen, tap . 2. From the Home screen, tap . 2. Tap a Contact entry. 3. Press and then tap Share namecard via and select a delivery method: Bluetooth, ChatON, Drive, Email (Exchange or Internet), Gmail, Messaging, or Wi-Fi Direct. Note: If there are multiple phone numbers...
... contact information, and can send all currently displayed Contact entries. 113 The Namecard attaches to the selected message type and is selected for dialing. From the Home screen, tap . 2. From the Home screen, tap . 2. Tap a Contact entry. 3. Press and then tap Share namecard via and select a delivery method: Bluetooth, ChatON, Drive, Email (Exchange or Internet), Gmail, Messaging, or Wi-Fi Direct. Note: If there are multiple phone numbers...

User Manual
Page 138
... schedule a time for the recipient (they will receive your message in the designated language). - Note: You must be directly delivered to your message. • Record video: allows you can be logged into your message by tapping Save. 131 Here you to temporarily exit the message, record a video clip using the phone's camera, and then add it to your spam folder. • Discard: closes the current open message. Enable the...
... schedule a time for the recipient (they will receive your message in the designated language). - Note: You must be directly delivered to your message. • Record video: allows you can be logged into your message by tapping Save. 131 Here you to temporarily exit the message, record a video clip using the phone's camera, and then add it to your spam folder. • Discard: closes the current open message. Enable the...
User Manual
Page 158
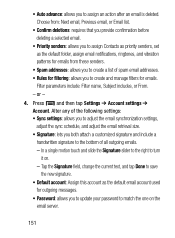
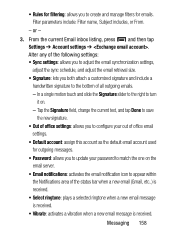
... tap Settings ➔ Account settings ➔ Account. Tap the Signature field, change the current text, and tap Done to save the new signature. • Default account: Assign this account as the default folder, assign email notifications, ringtones, and vibration patterns for emails from : Next email, Previous email, or Email list. • Confirm deletions: requires that you provide confirmation before deleting a selected email. • Priority senders: allows you to assign Contacts as priority senders, set as the default email account used...
... tap Settings ➔ Account settings ➔ Account. Tap the Signature field, change the current text, and tap Done to save the new signature. • Default account: Assign this account as the default folder, assign email notifications, ringtones, and vibration patterns for emails from : Next email, Previous email, or Email list. • Confirm deletions: requires that you provide confirmation before deleting a selected email. • Priority senders: allows you to assign Contacts as priority senders, set as the default email account used...
User Manual
Page 165
... to save the new signature. • Out of office settings: allows you to configure your out of office email settings. • Default account: assign this account as the default email account used for outgoing messages. • Password: allows you to appear within the Notifications area of the status bar when a new email (Gmail, etc..) is received. • Select ringtone: plays a selected ringtone when a new email message is received. • Vibrate: activates a vibration when a new email message is received. Messaging 158 From the current Email inbox listing...
... to save the new signature. • Out of office settings: allows you to configure your out of office email settings. • Default account: assign this account as the default email account used for outgoing messages. • Password: allows you to appear within the Notifications area of the status bar when a new email (Gmail, etc..) is received. • Select ringtone: plays a selected ringtone when a new email message is received. • Vibrate: activates a vibration when a new email message is received. Messaging 158 From the current Email inbox listing...

User Manual
Page 180
...: when set to On, this option allows you to take and save a mirror-image video when using self-recording mode. • Storage: Select the memory location for storage. • Shutter sound: Turn the shutter sound on the screen to display them. 2. Photo viewing options 1. Note: If no control icons are available at the top of the filename. You must first activate GPS tag described above. • Save as part of the screen: • Change player...
...: when set to On, this option allows you to take and save a mirror-image video when using self-recording mode. • Storage: Select the memory location for storage. • Shutter sound: Turn the shutter sound on the screen to display them. 2. Photo viewing options 1. Note: If no control icons are available at the top of the filename. You must first activate GPS tag described above. • Save as part of the screen: • Change player...

User Manual
Page 244
... sounds, images, videos, bluetooth files, Android files, and other memory card data in this viewer works on -screen instructions. This application allows you to manage your phone (ex: MP4). Ⅲ From the Home screen, tap (Apps) ➔ (My Files). Note: Navigation in one convenient location. Once installed, open the application and follow the on a hierarchy structure with folders, subfolders, etc. Note: The application lets you view supported image files and text files on -screen instructions to download...
... sounds, images, videos, bluetooth files, Android files, and other memory card data in this viewer works on -screen instructions. This application allows you to manage your phone (ex: MP4). Ⅲ From the Home screen, tap (Apps) ➔ (My Files). Note: Navigation in one convenient location. Once installed, open the application and follow the on a hierarchy structure with folders, subfolders, etc. Note: The application lets you view supported image files and text files on -screen instructions to download...

User Manual
Page 256
... screen displays. 3. POLARIS Office 5 Polaris Office Mobile for compatible documents. 249 The application can also open Adobe PDF (Portable Document Format) files. 1. From the Home screen, tap (Apps) ➔ (POLARIS Office 5). 2. Tap Skip to ignore this feature. From the Registration screen, enter your device and SD card for Android is required to use this registration. Follow the on-screen instructions to use : • New: creates a new office document. • Menu: provides access to Settings...
... screen displays. 3. POLARIS Office 5 Polaris Office Mobile for compatible documents. 249 The application can also open Adobe PDF (Portable Document Format) files. 1. From the Home screen, tap (Apps) ➔ (POLARIS Office 5). 2. Tap Skip to ignore this feature. From the Registration screen, enter your device and SD card for Android is required to use this registration. Follow the on-screen instructions to use : • New: creates a new office document. • Menu: provides access to Settings...
User Manual
Page 293
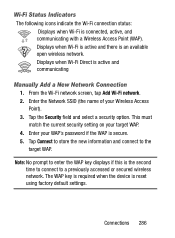
...-Fi network screen, tap Add Wi-Fi network. 2. Tap the Security field and select a security option. Note: No prompt to enter the WAP key displays if this is reset using factory default settings. The WAP key is required when the device is the second time to connect to the target WAP. Displays when Wi-Fi is active and there is secure. 5. This must match the current security setting on your Wireless Access Point). 3. Enter the Network SSID...
...-Fi network screen, tap Add Wi-Fi network. 2. Tap the Security field and select a security option. Note: No prompt to enter the WAP key displays if this is reset using factory default settings. The WAP key is required when the device is the second time to connect to the target WAP. Displays when Wi-Fi is active and there is secure. 5. This must match the current security setting on your Wireless Access Point). 3. Enter the Network SSID...

User Manual
Page 302
... Wi-Fi list as connected. This number is active and communicating. From the main Settings page, tap Connections tab ➔ Wi-Fi. 2. Press then tap WPS PIN entry. 3. Displays when Wi-Fi Direct is then entered into your device using WPS PIN: 1. Wi-Fi Direct Setup and Settings You can configure your current Wi-Fi network connection. 295 WPS PIN Entry If a WPS Push Button does not work, there...
... Wi-Fi list as connected. This number is active and communicating. From the main Settings page, tap Connections tab ➔ Wi-Fi. 2. Press then tap WPS PIN entry. 3. Displays when Wi-Fi Direct is then entered into your device using WPS PIN: 1. Wi-Fi Direct Setup and Settings You can configure your current Wi-Fi network connection. 295 WPS PIN Entry If a WPS Push Button does not work, there...

User Manual
Page 338
... times will cause the device to phone numbers stored in the FDN list on FDN. 3. Contact customer service for assistance. From the main Call settings page, tap Additional settings ➔ Fixed dialing numbers. 2. From the main Call settings page, tap Additional settings ➔ Fixed dialing numbers. 2. At the prompt, enter your PIN2 code. Not all SIM cards use a PIN2 code. The PIN2 code is enabled. 4. Tap Turn on the SIM card. 1. Tap FDN list then press and then tap Add contact or edit the contacts...
... times will cause the device to phone numbers stored in the FDN list on FDN. 3. Contact customer service for assistance. From the main Call settings page, tap Additional settings ➔ Fixed dialing numbers. 2. From the main Call settings page, tap Additional settings ➔ Fixed dialing numbers. 2. At the prompt, enter your PIN2 code. Not all SIM cards use a PIN2 code. The PIN2 code is enabled. 4. Tap Turn on the SIM card. 1. Tap FDN list then press and then tap Add contact or edit the contacts...

User Manual
Page 372
... from using a PIN code. Tip: Make sure your SIM PIN number. 1. Tap Set up SIM Card Lock Prevent another user from accessing information stored on your SIM card by protecting the information using your SIM card to determine the security level for a PIN number each time you use the phone. Using this feature requires a numeric PIN or password to enable the encryption on your phone will ask for your device. Encryption may take an hour or more information, read the displayed help screen...
... from using a PIN code. Tip: Make sure your SIM PIN number. 1. Tap Set up SIM Card Lock Prevent another user from accessing information stored on your SIM card by protecting the information using your SIM card to determine the security level for a PIN number each time you use the phone. Using this feature requires a numeric PIN or password to enable the encryption on your phone will ask for your device. Encryption may take an hour or more information, read the displayed help screen...

User Manual
Page 438
... to My Location 229 Accessibility Text Booster 225 Accessing Recently-used applications 194 Voicemail 21 Accessory 337 Dock Sound 337 Accounts and Sync Adding Contacts 118 Add 3 Sec Pause 65, 105 Add to Favorites 125 Adjusting Call volume 71 Adobe PDF 249 Air Gesture Quick Glance 55 Airplane Mode On 300 431 Alarm Deleting an Existing Alarm 205 Setting 203 Turning Off 205 Alerts Presidential 140 Alerts on Call 325 AllShare Play see Samsung Link 256...
... to My Location 229 Accessibility Text Booster 225 Accessing Recently-used applications 194 Voicemail 21 Accessory 337 Dock Sound 337 Accounts and Sync Adding Contacts 118 Add 3 Sec Pause 65, 105 Add to Favorites 125 Adjusting Call volume 71 Adobe PDF 249 Air Gesture Quick Glance 55 Airplane Mode On 300 431 Alarm Deleting an Existing Alarm 205 Setting 203 Turning Off 205 Alerts Presidential 140 Alerts on Call 325 AllShare Play see Samsung Link 256...

User Manual
Page 449
... into Google Mail 161 Spam 129 Text Templates 145 Translate Text 131 Types of Messages 126 Viewing new 133 micro SIM Card Changing Existing PIN 366 Importing and Exporting 121 Lock 365 Setting Up Lock 365 microSD Card Insertion 11 Removal 12 Microsoft Exchange 99, 145 Missed Call Viewing from Lock Screen 82 Mobile Data Activate/Deactivate 299 Set Data Limit 299 Usage 301 Mobile Networks 301 Mobile Data 301 Mobile Web 216 Entering Text in the Mobile Web Browser 218 Navigating with the Mobile Web 216 Using Bookmarks 220...
... into Google Mail 161 Spam 129 Text Templates 145 Translate Text 131 Types of Messages 126 Viewing new 133 micro SIM Card Changing Existing PIN 366 Importing and Exporting 121 Lock 365 Setting Up Lock 365 microSD Card Insertion 11 Removal 12 Microsoft Exchange 99, 145 Missed Call Viewing from Lock Screen 82 Mobile Data Activate/Deactivate 299 Set Data Limit 299 Usage 301 Mobile Networks 301 Mobile Data 301 Mobile Web 216 Entering Text in the Mobile Web Browser 218 Navigating with the Mobile Web 216 Using Bookmarks 220...

User Manual
Page 456
... 385 Speed Dial Changing an entry 68 Making a call 69 Removing an entry 69 Setting up entries 67 Standard Limited Warranty 413 Standard Mode 323 Status Bar 30 Sub-Menus Navigation 57 SugarSync 259 Switching to a Bluetooth During a call 73 Swype 83 123ABC Mode 87 ABC Mode 86 Cellular Data 346 Entering Numbers 89 Entering Symbols 89 Entering Text 84 Keyboard Mode 86 Select Text Input Mode 86 Settings 344 449 SYM mode 86 System Volume 320 System Tone Settings...
... 385 Speed Dial Changing an entry 68 Making a call 69 Removing an entry 69 Setting up entries 67 Standard Limited Warranty 413 Standard Mode 323 Status Bar 30 Sub-Menus Navigation 57 SugarSync 259 Switching to a Bluetooth During a call 73 Swype 83 123ABC Mode 87 ABC Mode 86 Cellular Data 346 Entering Numbers 89 Entering Symbols 89 Entering Text 84 Keyboard Mode 86 Select Text Input Mode 86 Settings 344 449 SYM mode 86 System Volume 320 System Tone Settings...


