Samsung SCD71 Research

Related Manual Pages


Similar Questions


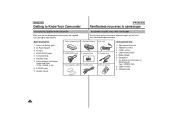
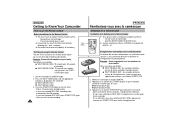
Samsung Digital Video Camcorder Scd71 Ac Adapter
Is it possible to purchase an AC Adapter for Samsung Digital Video Camcorder SCD71? Thank you.
Is it possible to purchase an AC Adapter for Samsung Digital Video Camcorder SCD71? Thank you.
(Posted by helenabasso 8 years ago)

How To Reset Samsung Hmx-f80 To Factory Settings
just opened my new samsung camcorder and clicked wrong button to put the time and date in when first...
just opened my new samsung camcorder and clicked wrong button to put the time and date in when first...
(Posted by Anonymous-91462 11 years ago)

Battery Also Runs Out Very Fast
we keep on buying he batteries and they also die after 5 to 10 mins that we use it. We have gone ba...
we keep on buying he batteries and they also die after 5 to 10 mins that we use it. We have gone ba...
(Posted by staffettam 11 years ago)

No Picture On Lcd Screen On My Digital Video Camera Sc-d353
I get no pictue or any light on my lcd screen but i can retrieve pictures on my computer . My screen...
I get no pictue or any light on my lcd screen but i can retrieve pictures on my computer . My screen...
(Posted by joger571 12 years ago)