
User Manual (user Manual) (ver.1.0) (English, French)
Page 1
...ÇAIS Caméscope numérique SCD71 AF Auto Focus CCD Charge Coupled Device LCD Liquid Crystal Display Owner's Instruction Book Before operating the unit, please read this instruction book thoroughly, and ...
...ÇAIS Caméscope numérique SCD71 AF Auto Focus CCD Charge Coupled Device LCD Liquid Crystal Display Owner's Instruction Book Before operating the unit, please read this instruction book thoroughly, and ...
User Manual (user Manual) (ver.1.0) (English, French)
Page 4
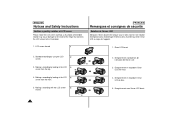
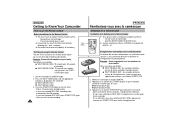
Enregistrement en regardant l'écran LCD de face. 5. ENGLISH Notices and Safety Instructions Notices regarding rotation of the hinge that connects the LCD screen to the inside of LCD screen Please rotate the LCD screen carefully as illustrated. Enregistrement en regardant l'écran LCD d'en haut. 4. Une rotation intempestive peut endommager l'intérieur de la charnière qui relie l'écran LCD au corps de l'appareil. 1. Écran LCD fermé. 2. Making a recording by looking at the LCD 4 screen from the top. 90° 4. LCD screen closed . 4 90° 90...
Enregistrement en regardant l'écran LCD de face. 5. ENGLISH Notices and Safety Instructions Notices regarding rotation of the hinge that connects the LCD screen to the inside of LCD screen Please rotate the LCD screen carefully as illustrated. Enregistrement en regardant l'écran LCD d'en haut. 4. Une rotation intempestive peut endommager l'intérieur de la charnière qui relie l'écran LCD au corps de l'appareil. 1. Écran LCD fermé. 2. Making a recording by looking at the LCD 4 screen from the top. 90° 4. LCD screen closed . 4 90° 90...

User Manual (user Manual) (ver.1.0) (English, French)
Page 9
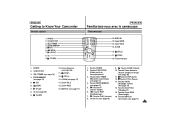
ENGLISH Getting to Know Your Camcorder FRANÇAIS Familiarisez-vous avec le caméscope Features • Digital data transfer function with IEEE1394 By incorporating IEEE 1394 (i.LINKTM : i.LINK is a serial data transfer protocol and interconnection system, used to transmit DV data) high speed data transport port, moving and still images can be transferred to PC, making it possible to produce or edit various images. • PHOTO The PHOTO function lets you capture an object as a still along with sound, while in CAMERA mode. • 500x Digital zoom Allows you to magnify an image to ...
ENGLISH Getting to Know Your Camcorder FRANÇAIS Familiarisez-vous avec le caméscope Features • Digital data transfer function with IEEE1394 By incorporating IEEE 1394 (i.LINKTM : i.LINK is a serial data transfer protocol and interconnection system, used to transmit DV data) high speed data transport port, moving and still images can be transferred to PC, making it possible to produce or edit various images. • PHOTO The PHOTO function lets you capture an object as a still along with sound, while in CAMERA mode. • 500x Digital zoom Allows you to magnify an image to ...
User Manual (user Manual) (ver.1.0) (English, French)
Page 10
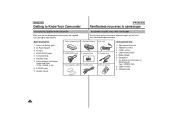
Accessoires fournis avec votre caméscope Assurez-vous que les accessoires de base ci-après ont été livrés avec votre caméscope numérique. AUDIO/VIDEO cable 5. Remote Control 1. Lithium batteries (2EA) 8. Bandoulière 7. AUDIO/VIDEO cable 5. Câble AUDIO/VIDEO 5. Jeu de piles au Lithium pour la télécommande (type : CR2025, 2EA) 8. Câble S-VIDEO 9. Lithium Ion Battery pack 2. AC cord 4. Remote Control X2 SLOW F.ADV SSTTOAPRT/ TIMSEERLF PHOTO MEMZOERROY DISPLAY A.DUB WIDE TELE STILL Accessoires de...
Accessoires fournis avec votre caméscope Assurez-vous que les accessoires de base ci-après ont été livrés avec votre caméscope numérique. AUDIO/VIDEO cable 5. Remote Control 1. Lithium batteries (2EA) 8. Bandoulière 7. AUDIO/VIDEO cable 5. Câble AUDIO/VIDEO 5. Jeu de piles au Lithium pour la télécommande (type : CR2025, 2EA) 8. Câble S-VIDEO 9. Lithium Ion Battery pack 2. AC cord 4. Remote Control X2 SLOW F.ADV SSTTOAPRT/ TIMSEERLF PHOTO MEMZOERROY DISPLAY A.DUB WIDE TELE STILL Accessoires de...
User Manual (user Manual) (ver.1.0) (English, French)
Page 14
LIGHT Switch 7. MENU ON/OFF button (see page 21) 9. DC jack (see page 32) 3. START/STOP button (see page 19) 14 9. Molette de MENU (voir page 32) 5. Lithium Battery Holder 7. Bouton START/STOP (voir page 26) 10. ENTER/DISPLAY button 4. DC jack 1. Témoin de charge (voir page 22) 2. Ouverture de l'écran à cristaux liquides 6. Ejection de la batterie (voir page 70) 11. Lithium Battery holder (see page 26) 10. START/STOP button 1. Commutateur de la TORCHE (voir page 60) 11. Anneau pour la bandoulière 8. Prise DC (voir page 21) 9. LCD open ...
LIGHT Switch 7. MENU ON/OFF button (see page 21) 9. DC jack (see page 32) 3. START/STOP button (see page 19) 14 9. Molette de MENU (voir page 32) 5. Lithium Battery Holder 7. Bouton START/STOP (voir page 26) 10. ENTER/DISPLAY button 4. DC jack 1. Témoin de charge (voir page 22) 2. Ouverture de l'écran à cristaux liquides 6. Ejection de la batterie (voir page 70) 11. Lithium Battery holder (see page 26) 10. START/STOP button 1. Commutateur de la TORCHE (voir page 60) 11. Anneau pour la bandoulière 8. Prise DC (voir page 21) 9. LCD open ...
User Manual (user Manual) (ver.1.0) (English, French)
Page 15
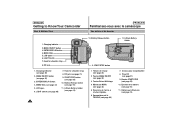
Frame Advance 1. Touche PHOTO 2. Touche ZERO MEMORY (voir page 67) 5. Touche X2 (voir page 66) 9. START/STOP 3. SELF TIMER 4. Zoom TELE 13. START/STOP 3. Frame Advance (see page 17) 1. DISPLAY (see page 66) 11. (STOP) 12. (STILL) 13. Touche STOP (Arrêt) 12. Touche STILL (Pause) 13. Touche Zoom WIDE (Grand angle) 16. X2 9. (SLOW) FRANÇAIS Familiarisez-vous avec le caméscope Télécommande START/ STOP PHOTO DISPLAY WIDE SELF ZERO TIMER MEMORY A.DUB TELE X2 SLOW F.ADV STILL 16. DISPLAY 15. A.DUB 12. (STILL) 11. (STOP) ...
Frame Advance 1. Touche PHOTO 2. Touche ZERO MEMORY (voir page 67) 5. Touche X2 (voir page 66) 9. START/STOP 3. SELF TIMER 4. Zoom TELE 13. START/STOP 3. Frame Advance (see page 17) 1. DISPLAY (see page 66) 11. (STOP) 12. (STILL) 13. Touche STOP (Arrêt) 12. Touche STILL (Pause) 13. Touche Zoom WIDE (Grand angle) 16. X2 9. (SLOW) FRANÇAIS Familiarisez-vous avec le caméscope Télécommande START/ STOP PHOTO DISPLAY WIDE SELF ZERO TIMER MEMORY A.DUB TELE X2 SLOW F.ADV STILL 16. DISPLAY 15. A.DUB 12. (STILL) 11. (STOP) ...
User Manual (user Manual) (ver.1.0) (English, French)
Page 18
You purchase the camcorder. - Example: Scene with all members of your family Two options are available s WAIT-10S/SELF-30S: 10 seconds wait, 30 seconds of the battery. Set the camcorder to use the Remote Control Battery Installation for the Remote Control 1 You must insert or replace the lithium battery when : - Press the SELF TIMER button until you to reverse the polarity of recording. quand la télécommande ne fonctionne pas. 1 Insérez la batterie au lithium (CR2025) en respectant la polarité + et -. SELF TIMER Self Record using the Remote Control The ...
You purchase the camcorder. - Example: Scene with all members of your family Two options are available s WAIT-10S/SELF-30S: 10 seconds wait, 30 seconds of the battery. Set the camcorder to use the Remote Control Battery Installation for the Remote Control 1 You must insert or replace the lithium battery when : - Press the SELF TIMER button until you to reverse the polarity of recording. quand la télécommande ne fonctionne pas. 1 Insérez la batterie au lithium (CR2025) en respectant la polarité + et -. SELF TIMER Self Record using the Remote Control The ...
User Manual (user Manual) (ver.1.0) (English, French)
Page 20
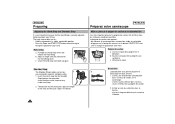
Close the hand strap cover back up again. Poignée de soutien a. Shoulder Strap Bandoulière The Shoulder Strap enables you to ensure that the Hand Strap is very important to carry 1 2 your camcorder around in complete safety. 1. d'appuyer sur le bouton du zoom et sur le bouton START/STOP sans avoir à changer la position de votre main. Ajustez la longueur de la poignée, puis recollez-la. Refermez le rabat. Thread each end into the Shoulder Strap hook on the camcorder. Hold the camcorder in the buckle. 2. La bandoulière vous ...
Close the hand strap cover back up again. Poignée de soutien a. Shoulder Strap Bandoulière The Shoulder Strap enables you to ensure that the Hand Strap is very important to carry 1 2 your camcorder around in complete safety. 1. d'appuyer sur le bouton du zoom et sur le bouton START/STOP sans avoir à changer la position de votre main. Ajustez la longueur de la poignée, puis recollez-la. Refermez le rabat. Thread each end into the Shoulder Strap hook on the camcorder. Hold the camcorder in the buckle. 2. La bandoulière vous ...
User Manual (user Manual) (ver.1.0) (English, French)
Page 21
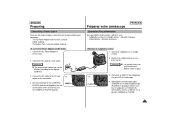
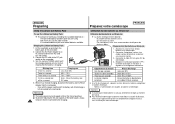
CAMERA FRANÇAIS Préparez votre caméscope Connexion d'une alimentation Deux possibilités d'alimentation s'offrent à vous : - le bloc batterie : utilisation extérieure. Branchez le cordon secteur sur une prise murale. Connectez le câble DC de l'adaptateur à la prise DC du caméscope. 4. Connect the DC cable to a wall socket. Utilisation de l'adaptateur secteur 1. Connect the AC cord to the DC jack 4-a socket on the power switch and turning it to the AC cord. 2. Connectez l'adaptateur à un cordon secteur. 2. Sélectionnez ...
CAMERA FRANÇAIS Préparez votre caméscope Connexion d'une alimentation Deux possibilités d'alimentation s'offrent à vous : - le bloc batterie : utilisation extérieure. Branchez le cordon secteur sur une prise murale. Connectez le câble DC de l'adaptateur à la prise DC du caméscope. 4. Connect the DC cable to a wall socket. Utilisation de l'adaptateur secteur 1. Connect the AC cord to the DC jack 4-a socket on the power switch and turning it to the AC cord. 2. Connectez l'adaptateur à un cordon secteur. 2. Sélectionnez ...
User Manual (user Manual) (ver.1.0) (English, French)
Page 22
It is recommended that the battery is left connected to the DC jack 2 socket on : - Blinking time Charging rate Once in a second Less than 50% Twice in a second Three times in a second 50% ~ 75% 75% ~ 100% On for a second Error - Chargement du bloc batterie au lithium-ion 1 34 1. Connectez l'adaptateur secteur à un cordon secteur et branchez ce dernier sur une prise murale. 3. Eteignez le caméscope (position OFF) ; ENGLISH Preparing Using the Lithium Ion Battery Pack To use the Zoom function. The type and capacity of battery pack you use the Lithium...
It is recommended that the battery is left connected to the DC jack 2 socket on : - Blinking time Charging rate Once in a second Less than 50% Twice in a second Three times in a second 50% ~ 75% 75% ~ 100% On for a second Error - Chargement du bloc batterie au lithium-ion 1 34 1. Connectez l'adaptateur secteur à un cordon secteur et branchez ce dernier sur une prise murale. 3. Eteignez le caméscope (position OFF) ; ENGLISH Preparing Using the Lithium Ion Battery Pack To use the Zoom function. The type and capacity of battery pack you use the Lithium...

User Manual (user Manual) (ver.1.0) (English, French)
Page 23
s Do not disassemble, process, pressure, or heat the Battery Pack. s Do not allow the + and - s Eloignez votre bloc batterie de toute source de chaleur (un feu, par exemple). s Do not put the battery pack near any heat source (fire or flames, for a long period, even when it is used in an environment of between Important 32°F (0°C) and 104°F (40°C). N'effectuez jamais de chargement à des températures inférieures à 32°F (0°C). Actual recording time depends on model and battery type. It should be shortcircuited. s Le ...
s Do not disassemble, process, pressure, or heat the Battery Pack. s Do not allow the + and - s Eloignez votre bloc batterie de toute source de chaleur (un feu, par exemple). s Do not put the battery pack near any heat source (fire or flames, for a long period, even when it is used in an environment of between Important 32°F (0°C) and 104°F (40°C). N'effectuez jamais de chargement à des températures inférieures à 32°F (0°C). Actual recording time depends on model and battery type. It should be shortcircuited. s Le ...
User Manual (user Manual) (ver.1.0) (English, French)
Page 31
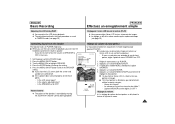
s Lorsque vous visionnez des images en lecture sur - Press the ENTER button to finish the SPEAKER SPEAKER. Press the MENU ON/OFF button to change the setting. Appuyez sur la touche ENTER. Is the LCD screen open? Is the SPEAKER set SPEAKER to OFF in CAMERA mode. (see page 29) FRANÇAIS Effectuez un enregistrement simple Réglage de l'écran LCD lors de la lecture (PLAY) 1 Vous pouvez régler l'écran LCD tout en visionnant des images. 1 Le réglage se fait de la même manière qu'en mode caméscope (voir page 29). If you do not ...
s Lorsque vous visionnez des images en lecture sur - Press the ENTER button to finish the SPEAKER SPEAKER. Press the MENU ON/OFF button to change the setting. Appuyez sur la touche ENTER. Is the LCD screen open? Is the SPEAKER set SPEAKER to OFF in CAMERA mode. (see page 29) FRANÇAIS Effectuez un enregistrement simple Réglage de l'écran LCD lors de la lecture (PLAY) 1 Vous pouvez régler l'écran LCD tout en visionnant des images. 1 Le réglage se fait de la même manière qu'en mode caméscope (voir page 29). If you do not ...
User Manual (user Manual) (ver.1.0) (English, French)
Page 32
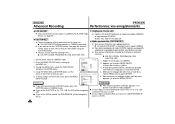
ENGLISH Advanced Recording Using the Various Functions q Setting the menu item Power switch Functions in menu CAMERA LCD ADJUST, CUSTOM SET, DIS, PIP, DIGITAL ZOOM, PROGRAM AE, DSE SELECT, WHITE BALANCE, SHUTTER SPEED, IRIS, REC MODE, REC LAMP, WIND CUT, AUDIO MODE, PHOTO MODE, DISPLAY, DATE/TIME, DEMO, CLOCK SETTING PLAYER LCD ADJUST, PHOTO SEARCH, AUDIO SELECT, SPEAKER, REC MODE, DISPLAY, DATE/TIME FRANÇAIS Perfectionnez vos enregistrements Utilisation des différentes fonctions q Réglages du menu Commutateur Mode CAMERA (caméscope) LCD ADJUST, CUSTOM SET, DIS, ...
ENGLISH Advanced Recording Using the Various Functions q Setting the menu item Power switch Functions in menu CAMERA LCD ADJUST, CUSTOM SET, DIS, PIP, DIGITAL ZOOM, PROGRAM AE, DSE SELECT, WHITE BALANCE, SHUTTER SPEED, IRIS, REC MODE, REC LAMP, WIND CUT, AUDIO MODE, PHOTO MODE, DISPLAY, DATE/TIME, DEMO, CLOCK SETTING PLAYER LCD ADJUST, PHOTO SEARCH, AUDIO SELECT, SPEAKER, REC MODE, DISPLAY, DATE/TIME FRANÇAIS Perfectionnez vos enregistrements Utilisation des différentes fonctions q Réglages du menu Commutateur Mode CAMERA (caméscope) LCD ADJUST, CUSTOM SET, DIS, ...
User Manual (user Manual) (ver.1.0) (English, French)
Page 33
O D.ZOOM O O O O O PHOTO ! ! ! ! ! O D.ZOOM O O O O O PHOTO ! ! ! ! ! The SHUTTER SPEED and IRIS mode will be released and the requested mode will work with the operating mode. Lorsque vous placez le mode PROGRAM AE sur manuel, - q : The operating mode will be changed to AUTO. PIP O O q q q GHOST q O q ! q : Le mode actif est désactivé et le mode demandé fonctionne. ! : Le mode demandé ne peut pas être changé. The PROGRAM AE mode will be changed to AUTO. Le mode SHUTTER SPEED et IRIS pass en ...
O D.ZOOM O O O O O PHOTO ! ! ! ! ! O D.ZOOM O O O O O PHOTO ! ! ! ! ! The SHUTTER SPEED and IRIS mode will be released and the requested mode will work with the operating mode. Lorsque vous placez le mode PROGRAM AE sur manuel, - q : The operating mode will be changed to AUTO. PIP O O q q q GHOST q O q ! q : Le mode actif est désactivé et le mode demandé fonctionne. ! : Le mode demandé ne peut pas être changé. The PROGRAM AE mode will be changed to AUTO. Le mode SHUTTER SPEED et IRIS pass en ...
User Manual (user Manual) (ver.1.0) (English, French)
Page 34
Please see page 53) correctly, set the status of each item to s Si vous réglez la vitesse d'obturation (SHUTTER) à 1/8, 1/15, 1/30, OFF. Effectuez les réglages de votre choix à l'aide de la status of each item to what you want before using the CUSTOM function. 1 You can customize settings and save them for future use the CUSTOM function (see page 29. 1 L'option LCD ADJUST fonctionne en mode caméscope (CAMERA) et magnétoscope (PLAYER). s If you want to s Si vous réglez la fonction IRIS sur manuel, le mode PROGRAM AE AUTO. ...
Please see page 53) correctly, set the status of each item to s Si vous réglez la vitesse d'obturation (SHUTTER) à 1/8, 1/15, 1/30, OFF. Effectuez les réglages de votre choix à l'aide de la status of each item to what you want before using the CUSTOM function. 1 You can customize settings and save them for future use the CUSTOM function (see page 29. 1 L'option LCD ADJUST fonctionne en mode caméscope (CAMERA) et magnétoscope (PLAYER). s If you want to s Si vous réglez la fonction IRIS sur manuel, le mode PROGRAM AE AUTO. ...
User Manual (user Manual) (ver.1.0) (English, French)
Page 35
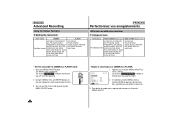
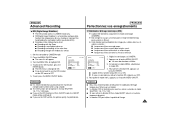
Press the MENU ON/OFF button. s The DIS menu is recommended that compensates for any shaking or moving of the hand holding the camcorder (within reasonable limits). 1 It provides more stable pictures when: s Recording with the Zoom s Recording a small object close-up s Recording and walking at the same time s Recording through the window of a vehicle 1. s If you do not want to use the DIS function, the picture quality may deteriorate. Réglez le caméscope sur CAMERA. Pour quitter le mode menu, appuyez sur la touche MENU ON/OFF. To activate the DIS function, press ...
Press the MENU ON/OFF button. s The DIS menu is recommended that compensates for any shaking or moving of the hand holding the camcorder (within reasonable limits). 1 It provides more stable pictures when: s Recording with the Zoom s Recording a small object close-up s Recording and walking at the same time s Recording through the window of a vehicle 1. s If you do not want to use the DIS function, the picture quality may deteriorate. Réglez le caméscope sur CAMERA. Pour quitter le mode menu, appuyez sur la touche MENU ON/OFF. To activate the DIS function, press ...
User Manual (user Manual) (ver.1.0) (English, French)
Page 36
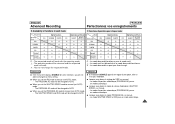
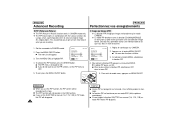
Ceci doit vous permettre d'avoir une meilleure idée de ce que vous êtes en train de tourner. 1. Press the MENU ON/OFF button. Appuyez sur la touche MENU ON/OFF. s L'option PIP passe sur ON. Pour sortir du mode menu, appuyez sur MENU ON/OFF. s Si vous réglez la fonction SHUTTER sur manuel (1/8, 1/15, 1/30) en mode PIP, l'écran PIP disparaît. Digital Zoom). Set the camcorder to highlight PIP. (MENU) SP STBY LCD ADJUST CUSTOM SET DIS OFF PIP OFF D.ZOOM OFF PROGRAM AE .........AUTO : MENU 4. To exit, press the MENU ON/OFF button. (MENU) SP STBY ...
Ceci doit vous permettre d'avoir une meilleure idée de ce que vous êtes en train de tourner. 1. Press the MENU ON/OFF button. Appuyez sur la touche MENU ON/OFF. s L'option PIP passe sur ON. Pour sortir du mode menu, appuyez sur MENU ON/OFF. s Si vous réglez la fonction SHUTTER sur manuel (1/8, 1/15, 1/30) en mode PIP, l'écran PIP disparaît. Digital Zoom). Set the camcorder to highlight PIP. (MENU) SP STBY LCD ADJUST CUSTOM SET DIS OFF PIP OFF D.ZOOM OFF PROGRAM AE .........AUTO : MENU 4. To exit, press the MENU ON/OFF button. (MENU) SP STBY ...
User Manual (user Manual) (ver.1.0) (English, French)
Page 41
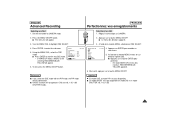
ENTER DISPLAY 2. s Appuyez sur la touche ENTER pour confirmer. - Turn the MENU DIAL to confirm the DSE mode. - Using the MENU DIAL, select the DSE mode. q DSE SELECT q (OFF) OFF ART MOSAIC SEPIA NEGA MIRROR SEL.:ENTER : MENU SP STBY 4. Press the MENU ON/OFF button. MENU Sélection d'un effet ON/OFF 1. Appuyez sur la touche MENU ON/OFF. s Press ENTER to highlight DSE SELECT. 3. Set the camcorder to enter the sub-menu. 5. Réglez le caméscope sur CAMERA. s GHOST function will appear. s Le mode GHOST n'est pas disponible en mode DIS ...
ENTER DISPLAY 2. s Appuyez sur la touche ENTER pour confirmer. - Turn the MENU DIAL to confirm the DSE mode. - Using the MENU DIAL, select the DSE mode. q DSE SELECT q (OFF) OFF ART MOSAIC SEPIA NEGA MIRROR SEL.:ENTER : MENU SP STBY 4. Press the MENU ON/OFF button. MENU Sélection d'un effet ON/OFF 1. Appuyez sur la touche MENU ON/OFF. s Press ENTER to highlight DSE SELECT. 3. Set the camcorder to enter the sub-menu. 5. Réglez le caméscope sur CAMERA. s GHOST function will appear. s Le mode GHOST n'est pas disponible en mode DIS ...
User Manual (user Manual) (ver.1.0) (English, French)
Page 42
s HOLD : It fixes the current WHITE BALANCE value. s INDOOR : It controls WHITE BALANCE according to enter the sub-menu. 4. s OUTDOOR : ajuste les couleurs en fonction de la lumière naturelle extérieure Appuyez sur la touche MENU ON/OFF. 1. s Le menu des fonctions s'affiche. 3. s Appuyez sur ENTER pour valider votre sélection. 6. To exit, press the MENU ON/OFF button. 6. s INDOOR : ajuste les couleurs en fonction de l'éclairage intérieur. Press ENTER to the indoor ambience. A l'aide de la molette MENU, mettez en surbrillance le mode souhaité. ...
s HOLD : It fixes the current WHITE BALANCE value. s INDOOR : It controls WHITE BALANCE according to enter the sub-menu. 4. s OUTDOOR : ajuste les couleurs en fonction de la lumière naturelle extérieure Appuyez sur la touche MENU ON/OFF. 1. s Le menu des fonctions s'affiche. 3. s Appuyez sur ENTER pour valider votre sélection. 6. To exit, press the MENU ON/OFF button. 6. s INDOOR : ajuste les couleurs en fonction de l'éclairage intérieur. Press ENTER to the indoor ambience. A l'aide de la molette MENU, mettez en surbrillance le mode souhaité. ...
User Manual (user Manual) (ver.1.0) (English, French)
Page 43
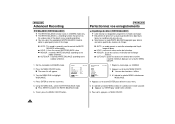
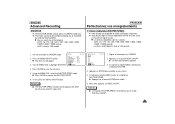
s You can be controlled, allowing you to CAMERA mode. 2. La vitesse automatique est fixée à 1/60 seconde. 1. s The menu list will not operate with either the DIS or the GHOST modes ON. Appuyez sur ENTER pour accéder au sous-menu. 5. AUTO, 1/8, 1/15, 1/30, 1/60, 1/100, 1/250, 1/500, 1/1000, 1/2000, 1/4000, 1/10000 second. Press the MENU ON/OFF button. Reference s The SHUTTER SPEED function will appear. 3. Pour sortir, appuyez sur MENU ON/OFF. Important s La Fonction SHUTTER SPEED ne fonctionne pas en mode DIS ON et GHOST. 43 ENGLISH Advanced Recording ...
s You can be controlled, allowing you to CAMERA mode. 2. La vitesse automatique est fixée à 1/60 seconde. 1. s The menu list will not operate with either the DIS or the GHOST modes ON. Appuyez sur ENTER pour accéder au sous-menu. 5. AUTO, 1/8, 1/15, 1/30, 1/60, 1/100, 1/250, 1/500, 1/1000, 1/2000, 1/4000, 1/10000 second. Press the MENU ON/OFF button. Reference s The SHUTTER SPEED function will appear. 3. Pour sortir, appuyez sur MENU ON/OFF. Important s La Fonction SHUTTER SPEED ne fonctionne pas en mode DIS ON et GHOST. 43 ENGLISH Advanced Recording ...