Hardware Guide
Page 3
...Other Media Supported Paper for This Printer 2 How to Read This Manual 3 Symbols ...3 Printer Types ...4 Using Manuals...5 Installing Manuals on Your Computer 5 Opening Manuals ...6 Removing Manuals from Your Computer 7 1. Connecting the Printer Network Connection 27 Reading the LED Lamps 28 USB Connection 29 4. Guide to Put the Printer 13 Unpacking ...16 Turning the Power On 21 Installing the Optional Paper Feed Unit 23 3. TABLE OF CONTENTS Positions of RWARNING and RCAUTION labels 1 Power Switch Symbols 1 Manuals for Each Tray 31 Paper Recommendations 33 Loading Paper...33...
...Other Media Supported Paper for This Printer 2 How to Read This Manual 3 Symbols ...3 Printer Types ...4 Using Manuals...5 Installing Manuals on Your Computer 5 Opening Manuals ...6 Removing Manuals from Your Computer 7 1. Connecting the Printer Network Connection 27 Reading the LED Lamps 28 USB Connection 29 4. Guide to Put the Printer 13 Unpacking ...16 Turning the Power On 21 Installing the Optional Paper Feed Unit 23 3. TABLE OF CONTENTS Positions of RWARNING and RCAUTION labels 1 Power Switch Symbols 1 Manuals for Each Tray 31 Paper Recommendations 33 Loading Paper...33...

Hardware Guide
Page 4
5. Troubleshooting Error & Status Messages on Smart Organizing Monitor 69 Panel Indicator ...74 Printer Does Not Print 75 When the Printer is Jammed 85 Removing Jammed Paper from the Inner/Tray 1/Tray 2 85 Removing Jammed Paper from the Bypass Tray 88 Removing Jammed Paper from the Exit Area/Duplex Unit 90 9. Removing Misfed Paper When Paper is Directly Connected to Take When Cleaning 65 Cleaning the Friction Pad and the Paper Feed Roller 66 7. Replacing Consumables Replacing the Print Cartridge 59 6. Appendix Moving and Transporting the Printer 95 Moving...
5. Troubleshooting Error & Status Messages on Smart Organizing Monitor 69 Panel Indicator ...74 Printer Does Not Print 75 When the Printer is Jammed 85 Removing Jammed Paper from the Inner/Tray 1/Tray 2 85 Removing Jammed Paper from the Bypass Tray 88 Removing Jammed Paper from the Exit Area/Duplex Unit 90 9. Removing Misfed Paper When Paper is Directly Connected to Take When Cleaning 65 Cleaning the Friction Pad and the Paper Feed Roller 66 7. Replacing Consumables Replacing the Print Cartridge 59 6. Appendix Moving and Transporting the Printer 95 Moving...
Hardware Guide
Page 9
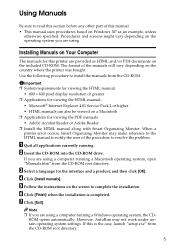
... printer are using a computer running a Macintosh operating system, open "Manuals.htm" from the CD-ROM root directory. When a printer error occurs, Smart Organizing Monitor may not work under certain operating system settings. Note ❒ If you are provided as an example, unless otherwise specified. The format of this is completed. E Follow the instructions on Windows XP as HTML and/or PDF...
... printer are using a computer running a Macintosh operating system, open "Manuals.htm" from the CD-ROM root directory. When a printer error occurs, Smart Organizing Monitor may not work under certain operating system settings. Note ❒ If you are provided as an example, unless otherwise specified. The format of this is completed. E Follow the instructions on Windows XP as HTML and/or PDF...
Hardware Guide
Page 10
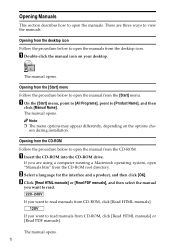
... HTML manuals] or [Read PDF manuals], and then select the manual you want to view the manuals. sen during installation. The manual opens. If you want to open "Manuals.htm" from CD-ROM, click [Read HTML manuals] or [Read PDF manuals]. There are using a computer running a Macintosh operating system, open the manual from the [Start] menu. The manual opens. A Insert the CD-ROM into the CD-ROM drive. Opening Manuals This section...
... HTML manuals] or [Read PDF manuals], and then select the manual you want to view the manuals. sen during installation. The manual opens. If you want to open "Manuals.htm" from CD-ROM, click [Read HTML manuals] or [Read PDF manuals]. There are using a computer running a Macintosh operating system, open the manual from the [Start] menu. The manual opens. A Insert the CD-ROM into the CD-ROM drive. Opening Manuals This section...
Hardware Guide
Page 13
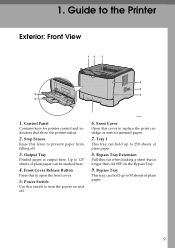
.... 4. Guide to replace the print cartridge or remove jammed paper. 7. Stop Fences Raise this out when loading a sheet that show the printer status. 2. Bypass Tray Extension Pull this fence to 125 sheets of plain paper can hold up to 50 sheets of plain paper. 8. Power Switch Use this to turn the power on the Bypass Tray. 9. Output Tray Printed paper is longer than A4 SEF on and off . 3. Up to prevent paper from falling off . Front Cover Release Button Press...
.... 4. Guide to replace the print cartridge or remove jammed paper. 7. Stop Fences Raise this out when loading a sheet that show the printer status. 2. Bypass Tray Extension Pull this fence to 125 sheets of plain paper can hold up to 50 sheets of plain paper. 8. Power Switch Use this to turn the power on the Bypass Tray. 9. Output Tray Printed paper is longer than A4 SEF on and off . 3. Up to prevent paper from falling off . Front Cover Release Button Press...
Hardware Guide
Page 16
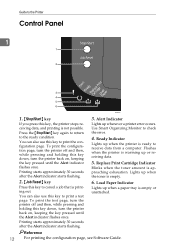
... to receive data from a computer. Replace Print Cartridge Indicator Blinks when the toner amount is not possible. Press the {Stop/Start} key again to return to check the error. 4. Lights up whenever a printer error occurs. Alert Indicator Lights up when the toner is empty. 6. Flashes when the printer is warming up when a paper tray is ready to print the configuration page. Load Paper Indicator Lights up or receiving data. 5. To print the configuration page, turn the printer back on , keeping the...
... to receive data from a computer. Replace Print Cartridge Indicator Blinks when the toner amount is not possible. Press the {Stop/Start} key again to return to check the error. 4. Lights up whenever a printer error occurs. Alert Indicator Lights up when the toner is empty. 6. Flashes when the printer is warming up when a paper tray is ready to print the configuration page. Load Paper Indicator Lights up or receiving data. 5. To print the configuration page, turn the printer back on , keeping the...
Hardware Guide
Page 17
..., break or make any modifications to install the printer and perform settings after installation. R WARNING: • The supplied power cord is for use an extension cord. Connect the power cord directly into contact with this manual. 2. Do not pull it hard nor bend it . Suffocation can result if polythene materials are electric shock and fire hazards. • Touching the prongs of the power cable's plug...
..., break or make any modifications to install the printer and perform settings after installation. R WARNING: • The supplied power cord is for use an extension cord. Connect the power cord directly into contact with this manual. 2. Do not pull it hard nor bend it . Suffocation can result if polythene materials are electric shock and fire hazards. • Touching the prongs of the power cable's plug...
Hardware Guide
Page 20
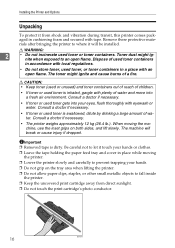
... sides, and lift slowly. R WARNING: 2 • Do not incinerate used toner gets into a fresh air environment. Installing the Printer and Options Unpacking To protect it from direct sunlight. ❒ Do not touch the print cartridge's photo conductor. 16 BSP024S When moving the printer. ❒ Lower the printer slowly and carefully to an open flame. Consult a doctor if necessary. • If toner or used toner or toner...
... sides, and lift slowly. R WARNING: 2 • Do not incinerate used toner gets into a fresh air environment. Installing the Printer and Options Unpacking To protect it from direct sunlight. ❒ Do not touch the print cartridge's photo conductor. 16 BSP024S When moving the printer. ❒ Lower the printer slowly and carefully to an open flame. Consult a doctor if necessary. • If toner or used toner or toner...
Hardware Guide
Page 29
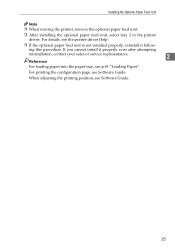
... or service representative. 2 Reference For loading paper into the paper tray, see the printer driver Help. ❒ If the optional paper feed unit is not installed properly, reinstall it follow- Installing the Optional Paper Feed Unit Note ❒ When moving the printer, remove the optional paper feed unit. ❒ After installing the optional paper feed unit, select tray 2 in the printer driver. For details, see p.41 "Loading Paper". ing this procedure. For printing the configuration page, see Software Guide. 25 When adjusting the printing position, see Software Guide...
... or service representative. 2 Reference For loading paper into the paper tray, see the printer driver Help. ❒ If the optional paper feed unit is not installed properly, reinstall it follow- Installing the Optional Paper Feed Unit Note ❒ When moving the printer, remove the optional paper feed unit. ❒ After installing the optional paper feed unit, select tray 2 in the printer driver. For details, see p.41 "Loading Paper". ing this procedure. For printing the configuration page, see Software Guide. 25 When adjusting the printing position, see Software Guide...
Hardware Guide
Page 41
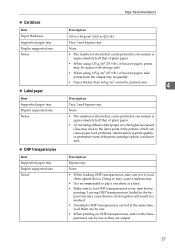
... to fan OHP transparencies every time before printing. Leaving OHP transparencies loaded in print quality, or premature wear of the print cartridge's photo conductor unit. Description Bypass tray None • When loading OHP transparencies, take prints from the output tray frequently. • Paper thicker than 160 g/m2 cannot be printed onto. 4 Description Tray 1 and bypass tray None • The number of sheets that can cause paper feed problems, deterioration in the bypass...
... to fan OHP transparencies every time before printing. Leaving OHP transparencies loaded in print quality, or premature wear of the print cartridge's photo conductor unit. Description Bypass tray None • When loading OHP transparencies, take prints from the output tray frequently. • Paper thicker than 160 g/m2 cannot be printed onto. 4 Description Tray 1 and bypass tray None • The number of sheets that can cause paper feed problems, deterioration in the bypass...
Hardware Guide
Page 57
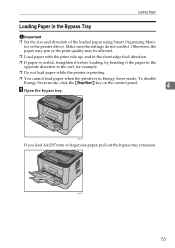
... cannot load paper when the printer is in the Bypass Tray Important ❒ Set the size and direction of the loaded paper using Smart Organizing Monitor or the printer driver. A Open the bypass tray. 4 BXG050 If you load A4 (297 mm) or larger size paper, pull out the bypass tray extension. BXG051 53 Make sure the settings do not conflict. To disable Energy Saver mode, click the {Stop/Start} key on the control panel. Loading Paper Loading Paper...
... cannot load paper when the printer is in the Bypass Tray Important ❒ Set the size and direction of the loaded paper using Smart Organizing Monitor or the printer driver. A Open the bypass tray. 4 BXG050 If you load A4 (297 mm) or larger size paper, pull out the bypass tray extension. BXG051 53 Make sure the settings do not conflict. To disable Energy Saver mode, click the {Stop/Start} key on the control panel. Loading Paper Loading Paper...
Hardware Guide
Page 64
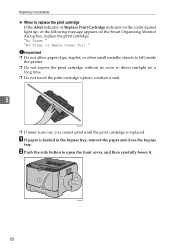
... paper is replaced. B Push the side button to direct sunlight for a long time. ❒ Do not touch the print cartridge's photo conductor unit. 5 BSP024S ❒ If toner runs out, you cannot print until the print cartridge is loaded in the bypass tray, remove the paper and close the bypass tray. "No Toner." Important ❒ Do not allow paper clips, staples, or other small metallic objects to fall inside the printer...
... paper is replaced. B Push the side button to direct sunlight for a long time. ❒ Do not touch the print cartridge's photo conductor unit. 5 BSP024S ❒ If toner runs out, you cannot print until the print cartridge is loaded in the bypass tray, remove the paper and close the bypass tray. "No Toner." Important ❒ Do not allow paper clips, staples, or other small metallic objects to fall inside the printer...
Hardware Guide
Page 73
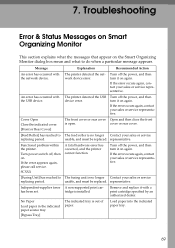
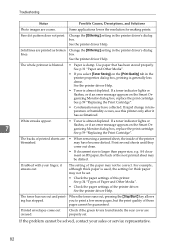
... toner A non-supported print car- No Paper Load paper in the indicated paper source tray. [Bypass Tray] The indicated tray is open. Functional problem within the printer. The printer detected the USB device error. If the error occurs again, contact your sales or service usable, and must be replaced. representative. Message An error has occurred with a print cartridge specified by an authorized dealer. Cover Open Close the indicated cover. [Front or Rear Cover] [Feed Roller] has reached to The fusing unit...
... toner A non-supported print car- No Paper Load paper in the indicated paper source tray. [Bypass Tray] The indicated tray is open. Functional problem within the printer. The printer detected the USB device error. If the error occurs again, contact your sales or service usable, and must be replaced. representative. Message An error has occurred with a print cartridge specified by an authorized dealer. Cover Open Close the indicated cover. [Front or Rear Cover] [Feed Roller] has reached to The fusing unit...
Hardware Guide
Page 75
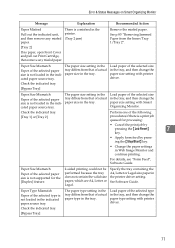
...the printer. (Tray 2 jam) [Tray 2] If no paper, open Front Cover and pull out Print Cartridge, then remove any misfed paper. Paper Size Mismatch Paper of the selected type is a misfeed in the printer driver setting. See Software Guide. Check the indicated tray. [Bypass Tray] The paper type setting in the tray differs from that of actual paper size in the tray, and then change the paper size setting with printer driver. 71 Load paper of the selected size in the tray. There is not loaded in Web Image Monitor and continue printing. Error & Status Messages...
...the printer. (Tray 2 jam) [Tray 2] If no paper, open Front Cover and pull out Print Cartridge, then remove any misfed paper. Paper Size Mismatch Paper of the selected type is a misfeed in the printer driver setting. See Software Guide. Check the indicated tray. [Bypass Tray] The paper type setting in the tray differs from that of actual paper size in the tray, and then change the paper size setting with printer driver. 71 Load paper of the selected size in the tray. There is not loaded in Web Image Monitor and continue printing. Error & Status Messages...
Hardware Guide
Page 76
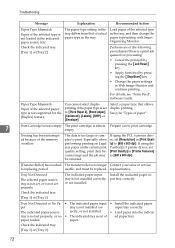
... not supported for processing: • Cancel the print job by pressing the {Job Reset} key. • Apply form feed by pressing the {Stop/Start} key. • Change the paper settings in the tray differs from that allows duplex printing. Select a paper type that of ed paper tray. The print cartridge is not installed cor- Especially when performing printing on Legal size paper under certain print quality setting, print data becomes large and the job may be replaced. If using the PostScript 3 printer driver, set to print. Tray...
... not supported for processing: • Cancel the print job by pressing the {Job Reset} key. • Apply form feed by pressing the {Stop/Start} key. • Change the paper settings in the tray differs from that allows duplex printing. Select a paper type that of ed paper tray. The print cartridge is not installed cor- Especially when performing printing on Legal size paper under certain print quality setting, print data becomes large and the job may be replaced. If using the PostScript 3 printer driver, set to print. Tray...
Hardware Guide
Page 85
... display. printing. Wait for [Energy Saver Mode 2:] using the printer driver. To resume from impact at all times, especially while it is different from the selected tray. If you use some functions, such as that it back on the control panel is flashing, the printer is being processed. A printed image is printing. • If lines appear on printed paper and other data intensive pages take a long time for the printer to match the paper size. Changing...
... display. printing. Wait for [Energy Saver Mode 2:] using the printer driver. To resume from impact at all times, especially while it is different from the selected tray. If you use some functions, such as that it back on the control panel is flashing, the printer is being processed. A printed image is printing. • If lines appear on printed paper and other data intensive pages take a long time for the printer to match the paper size. Changing...
Hardware Guide
Page 86
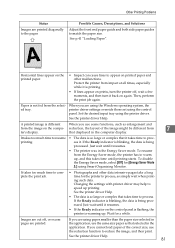
... "Paper and Other Media". • If you to print a few more pages, but the print quality of those pages cannot be guaranteed. If a toner indicator lights or flashes, or if an error message appears on the Smart Organizing Monitor dialog box, replace the print cartridge. Print several sheets until they come out creased. Troubleshooting Status Possible Causes, Descriptions, and Solutions Photo images are printed as broken Change the [Dithering:] setting in the printer driver's dialog lines...
... "Paper and Other Media". • If you to print a few more pages, but the print quality of those pages cannot be guaranteed. If a toner indicator lights or flashes, or if an error message appears on the Smart Organizing Monitor dialog box, replace the print cartridge. Print several sheets until they come out creased. Troubleshooting Status Possible Causes, Descriptions, and Solutions Photo images are printed as broken Change the [Dithering:] setting in the printer driver's dialog lines...
Hardware Guide
Page 89
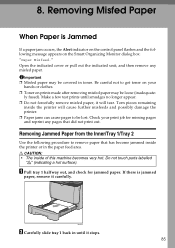
... the indicated unit, and then remove any pages that has become jammed inside the printer or in the paper feed area. Important ❒ Misfed paper may be loose (inadequate- Make a few test prints until it stops. 85 Removing Jammed Paper from the Inner/Tray 1/Tray 2 Use the following message appears on prints made after removing misfed paper may be lost. If there is Jammed If a paper jam occurs, the Alert indicator on the control panel flashes and the...
... the indicated unit, and then remove any pages that has become jammed inside the printer or in the paper feed area. Important ❒ Misfed paper may be loose (inadequate- Make a few test prints until it stops. 85 Removing Jammed Paper from the Inner/Tray 1/Tray 2 Use the following message appears on prints made after removing misfed paper may be lost. If there is Jammed If a paper jam occurs, the Alert indicator on the control panel flashes and the...
Hardware Guide
Page 99
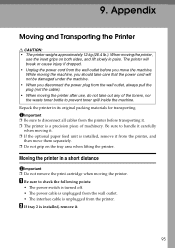
... a precision piece of the toners, nor the waste toner bottle to check the following points: • The power switch is turned off. • The power cable is unplugged from the wall outlet. • The interface cable is installed, remove it . 95 While moving it. ❒ If the optional paper feed unit is unplugged from the printer, and then move the machine. When moving the printer, use , do not take care...
... a precision piece of the toners, nor the waste toner bottle to check the following points: • The power switch is turned off. • The power cable is unplugged from the wall outlet. • The interface cable is installed, remove it . 95 While moving it. ❒ If the optional paper feed unit is unplugged from the printer, and then move the machine. When moving the printer, use , do not take care...
Hardware Guide
Page 107
...the optional paper feed unit, 23 Installing the printer, 13 L Loading envelopes, 55 Loading paper, 33, 41 bypass tray, 53 tray 1, 41 tray 2, 50 M Manual duplex, 4 Manuals for this printer, 2 Model types, 4 Moving and transporting the printer, 95 Moving over a long distance, 96 N Network, 27 O Opening manuals, 6 Options, 23 Other printing problems, 79 P Panel indicator, 74 Paper and other media, 31 Paper feed roller, 66 Paper feed unit, 23, 50, 101 Paper not supported, 38 Paper recommendations, 33 Positions of WARNING and CAUTION labels, 1 Power switch symbols, 1 Print area, 39 Print cartridge...
...the optional paper feed unit, 23 Installing the printer, 13 L Loading envelopes, 55 Loading paper, 33, 41 bypass tray, 53 tray 1, 41 tray 2, 50 M Manual duplex, 4 Manuals for this printer, 2 Model types, 4 Moving and transporting the printer, 95 Moving over a long distance, 96 N Network, 27 O Opening manuals, 6 Options, 23 Other printing problems, 79 P Panel indicator, 74 Paper and other media, 31 Paper feed roller, 66 Paper feed unit, 23, 50, 101 Paper not supported, 38 Paper recommendations, 33 Positions of WARNING and CAUTION labels, 1 Power switch symbols, 1 Print area, 39 Print cartridge...


